Giter Club home page Giter Club logo

s2r-depthnet's Introduction

S2R-DepthNet: Learning a Generalizable Depth-specific Structural Representation

This is the official PyTorch implementation of the paper S2R-DepthNet: Learning a Generalizable Depth-specific Structural Representation, CVPR 2021 (Oral), Xiaotian Chen, Yuwang Wang, Xuejin Chen, and Wenjun Zeng.

Citation

@inproceedings{Chen2021S2R-DepthNet,
             title = {S2R-DepthNet: Learning a Generalizable Depth-specific Structural Representation},
             author = {Chen, Xiaotian and Wang , Yuwang and Chen, Xuejin and Zeng, Wenjun},
	     conference={IEEE/CVF Conference on Computer Vision and Pattern Recognition (CVPR)},
             year = {2021}   
}

Introduction

Human can infer the 3D geometry of a scene from a sketch instead of a realistic image, which indicates that the spatial structure plays a fundamental role in understanding the depth of scenes. We are the first to explore the learning of a depth-specific structural representation, which captures the essential feature for depth estimation and ignores irrelevant style information. Our S2R-DepthNet (Synthetic to Real DepthNet) can be well generalized to unseen real-world data directly even though it is only trained on synthetic data. S2R-DepthNet consists of: a) a Structure Extraction (STE) module which extracts a domaininvariant structural representation from an image by disentangling the image into domain-invariant structure and domain-specific style components, b) a Depth-specific Attention (DSA) module, which learns task-specific knowledge to suppress depth-irrelevant structures for better depth estimation and generalization, and c) a depth prediction module (DP) to predict depth from the depth-specific representation. Without access of any real-world images, our method even outperforms the state-of-the-art unsupervised domain adaptation methods which use real-world images of the target domain for training. In addition, when using a small amount of labeled real-world data, we achieve the state-of-the-art performance under the semi-supervised setting.

The following figure shows the overview of S2RDepthNet.

figure

Examples of Depth-specific Structural Representation.

Usage

Dependencies

Datasets

The outdoor Synthetic Dataset is vKITTI and outdoor Real dataset is KITTI

TODO

  • Trianing Structure Encoder

Pretrained Models

We also provide our trained models for inference(outdoor and indoor scenes). Models Link

Train

As an example, use the following command to train S2RDepthNet on vKITTI.

Train Structure Decoder

python train.py --syn_dataset VKITTI \            
	        --syn_root "the path of vKITTI dataset" \
	        --syn_train_datafile datasets/vkitti/train.txt \
	        --batchSize 32 \
	        --loadSize 192 640 \          
	        --Shared_Struct_Encoder_path "the path of pretrained Struct encoder(.pth)" \
	        --train_stage TrainStructDecoder                  

Train DSA Module and DP module

python train.py --syn_dataset VKITTI \
	        --syn_root "the path of vKITTI dataset" \
	        --syn_train_datafile datasets/vkitti/train.txt \
	        --batchSize 32 \
	        --loadSize 192 640 \
	        --Shared_Struct_Encoder_path "the path of pretrained Struct encoder(.pth)" \
		--Struct_Decoder_path "the path of pretrained Structure decoder(.pth)" \
	        --train_stage TrainDSAandDPModule 

Evaluation

Use the following command to evaluate the trained S2RDepthNet on KITTI test data.

 python test.py --dataset KITTI --root "the path of kitti dataset" --test_datafile datasets/kitti/test.txt --loadSize 192 640 --Shared_Struct_Encoder_path "the path of pretrained Struct encoder(.pth)" --Struct_Decoder_path "the path of pretrained Structure decoder(.pth)" --DSAModle_path "the path of pretrained DSAModle(.pth)" --DepthNet_path "the path of pretrained DepthNet(.pth)" --out_dir "Path to save results"

Use the following command to evaluate the trained S2RDepthNet on NYUD-v2 test data.

 python test.py --dataset NYUD_V2 --root "the path of NYUD_V2 dataset" --test_datafile datasets/nyudv2/nyu2_test.csv --loadSize 192 256 --Shared_Struct_Encoder_path "the path of pretrained Struct encoder(.pth)" --Struct_Decoder_path "the path of pretrained Structure decoder(.pth)" --DSAModle_path "the path of pretrained DSAModle(.pth)" --DepthNet_path "the path of pretrained DepthNet(.pth)" --out_dir "Path to save results"

Acknowledgement

We borrowed code from GASDA and VisualizationOC.

s2r-depthnet's People

Contributors

microsoft-github-operations[bot] avatar microsoftopensource avatar xt-chen avatar

Stargazers

 avatar  avatar  avatar  avatar  avatar  avatar  avatar  avatar  avatar  avatar  avatar  avatar  avatar  avatar  avatar  avatar  avatar  avatar  avatar  avatar  avatar  avatar  avatar  avatar  avatar  avatar  avatar  avatar  avatar  avatar  avatar  avatar  avatar  avatar  avatar  avatar  avatar  avatar  avatar  avatar  avatar  avatar  avatar  avatar  avatar  avatar  avatar  avatar  avatar  avatar  avatar  avatar  avatar  avatar  avatar  avatar  avatar  avatar  avatar  avatar  avatar  avatar  avatar  avatar  avatar  avatar  avatar  avatar  avatar  avatar  avatar  avatar  avatar  avatar  avatar  avatar  avatar  avatar  avatar  avatar  avatar  avatar  avatar  avatar  avatar  avatar  avatar  avatar  avatar  avatar  avatar  avatar  avatar  avatar  avatar  avatar  avatar  avatar  avatar  avatar

Watchers

 avatar  avatar  avatar  avatar  avatar  avatar  avatar  avatar  avatar  avatar

s2r-depthnet's Issues

Questions about loadSize

Hi, thanks for your work again!

I have some questions about loadSize, the rgb and depth image first resize to loadSize (192, 640) before feeding in the network.

scale_transform = transforms.Compose([transforms.Resize(self.size, Image.BICUBIC)])
img1 = scale_transform(img1)              ## RGB image

And resize to original size after network.
pred_depth = torch.nn.functional.interpolate(pred_depth[-1], size=[depth_.size(1),depth_.size(2)], mode='bilinear',align_corners=True)

I want to know why you downsample the image from (375, 1242) to (192, 640)? Is it just to reduce GPU memory? Will it cause performance degradation due to loss of information?

Result about the NYUD-v2 test data on S2RDepthNet

Hi, I'm evaluating the trained S2RDepthNet on NYUD-v2 test data by the command you provided, but I can see nothing from the "pred_depth_np" when I use "cv2.imwrite()" to save it, when I print the "pred_depth_np", all data are between 1 and 5, do you know where is the problem ?
Look forward to your reply, thank you!

End-to-end v.s. multi-stage

I'm curious about the training pipeline.

  • Is multi-stage training necessary? As far as I'm concerned, maybe the struct encoder needs to be pre-trained, but why do you also train the struct decoder and depth-specific attention module separately?
  • What makes the attention map extracted by DSA module depth specific? If existing works may overfit depth-irrelevant cues, which design in your work makes them suppressed?

About convert Cityscapes disparity gt to depth map

I'm conducting a monocular depth estimation study using Cityscapes dataset. So, i reproduced your model and evaluated it using the Cityscapes depth map that i converted, and found that there was a slight performance gap between my result and the result presented in your paper. So if you don't mind, I'd like to ask you some details about how you convert Cityscapes disparity map to a depth map such as min distance, max distance, etc. The code below is what I used to convert disparity gt to depth map.

`def convert(disp_img_path, depth_img_path, baseline, focal, scale, max_dist, min_dist):
img_disp = cv2.imread(disp_img_path, cv2.IMREAD_UNCHANGED).astype(np.float32)
disp_nonzero_mask = img_disp > 0

img_disp[disp_nonzero_mask] = (img_disp[disp_nonzero_mask] - 1) / 256

img_depth = np.zeros(img_disp.shape, dtype=np.uint16)
img_depth[disp_nonzero_mask] = (baseline * focal) / img_disp[disp_nonzero_mask]

depth_nonzero_mask = img_depth > 0

img_depth[depth_nonzero_mask] = img_depth[depth_nonzero_mask] * scale

cv2.imwrite(depth_img_path, img_depth)

def make_dirs(path):
if not os.path.exists(path):
os.makedirs(path)
print("%s SUCCESSFULLY CREATED." % path)

disp_path = '/tt/woonghyun/disparity'
depth_path = '/tt/woonghyun/depth_v2'

baseline = 0.22
focal = 2262
scale = 256
max_dist = 80.0
min_dist = 1e-3

make_dirs(depth_path)

count = 0
max_count = 24997

np.seterr(divide='ignore', invalid='ignore')

for cat in os.listdir(disp_path):
disp_path1 = os.path.join(disp_path, cat)
depth_path1 = os.path.join(depth_path, cat)
make_dirs(depth_path1)

for city in os.listdir(disp_path1):
    disp_path2 = os.path.join(disp_path1, city)
    depth_path2 = os.path.join(depth_path1, city)
    make_dirs(depth_path2)

    for img in os.listdir(disp_path2):
        disp_img_path = os.path.join(disp_path2, img)

        words = img.split('_')
        depth_img_path = os.path.join(depth_path2, words[0] + '_' + words[1] + '_' + words[2] + '_depth.png')
        convert(disp_img_path, depth_img_path, baseline, focal, scale, max_dist, min_dist)

        count += 1

        print("[%d / %d] %s SUCCESSFULLY SAVED." % (count, max_count, depth_img_path))

`

Fine tune on KITTI

Hello, may I know how to fine tune with KITTI dataset? It seems like there are 2 differences between vKITTI and KITTI depth, one is sparse and dense depth map as ground truth, another one is the large distance points. I understand I can use lin_interpolation to interpolate sparse map, but what about the second difference? It seems like vKITTI makes the far points very large but KITTI makes it 0. So how did you fine tune on KITTI? In the paper you mentioned 1000 images of KITTI were used to fine tune.
Thank you!

training code for indoor scenes

Thanks for open sourcing the great work!

The training code for indoor scenes (e.g. data preparation and data split) is missing, are you going to provide it?

How to visualize the intermediate results as presented in the paper

Great work, thanks for making the code public.

I was wondering how to visualize the depth-specific structure map as presented in Figure 3 in the paper. I'm trying to save the result with the following code snippet, but it looks quite different from that in the paper. Does it relate to the colormap? Thanks.

Intermediate results visualization in the paper

image

My code snippet

# input is the intermediate result
image = np.squeeze(input.cpu().detach().numpy())
image_min = np.min(image)
image_max = np.max(image)
image = (image - image_min) / (image_max - image_min) * 255.0
# matplotlib to save the image
mpimg.imsave('result', image, cmap="jet")

The image I'm using (left) and the result I've got (right)

File: KITTI_raw/2011_10_03/2011_10_03_drive_0027_sync/image_02/data/0000000000.png

image

The model I'm using

Outdoor settings

Question about vkitti dataset?

Hi, thanks for your good work!
There are two camera views in each sequences (Camera_0 and Camera_1), but i found the data file you used does not distinguish between Camera_0 and Camera_1, for example,
rgb/0006/clone/00046.png depth/0006/clone/00046.png
rgb/0006/clone/00073.png depth/0006/clone/00073.png
rgb/0006/clone/00176.png depth/0006/clone/00176.png
I want to know which camera view you use in the experiment? And why don't use both of Camera_0 and Camera_1 data? It will provide more train data, right?
Another problem is how to divide the train, val and test datasets?
Thank you in advance!

The results were not very satisfactory.

Hello! I would like to inquire whether it is possible to achieve the same results as shown in your paper using my own images. If it is possible to achieve the desired results, how should I modify the code? I tested your trained model on my own dataset and found that the results were not very satisfactory.

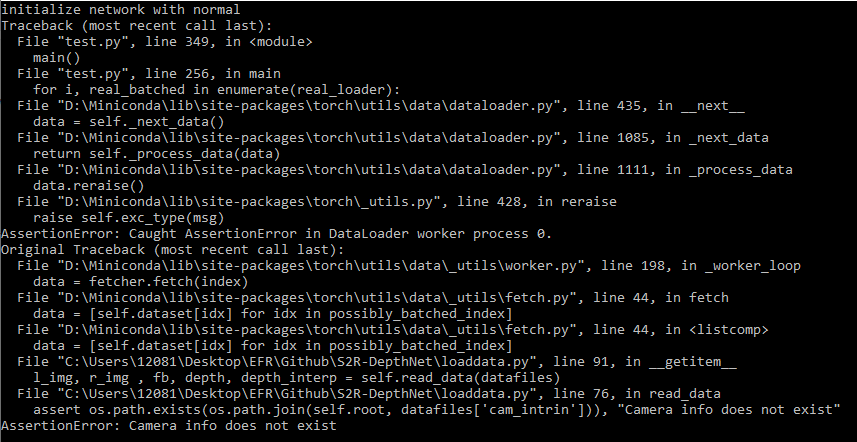
cam_intrin | Camera info does not exist | Where to find?

Hi, I want to test it but facing an issue.

image

No data of camera info are loaded.

In loaddata.py, there are 4 kinds of data which should be loaded:

  • l_rgb

  • r_rgb

  • cam_intrin

  • depth

from KITTI dataset, for example: 2011_09_26_drive_0015_sync, the file structure is as following:

2011_09_26_drive_0015_sync
│   image_00
│   image_01    
│   image_02
│   image_03
│   oxts
│   velodyne_points

as the test.txt under S2R-DepthNet\datasets\kitti shows,

image

.png files from images_02 = l_rgb
.png files from image_03 = r_rgb
.bin files from velodyne_points = depth

The files in image_00 and image_01 are grayscale image. The files in oxts seems to be GPU and IMU data.

Then where can I find the files which are relevant to camera infos (cam_intrin)?

Thank a lot in advance :-)

module "net_mask" from "test.py" | no module named "net_mask"

Hi, when I run test.py there come an error no module named "net_mask". I found this code is in line 23 import net_mask. I didn't find any information about the module net_mask, could you please explain what this module is and how can I prevent this error? Thanks a lot in advance.

TypeError:'int' object is not subscriptable during testing

Hi, during testing these is an error arised

TypeError:'int' object is not subscriptable

image

Some codes of transform.py maybe need to be modified to fix this error. Could you please have a check of this issue?

Thanks a lot in advance.


My setup (for reference)
image

about the kitti depth gt

`
import numpy as np
import os
from collections import Counter
import cv2

class KITTI:
def read_calib_file(self, path):
# taken from https://github.com/hunse/kitti
float_chars = set("0123456789.e+- ")
data = {}
with open(path, 'r') as f:
for line in f.readlines():
line = line.strip('\n')
if line == '': continue
key, value = line.split(':')
value = value.strip()
data[key] = value
if float_chars.issuperset(value):
# try to cast to float array
try:
data[key] = np.array(list(map(float, value.split(' '))))
except ValueError:
# casting error: data[key] already eq.value, so pass
pass

    return data

def get_fb(self, calib_dir, cam=2):
    cam2cam = self.read_calib_file(os.path.join(calib_dir, 'calib_cam_to_cam.txt'))
    P2_rect = cam2cam['P_rect_02'].reshape(3, 4)   # Projection matrix of the left camera
    P3_rect = cam2cam['P_rect_03'].reshape(3, 4)   # Projection matrix of the right camera

    # cam 2 is left of cam 0 -6cm
    # cam 3 is to the right +54cm

    b2 = P2_rect[0, 3] / -P2_rect[0,0]       # offset of cam 2 relative to cam0
    b3 = P3_rect[0, 3] / -P3_rect[0,0] 		 # offset of cam 3 relative to cam0

    baseline = b3 - b2

    if cam == 2:
        focal_length = P2_rect[0, 0]         # focal_length of cam 2
    elif cam == 3:
        focal_length = P3_rect[0, 0]         # focal_length of cam 3
    return focal_length * baseline

def load_velodyne_points(self, file_name):
    # adapted from https://github.com/hunse/kitti
    points = np.fromfile(file_name, dtype=np.float32).reshape(-1, 4)
    points[:, 3] = 1.0
    return points

def lin_interp(self, shape, xyd):
    # taken from https://github.com/hunse/kitti
    from scipy.interpolate import LinearNDInterpolator
    ## m=h, n=w xyd
    m, n = shape
    ij, d = xyd[:, 1::-1], xyd[:, 2]
    f = LinearNDInterpolator(ij, d, fill_value=0)
    # h, w
    J, I = np.meshgrid(np.arange(n), np.arange(m))
    IJ = np.vstack([I.flatten(), J.flatten()]).T
    disparity = f(IJ).reshape(shape)
    return disparity

def sub2ind(self, metrixSize, rowSub, colSub):
    # m=h, n=w
    # rowsub y
    # colsub x
    m, n = metrixSize

    return rowSub * (n-1) + colSub - 1  # num

def get_depth(self, calib_dir, velo_file_name, im_shape, cam=2, interp=False, vel_depth=False):
    # load calibration files
    cam2cam = self.read_calib_file(calib_dir)
    velo2cam = self.read_calib_file(calib_dir)
    velo2cam = velo2cam['Tr_velo_to_cam'].reshape(3, 4)
    velo2cam = np.vstack((velo2cam, np.array([0, 0, 0, 1.0])))   # Projection matrix of Point cloud to cam

    # compute projection matrix velodyne --> image plane
    R_cam2rect = np.eye(4)
    R_cam2rect[:3,:3] = cam2cam['R0_rect'].reshape(3, 3) # Corrected rotation matrix for camera 0 to camera 0
    P_rect = cam2cam['P2'].reshape(3, 4)    # Projection matrix of the left camera

    P_velo2im = np.dot(np.dot(P_rect, R_cam2rect), velo2cam)

    # load velodyne points and remove all behind image plane (approximation)
    # each row of the velodyne data is forward, left, up, reflectance
    velo = self.load_velodyne_points(velo_file_name)
    velo = velo[velo[:, 0]>=0, :]  # remove all behind image plane
    # project the points to camera
    velo_pts_im = np.dot(P_velo2im, velo.T).T
    velo_pts_im[:, :2] = velo_pts_im[:, :2] / velo_pts_im[:, 2][..., np.newaxis] #homogenous --> not homogenous

    if vel_depth:
        velo_pts_im[:, 2] = velo[:, 0]

    # check is in bounds
    # use minus 1 to get the exact same value as KITTI matlab code

    velo_pts_im[:, 0] = np.round(velo_pts_im[:, 0]) - 1
    velo_pts_im[:, 1] = np.round(velo_pts_im[:, 1]) - 1
    val_inds = (velo_pts_im[:, 0] >= 0) & (velo_pts_im[:, 1] >= 0)
    val_inds = val_inds & (velo_pts_im[:, 0] < im_shape[1]) & (velo_pts_im[:, 1]<im_shape[0])
    velo_pts_im = velo_pts_im[val_inds, :]

    # project to image
    depth = np.zeros((im_shape))   # h, w
    depth[velo_pts_im[:, 1].astype(np.int), velo_pts_im[:, 0].astype(np.int)] = velo_pts_im[:, 2]
    print(depth.shape)

    # find the duplicate points and choose the closest depth
    # depth_shape = (h, w)   velo_pts_im[:, 1] y  velo_pts_im[:, 0] x
    inds = self.sub2ind(depth.shape, velo_pts_im[:, 1], velo_pts_im[:, 0])
    dupe_inds = [item for item, count in Counter(inds).items() if count > 1]
    for dd in dupe_inds:
        pts = np.where(inds==dd)[0]
        x_loc = int(velo_pts_im[pts[0], 0])   # x
        y_loc = int(velo_pts_im[pts[0], 1])   # y
        depth[y_loc, x_loc] = velo_pts_im[pts, 2].min()
    print(np.unique(depth))
    depth[depth<0] = 0

    if interp:
        # interpolate the depth map to fill in holes
        depth_interp = self.lin_interp(im_shape, velo_pts_im)
        return depth, depth_interp
    else:
        cv2.imshow("enhanced",depth)
        cv2.waitKey()
        return depth

KITTI().get_depth('D:\BaiduNetdiskDownload\KITTI\train\calib\000000.txt','D:\BaiduNetdiskDownload\KITTI\train\velodyne\000000.bin',(375,1242) )
`
because my data structure dont like yours,i change you kitti dataload and look the depth img
image

this picture click open may look clearly

image

is this right? by the np.unique(depth) ,i get this
image
it is realy in 80m
if it is right,i wonder why use it as gt and why it can , why not img like this
image

i am a green hand,and in china i cant download the vkitti,is there someway i can get the dataset
if you have time reply me ,i will be very grateful for you

Questions about parameter settings

Hi, the parameter settings in the code are different from the paper, in the code:

parser.add_argument('--lambda_w', type=float, default=0.001, help='the weight parameters of structure map.')
parser.add_argument('--hyper_w', type=float, default=1.0, help='the weight parameters.')

struct_weighted_loss = train_loss.struct_weighted_loss(structure_map, depth, train_iteration, args.hyper_w)
total_loss = depth_loss + args.lambda_w * struct_weighted_loss

but the paper decribes "The hyper parmameters λ and β in Eq. 1 are set to 1 and 0.001, respectively", the two parameter settings seem to be reversed.

about the experiment

have you considered training the model in some larger sythesized datasets like tartanair and test in kitti and NYU. cause i think vkitti is very similar to kitti_real, did the review doubt this during your rebuttal? how did u reply?

Values in depth matrix

There is a way to translate the depth matrix to meters?

I want to know how can I use the results of this project in order to estimate the distance between the camera to an object in a frame?

Thanks

Questions about median scaling

Hi, as shown in the code, the last activation function is tanh, the depth image used for surpervised is scaled to 0-1 in training, and the output of network will scale to 0~80m (kitti) in testing.

# training 
if self.dataset.upper() == 'KITTI' or self.dataset.upper() == 'VKITTI':
	#print("Using outdoor scene transform.")
	arr_depth = np.array(depth, dtype=np.float32)
	arr_depth[arr_depth>8000.0]=8000.0
	arr_depth /= 8000.0   # cm -> m 
	arr_depth[arr_depth<0.0] = 0.0

# testing
pred_depth_np += 1.0
pred_depth_np /= 2.0
pred_depth_np *= 80.0

I know it based on previous work, but i am curious why scaling instead of directly regressing to the real depth value? Will it bring performance improvements?

Thanks in advance!

Recommend Projects

  • React photo React

    A declarative, efficient, and flexible JavaScript library for building user interfaces.

  • Vue.js photo Vue.js

    🖖 Vue.js is a progressive, incrementally-adoptable JavaScript framework for building UI on the web.

  • Typescript photo Typescript

    TypeScript is a superset of JavaScript that compiles to clean JavaScript output.

  • TensorFlow photo TensorFlow

    An Open Source Machine Learning Framework for Everyone

  • Django photo Django

    The Web framework for perfectionists with deadlines.

  • D3 photo D3

    Bring data to life with SVG, Canvas and HTML. 📊📈🎉

Recommend Topics

  • javascript

    JavaScript (JS) is a lightweight interpreted programming language with first-class functions.

  • web

    Some thing interesting about web. New door for the world.

  • server

    A server is a program made to process requests and deliver data to clients.

  • Machine learning

    Machine learning is a way of modeling and interpreting data that allows a piece of software to respond intelligently.

  • Game

    Some thing interesting about game, make everyone happy.

Recommend Org

  • Facebook photo Facebook

    We are working to build community through open source technology. NB: members must have two-factor auth.

  • Microsoft photo Microsoft

    Open source projects and samples from Microsoft.

  • Google photo Google

    Google ❤️ Open Source for everyone.

  • D3 photo D3

    Data-Driven Documents codes.