There is currently a major bug in Swift-Colab. See more below.
In March 2021, Google ended built-in Swift support on Colaboratory as part of the shutdown of Swift for TensorFlow (S4TF). When new contributors temporarily revived S4TF, a Swift Colab kernel became essential for testing whether TPU acceleration still worked. This repository is the successor to google/swift-jupyter, rewritten entirely in Swift.
Swift-Colab is an accessible way to do programming with Swift. It runs in a browser, taking only 30 seconds to start up. It is perfect for programming on Chromebooks and tablets, which do not have the full functionality of a desktop. You can access a free NVIDIA GPU for machine learning and use the standard C bindings for OpenCL - instead of Python wrappers.
For an in-depth look at how and why this repository was created, check out the summary of its history.
- Getting Started
- Using Swift-Colab
- Installing Packages
- SwiftPlot Integration
- Swift for TensorFlow Integration
- Swift Tutorials
- Testing
Recently, Google upgraded Colab from Ubuntu 18.04 to Ubuntu 20.04. This coincided with upgrading the Python version from 3.7 to 3.8. Multiple things seem to have broken, one being the Swift LLDB interpreter. Upon calling SBDebugger::Initialize(), any code touching the CPython library will cause a silent crash. I cannot debug the crash because stderr is redirected to somewhere unknown in Colab.
Luckily, Swift-Colab is still usable. Use Swift 5.6.2 instead of 5.7.3 and change the notebook's first cell to pull from the main branch. This can be accomplished by replacing the first cell with the following. Since the workaround breaks source compatibility, I will release a new Swift-Colab version once a full fix is found.
!curl "https://raw.githubusercontent.com/philipturner/swift-colab/main/install_swift.sh" --output "install_swift.sh"
!bash "install_swift.sh" "5.6.2" #// Replace '5.7.3' with newest Swift version.Colab notebooks created directly from Google Drive are tailored for Python programming. When making a Swift notebook, copy the official template instead. It contains the commands listed below, which download and compile the Jupyter kernel. Run the first code cell and click Runtime > Restart runtime in the menu bar.
!curl "https://raw.githubusercontent.com/philipturner/swift-colab/release/latest/install_swift.sh" --output "install_swift.sh"
!bash "install_swift.sh" "5.7.3" #// Replace '5.7.3' with newest Swift version.
Tip: Colab measures how long you keep a notebook open without interacting with it. If you exceed the time limit of Colab's free tier, it may restart in Python mode. That means Swift code executes as if it's Python code. In that situation, repeat the process outlined above to return to Swift mode.
To automatically crash and restart the runtime, add the following line to the code cell. You can also restart the runtime with Cmd/Ctrl + M + ., so this is not in the template notebook.
import os; import sys; sys.stdout.flush(); os.kill(os.getpid(), 9)When Google sponsored S4TF from 2018 - 2021, the Swift community created several Jupyter notebooks. To run these notebooks now, slightly modify them. Create a new cell at the top of each notebook, including the commands shown above*. No further changes are necessary because of Swift-Colab's backward-compatibility. If you experience a problem, please file an issue.
*For a more future-proof solution, fill that cell with only a comment directing the user to Swift-Colab's repository. Whoever runs the notebook will likely not update the Swift version passed into
install_swift.sh. I recommend this approach for the fastai/swiftai notebooks and anything else that must be maintained indefinitely.
This repository contains a growing list of tutorials sourced from s4tf/s4tf-docs (formerly tensorflow/swift) and fastai/swiftai. Before following them, read through this README and familiarize yourself with the peculiarities of Swift-Colab.
Google Colab is like the Swift REPL, but it submits several lines of code at once. Create a new cell with Insert > Code cell and fill it with the first example below. Run it, and 64 appears in the output. No matter how many lines a cell has, only the last one's return value appears. To get around this restriction, use print(...) to display values.
Int.bitWidth
// Output: (you can include this comment in the cell; it doesn't count as the "last line")
// 64Int.bitWidth
Int.bitWidth
// Output:
// 64print(Int.bitWidth)
Int.bitWidth
// Output:
// 64
// 64The Swift kernel has several powerful features, including magic commands and Google Drive integration.
To install a Swift package, type %install and a Swift 4.2-style package declaration. The declaration should appear between two single quotes. After that, enter the modules you want to compile. Before importing any module with a Swift import statement, execute its %install command. You can install packages in any cell, even after other Swift code has executed.
%install '.package(url: "https://github.com/pvieito/PythonKit", .branch("master"))' PythonKitUpon restarting the runtime, remember to rerun the %install command for each package. This command tells the Swift interpreter that the package is ready to be imported. It runs much more quickly than the first time through, because Swift-Colab utilizes cached build products from the previous Jupyter session. Try testing this mechanism by redundantly importing the same package. Make sure both commands match character-for-character!
%install '.package(url: "https://github.com/pvieito/PythonKit", .branch("master"))' PythonKit
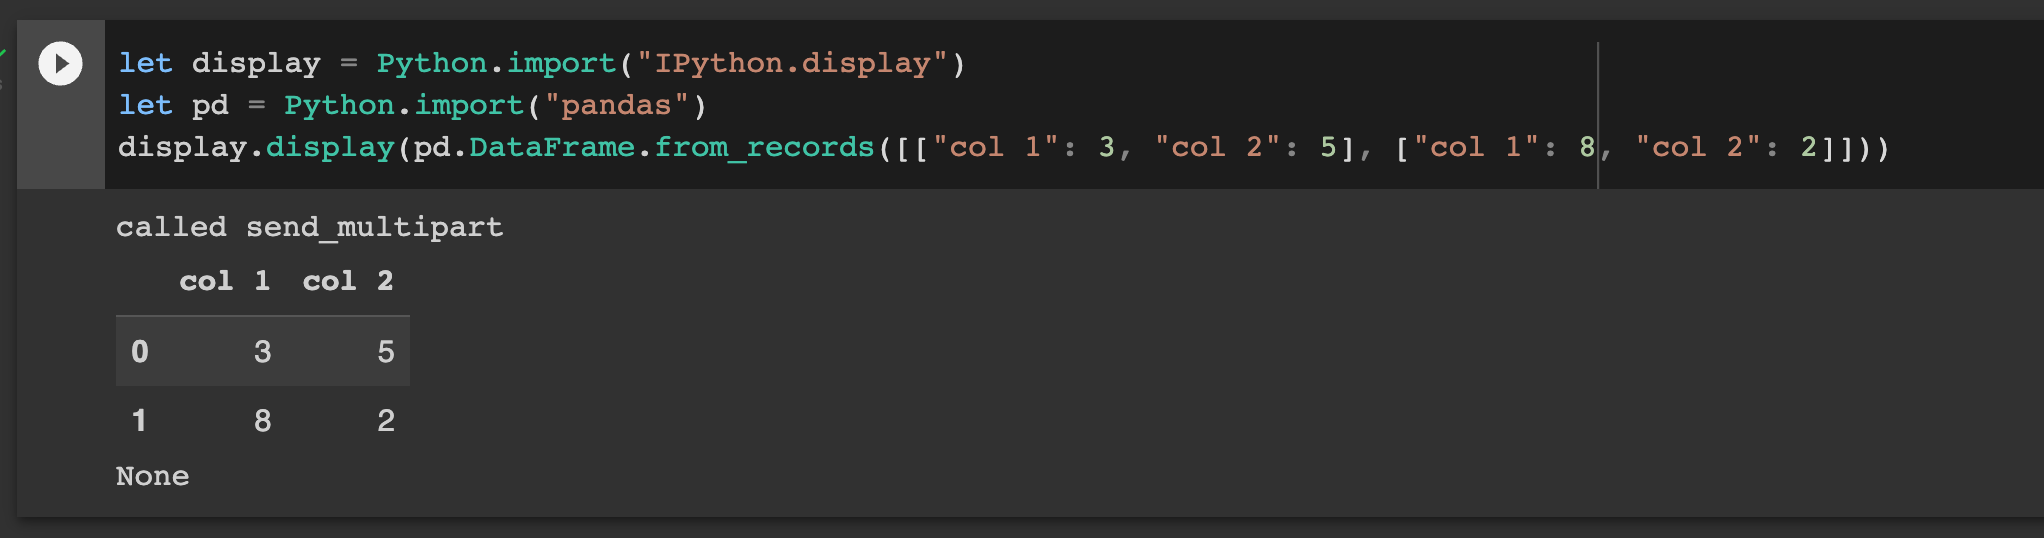
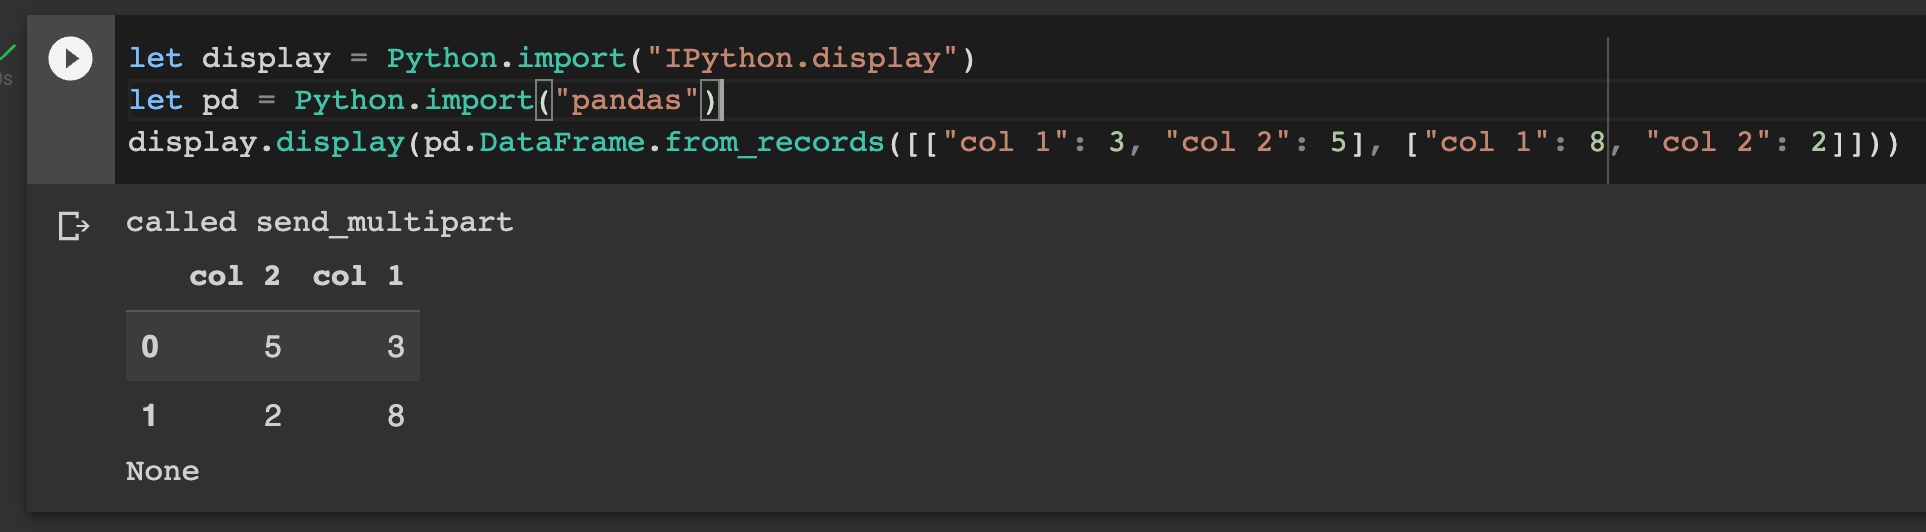
%install '.package(url: "https://github.com/pvieito/PythonKit", .branch("master"))' PythonKitTo use IPython graphs or SwiftPlot plots, enter the magic commands shown below. Include EnableIPythonDisplay.swift after installing the Swift packages, because the file depends on both of them. SwiftPlot takes 23 seconds to compile, so you may skip its install command unless you intend to use it. However, you must restart the runtime if you change your mind.
%install '.package(url: "https://github.com/pvieito/PythonKit", .branch("master"))' PythonKit
%install '.package(url: "https://github.com/KarthikRIyer/swiftplot", .branch("master"))' SwiftPlot AGGRenderer
%include "EnableIPythonDisplay.swift"
EnableIPythonDisplay.swift injects the following code into the interpreter, gated under multiple import guards. The code samples here do not explicitly import these libraries, as doing so would be redundant. If you do not include EnableIPythonDisplay.swift, explicitly import them before running other Swift code.
import PythonKit
import SwiftPlot
import AGGRenderer
For tutorials on using the SwiftPlot API, check out KarthikRIyer/swiftplot.
S4TF has a quite complex build setup. The easiest way to use it is copying the S4TF test notebook into your Google Drive. To configure it manually, read the instructions below.
Swift 5.7 has been released, so this section is out of date.
Swift for TensorFlow does not compile on Linux release toolchains, so select a Swift development toolchain. Visit swift.org/download and scroll to "Trunk Development (main)". Note the date next to "Ubuntu 18.04" - at the time of writing, July 20, 2022. At the top of your Colab notebook, the first code cell says "Replace 5.6.2 with newest Swift version." Delete the "5.6.2" after "install_swift.sh" and enter the snapshot's date in YYYY-MM-DD format.
!bash "install_swift.sh" "2022-07-20" #// Replace 5.7 with newest Swift version.You can easily download trunk snapshots by pasting their date. For other toolchains, the entire URL must be present. The code below downloads the July 5, 2022 snapshot from Swift's release/5.7 branch. Do not enter it into the notebook; it is only here for reference.
!bash "install_swift.sh" "https://download.swift.org/swift-5.7-branch/ubuntu1804/swift-5.7-DEVELOPMENT-SNAPSHOT-2022-07-05-a/swift-5.7-DEVELOPMENT-SNAPSHOT-2022-07-05-a-ubuntu18.04.tar.gz" #// Replace 5.7 with newest Swift version.Execute the installation script and go to Runtime > Restart runtime. Next, download the X10 binary created from tensorflow/tensorflow and the C++ code in s4tf/s4tf. Paste the commands below into a unique code cell, which you only run once. Do not add anything else to this cell.
%system curl "https://storage.googleapis.com/swift-tensorflow-artifacts/oneoff-builds/tensorflow-ubuntu1804-cuda11-x86.zip" --output "x10-binary.zip"
%system unzip "x10-binary.zip"
%system cp -r "/content/Library/tensorflow-2.4.0/usr/include/tensorflow" "/usr/include/tensorflow"
Top-of-tree S4TF is currently tested against TensorFlow 2.9, as shown in the S4TF build script. The script does not yet run on every platform and a major XLA bug exists, so I cannot host modern X10 binaries online. The previous command downloaded the last X10 binary that Google created, which uses TF 2.4. Using an outdated binary brings some caveats, as the raw TensorFlow bindings were recently updated for v2.9. As a rule of thumb, avoid the _Raw namespace.
Now, the real action begins. s4tf/s4tf takes 3 minutes to compile on Google Colab, which sounds worse than it is. Swift-Colab 2.0 made this a one-time cost, so the package rebuilds instantaneously after restarting the runtime. Grab a cup of coffee or read a Medium article while it compiles, and that's the only waiting you ever need to do. If you accidentally close the browser tab with S4TF loaded, salvage it with Runtime > Manage sessions.
To access your closed notebook, first open a new notebook.
Runtime > Manage sessionsshows a list of active Colab sessions. Click on the closed notebook's name, and it opens in a new browser tab.
Go to Insert > Code cell and paste the following commands. The SwiftPM flags -c release -Xswiftc -Onone are commented out. They shorten build time to 2 minutes, but require restarting the runtime twice because of a compiler bug. Consider using these flags if compile time becomes a serious bottleneck in your workflow.
%install-swiftpm-flags $clear
// %install-swiftpm-flags -c release -Xswiftc -Onone
%install-swiftpm-flags -Xlinker "-L/content/Library/tensorflow-2.4.0/usr/lib"
%install-swiftpm-flags -Xlinker "-rpath=/content/Library/tensorflow-2.4.0/usr/lib"
%install '.package(url: "https://github.com/s4tf/s4tf", .branch("main"))' TensorFlow
Finally, import Swift for TensorFlow into the interpreter.
import TensorFlowTutorial notebooks do not include commands for installing Swift-Colab; you must add the commands described in Getting Started. They also depend on modules such as PythonKit and TensorFlow, which were previously part of custom S4TF toolchains. We now use stock toolchains, so download the packages as described in Installing Packages and Swift for TensorFlow Integration. For tutorials that involve automatic differentiation, either use Differentiation or download a development toolchain.
Multiple tutorial notebooks depend on Swift for TensorFlow. You must recompile the Swift package in each notebook, waiting 3 minutes each time. Save time by compiling S4TF in one Colab instance, then reusing it for multiple tutorials. To start, open up the Swift for TensorFlow test notebook. Append the commands below to the cell that compiles S4TF. When S4TF starts building, read the rest of these instructions.
%install-swiftpm-flags $clear
%install '.package(url: "https://github.com/pvieito/PythonKit", .branch("master"))' PythonKit
import _Differentiation // If using a development toolchain.

// If using a release toolchain.
// %install '.package(url: "https://github.com/philipturner/differentiation", .branch("main"))' _Differentiation
// import Differentiation
In another browser tab, open one of the tutorials. Click Edit > Select all cells in the menu bar. Every cell should turn blue. Press Cmd/Ctrl + C to copy the cells. Switch back to the original Colab notebook and click the last cell. Press Cmd/Ctrl + V. Every cell from the tutorial should appear in the notebook that is compiling S4TF.
When following a tutorial for the first time, run its cells one by one. To run all of them at once, click the first code cell of the tutorial. Then, go to Runtime > Run after. If you are lucky, the cells can be deleted with Edit > Undo insert X cells. Otherwise, select all cells, delete them, and paste the contents of the S4TF test notebook. After resetting the notebook, go to Runtime > Restart runtime. Rerun the cell that installs TensorFlow and PythonKit, which should take 4 seconds to execute. Proceed with the second tutorial.
In the table below, "Compatible Swift Versions" lists whether each notebook runs under the latest release or development toolchain.
- Release = 5.6.2 Release
- Development = July 20, 2022 Development Snapshot
| Tutorials from Google | Dependencies | Compatible Swift Versions |
|---|---|---|
| A Swift Tour | Release, Development | |
| Protocol-Oriented Programming & Generics | Release, Development | |
| Python Interoperability[1] | PythonKit, S4TF[2] | Release, Development |
| Sharp Edges in Differentiability[3][4] | Differentiation | Release, Development |
| Model Training Walkthrough | Differentiation, PythonKit, S4TF | Development |
| Raw TensorFlow Operators | Differentiation, S4TF | Development |
| Introducing X10, an XLA-Based Backend[5] | S4TF, S4TF Models | n/a |
1One cell fails because of ambiguous overloads for
PythonObject.==andPythonObject.<. Work around this by explicitly casting the comparison result toBoolbefore printing.2When using release toolchains, skip the cell that contains
Tensor<Float>.3Several cells fail because
gradient(at:in)was renamed togradient(at:of:). Fix the second argument label and rerun the failed cells.4One cell fails because of the ambiguous line
gradient(at: 2, 2, of: pow). Fix this by replacing either2withDouble(2).5This notebook depends on tensorflow/swift-models, which is now maintained at s4tf/models. The repository has not been tested recently. Also, compilation requires using
%install-swiftpm-importto inject theTensorFlowmodule.
These tests ensure that Swift-Colab runs on recent Swift toolchains. Some of them originate from unit tests in swift-jupyter, while others cover fixed bugs and third-party libraries. If any notebook fails or you have a suggestion for a new test, please open an issue.
To run a test, replace "5.7" in the first code cell with the newest Swift version. Run the installation commands, then go to Runtime > Restart runtime. Click on the second code cell and instruct Colab to execute every cell in the notebook (Runtime > Run after). Compare each cell's expected output with its actual output. If additional instructions appear at the top of the notebook, read them before running the test.
| Test | Passing | Date of Last Test Run | Swift Version |
|---|---|---|---|
| Swift Kernel Tests | ✅ | October 2022 | 5.7 Release |
| Own Kernel Tests | ✅ | October 2022 | 5.7 Release |
| Simple Notebook Tests | ✅ | October 2022 | 5.7 Release |
| SwiftPlot | ✅ | October 2022 | 5.7 Release |
| Swift for TensorFlow | ✅ | August 2022 | August 9, 2022 Development Snapshot |
| Concurrency | ✅ | October 2022 | 5.7 Release |
| TPU Tests | ✅ | July 2022 | July 5, 2022 v5.7 Development Snapshot |