Giter Club home page Giter Club logo

movement_cloud's Introduction

OpenWorm

Docker Image CI Docker Image Test - quick Docker Image Test Build - Intel drivers

About OpenWorm

OpenWorm aims to build the first comprehensive computational model of Caenorhabditis elegans (C. elegans), a microscopic roundworm. With only a thousand cells, it solves basic problems such as feeding, mate-finding and predator avoidance. Despite being extremely well-studied in biology, a deep, principled understanding of the biology of this organism remains elusive.

We are using a bottom-up approach, aimed at observing the worm behaviour emerge from a simulation of data derived from scientific experiments carried out over the past decade. To do so, we are incorporating the data available from the scientific community into software models. We are also forging new collaborations with universities and research institutes to collect data that fill in the gaps.

You can earn a badge with us simply by trying out this package! Click on the image below to get started. OpenWorm Docker Badge

Quickstart

We have put together a Docker container that pulls together the major components of our simulation and runs it on your machine. When you get it all running it does the following:

  1. Run our nervous system model, known as c302, on your computer.
  2. In parallel, run our 3D worm body model, known as Sibernetic, on your computer, using the output of the nervous system model.
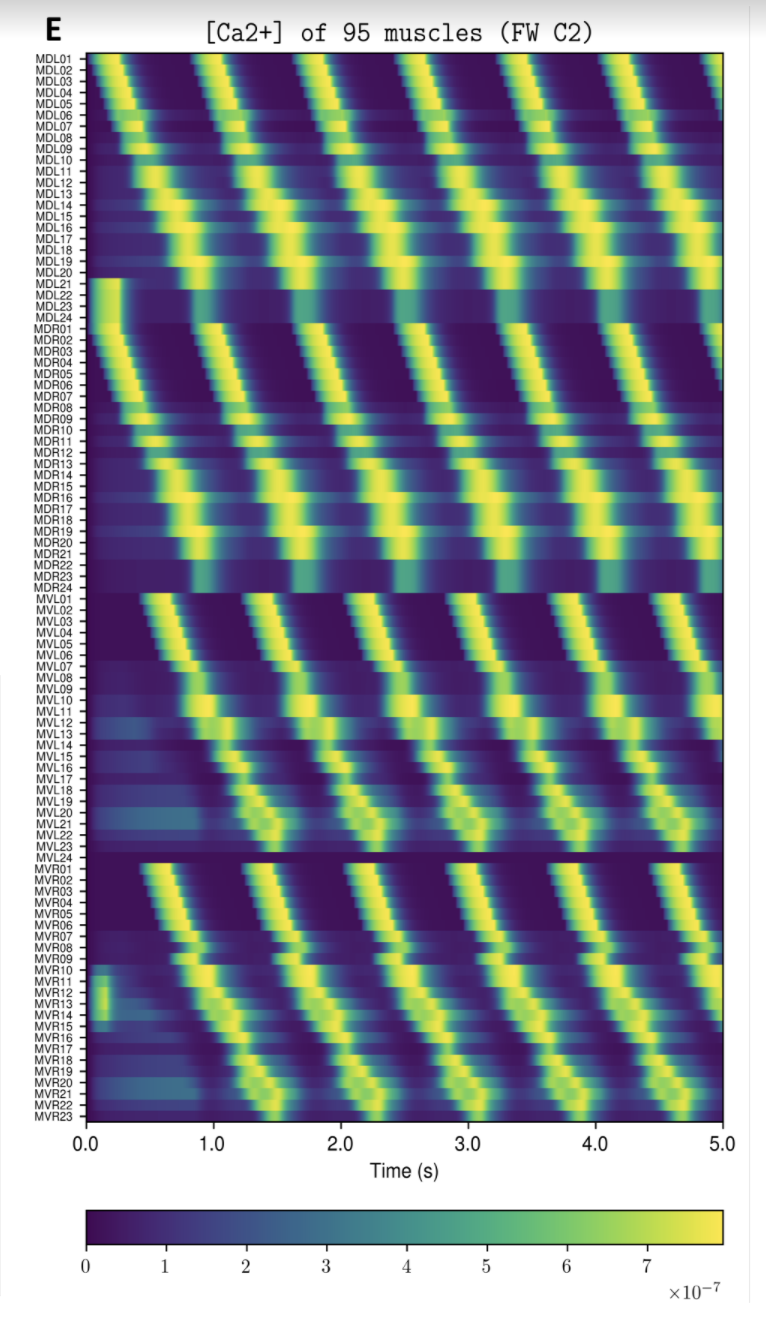
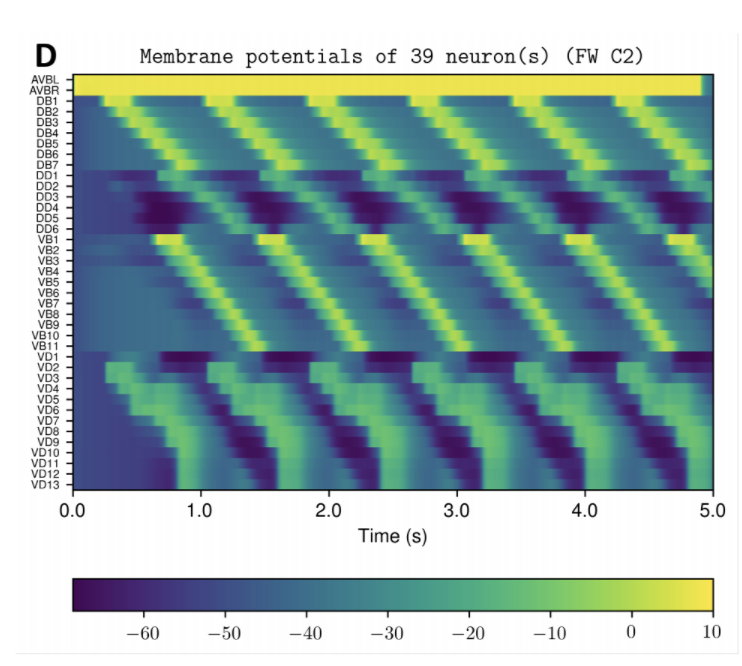
  3. Produce graphs from the nervous system and body model that demonstrate its behavior on your computer for you to inspect.
  4. Produce a movie showing the output of the body model.

Example Output

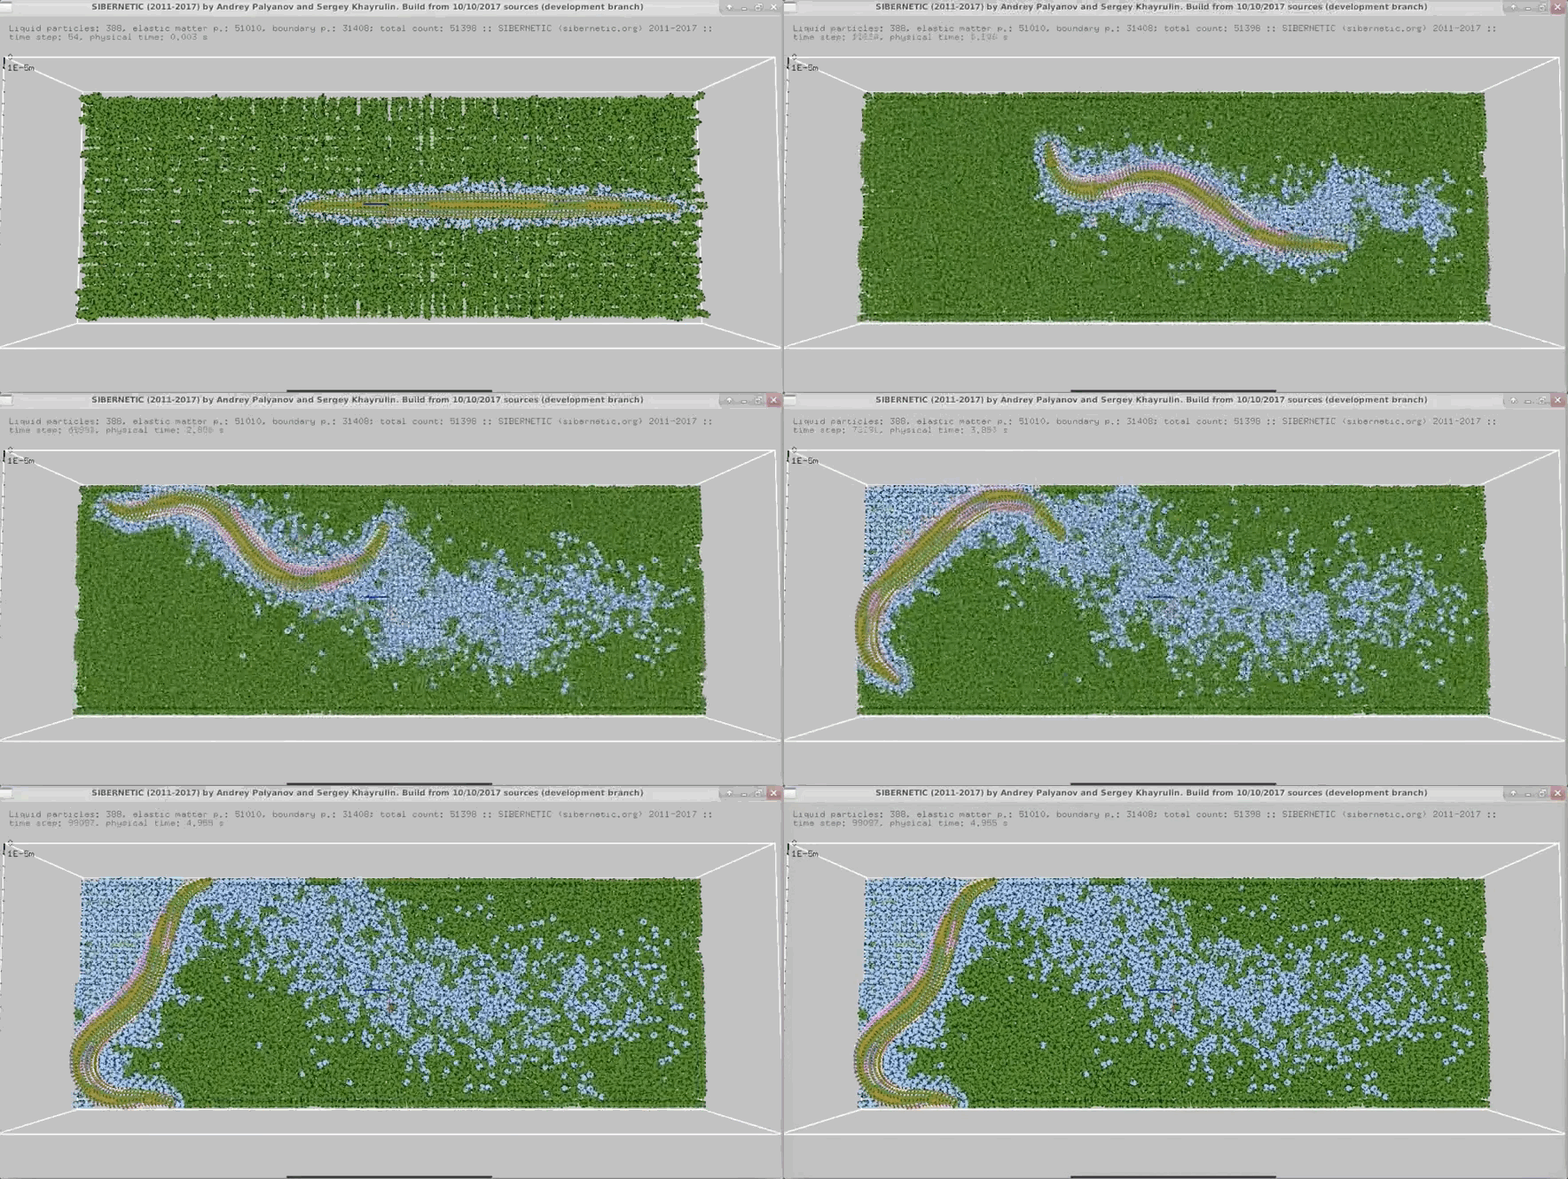
Worm Crawling

NOTE: Running the simulation for the full amount of time would produce content like the above. However, in order to run in a reasonable amount of time, the default run time for the simulation is limited. As such, you will see only a partial output, equivalent to about 5% of run time, compared to the examples above. To extend the run time, use the -d argument as described below.

Installation

Pre-requisites:

  1. You should have at least 60 GB of free space on your machine and at least 2GB of RAM
  2. You should be able to clone git repositories on your machine. Install git, or this GUI may be useful.

To Install:

  1. Install Docker on your system.
  2. If your system does not have enough free space, you can use an external hard disk. On MacOS X, the location for image storage can be specified in the Advanced Tab in Preferences. See this thread in addition for Linux instructions.

Running

  1. Ensure the Docker daemon is running in the background (on MacOS/Windows there should be an icon with the Docker whale logo showing in the menu bar/system tray).
  2. Open a terminal and run: git clone http://github.com/openworm/openworm; cd openworm
  3. Optional: Run ./build.sh (or build.cmd on Windows). If you skip this step, it will download the latest released Docker image from the OpenWorm Docker hub.
  4. Run ./run.sh (or run.cmd on Windows).
  5. About 5-10 minutes of output will display on the screen as the steps run.
  6. The simulation will end. Run stop.sh (stop.cmd on Windows) on your system to clean up the running container.
  7. Inspect the output in the output directory on your local machine.

Advanced

Arguments

  • -d [num] : Use to modify the duration of the simulation in milliseconds. Default is 15. Use 5000 to run for time to make the full movie above (i.e. 5 seconds).

Other things to try

  • Open a terminal and run ./run-shell-only.sh (or run-shell-only.cmd on Windows). This will let you log into the container before it has run master_openworm.py. From here you can inspect the internals of the various checked out code bases and installed systems and modify things. Afterwards you'll still need to run ./stop.sh to clean up.
  • If you wish to modify what gets installed, you should modify Dockerfile. If you want to modify what runs, you should modify master_openworm.py. Either way you will need to run build.sh in order to rebuild the image locally. Afterwards you can run normally.

FAQ

What is the Docker container?

The Docker container is a self-contained environment in which you can run OpenWorm simulations. It's fully set up to get you started by following the steps above. At the moment, it runs simulations and produces visualizations for you, but these visualizations must be viewed outside of the Docker container. While you do not need to know much about Docker to use OpenWorm, if you are planning on working extensively with the platform, you may benefit from understanding some basics. Docker Curriculum is an excellent tutorial for beginners that is straightforward to work through (Sections 1 - 2.5 are plenty sufficient).

Is it possible to modify the simulation without having to run build.sh?

Yes, but it is marginally more complex. The easiest way is to modify anything in the Docker container once you are inside of it - it will work just like a bash shell. If you want to modify any code in the container, you'll need to use an editor that runs in the terminal, like nano. Once you've modified something in the container, you don't need to re-build. However, if you run stop.sh once you exit, those changes will be gone.

How do I access more data than what is already output?

The simulation by default outputs only a few figures and movies to your home system (that is, outside of the Docker container). If you want to access the entire output of the simulation, you will need to copy it from the Docker container.

For example, say you want to extract the worm motion data. This is contained in the file worm_motion_log.txt, which is found in the /home/ow/sibernetic/simulations/[SPECIFIC_TIMESTAMPED_DIRECTORY]/worm_motion_log.txt. The directory [SPECIFIC_TIMESTAMPED_DIRECTORY] will have a name like C2_FW_2018_02-12_18-36-32, and its name can be found by checking the output directory. This is actually the main output directory for the simulation, and contains all output, including cell modelling and worm movement.

Once the simulation ends and you exit the container with exit, but before you run stop.sh, run the following command from the openworm-docker-master folder:

docker cp openworm:/home/ow/sibernetic/simulations/[SPECIFIC_TIMESTAMPED_DIRECTORY]/worm_motion_log.txt ./worm_motion_log.txt

This will copy the file from the Docker container, whose default name is openworm. It is crucial that you do not run stop.sh before trying to get your data out (see below)

What is the difference between exit and stop.sh?

When you are in the Docker Container openworm, and are done interacting with it, you type exit to return to your system's shell. This stops execution of anything in the container, and that container's status is now Exited. If you try to re-start the process using run-shell-only.sh, you will get an error saying that the container already exists. You can choose, at this point, to run stop.sh. Doing so will remove the container and any files associated with it, allowing you to run a new simulation. However, if you don't want to remove that container, you will instead want to re-enter it.

How do I enter a container I just exited?

If you run stop.sh you'll delete your data and reset the container for a new run. If, however, you don't want to do that, you can re-enter the Docker container like this:

docker start openworm                 # Restarts the container
docker exec -it openworm /bin/bash    # Runs bash inside the container

This tells Docker to start the container, to execute commands (exec) with an interactive, tty (-it) bash (bash) shell in the container openworm.

You'll be able to interact with the container as before.

Documentation

to find out more about OpenWorm, please see the documentation at http://docs.openworm.org or join us on Slack.

This repository also contains project-wide tracking via high-level issues and milestones.

movement_cloud's People

Contributors

cheelee avatar gsarma avatar michaelcurrie avatar

Stargazers

 avatar  avatar  avatar  avatar  avatar

Watchers

 avatar  avatar  avatar  avatar  avatar  avatar  avatar  avatar  avatar  avatar  avatar

movement_cloud's Issues

Features Means: Foreign Key link with Experiments

FeaturesMeans isn't currently linked with Experiments, and what I assumed to be the foreign key in FeaturesMeans (experiment_id) is of a different size (Big20) from the id maintained with Experiments.

Add favicon

Right now the server complains:

Not Found: /favicon.ico
[07/May/2017 16:43:37] "GET /favicon.ico HTTP/1.1" 404 2085

Change exit_flags table

To avoid fully dumping the database, and to try a more surgical approach, try this on your local machine:

mysqldump mrc_db4 exit_flags > exit_flags_old.sql

in remote mysql:

use mrc_db4;
drop table exit_flags;
source exit_flags_old.sql

Put schema in version control

We'll need to figure out how to do mysqldump to get a baseline version of the schema.

Subsequent changes to the schema should basically be modification statements, because the database already has data so the original code cannot simply be re-run.

What is the new table, `experiments_full`?

Hi @ver228, in the latest version of the database (I am calling it mrc_db4 in our AWS mysql server), you have two tables:

  • experiments
  • experiments_full

I believe the old database only had "experiments". What is the new table for, and does it render the old table redundant?

In fact I cannot even access this new _full table:

mysql> select count(*) from experiments_full;
ERROR 1449 (HY000): The user specified as a definer ('ajaver'@'localhost') does not exist

Thanks

Unknown and None entries need to be correctly handled

Records in the database sometimes have null values for certain fields. These are reflected in the tool as "Unknown" or "None" (following a fairly arbitrary assignment scheme based on the nature of the field.)

There needs to be a reverse mapping for when "Unknown" or "None" values are required. It remains to be seen if this is even possible. It means a query on the database requesting for matching a NULL value. If this does not make sense, the tool should not allow "Unknown" or "None" fields to be selected for filtering purposes.

Drop Display of Experiment Name Database Field

The Experiment name field appears to be constructed in a way that annotates a subset of the experiment properties (e.g. date) as is typical for some choice for file names. This tends to make for a long name that brings no extra benefit to a database search interface, and should be dropped.

Give Avelino access to the dev server

Steps to add Avelino

From the dev server

See all users:
cut -d: -f1 /etc/passwd | sort

ubuntu
mysql
mcurrie
cwlee

Create a new user, ajaver:

sudo adduser ajaver (password: mexico)

Note: to change the password later, do this:
sudo passwd ajaver

From Avelino's local machine

From Avelino's local machine: Generate a public/private ssh key pair
ssh-keygen -t rsa

List all Avelino's local machine public keys:
ls ~/.ssh/*.pub

Copy the following public key:
cat ~/.ssh/id_rsa.pub

Avelino please use slack to direct message Michael this public key.

Then Michael will add it to

/home/ubuntu/.ssh/authorized_keys, which is a text file currently containing only the OW_latest_spore_keypair public key:

ssh-rsa AAAAB3NzaC1yc2EAAAADAQABAAABAQCFCqSfNxnGp5WbnXdHZaUw2t80whn+3rjWHgoKLu9TpTUI5A9ZBPitresH7H7cFcBWQIvSg5/NcjOezAg5yANj88pbjcMAlEoliKC+EIeEcQx3ICU84Ss0WcqQSTbi/sprzsx4s2p6SnzYEDFh OW_latest_spore_keypair

This key will let you connect to [email protected], on port 22.

Extended Test Database

Create new extended test database with links to -

  1. experiment data files (Zenodo archive)
  2. youtube videos that demonstrate key worm movement characteristics. The goal is to embed the videos in the database interface users can view after filtering.

Generate Test Database CSV

@MichaelCurrie Is it possible to dump a CSV file from the database instead of a .sql file? I'm encountering significant difficulty trying to import the latter into an sqlite3 database we could use as a convenient test database for development purposes.

Crossfilter: fix the 1-year limitation

Currently the results are all projected onto the year 2001, a limitation of the original example I am adapting. Let's make it possible to view multiple years?

Or maybe it's better this way.

Limit the number of search results

As a sanity check, to avoid the server returning thousands of results, perhaps there should be a limit of 50 in the search results page.

This would fix the problem of thousands of youtube videos on one page...

The url download file generated can contain the full list, though.

Sex search leads to "Service unavailable"

If I do a search and select all Males but do not narrow the search in any other way, and click the red search button, I get a page that simply says "Service unavailable" in plain text in the upper left corner.

Refactor features_means

  1. Create a features table containing descriptions of each feature (possibly based on https://github.com/openworm/open-worm-analysis-toolbox/blob/master/open_worm_analysis_toolbox/features/feature_metadata/features_list.csv) (DONE)
  2. Add information about a "top 10" features specifically referencing the "default core features" (DONE)
  3. Replace https://github.com/openworm/movement_cloud/blob/dev/webworm/defaultCoreFeatures.json with a view on the features table.
  4. Have features_means reference this features table as a foreign key
  5. Link features_means to experiments (#14)
  6. Make a schema change PR! (before I do, changes will be live in the MySQL server without being reflected in the schema tracked by version control!)

Crossfilter: Attempt to remove a chart fails.

In static/webworm/crossfilter_parameters.js and template/webworm/crossfitler-template.html, attempting to remove one of the charts like the following results in none of the charts getting populated:

    "charts": [
        "hour",
        "path_range",
        "iso_date"
    ],

and

  <div id='charts'>
    <div id='chart0' class='chart'>
      <div class='title'></div>
    </div>
    <div id='chart1' class='chart'>
      <div class='title'></div>
    </div>
    <div id='chart2' class='chart'>
      <div class='title'></div>
    </div>
  </div>

Add JSON processing to server environment

I have added features that require JSON file processing. requirements.txt reflects this.

For now, we will need to add "pip install simplejson" to the static server software stack environment.

In the future we should consider a setup framework that allows us to automatically take server systems that satisfy basic requirements, and then augment them to satisfy any additional software stack requirement changes due to changes in the repo. The clearest example of this is if we need support for more python modules like matplotlib.

Focus on "core" features

Here's the list of 'core' features with a brief description.

  • Andre

length - the length of the worm's midline

area - the area of the worm

midbody_bend_mean_abs - the absolute value of the worm's midbody bend angle

max_amplitude - the maximum distance between the points on the worm body that are farthest from the line connecting the head and the tail

head_tip_speed_abs - the absolute value of the worm's head speed (will capture some contribution from the high frequency 'foraging' motion of the worm's head).

midbody_speed_abs - the absolute value of the worm's midbody speed

path_range - the farthest distance recorded between the worm's staring point and any point on its trajectory during the recording

forward_motion_frequency - the frequency of forward motion bouts

paused_motion_frequency - the frequency of pauses (where the worm doesn't move much)

backward_motion_frequency - the frequency of reversals (where the worm moves backward for some time)

Server generate crossfilter data

Based on selected features, generate crossfilter data that can be consumed by the client-side crossfilter javascript program.

https://github.com/crossfilter/crossfilter/wiki/API-Reference

From their example, it looks like it's just a JSON file that would be needed. In this example, the client-side crossfilter function is applied to some hardcoded data, that could easily be derived from a JSON file.

var payments = crossfilter([
  {date: "2011-11-14T16:17:54Z", quantity: 2, total: 190, tip: 100, type: "tab", productIDs:["001"]},
  {date: "2011-11-14T16:20:19Z", quantity: 2, total: 190, tip: 100, type: "tab", productIDs:["001", "005"]},
  {date: "2011-11-14T16:28:54Z", quantity: 1, total: 300, tip: 200, type: "visa", productIDs:["004" ,"005"]},
  {date: "2011-11-14T16:30:43Z", quantity: 2, total: 90, tip: 0, type: "tab", productIDs:["001", "002"]},
  {date: "2011-11-14T16:48:46Z", quantity: 2, total: 90, tip: 0, type: "tab", productIDs:["005"]},
  {date: "2011-11-14T16:53:41Z", quantity: 2, total: 90, tip: 0, type: "tab", productIDs:["001", "004" ,"005"]},
  {date: "2011-11-14T16:54:06Z", quantity: 1, total: 100, tip: 0, type: "cash", productIDs:["001", "002", "003", "004" ,"005"]},
  {date: "2011-11-14T16:58:03Z", quantity: 2, total: 90, tip: 0, type: "tab", productIDs:["001"]},
  {date: "2011-11-14T17:07:21Z", quantity: 2, total: 90, tip: 0, type: "tab", productIDs:["004" ,"005"]},
  {date: "2011-11-14T17:22:59Z", quantity: 2, total: 90, tip: 0, type: "tab", productIDs:["001", "002", "004" ,"005"]},
  {date: "2011-11-14T17:25:45Z", quantity: 2, total: 200, tip: 0, type: "cash", productIDs:["002"]},
  {date: "2011-11-14T17:29:52Z", quantity: 1, total: 200, tip: 100, type: "visa", productIDs:["004"]}
]);

Crossfilter: Attempt to move Date to 2nd position results in overlap

The worm_length chart ends up overlapping with the iso_date chart when changing from:

    "charts": [
        "hour",
        "worm_length",
        "path_range",
        "iso_date"
    ],

to:

    "charts": [
        "hour",
        "iso_date",
        "worm_length",
        "path_range",
    ],

However the following order works as expected:

    "charts": [
        "iso_date",
        "hour",
        "worm_length",
        "path_range",
    ],

Figure out desired Django collaboration idiom

This URL documents the various idioms other groups adopt to support multiple split settings for development, and for deployment.

https://code.djangoproject.com/wiki/SplitSettings

We should consider and agree on a way we can be comfortable working with.

This should also address the issues of different developers having a slightly different local setup for their test database. Regardless, it is important to note that Django expects migrations to be packaged as part of the repository.

Start on the "Search Tools" tab

Rather than starting on the Results tab, if there are no results yet, start on the "Search Tools" tab instead. This will be more intuitive for users.

image

Django still pointed at old database

If you go to movement.openworm.org/webworm, you'll see the below error.

I've confirmed that our mysql server has an mrc_db database, along with a mrc_db4 database, which we should now be using. The latter database has the requisite features_means table referenced here.

image

However, I have run migrations and restarted the server, so I'm not sure why the reference to mrc_db persists.

python3 manage.py migrate auth --database=mrc_db4_link_for_django
python3 manage.py migrate --database=mrc_db4_link_for_django
python3 manage.py migrate --fake webworm --database=mrc_db4_link_for_django
# We use “fake” to deal with “Alleles” migration nonsense

Then I use htop to identify the server process, sudo kill to kill it, then I run:

nohup sudo python3 manage.py runserver 0.0.0.0:80 & (as ubuntu)

Add Basic CI Tests

It should be about time we added CI tests to this repo. This will need some research as I don't know how one conducts a test on a GUI. My idea -

  1. CI starts the server with a smaller test database.
  2. (Research needed) CI triggers a script requesting from the server a specific set of search parameters.
  3. (Research needed) CI somehow acquires the HTML output from the results tab.
  4. HTML output is compared against a static expected output file.

Add WCON viewing page with visualization of worm

Progress:

CSS selectors:

.class
#id
*
element e.g. p selects all

elements

Migrate Django code from /home/ubuntu to /srv

Migrate web_code from /home/ubuntu to /srv
Figure out what process started the django server

Do this so multiple users can access the Django server rather than just one (ubuntu) as it is now.

Recommend Projects

  • React photo React

    A declarative, efficient, and flexible JavaScript library for building user interfaces.

  • Vue.js photo Vue.js

    🖖 Vue.js is a progressive, incrementally-adoptable JavaScript framework for building UI on the web.

  • Typescript photo Typescript

    TypeScript is a superset of JavaScript that compiles to clean JavaScript output.

  • TensorFlow photo TensorFlow

    An Open Source Machine Learning Framework for Everyone

  • Django photo Django

    The Web framework for perfectionists with deadlines.

  • D3 photo D3

    Bring data to life with SVG, Canvas and HTML. 📊📈🎉

Recommend Topics

  • javascript

    JavaScript (JS) is a lightweight interpreted programming language with first-class functions.

  • web

    Some thing interesting about web. New door for the world.

  • server

    A server is a program made to process requests and deliver data to clients.

  • Machine learning

    Machine learning is a way of modeling and interpreting data that allows a piece of software to respond intelligently.

  • Game

    Some thing interesting about game, make everyone happy.

Recommend Org

  • Facebook photo Facebook

    We are working to build community through open source technology. NB: members must have two-factor auth.

  • Microsoft photo Microsoft

    Open source projects and samples from Microsoft.

  • Google photo Google

    Google ❤️ Open Source for everyone.

  • D3 photo D3

    Data-Driven Documents codes.