This is an Eclipse Plugin for examining bugs reported by SVF-based detectors.
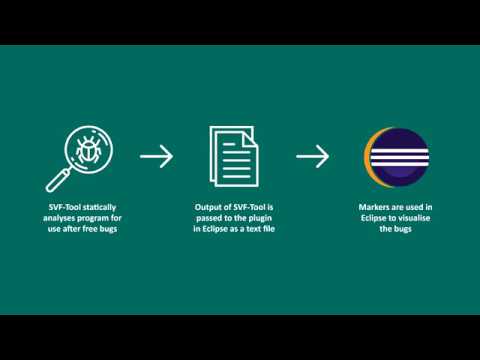
To confirm or fix a bug reported by detectors, one needs to first examine it. This process is usually difficult in large projects because a bug may involve multiple lines of code scattered in different files. To make this process easier, we implemented a tool called UAF-Marker for bug-detectors based on SVF. UAF-Marker, which is a simple Eclipse plugin, targets at use-after-free bugs. Specifically, it takes Eclipse as a code viewer and uses markers and colors to highlight the potential buggy code lines so that the user can clearly see the bugs.
This plugin requires Java 8 to run. Install Java 8 first before continuing with the steps below.
Copy from the plugins folder the jar file uafmarker_1.0.0.<version_number>.jar to your eclipseCPP_installation_dir/dropins directory.
Delete the current uafmarker jar file you have in your dropins directory, and repeat the same steps from the 'Fresh Installation' section above.
- Note: After upgrading the markers might not automatically upgrade to the ones produced by the new version of the plugin. If this occurs, just enable and disable the plugin (as specified under section 1 of 'Usage') to get it to update to the new version.
To display the bugs found by detectors, UAF-Marker requires a file named UAF.txt as input for the plugin, placed in the root of the project directory (see Usage for more detailed instructions). The format of UAF.txt is as output by the SVF tool, as follows.
## Use_After_Free ## 1 ## {
## Use  ############ {                          # tag
line: 10                                        # line number of the use point
file: ./benchmark/array/array1.c                # file of the use point
dir : /home/stc/stc/test/testMicroBenchmark     # directory of the use point
CXT : ==>main(ln: 10)  ==> $$$                  # call string of the use point
Arg Pos: -1                                     # argument position of the use point (if the use is a call)
## Use  ############ }
## Free ############ {                          # tag
line: 9                                         # line number of the free point
file: ./benchmark/array/array1.c                # file of the free point
dir : /home/stc/stc/test/testMicroBenchmark     # directory of the free point
CXT : ==>main(ln: 9)  ==> $$$
## Free ############ }
## Use_After_Free ## 1 ## }
Each use-after-free corresponds to 15 lines in UAF.txt. The first line is the tag of the start of a use after free, the next 7 lines are the information about the use point, after which the next following 6 lines are the information about the associated free point, followed by an ending tag to mark the end of that use after free.
- Create your C/C++ project
- Launch Eclipse CPP
- Create a new C/C++ project and add the existing code/project that is being tested to the project
- Copy UAF.txt to the root directory of the project
- To activate the plugin, right click on the project name, and activate/deactivate the plugin using the disable/enable Sample Builder option under the Configure option, as shown below. This has to be done for every project that the plugin is intended to run in.

- Using UAF Markers
- UAF Marker should work right away after activation. This can be checked by checking if markers are being placed in the workspace. If it doesn't work, refresh the project or force a build by changing a small part of the project and saving it, cleaning it, or disable and enable the plugin again.
- The UAF bugs can be identified using the markers that the plugin creates. All markers can be seen in the problems panel of eclipse, and to jump to where the bugs are in the code, double click on the corresponding marker(s).
- It is worth noting here that on the next time Eclipse is started up the markers in the workspace are the same ones from the previous session if no change has been made to the project since the previous session. Just disable and enable the plugin again if you want to force a full build.
- Modify the Problems Panel (Recommended)
- The markers can be sorted and grouped based on which bug they are related to. To do this, under the options of the problems view (accessible through the triangle shaped button circled in red in the picture below), select to group by UAF Issues. The markers will then be grouped by issues, as shown below.
 This view will help with the identification and classification of markers.
 - Each group will have an Use Point and a Free Point, making up the UAF pair. Some UAF bugs will have call stack information, explained below.
- Call Stack Following
- This plugin supports call stack following, with the call stack input from the CXT field in UAF.txt. Call stack information is displayed as shown in the picture below.

- In the picture we can see that both the use point and free point has a call stack. The call stack can be ordered in order of occurrence by sorting the markers by "Description". The call stack start with call stack 1 all the way to the highest call stack (in this case call stack 3), before reaching either the free or use point.
- In order for the call stack functionality to work with multiple files (when the call stack spans across multiple files), all the files involved must be located in the project. Otherwise, the corresponding call stack marker for the call stack point whose file is not in the project will have a "location not found" notation next to it.
- Removing Markers from Other Open Projects
- If you have other markers existing in the workspace that are from other open projects, you can remove them temporarily by closing all other projects, to only see the markers from the project currently being worked on.
Ensure you are running Java 8 on your machine. Then, try to disable, then enable your the Simple Builder under the configure menu a few times. If that does not work, try to refresh the project or force a build by changing a small part of the project and saving it, or by cleaning it and manually invoking build project. Otherwise, exit Eclipse and reinstall the plugin using the installation instructions above. If all fails, re-export the plugin using your own machine with the instructions below.
If right clicking on the project name does not show the disable/enable the Sample Builder option under Configure, you can manually configure your project by going to your project directory and editing the .project file to add the following:
<buildSpec>
    <!-- Other, existing builders for your project -->
    <!-- Add this -->
    <buildCommand>
        <name>uafmarker.sampleBuilder</name>
        <arguments>
        </arguments>
    </buildCommand>
</buildSpec>
<natures>
    <!-- Other, existing natures for your project -->
    <!-- Add this -->
    <nature>uafmarker.sampleNature</nature>
</natures>
If the above does not work, check the project properties by right clicking on the project name. The Sample Builder should be listed under the Builders option. If it is not there or if it says "Missing Builder", the plugin may not be configured correctly. Either check the configuration or re-export the plugin from this project using your own machine.
To recreate the project/edit the project:
- Download and launch Eclipse RCP
- Import the project from this repository into your workspace
- To test your changes, run as an Eclipse application and create your projects with the necessary files in the Eclipse environment that appears. You should be able to enable/disable the plugin in the testing environment through the Configure option that is available when you right click the project name.
- To export your plugin, right click on your project name, go to export, as deployable plugin, and export. Install and use as specified above