![]()


Query, visualize, curate, and download L8 and S2 products for your region of interest.
Tile Viewer is a crossplatform app built with Electron, Typescript, SCSS, Semantic UI, React, Redux, and Openlayers. Prebuilt binaries are provided for Windows and Linux.
- yarn (optional)
- node 12
- node-gyp properly installed (for building node-canvas, see the Wiki for common issues when building)
git clone https://github.com/sscullen/tile_viewer.git
yarn install
yarn start
To build the app for deployment and generate a complete web app in the dist folder:
yarn build
To use electron-builder to create the final distributable Electron app in the out-builds folder:
yarn dist-builder
Make sure you update the version number in the package.json.
To publish to Github, make sure you have GH_TOKEN env var set with a Github personal access token. You'll want to tag the commit you are building with the version number you have updated to. On Github create a new release draft with the tag you are using. Then run:
yarn dist-publish
After it finishes uploading, you will see the binaries in the release's files. You will have to repeat this process for every platform you want to support.
For in-depth instructions and screenshots, see the wiki.
First you'll need to connect to the backend API that does the heavy lifting for querying, hosting preview images, and downloading imagery. You can find more info here: tile viewer api. There is a testing API available at https://s2d2.satdat.space . If you want access please email me and I can create credentials for you to test out the API.
Once you have the URL of the API and a login, open the Settings page (File -> Settings) and enter the URL, username, and password. You will see a message about the API connecting successfully and it will show the API version number. Ideally this should match the Tile Viewer version shown at the bottom of the Settings page.
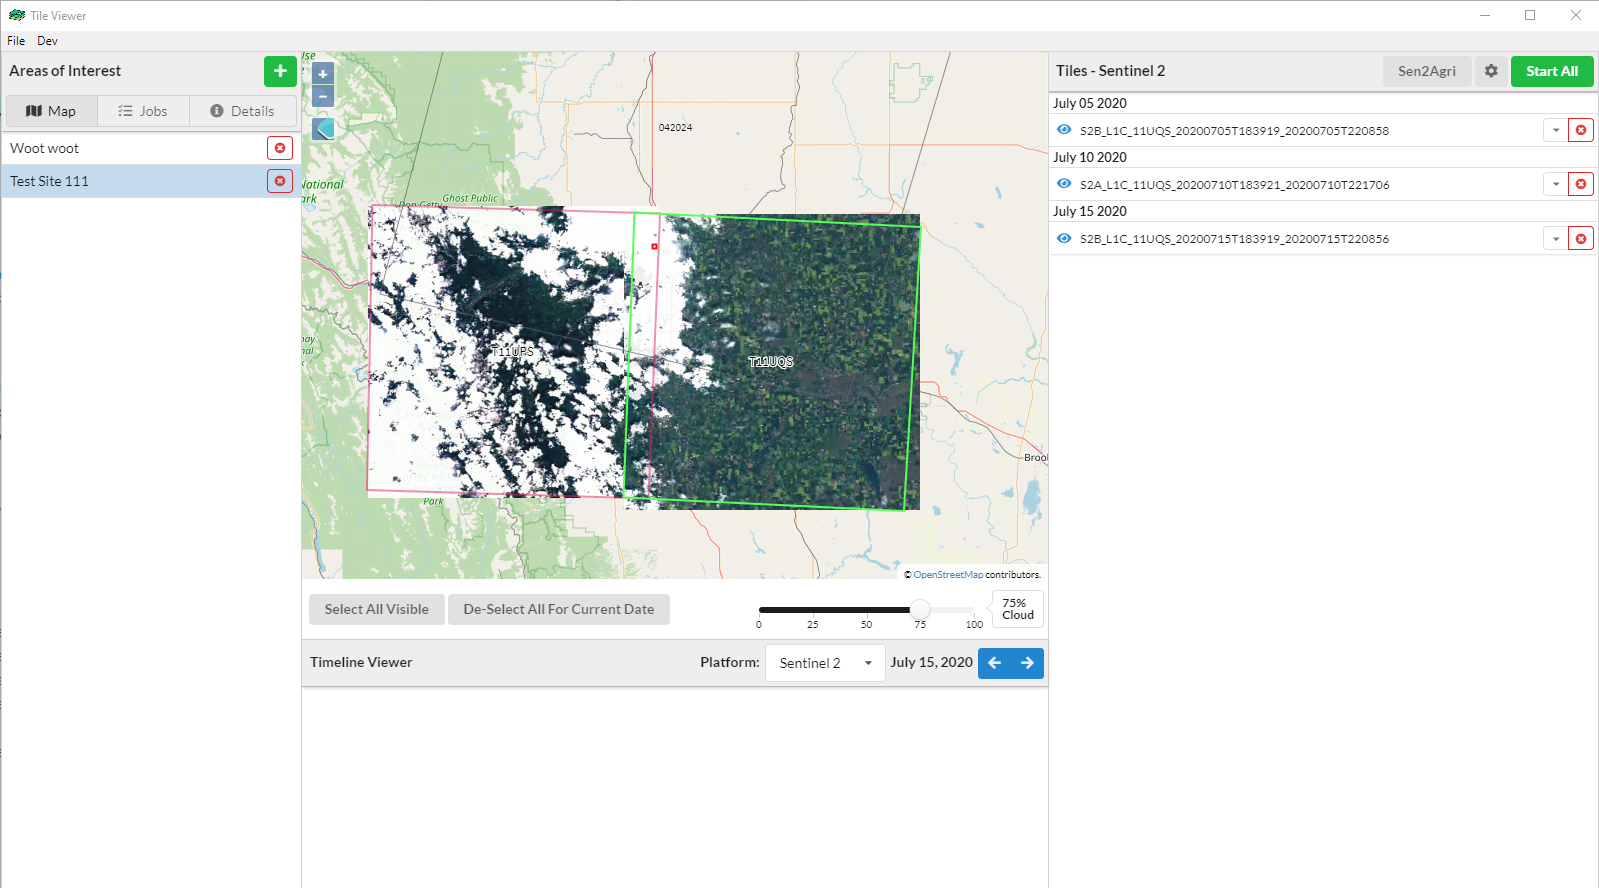
Click the green plus button in the top left of screen, to the right of where it says Areas of Interest. This will open a modal where you set the constraints of your area. The shapefile for the spatial extent needs to be in EPSG:4326 projection. You can add more shapefiles for visualization purposes, these can be point, polyline, or polygon files and must be in EPSG:4326 projection as well. Once you have set the constraints and selected your shapefiles, hit the blue Create Area of Interest button to submit the query to the API. This process will take a long time for areas with large spatial and/or temporal extents. You can close the window and do other things while it is working, or you can wait for a message in the modal.
Once the area of interest is added it will show up in the left panel, click the name of the area to activate it. This will zoom the map to the extent of the area, and the one of the selected sensors will show up below the map in the Timeline Viewer panel.
With an area selected, all products for a specific date for the selected sensor will be shown on the map. Select the tiles that you want to keep, these will show up in the right most panel. They will also be highlighted in cyan on the map. In the Timeline Viewer panel you can navigate the timeline by using the left and right arrow buttons. Use the slider below the map to filter the products by cloudiness. Dates that have no products that meet the cloud threshold will be skipped when iterating over the dates with products. Change the active sensor with the dropdown to the left of the currently active date. There are keyboard shortcuts to make navigating through the products easier. You can also box select on the map if you hold the CTRL key down and click and drag the mouse, this will draw a box and all products in the box will be selected. Layers on the map can be turned on/off in the layer select panel below the zoom buttons in the top left of the map panel.
Once you have the tiles you want for your sensor, use the green Start All button in the top right of the window to begin downloading the selected products. You can use the ⚙️ settings button to select atmospheric correction for your downloads, in addition to copying your selected product names (for use with another command line tool) to the clipboard, or saving the list as a JSON file. The overall job will be shown under the Jobs tab (left hand side under the Areas of Interest header). Individual download progresses for each tile will show up under the product name in the list, with an overall status shown by an hourglass icon, and discrete download progress shown as a progress bar.
If any individual products fail to complete and are shown as a red hourglass, you can select individual products in the list by clicking the item and holding the CTRL key. When a subset of the list is selected, the buttons labels will change to reflect this. This will allow you to retry specific products or copy specific product names without having to deselect them on the map.
In addition to the Map and Jobs tabs, there is a Detail tab, which will show you the basic info about your area of interest, including extent in WKT, MGRS and WRS2 grid intersects, etc. Under the jobs tab, there is a Sen2Agri tab, where you can create jobs to generate L2A, L3A, and L3B (atmospheric correction, cloudfree composites, and LAI/NDVI phenology) products. This functionality is experimental, more info can be found in the wiki.
Previous date: ⬅️ left arrow key
Next date: ➡️ right arrow key
Lower cloud threshold: ⬇️ down arrow key
Higher cloud threshold: ⬆️ up arrow key
Select all visible products: a key
De-select all products: d key
MIT © Shaun Cullen.


