Imagine you wanted to move a use a DC motor and get that thing to rotate to a specific position.
You hook up the motor to your to arduino using an L298 motor driver (example). Speed of the motor is controlled by the stupidly easy PWM methods. The PWM settings for example could be guided manually to move using a potentiometer - example.
This graph is an example of what might happen:

The x-axis is time, the y-axis is motor position. The red line shows the position you want to move the motor. But it's just you and your fat fingers trying to move that motor. What might happen is something like the blue line. You request to go to a certain position and in the case of the blue line, the motor wildly over shoots that position. You dont know how to slow down at the right time, maybe if you were manually controlling it it would go "whoaaaaa" and try to swing back to that position, over shooting, and eventually you'd bounce back and forth to get close to the desired position.
Suppose then, you're like me and you read up on dc motor control using an arduino and you discover something called PID. In this case you send serial commands to the motor, no more potentiometers. And also let's go with a dc motor equipped with an encoder. "Hey hey, great resolution" you think. Here, you use the encoder to track the position based on the number of encoder ticks and you hope the motor will arrive at that position.
The original Grett Beauregard blog post on PID for the arduino.
This is the arduino playground page for the PID library.
So I have to admit I never really understood this formula:

still dont, quite frankly. But once you get PID working in your arduino code, and try to move a motor - this is an example of what might happen:

Again, the x-axis is time, the y-axis is motor position. Using a serial you issue a command to go to a certain position. The blue shows the ideal situation: at a certain time point you want the dumb thing to go to a specific point and just stay there. What might happen is something like the purple line. You request to go to a certain position and in the case of the purple line, the motor wildly over shoots that position. It also doesnt know how to slow down at the right time, it also goes "whoaaaaa" and tries to swing back to the target position, over shooting, and eventually bounces back and forth to get close to the target position.
You try a bunch of variables for kP, kI, and kD and the motor is behaving erratically. The other lines on the graph show various behaviors depending on your settings. Okay, so this sucks - because none of the PID components work well unless you are able to really see how the motor is reacting to the PID settings. Maybe you've got enough experience with tuning that you've developed an intuition for how to set parameters to work well, or, maybe you'll just luck out. Not me, not so far.
If you use python, you can use it to issue commands to an arduino, change PID settings, and then graph the results to view the response of the motor.
Here's the plan:
- Write an .ino for the arduino that can take commands from python;
- Use the python code on the command line to connect through the serial to your curcuit;
- Have the arduino do a little data recording;
- Issue various commands to control the circuit:
- Move the motor;
- Change PID settings;
- Store settings in eeprom;
- Dump data to pyplot;
- Use the plot in combination with observing the motor behavior to optimize your PID settings
If you're like me, you hate IDEs and love command line programming. I really like platformio. You dont have to use it, but installing the code on the arduino will be different. I'm not going to walk your through installing all the include files shown in my src folder. Frankly I dont know how to do it for the arduino IDE.
Similarly, installation and usage of python as well as pyplot is left up to you.
I use teensy's boards. They're cute, they're small, they dont have those goofy old school usb connectors. The downsides is they have 3.2v TTL output and they're not as cheap as some people might like. They also have slight variations in the code that they use. There may be cases where my code is not compatible with an uno for example - I will try to do some testing at some point.
Let's look at some of the sections of the code. Starting with:
double kp=0.5;
double ki=0.0;
double kd=0.0;
double position=0, output=0, target=0;
PID myPID(&position, &output, &target, kp, ki, kd, DIRECT);
Again, there's a lot documentation for the PID library, but think of it as a function that gets some inputs and delivers an important output. We're going to supply it with kP, kI, and kD variables that are the parameters that will be used for tuning. There are also:
- target - the desired, final position of the motor;
- position - the current position of the motor, as generated by the encoder's output;
- output - a number for the PWM. This gets sent to the motor driver to influence how fast the motor will move, and controls the motor direction based on it's sign;
So basically you want this function to output a PWM signal to move motor fposition to be the same as the target. You'd also like it to arrive at that position without a taking a lot of time.
One function in the code to review is handle_cmd()
void handle_cmd() {
  inputString.trim(); // removes beginning and ending white spaces
  int idx = inputString.indexOf(' ');
  String cmd = inputString.substring(0, idx);
  String value = inputString.substring(idx + 1);

  if ((cmd.length() > 0)) {
    if (cmd.equals("probe_device")) {
      Serial.println("PID_device");
      state = S_MOTOR_OFF;
    }
    if (cmd.equals("p")) {
      Serial.println("pause");
      state = S_MOTOR_OFF;
    }
    if (cmd.equals("zero")) {
      Serial.println("zero encoder");
      encoder.write(0);
      state = S_MOTOR_OFF;
    }
    if (cmd.equals("report")) {
      Serial.println("reporting");
      prevState = state;
      state = S_REPORT;
    }
    if (cmd.equals("W")) {
      Serial.println("W - write EEPROM:");
      state = S_MOTOR_OFF;
      writetoEEPROM();
    }
    .
    .
    .
    etc
handle_cmd() is invoked when anything comes in from the serial. It's important to note that it's called from an interrupt routine called serialEvent(). Since it's being invoked from an interrupt, I like to have it do as little as possible and then return back to the rest of the program. So pretty much all handle_cmd() does is parse a command, then based on that command print out something to the serial and set a variable like:
state = S_MOTOR_INIT;
The following are examples of commands that can be submitted to handle_cmd():
report- does a text dump of various variables.W- write variables kP, kI, and kD to the eepromdump- dump all eeprom variables out as textreset- restore the current kP, kI, and kD variables from what's in eeprom.P 10.0- sets kP to 10.0I 0.002- sets kI to 0.002D 1.0- sets kD to 1.0target 100- sets the target to 100plot- sends data to the python program for graphingP- pause the motor.zero- sets the encoder counter to zero.probe_device- returns a name for the device, in this case "PID_device". I like this when multiple devices are hanging off the same computer, then my python code can poll all the devices and find the one it's interested in.
Note: you can use all of those commands in the serial terminal of the arduino IDE. To give it a try go to Tools-->serial monitor.
Moving on. The setup() function is not particularly interesting. The function cal recoverPIDfromEEPROM(); handles retrieving the variables kP, kI, and kD from the eeprom. The loop() function looks like this:
Hopefully you're familiar with state machines. These are really handy if you get tired of having if {this1} else if {this2} else if {this3}.... There are some super fast programs for things like balancing robots that use state machines. The basis of this section is the switch statement. Where:
 // state = some_value like S_REPORT, S_MOTOR_RUN or some other integer

  switch (state) {
  case S_REPORT:
    position = encoder.read();
    printPos();
    state = S_MOTOR_OFF;
    break;
  case S_MOTOR_RUN:
  .
  .
  .
  etc
The most relevant section of the loop is:
  case S_MOTOR_INIT:
    // clear array
    for(int i=0; i<maxCount; i++) positionArray[i]=0;
    myPID.SetTunings(kp,ki,kd);
    start = encoder.read();
    positionCount = 0;
    state = S_MOTOR_RUN;
    break;
  case S_MOTOR_RUN:
    position = encoder.read();

    RA1.addValue(position);

    // wait till PID is actually computed
    while(!myPID.Compute());

    if(output < 0) {
      digitalWrite(IN_A, HIGH);
      digitalWrite(IN_B, LOW);
      analogWrite(PWM_PIN,abs(output));
    }
    else {
      digitalWrite(IN_A, LOW);
      digitalWrite(IN_B, HIGH);
      analogWrite(PWM_PIN,abs(output));
    }

    // loading this array to display for graphing
    if(positionCount < maxCount) {
      positionArray[positionCount]=position;
    }
    positionCount++;

    state = S_MOTOR_RUN;
    break;
When state = S_MOTOR_INIT we'll clear the positionArray[] that will be used log our position data, pass our current kP, kI, kD values to the PID function, and then change the state to S_MOTOR_RUN. When we're in S_MOTOR_RUN we do a very simple set of things:
- find position with
encoder.read(); - compute the PID with `myPID.Compute();
- note: this is put into a while loop to make sure that it's performed the complete calculation
outputcan range from -255 to +255- set direction of the motors based if if output is < 0,
digitalWrite(); - set the motor's speed with
analogWrite(PWM_PIN,abs(output));
- set direction of the motors based if if output is < 0,
- then log the position in positionArray[]
That's PID control! Pretty darn simple.
We stay in S_MOTOR_RUN state until another command is issued to the program.
This python code is used to make a serial connection to your arduino and control the thing using the commans shown above. An important line of code in the pythong program is:
port = '/dev/tty.usbmodem2335471'
be sure to modify this based on the location of the serial port from your computer. If you're running the python in windows, port might just be:
port = 'COM3'
check, the, net for using python with windows (and other platforms).
this loop:
        while True:
            buffer = []
            try:
                for message in iter(lambda:raw_input("Enter Message:"),""):
                    if (message == 'quit'):
                        print message
                        ser.close()
                        sys.exit()
                    msg_with_newline = message+"\n"
                    print "sending", msg_with_newline.rstrip()
                    ser.write(msg_with_newline)
                    buffer = ''
                    time.sleep(1)
                    while ser.inWaiting() > 0:
                        buffer += ser.read(1)
                    if (re.match(r'plot', buffer)):
                        l.handle_plot(buffer)
                    else:
                        print ("%s %s") % (port, buffer)

            except KeyboardInterrupt:
                print "Bye"
                ser.close()
                sys.exit()
in the python code handles accepting keyboard input from your computer, sending it to the arduino, and then receiving the response from the arduino. You can use all the commands that we specified before. If you want to exit, type exit, or Control-c. Here's an example session. First start the python program one the comman line like this:
$ ./serial_n_plot.py
and then here is an example session:
owens-MacBook-Air-2:PID_motor_control owhite$ ./serial_n_plot.py
found:  /dev/tty.usbmodem2335471
Enter Message:report
sending report
/dev/tty.usbmodem2335471 reporting
Position=86.00 PID_output=44.80 Target=200.00
P=0.40 I=0.00 D=0.00
 state=S_MOTOR_OFF

Enter Message:P 0.5
sending P 0.5
/dev/tty.usbmodem2335471 set P

Enter Message:target 250
sending target 250
/dev/tty.usbmodem2335471 target: 250.00

Enter Message:report
sending report
/dev/tty.usbmodem2335471 reporting
Position=252.00 PID_output=-1.00 Target=250.00
P=0.50 I=0.00 D=0.00
 state=S_MOTOR_RUN

Enter Message:plot
sending plot
you're motor may have different behavior but when you hit plot, you might get a result like this:

and the cool thing is, this is not some theoretical plot that you found on the net, it actually the behavior of the last target 250 that you just ran.
Note, when the plot comes up you have to use your mouse to close the window, and then it returns control back to the command line that is running the python code. Be gentle about exiting the python program. Control-c and quit is the way to go, otherwise you may gum up the serial port and will probably need to reboot.
Okay, I have yet to tune my little DC motor, but the next thing I'm going to do is read "PID Without a PhD" and start trying out what it says in the tuning section. (I do have a PhD by way, but it's in plant molecular biology.)
Below is an example of a system that could greatly benifit from tuned PID:
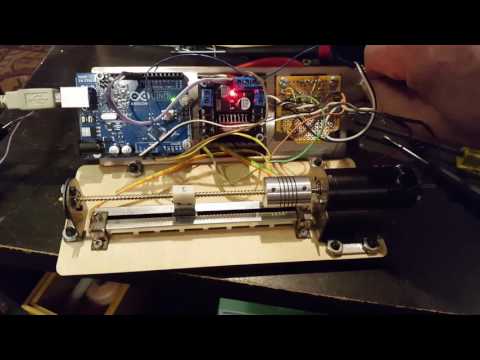

