![]()
Access private network from the internet, support port forwarding from private network to outside via cloud.
sudo apt-get update && sudo apt-get install -y curl
curl -sSL https://raw.githubusercontent.com/vzakharchenko/l2tp-ipsec-radius-docker/main/ubuntu.install| bash
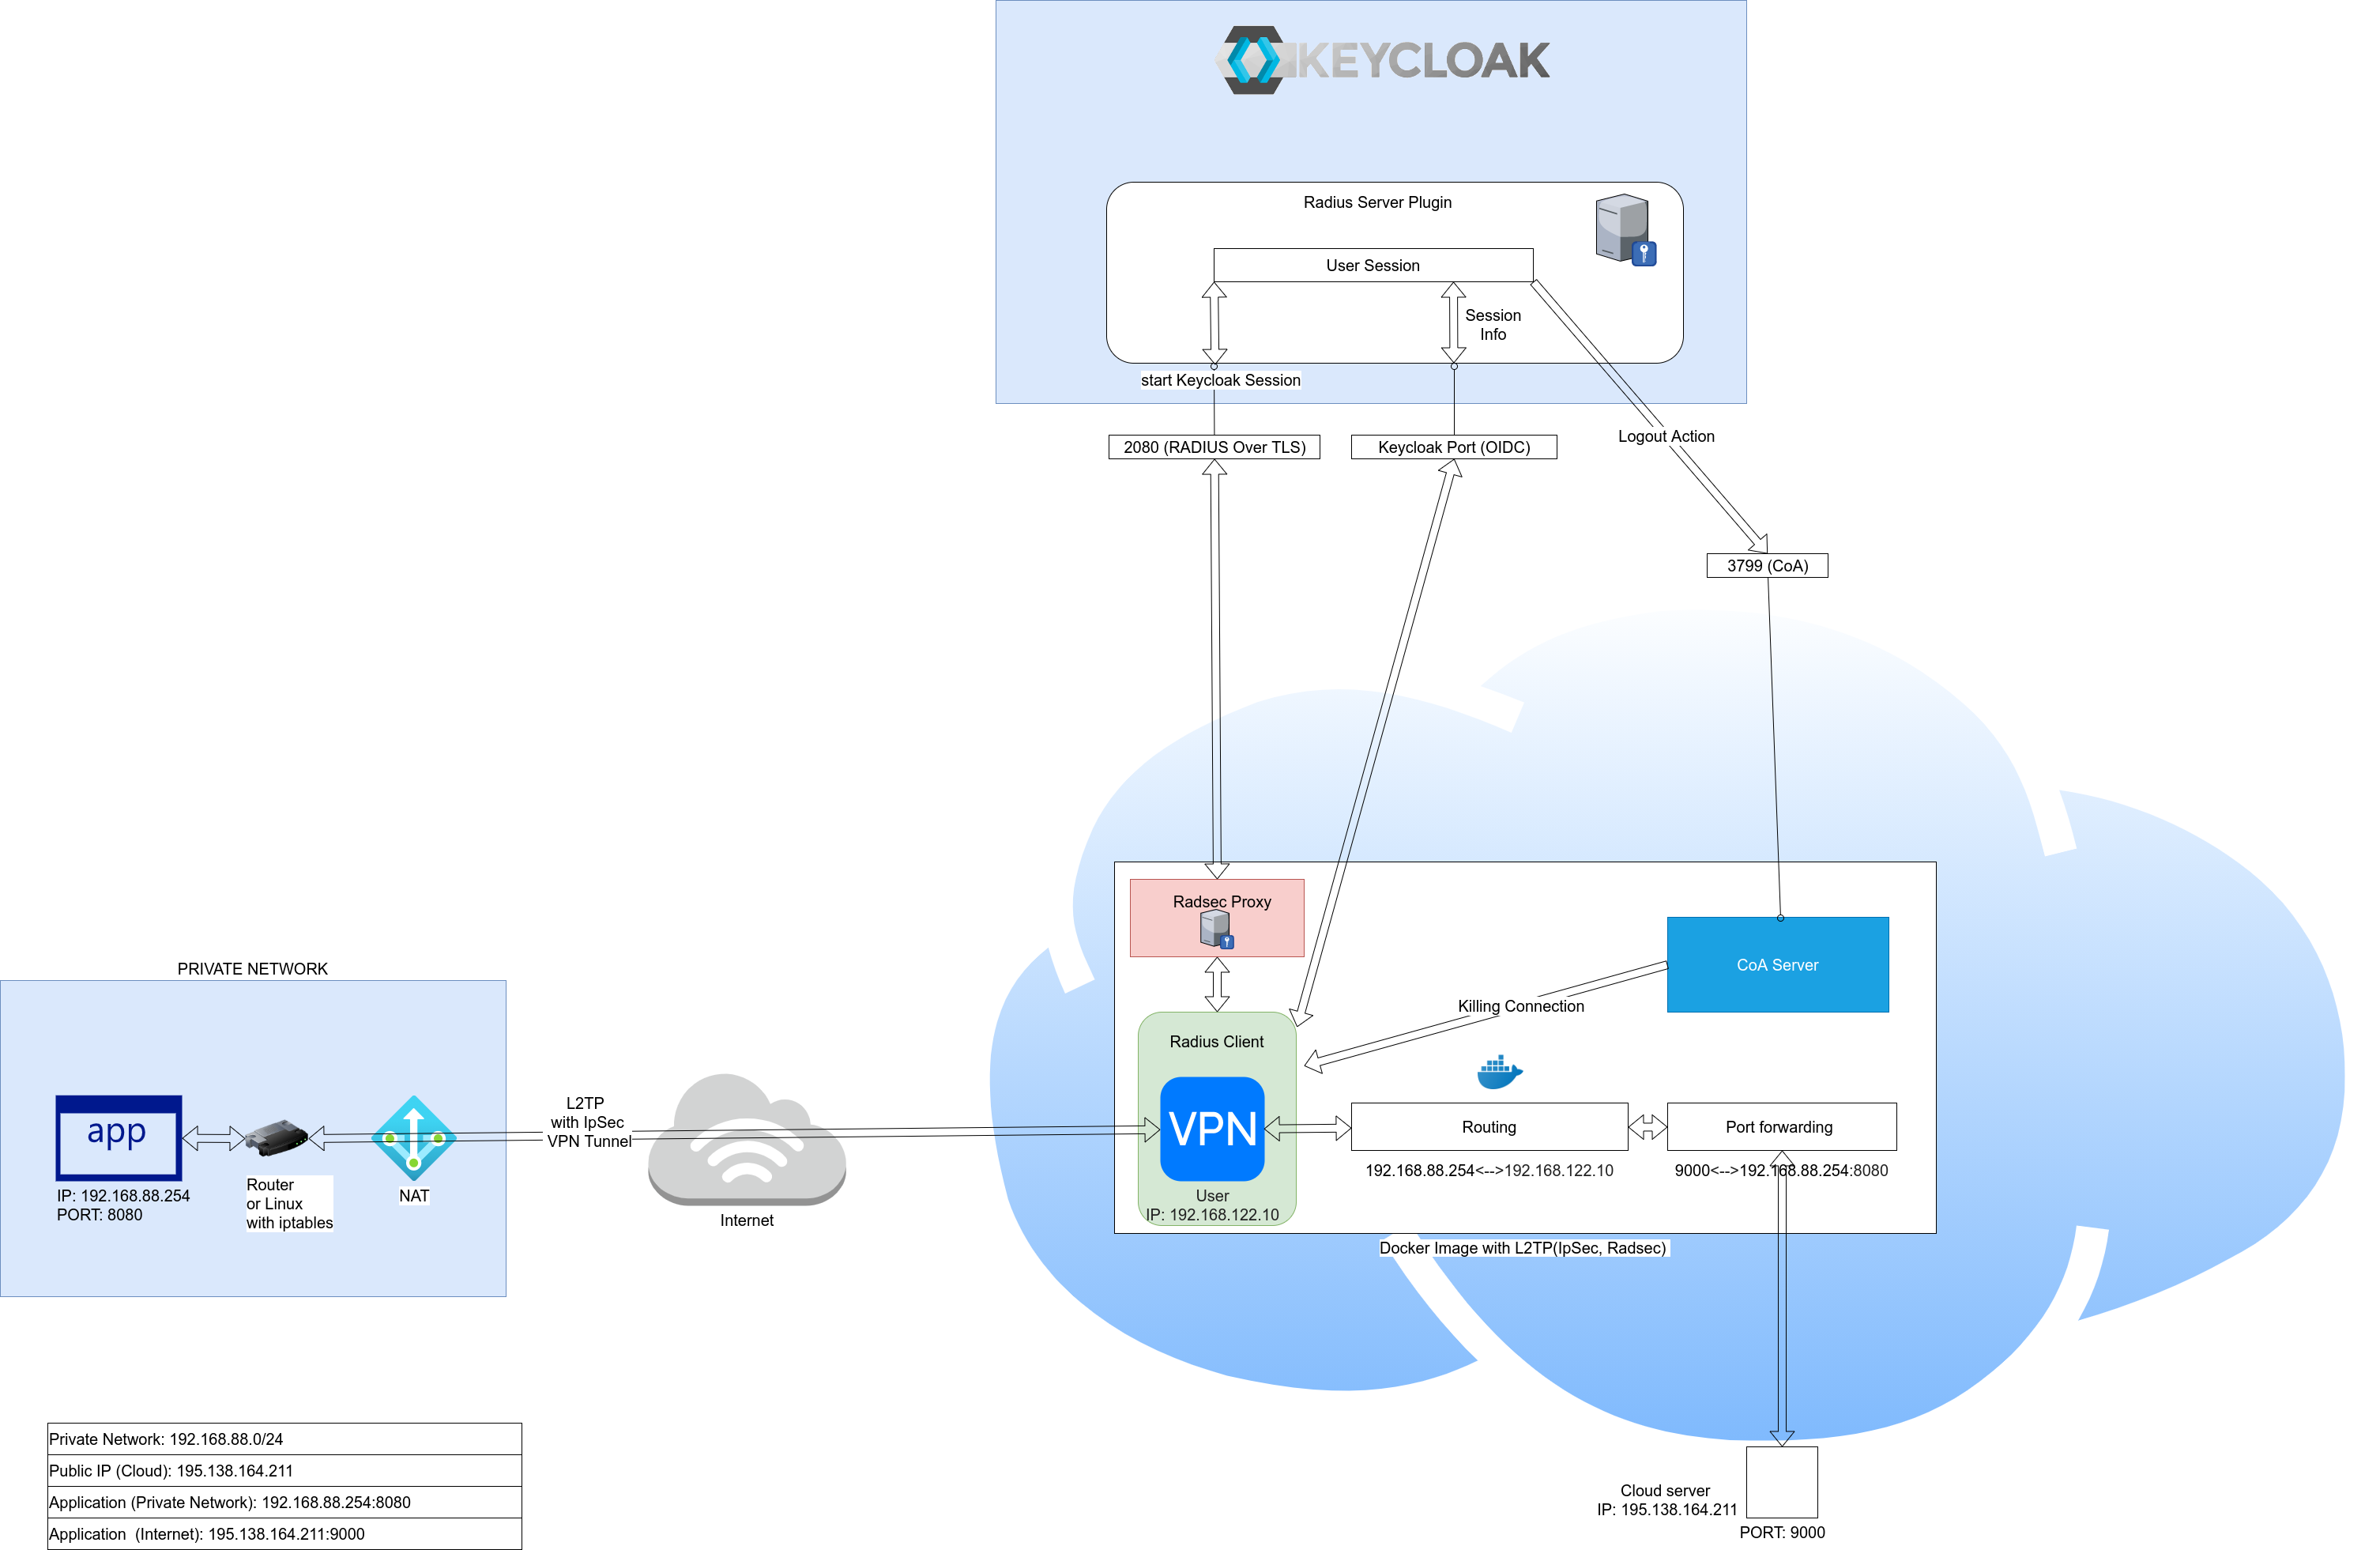
- Docker image
- Keycloak authentication and authorization
- Radius client
- RadSec protocol (Radius over TLS)
- IpSec
- Management routing and portforwarding using json file
- Connect to LAN from the internet
- Port forwarding
- Connect multiple networks
- Automatic installation(Ubuntu)
- Manual Installation steps (Ubuntu)
- Deny user access to VPN
{
   "radsec":{
      "privateKey": RADSEC_PRIVATE_KEY,
      "certificateFile": RADSEC_CERTIFICATE_FILE,
      "CACertificateFile": RADSEC_CA_CERTIFICATE_FILE,
      "certificateKeyPassword": RADSEC_PRIVATE_KEY_PASSWORD
   },
   "keycloak":{
      "json":KEYCLOAK_JSON
   },
   "radius":{
      "protocol":RADIUS_PROTOCOL
   },
   "authorizationMap":{
      "roles":{
         KEYCLOAK_ROLE:{
            "routes":ROUTING_TABLE,
            "forwarding":[{
               "sourceIp":APPLICATION_IP,
               "sourcePort":APPLICATION_PORT,
               "externalIP":REMOTE_IP,
               "externalPort":REMOTE_PORT
            }
            ]
         }
      }
   },
   "ipsec":{
      "secret":IPSEC_SHARED_SECRET
   }
}
Where
- RADSEC_PRIVATE_KEY ssl privateKey
- RADSEC_CERTIFICATE_FILE ssl private certificate
- CACertificateFile ssl CA certificate
- certificateKeyPassword privateKey password
- KEYCLOAK_JSON Keycloak.json
- RADIUS_PROTOCOL Radius protocol. Supported pap,chap and mschap-v2. If used RadSec(Radius over TLS) then better to use PAP, otherwise mschap-v2
- APPLICATION_IP service IP behind NAT (port forwarding)
- APPLICATION_PORT service PORT behind NAT (port forwarding)
- REMOTE_IP Remote Ip
- REMOTE_PORT port accessible from the internet (port forwarding)
- ROUTING_TABLE ip with subnet for example 192.168.8.0/24
- KEYCLOAK_ROLE Role assigned to user
- IPSEC_SHARED_SECRET Ipsec shared secret
Installation Keycloak-Radius-plugin
- Create Realm with Radius client


- Create OIDC client to Radius Realm

- Enable Service Accounts for OIDC client

- Add role "Radius Session Role" to Service Accounts

- Download Keycloak.json

- add keycloak.json to config.json
{
  "radsec": {
    "privateKey": RADSEC_PRIVATE_KEY,
    "certificateFile": RADSEC_CERTIFICATE_FILE,
    "CACertificateFile": RADSEC_CA_CERTIFICATE_FILE,
    "certificateKeyPassword": RADSEC_PRIVATE_KEY_PASSWORD
  },
  "keycloak": {
    "json": {
        "realm": "VPN",
        "auth-server-url": "http://keycloak/auth/",
        "ssl-required": "external",
        "resource": "vpn-client",
        "credentials": {
            "secret": "vpn-client"
         },
        "confidential-port": 0
    }
  },
  "radius": {
    "protocol":"pap"
  },
  "ipsec":{
     "secret":"123456"
  }
}- create private key, certificate and CA certificate : RADSEC_PRIVATE_KEY , RADSEC_CERTIFICATE_FILE,
- Run Keycloak-radius-plugin in Docker
docker run -p 8090:8080 -e JAVA_OPTS="-Dkeycloak.profile.feature.scripts=enabled -Dkeycloak.profile.feature.upload_scripts=enabled -server -Xms64m -Xmx512m -XX:MetaspaceSize=96M -XX:MaxMetaspaceSize=256m -Djava.net.preferIPv4Stack=true -Djboss.modules.system.pkgs=org.jboss.byteman -Djava.awt.headless=true" -e KEYCLOAK_USER=admin -e KEYCLOAK_PASSWORD=admin -v `pwd`/examples:/examples -e KEYCLOAK_IMPORT=/examples/realm-export.json vassio/keycloak-radius-plugin
| User | Password | Role1 | Role2 |
|---|---|---|---|
| user | user | X | X |
| user1 | user1 | X | - |
| user2 | user2 | - | X |
| user3 | user3 | - | - |

- user1 - router with subnet 192.168.88.0/24 behind NAT


- user2 - user who has access to subnet 192.168.88.0/24 from the Internet

{
   "radsec":{
      "privateKey":"RADSEC_PRIVATE_KEY",
      "certificateFile":"RADSEC_CERTIFICATE_FILE",
      "CACertificateFile":"RADSEC_CA_CERTIFICATE_FILE",
      "certificateKeyPassword":"RADSEC_PRIVATE_KEY_PASSWORD"
   },
   "keycloak":{
      "json":{
         "realm":"VPN",
         "auth-server-url":"http://<IP>:8090/auth/",
         "ssl-required":"external",
         "resource":"vpn-client",
         "credentials":{
            "secret":"vpn-client"
         },
         "confidential-port":0
      }
   },
   "radius":{
      "protocol":"pap"
   },
   "authorizationMap":{
      "roles":{
         "Role1":{
            "routing":[
               {
                  "route":"192.168.88.0/24"
               }
            ]
         }
      }
   },
   "ipsec":{
      "secret":"123456"
   }
}
- user - router with subnet 192.168.88.0/24 behind NAT.
- Subnet contains service http://192.168.8.254:80 which is available at from http://195.138.164.211:9000
{
   "radsec":{
      "privateKey":"RADSEC_PRIVATE_KEY",
      "certificateFile":"RADSEC_CERTIFICATE_FILE",
      "CACertificateFile":"RADSEC_CA_CERTIFICATE_FILE",
      "certificateKeyPassword":"RADSEC_PRIVATE_KEY_PASSWORD"
   },
   "keycloak":{
      "json":{
         "realm":"VPN",
         "auth-server-url":"http://<HOST_IP>:8090/auth/",
         "ssl-required":"external",
         "resource":"vpn-client",
         "credentials":{
            "secret":"vpn-client"
         },
         "confidential-port":0
      }
   },
   "radius":{
      "protocol":"pap"
   },
   "authorizationMap":{
      "roles":{
         "Role1":{
            "forwarding":[
               {
                  "sourceIp":"192.168.88.1",
                  "sourcePort":"80",
                  "destinationPort":9000
               }
            ]
         }
      }
   },
   "ipsec":{
      "secret":"123456"
   }
}
- user1 - router with subnet 192.168.88.0/24 behind NAT. Subnet contains service http://192.168.88.254:80 which is available at from http://195.138.164.211:9000
- user2 - router with subnet 192.168.89.0/24 behind NAT.


- user3 - user who has access to subnets 192.168.88.0/24 and 192.168.89.0/24 from the Internet
{
   "radsec":{
      "privateKey":"RADSEC_PRIVATE_KEY",
      "certificateFile":"RADSEC_CERTIFICATE_FILE",
      "CACertificateFile":"RADSEC_CA_CERTIFICATE_FILE",
      "certificateKeyPassword":"RADSEC_PRIVATE_KEY_PASSWORD"
   },
   "keycloak":{
      "json":{
         "realm":"VPN",
         "auth-server-url":"http:/<HOST_IP>:8090/auth/",
         "ssl-required":"external",
         "resource":"vpn-client",
         "credentials":{
            "secret":"vpn-client"
         },
         "confidential-port":0
      }
   },
   "radius":{
      "protocol":"pap"
   },
   "authorizationMap":{
      "roles":{
         "Role1":{
            "forwarding":[
               {
                  "sourceIp":"192.168.88.254",
                  "sourcePort":"80",
                  "destinationPort":9000
               }
            ],
            "routing":[
               {
                  "route":"192.168.88.0/24"
               }
            ]
         },
         "Role2":{
            "routing":[
               {
                  "route":"192.168.89.0/24"
               }
            ]
         }
      }
   },
   "ipsec":{
      "secret":"123456"
   }
}- Viewing logs in docker container:
docker logs l2tp-ipsec-radius-docker -f
- print routing tables
docker exec l2tp-ipsec-radius-docker bash -c "ip route"
- print iptable rules
docker exec l2tp-ipsec-radius-docker bash -c "iptables -S"
sudo apt-get update && sudo apt-get install -y curl
curl -sSL https://raw.githubusercontent.com/vzakharchenko/l2tp-ipsec-radius-docker/main/ubuntu.install -o ubuntu.install
chmod +x ubuntu.install
./ubuntu.install
- create client/realm role and add attribute:
REJECT_Connect-Info=L2TP

- assign a role to a user and after that the user will always be rejected
- install all dependencies
sudo apt-get update && sudo apt-get install -y iptables git iptables-persistent nodejs linux-modules-extra-$(uname -r)
- install docker
sudo apt-get remove docker docker.io containerd runc
sudo curl -sSL https://get.docker.com | bash
sudo groupadd docker
sudo usermod -aG docker $USER
newgrp docker
- Configure host machine
sysctl -w net.ipv4.ip_forward=1
sysctl -w net.netfilter.nf_conntrack_helper=1
sudo echo "net.ipv4.ip_forward=1">/etc/sysctl.conf
sudo echo "net.netfilter.nf_conntrack_helper=1">/etc/sysctl.conf
-
start docker image
export CONFIG_PATH=/opt/config.json
curl -sSL https://raw.githubusercontent.com/vzakharchenko/docker-l2tp-port-forwarding/main/l2tp-js/generateDockerCommands.js -o generateDockerCommands.js
`node generateDockerCommands.js`


