ultralytics / yolov5 Goto Github PK
View Code? Open in Web Editor NEWYOLOv5 🚀 in PyTorch > ONNX > CoreML > TFLite
Home Page: https://docs.ultralytics.com
License: GNU Affero General Public License v3.0
YOLOv5 🚀 in PyTorch > ONNX > CoreML > TFLite
Home Page: https://docs.ultralytics.com
License: GNU Affero General Public License v3.0
Will there any C++ API like the one in AlexeyAB's repo https://github.com/AlexeyAB/darknet#how-to-use-yolo-as-dll-and-so-libraries in the future??
I dont have trouble training using pytorch, but would be good if there's an alternative to run inference in C++
Hello,
I download the provided ckpt files and use python test.py --img-size 736 --conf_thres 0.001 for reproducing results, but I got different AP and AP50 when compare with the table in readme.
yolov3-spp: 44.1% AP, 64.4% AP50 (Table 45.5% AP, 65.2% AP50)
Speed: 10.4/2.1/12.6 ms inference/NMS/total per 736x736 image at batch-size 16
yolov5s: 31.4% AP, 52.3% AP50 (Table 33.1% AP, 53.3% AP50)
Speed: 2.2/2.1/4.4 ms inference/NMS/total per 736x736 image at batch-size 16
yolov5m: 39.9% AP, 60.7% AP50 (Table 41.5% AP, 61.5% AP50)
Speed: 5.4/1.8/7.2 ms inference/NMS/total per 736x736 image at batch-size 16
yolov5l: 42.7% AP, 63.5% AP50 (Table 44.2% AP, 64.3% AP50)
Speed: 11.3/2.2/13.5 ms inference/NMS/total per 736x736 image at batch-size 16
yolov5x: 45.7% AP, 65.9% AP50 (Table 47.1% AP, 66.7% AP50)
Speed: 20.3/2.2/22.5 ms inference/NMS/total per 736x736 image at batch-size 16
Do the reported results are from the test.py or they are calculated by evaluation server?
how to train with my custom dataset,?
Hi,
If I have only a very small dataset, e.g., server hundred images for about ten classes. As suggested, i) I need to train my own data from the pre-trained weight, and ii) maybe I need to freeze some layers, for instance , the backbone, and only modify weight of other layers.
My questions are:
i) Are the above two methods are the best strategies to deal with training very small dataset?
ii) How to freeze some layers of the yolov5?
Thanks.
v5 is so fast! I even dare to imagine how fast it is speeded up by TensorRT, Do you has any job about it ?
Hello! Thank you for such a great implementation. Amazing inference performance!
I have a few questions that I would like some quick clarification on:
Imagine I have a data base of images of size 1980x1080
When using train.py --> what does --img really do? Does it scale images and keep aspect ratio to then feed into the network at that given size and then calculate the amount of tiles based on stride and dimensions?
does the --img take parameters [width,height] or [height,width]?
If I trained a network using --img 1280 , what should I set my --img-size to when using detect.py ? 1280 as well?
My assumption is that if I have images of 1980x1080 and I want to find small objects in each, I should then train my network with image size 1980 to retain image information correct?
What do you recommend to make the anchors in the .yaml for detecting smaller objects? The model is already fantastic as finding small objects, but I am curious if there are any other tips you have on tweaking training parameters to find small objects reliably in images.
Trying to use the --evolve arg ends up with an error:
Traceback (most recent call last):
File "train.py", line 440, in
results = train(hyp.copy())
File "train.py", line 201, in train
tb_writer.add_histogram('classes', c, 0)
AttributeError: 'NoneType' object has no attribute 'add_histogram'
Thank you in advance!
I found something wired when I am looking at torch_utils.py.
If you want to reduce randomness, shouldn't do as pytorch document suggested to set torch.backends.cudnn.deterministic = True and
torch.backends.cudnn.benchmark = False ?
Lines 12 to 18 in 7c2832c
Hello
Thank you for this project.
Do you have paper or blogpost how you can achieve so amazing results?
Hi.
With such high fps with the small yolov5 model, would it run decently on a cpu configuration (xeon processor for instance)?
thinks for your great job !
i download the coco128 and try to train it from scratch:
python train.py --img 640 --batch 16 --epochs 10 --data ./data/coco128.yaml --cfg ./models/yolov5s.yaml --weights '' --device 4,5,6,7
The GIou, objectness, Classification work, However, the mAP, Precision and Recall is both 0, in each epoch.
5/9 11.1G 0.1098 0.08732 0.117 0.3142 200 640 0 0 0 0 0.1034 0.07643 0.1161
Then, i try to use the pretrained weight:
python train.py --img 640 --batch 16 --epochs 1 --data ./data/coco128.yaml --cfg ./models/yolov5s.yaml --weights yolov5s.pt --device 4,5,6,7
in this case, everything work well
0/9 7.3G 0.04367 0.07351 0.01972 0.1369 177 640 0.4245 0.7103 0.657 0.4169 0.04242 0.05659 0.01382
i get this with the original code.
since i didn't implement the Nvidia Apex, i change the mixed precision training = False
simply run again and get the same result.( mAP = 0 )
any idea about this ? thanks for your reply.
when using 4* 2080ti for training:
"RuntimeError: Model replicas must have an equal number of parameters."
(1 gpu is OK)
REQUIRED: Code to reproduce your issue below
CUDA_VISIBLE_DEVICES=0,1,2,3 python train.py --device 0,1,2,3 --data coco.yaml --cfg yolov3-spp.yaml --weights '' --batch-size 64
## Expected behavior
It should be OK

## Environment
 - OS: [Ubuntu 18.04]
 - GPU [4* 2080 Ti]
 - packages:  match  requriments.txt
It seems the pretrain weight yolov5s.pt doesn't math yolov5s.yaml.
When train with
python train.py --img 320 --batch 16 --epochs 100 --data coco128.yaml --cfg yolov5s.yaml --weights yolov5s.pt --name coco128 --cache
It will report not compatible.
yolov5m.pt and yolov5l.pt are fine.
I see you use multi-scale tricks in two places: directly resizing model inputs in train.py and scale image with random_affine in datasets.py, which one is better to use or shoule we use them simultaneously ?
Multiple GPU support
Increased performance!
I just bought a 3-way p100 box, come on please :)
Google Compute TPU support?
Traceback (most recent call last):
  File "detect.py", line 172, in <module>
    detect()
  File "detect.py", line 79, in detect
    fast=True, classes=opt.classes, agnostic=opt.agnostic_nms)
  File "D:\yolov5-master\utils\utils.py", line 511, in non_max_suppression
    x = x[(j.view(-1, 1) == torch.tensor(classes, device=j.device)).any(1)]
IndexError: The shape of the mask [21] at index 0does not match the shape of the indexed tensor [20, 6] at index 0
REQUIRED: Code to reproduce your issue below
python detect.py --source 0 --weights yolov5x.pt --view-img --classes 0
No error produce
If applicable, add screenshots to help explain your problem.
Lines 501 to 512 in 7c2832c
Change
 if classes:
     x = x[(j.view(-1, 1) == torch.tensor(classes, device=j.device)).any(1)]
To
 if classes:
     x = x[(x[:, 5:].view(-1, 1) == torch.tensor(classes, device=j.device)).any(1)]

Image Placeholder


I have train image label normal but test image label shift, how could that possible? i have exactly same number of images and labels:

Some normal, some shifted.
While train is normal. What's the problem could be?
I was trying to inference the yolov5x model and I found your pretrained weight save the whole model, which make torch.load function rely on the relative path of yolov5x.yaml.
And I have tried to load weight like this:
model = Model(r'models/yolov5x.yaml') trained_model = torch.load(opt.weights, map_location=device)['model'].to(device).eval() model.load_state_dict(trained_model.state_dict()) model.to(device).eval()
But I found that the inference outputs of the two models are different
Excuse me, when I run detect.py, there is a parameter "augment", but I see that there is no relevant function yet?
"pred = model(img, augment=opt.augment)[0]" in detect.py
Add the model results on COCO to sotabench
Sotabench is arguably the best independent model benchmark which allows to obtain fair comparison between models.
What is required is to add sotabench.py to the repository. The website has both guides and code examples. Existing submissions can be used as a guideline too.
yolov5__Bottlenck VS yolov3__Bottlenck??
this isnot differences?
yolov3__Bottlenck
[convolutional]
batch_normalize=1
filters=128
size=1
stride=1
pad=1
activation=leaky
[convolutional]
batch_normalize=1
filters=256
size=3
stride=1
pad=1
activation=leaky
[shortcut]
from=-3
activation=linear
yolov5__Bottlenck
class Bottleneck(nn.Module):
def init(self, c1, c2, shortcut=True, g=1, e=0.5): # ch_in, ch_out, shortcut, groups, expansion
super(Bottleneck, self).init()
c_ = int(c2 * e) # hidden channels
self.cv1 = Conv(c1, c_, 1, 1)
self.cv2 = Conv(c_, c2, 3, 1, g=g)
self.add = shortcut and c1 == c2
def forward(self, x):
    return x + self.cv2(self.cv1(x)) if self.add else self.cv2(self.cv1(x))

hi @glenn-jocher
I running command below , I want to running the program behind backend.

but i find the nohup.out file was update very frequently, May it is different with terminal in show

Can you provide a Yolov5 model that is not based on YAML files?
I tried porting to libtorch.I can't understand the model based on yaml file.
After trained on several epochs, I found the mAP is still very low. Does the training really works?
    Epoch   gpu_mem      GIoU       obj       cls     total   targets  img_size
    14/299      6.4G   0.02273  0.002925 0.0003764   0.02603        11       640: 100%|█████████████████████████████████████████████████████████████████████████████████████████████████████████████████████████| 6960/6960 [54:20<00:00,  2.13it/s]
               Class      Images     Targets           P           R      [email protected]  [email protected]:.95: 100%|█████████████████████████████████████████████████████████████████████████████████████████████████████████████| 6960/6960 [13:37<00:00,  8.51it/s]
                 all    5.57e+04    1.74e+05    0.000332     0.00039     2.4e-06    8.59e-07

     Epoch   gpu_mem      GIoU       obj       cls     total   targets  img_size
    15/299      6.4G   0.02232  0.002874  0.000371   0.02556         7       640: 100%|█████████████████████████████████████████████████████████████████████████████████████████████████████████████████████████| 6960/6960 [54:36<00:00,  2.12it/s]
               Class      Images     Targets           P           R      [email protected]  [email protected]:.95: 100%|█████████████████████████████████████████████████████████████████████████████████████████████████████████████| 6960/6960 [14:23<00:00,  8.06it/s]
                 all    5.57e+04    1.74e+05    0.000342    0.000401    2.44e-06    8.66e-07
should line 244 in train.py:
imgsz = random.randrange(640, 640 + gs) // gs * gs
change to be
imgsz = random.randrange(320, 640 + gs) // gs * gs ?
hi , nice work
But when i train with my dataset which only has one class, I get same p, r with diffierent iou threshold. is that right? this is the result of p r and ap , I just print the value in test.py line 178.
p: [[ 0.39592 0.39592 0.39592 0.39592 0.39592 0.39592 0.39592 0.39592 0.39592 0.39592]]
r: [[ 0.85968 0.85968 0.85968 0.85968 0.85968 0.85968 0.85968 0.85968 0.85968 0.85968]]
ap: [[ 0.76316 0.717 0.66569 0.6059 0.52429 0.42925 0.31236 0.19329 0.07503 0.005899]]
f1: [[ 0.54216 0.54216 0.54216 0.54216 0.54216 0.54216 0.54216 0.54216 0.54216 0.54216]]
when export_onnx is set to be true, error will be outcome:
AttributeError: 'Model' object has no attribute 'fuse'
I try to test yolov5l on v100 using followed commend
python test.py --img-size 640 --conf-thres 0.1 --batch-size 16 --weights weights/yolov5l.pt --data data/coco.yaml --device 0RuntimeError is reported, but it works on detect.py and train.py

I used the docker image (ultralytics/yolov5:latest) you provided.
Add the model results on COCO to sotabench
Sotabench is arguably the best independent model benchmark which allows to obtain fair comparison between models.
What is required is to add sotabench.py to the repository. The website has both guides and code examples. Existing submissions can be used as a guideline too.
Thank you for your work, When using your own data for training, we found that the generated weight file is about 52MB , but the provided model is only about 27MB, What's the difference?
How can i reduce the model size? or convert another format?
it is too big (240MB) :(
i used the tiny model but accuracy is not sufficent
Compared with v3-spp, the time of inference is twice long. And the aug is important so that I can not remove it.
Is there any way to speed up without losing too much map?
how to get cfg file like in darknet?
There is no problem for object detection, and it's a great job, thank you!
However, I want to use this repo as a detector in my project, which is the first stage. But I can't use 'torch.load()' to load the weights you provided, get the error as follows:
self.model = torch.load(self.weight_path, map_location=self.device)['model']
  File "torch1.5-py37/lib/python3.7/site-packages/torch/serialization.py", line 593, in load
return _legacy_load(opened_file, map_location, pickle_module, **pickle_load_args)
  File "torch1.5-py37/lib/python3.7/site-packages/torch/serialization.py", line 773, in _legacy_load
result = unpickler.load()
ModuleNotFoundError: No module named 'models.yolo'
torch.save(the_model, PATH)
the_model = torch.load(PATH)

However in this case, the serialized data is bound to the specific classes and the exact directory structure used, so it can break in various ways when used in other projects, or after some serious refactors.
torch.save(the_model.state_dict(), PATH)
the_model = TheModelClass(*args, **kwargs)
the_model.load_state_dict(torch.load(PATH))

and My code as follows:
weights='weights/yolov5m.pt'
device = torch_utils.select_device(device='cpu' if ONNX_EXPORT else '0')
model = torch.load(weights, map_location=device)['model']
torch.save(model.state_dict(), 'weights/yolov5m_resave.pt')
from models.yolo import Model
yaml_path='models/yolov5m.yaml'
new_weights='weights/yolov5m_resave.pt'
model = Model(yaml_path).to(device)
model.load_state_dict(torch.load(new_weights))
before nms: tensor([[[5.57901e+00, 5.70358e+00, 2.26364e+01,  ..., 1.07860e-03, 9.78606e-04, 1.86649e-03],
         [1.35772e+01, 5.58121e+00, 2.83575e+01,  ..., 7.84854e-04, 6.75088e-04, 1.18259e-03],
         [2.03256e+01, 5.90291e+00, 2.71849e+01,  ..., 1.05030e-03, 7.25093e-04, 1.90396e-03],
         ...,
         [3.39442e+02, 3.87110e+02, 1.64121e+02,  ..., 1.63732e-02, 5.22475e-03, 1.01126e-02],
         [3.65044e+02, 3.88645e+02, 1.44507e+02,  ..., 1.25172e-02, 4.94093e-03, 9.01083e-03],
         [3.91104e+02, 3.97117e+02, 1.44332e+02,  ..., 1.07815e-02, 4.93309e-03, 8.51673e-03]]], device='cuda:0')

after nms: [None]
I don't know what's the problem it is? And I don't understand why you use this save method instead of another more flexible way? About my problem, do you have any good ideas? Thank you very much!
Run onnx export got error:
RuntimeError: Input type (torch.cuda.FloatTensor) and weight type (torch.FloatTensor) should be the same
weights trained on GPU, and converted both model and image to cuda device, why this error still happens
hi @glenn-jocher
I try to reproduce training result.

using command above , 8 GPU Tela P40.
when finish 1 epoch training., The test process broken.

📚 This guide explains how to load YOLOv5 🚀 from PyTorch Hub https://pytorch.org/hub/ultralytics_yolov5. See YOLOv5 Docs for additional details. UPDATED 26 March 2023.
Install requirements.txt in a Python>=3.7.0 environment, including PyTorch>=1.7. Models and datasets download automatically from the latest YOLOv5 release.
pip install -r https://raw.githubusercontent.com/ultralytics/yolov5/master/requirements.txt💡 ProTip: Cloning https://github.com/ultralytics/yolov5 is not required 😃
This example loads a pretrained YOLOv5s model from PyTorch Hub as model and passes an image for inference. 'yolov5s' is the lightest and fastest YOLOv5 model. For details on all available models please see the README.
import torch

# Model
model = torch.hub.load('ultralytics/yolov5', 'yolov5s')

# Image
im = 'https://ultralytics.com/images/zidane.jpg'

# Inference
results = model(im)

results.pandas().xyxy[0]
#      xmin    ymin    xmax   ymax  confidence  class    name
# 0  749.50   43.50  1148.0  704.5    0.874023      0  person
# 1  433.50  433.50   517.5  714.5    0.687988     27     tie
# 2  114.75  195.75  1095.0  708.0    0.624512      0  person
# 3 986.00 304.00 1028.0 420.0 0.286865 27 tieThis example shows batched inference with PIL and OpenCV image sources. results can be printed to console, saved to runs/hub, showed to screen on supported environments, and returned as tensors or pandas dataframes.
import cv2
import torch
from PIL import Image
# Model
model = torch.hub.load('ultralytics/yolov5', 'yolov5s')
# Images
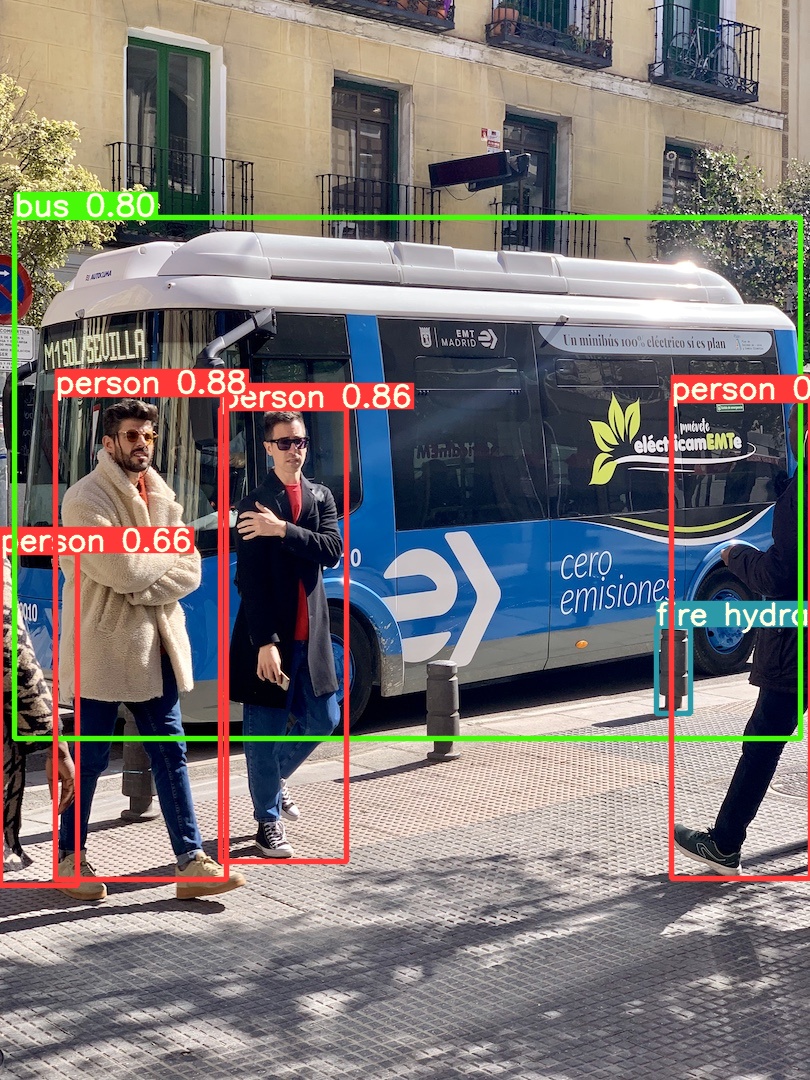
for f in 'zidane.jpg', 'bus.jpg':
torch.hub.download_url_to_file('https://ultralytics.com/images/' + f, f) # download 2 images
im1 = Image.open('zidane.jpg') # PIL image
im2 = cv2.imread('bus.jpg')[..., ::-1] # OpenCV image (BGR to RGB)
# Inference
results = model([im1, im2], size=640) # batch of images
# Results
results.print()
results.save() # or .show()
results.xyxy[0] # im1 predictions (tensor)
results.pandas().xyxy[0] # im1 predictions (pandas)
# xmin ymin xmax ymax confidence class name
# 0 749.50 43.50 1148.0 704.5 0.874023 0 person
# 1 433.50 433.50 517.5 714.5 0.687988 27 tie
# 2 114.75 195.75 1095.0 708.0 0.624512 0 person
# 3 986.00 304.00 1028.0 420.0 0.286865 27 tie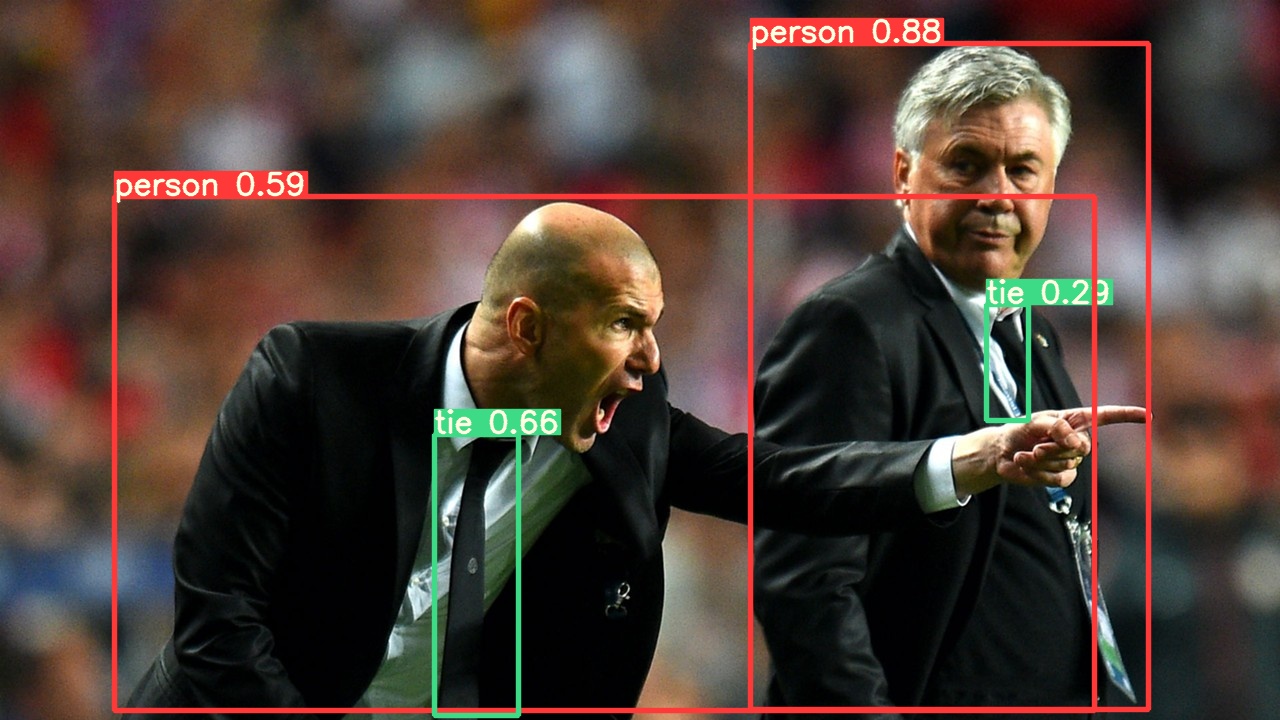
For all inference options see YOLOv5 AutoShape() forward method:
Lines 243 to 252 in 30e4c4f
YOLOv5 models contain various inference attributes such as confidence threshold, IoU threshold, etc. which can be set by:
model.conf = 0.25  # NMS confidence threshold
      iou = 0.45  # NMS IoU threshold
      agnostic = False  # NMS class-agnostic
      multi_label = False  # NMS multiple labels per box
      classes = None  # (optional list) filter by class, i.e. = [0, 15, 16] for COCO persons, cats and dogs
      max_det = 1000  # maximum number of detections per image
      amp = False  # Automatic Mixed Precision (AMP) inference

results = model(im, size=320) # custom inference sizeModels can be transferred to any device after creation:
model.cpu()  # CPU
model.cuda()  # GPU
model.to(device)  # i.e. device=torch.device(0)
Models can also be created directly on any device:
model = torch.hub.load('ultralytics/yolov5', 'yolov5s', device='cpu') # load on CPU💡 ProTip: Input images are automatically transferred to the correct model device before inference.
Models can be loaded silently with _verbose=False:
model = torch.hub.load('ultralytics/yolov5', 'yolov5s', _verbose=False) # load silentlyTo load a pretrained YOLOv5s model with 4 input channels rather than the default 3:
model = torch.hub.load('ultralytics/yolov5', 'yolov5s', channels=4)In this case the model will be composed of pretrained weights except for the very first input layer, which is no longer the same shape as the pretrained input layer. The input layer will remain initialized by random weights.
To load a pretrained YOLOv5s model with 10 output classes rather than the default 80:
model = torch.hub.load('ultralytics/yolov5', 'yolov5s', classes=10)In this case the model will be composed of pretrained weights except for the output layers, which are no longer the same shape as the pretrained output layers. The output layers will remain initialized by random weights.
If you run into problems with the above steps, setting force_reload=True may help by discarding the existing cache and force a fresh download of the latest YOLOv5 version from PyTorch Hub.
model = torch.hub.load('ultralytics/yolov5', 'yolov5s', force_reload=True) # force reloadTo run inference on your desktop screen:
import torch
from PIL import ImageGrab

# Model
model = torch.hub.load('ultralytics/yolov5', 'yolov5s')

# Image
im = ImageGrab.grab()  # take a screenshot

# Inference
results = model(im)YOLOv5 models can be be loaded to multiple GPUs in parallel with threaded inference:
import torch
import threading

def run(model, im):
  results = model(im)
  results.save()

# Models
model0 = torch.hub.load('ultralytics/yolov5', 'yolov5s', device=0)
model1 = torch.hub.load('ultralytics/yolov5', 'yolov5s', device=1)

# Inference
threading.Thread(target=run, args=[model0, 'https://ultralytics.com/images/zidane.jpg'], daemon=True).start()
threading.Thread(target=run, args=[model1, 'https://ultralytics.com/images/bus.jpg'], daemon=True).start()To load a YOLOv5 model for training rather than inference, set autoshape=False. To load a model with randomly initialized weights (to train from scratch) use pretrained=False. You must provide your own training script in this case. Alternatively see our YOLOv5 Train Custom Data Tutorial for model training.
model = torch.hub.load('ultralytics/yolov5', 'yolov5s', autoshape=False)  # load pretrained
model = torch.hub.load('ultralytics/yolov5', 'yolov5s', autoshape=False, pretrained=False) # load scratchFor use with API services. See #2291 and Flask REST API example for details.
results = model(im)  # inference

results.ims # array of original images (as np array) passed to model for inference
results.render()  # updates results.ims with boxes and labels
for im in results.ims:
    buffered = BytesIO()
    im_base64 = Image.fromarray(im)
    im_base64.save(buffered, format="JPEG")
print(base64.b64encode(buffered.getvalue()).decode('utf-8')) # base64 encoded image with resultsResults can be returned and saved as detection crops:
results = model(im)  # inference
crops = results.crop(save=True) # cropped detections dictionaryResults can be returned as Pandas DataFrames:
results = model(im)  # inference
results.pandas().xyxy[0] # Pandas DataFrameprint(results.pandas().xyxy[0])
# xmin ymin xmax ymax confidence class name
# 0 749.50 43.50 1148.0 704.5 0.874023 0 person
# 1 433.50 433.50 517.5 714.5 0.687988 27 tie
# 2 114.75 195.75 1095.0 708.0 0.624512 0 person
# 3 986.00 304.00 1028.0 420.0 0.286865 27 tieResults can be sorted by column, i.e. to sort license plate digit detection left-to-right (x-axis):
results = model(im)  # inference
results.pandas().xyxy[0].sort_values('xmin') # sorted left-rightResults can be returned and saved as detection crops:
results = model(im)  # inference
crops = results.crop(save=True) # cropped detections dictionaryResults can be returned in JSON format once converted to .pandas() dataframes using the .to_json() method. The JSON format can be modified using the orient argument. See pandas .to_json() documentation for details.
results = model(ims)  # inference
results.pandas().xyxy[0].to_json(orient="records") # JSON img1 predictions[
{"xmin":749.5,"ymin":43.5,"xmax":1148.0,"ymax":704.5,"confidence":0.8740234375,"class":0,"name":"person"},
{"xmin":433.5,"ymin":433.5,"xmax":517.5,"ymax":714.5,"confidence":0.6879882812,"class":27,"name":"tie"},
{"xmin":115.25,"ymin":195.75,"xmax":1096.0,"ymax":708.0,"confidence":0.6254882812,"class":0,"name":"person"},
{"xmin":986.0,"ymin":304.0,"xmax":1028.0,"ymax":420.0,"confidence":0.2873535156,"class":27,"name":"tie"}
]This example loads a custom 20-class VOC-trained YOLOv5s model 'best.pt' with PyTorch Hub.
model = torch.hub.load('ultralytics/yolov5', 'custom', path='path/to/best.pt')  # local model
model = torch.hub.load('path/to/yolov5', 'custom', path='path/to/best.pt', source='local') # local repoPyTorch Hub supports inference on most YOLOv5 export formats, including custom trained models. See TFLite, ONNX, CoreML, TensorRT Export tutorial for details on exporting models.
💡 ProTip: TensorRT may be up to 2-5X faster than PyTorch on GPU benchmarks
💡 ProTip: ONNX and OpenVINO may be up to 2-3X faster than PyTorch on CPU benchmarks
model = torch.hub.load('ultralytics/yolov5', 'custom', path='yolov5s.pt')  # PyTorch
                                                            'yolov5s.torchscript')  # TorchScript
                                                            'yolov5s.onnx')  # ONNX
                                                            'yolov5s_openvino_model/')  # OpenVINO
                                                            'yolov5s.engine')  # TensorRT
                                                            'yolov5s.mlmodel')  # CoreML (macOS-only)
                                                            'yolov5s.tflite')  # TFLite
'yolov5s_paddle_model/') # PaddlePaddleYOLOv5 may be run in any of the following up-to-date verified environments (with all dependencies including CUDA/CUDNN, Python and PyTorch preinstalled):


![]()
If this badge is green, all YOLOv5 GitHub Actions Continuous Integration (CI) tests are currently passing. CI tests verify correct operation of YOLOv5 training, validation, inference, export and benchmarks on MacOS, Windows, and Ubuntu every 24 hours and on every commit.
A clear and concise description of what the bug is.
Traceback (most recent call last):
  File "detect.py", line 162, in <module>
    detect()
  File "detect.py", line 48, in detect
    names = model.names if hasattr(model, 'names') else model.modules.names
AttributeError: 'function' object has no attribute 'names'
!python detect.py --source ./inference/images/ --weights yolov5s.pt --conf 0.4
Expected the download of the model with weights and inference to happen
Google Colab with GPU (name='Tesla K80', total_memory=11441MB)
This issue seems to arise on all yolov5 weights downloaded since 1-2 days back, but not on yolov3-spp.pt
when i run train.py, i get this error:

datasets have been loaded
I used to call darknet format model with c++ and opencv,if I switch to this yolov5 project, how to deploy it to the production line using opencv or libtorch?
Hi, thanks for this awesome implementation and pre-trained models!
This is just a minor issue and maybe it is I miss something, but I think the importing path of
yolov5/weights/download_weights.sh
Line 4 in c14368d
from utils.google_utils import * since the attempt_download function is within utils/google_utils.py, right?I have 1200 images (1000 train, 200 test) collected by ground penetrating radar sensor and the goal is to detect different type of defects present in those images. There are 7 classes in total and the defects look like this:


I tried to train your model on my data and it is not working as expected. After 300 epochs I got only 2% mAP and it is not increasing at all. I have made the necessary changes in config files, prepared my data according to your custom data training tutorial. Am not sure what is wrong in my training process.
Do you have any idea or suggestions in order to achieve good mAP on my dataset?
Thanks,
Rajat
When I train my own data set, do I still use the provided complete model as pre-training weights?
📚 This guide explains how to train your own custom dataset with YOLOv5 🚀. See YOLOv5 Docs for additional details. UPDATED 13 April 2023.
Clone repo and install requirements.txt in a Python>=3.7.0 environment, including PyTorch>=1.7. Models and datasets download automatically from the latest YOLOv5 release.
git clone https://github.com/ultralytics/yolov5  # clone
cd yolov5
pip install -r requirements.txt  # install
Creating a custom model to detect your objects is an iterative process of collecting and organizing images, labeling your objects of interest, training a model, deploying it into the wild to make predictions, and then using that deployed model to collect examples of edge cases to repeat and improve.
YOLOv5 models must be trained on labelled data in order to learn classes of objects in that data. There are two options for creating your dataset before you start training:
Your model will learn by example. Training on images similar to the ones it will see in the wild is of the utmost importance. Ideally, you will collect a wide variety of images from the same configuration (camera, angle, lighting, etc.) as you will ultimately deploy your project.
If this is not possible, you can start from a public dataset to train your initial model and then sample images from the wild during inference to improve your dataset and model iteratively.
Once you have collected images, you will need to annotate the objects of interest to create a ground truth for your model to learn from.
Roboflow Annotate is a simple
web-based tool for managing and labeling your images with your team and exporting
them in YOLOv5's annotation format.
Whether you label your images with Roboflow or not, you can use it to convert your dataset into YOLO format, create a YOLOv5 YAML configuration file, and host it for importing into your training script.
Create a free Roboflow account
and upload your dataset to a Public workspace, label any unannotated images,
then generate and export a version of your dataset in YOLOv5 Pytorch format.
Note: YOLOv5 does online augmentation during training, so we do not recommend
applying any augmentation steps in Roboflow for training with YOLOv5. But we
recommend applying the following preprocessing steps:
Generating a version will give you a point in time snapshot of your dataset so
you can always go back and compare your future model training runs against it,
even if you add more images or change its configuration later.
Export in YOLOv5 Pytorch format, then copy the snippet into your training
script or notebook to download your dataset.
Now continue with 2. Select a Model.
COCO128 is an example small tutorial dataset composed of the first 128 images in COCO train2017. These same 128 images are used for both training and validation to verify our training pipeline is capable of overfitting. data/coco128.yaml, shown below, is the dataset config file that defines 1) the dataset root directory path and relative paths to train / val / test image directories (or *.txt files with image paths) and 2) a class names dictionary:
# Train/val/test sets as 1) dir: path/to/imgs, 2) file: path/to/imgs.txt, or 3) list: [path/to/imgs1, path/to/imgs2, ..]
path: ../datasets/coco128  # dataset root dir
train: images/train2017  # train images (relative to 'path') 128 images
val: images/train2017  # val images (relative to 'path') 128 images
test:  # test images (optional)

# Classes (80 COCO classes)
names:
  0: person
  1: bicycle
  2: car
  ...
  77: teddy bear
  78: hair drier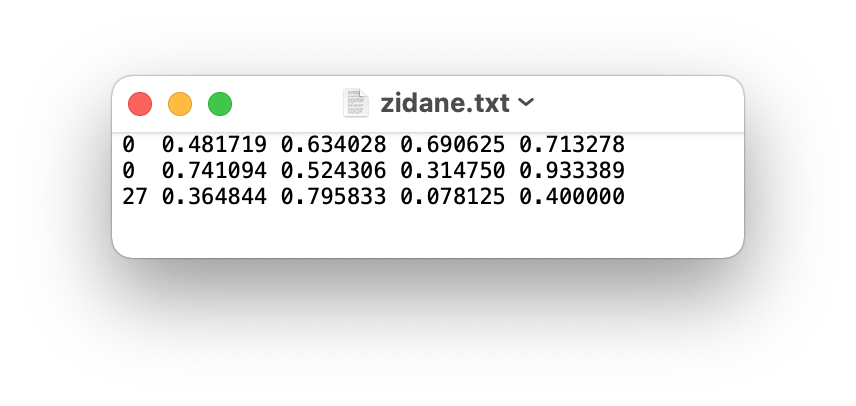
79: toothbrushAfter using an annotation tool to label your images, export your labels to YOLO format, with one *.txt file per image (if no objects in image, no *.txt file is required). The *.txt file specifications are:
class x_center y_center width height format.x_center and width by image width, and y_center and height by image height.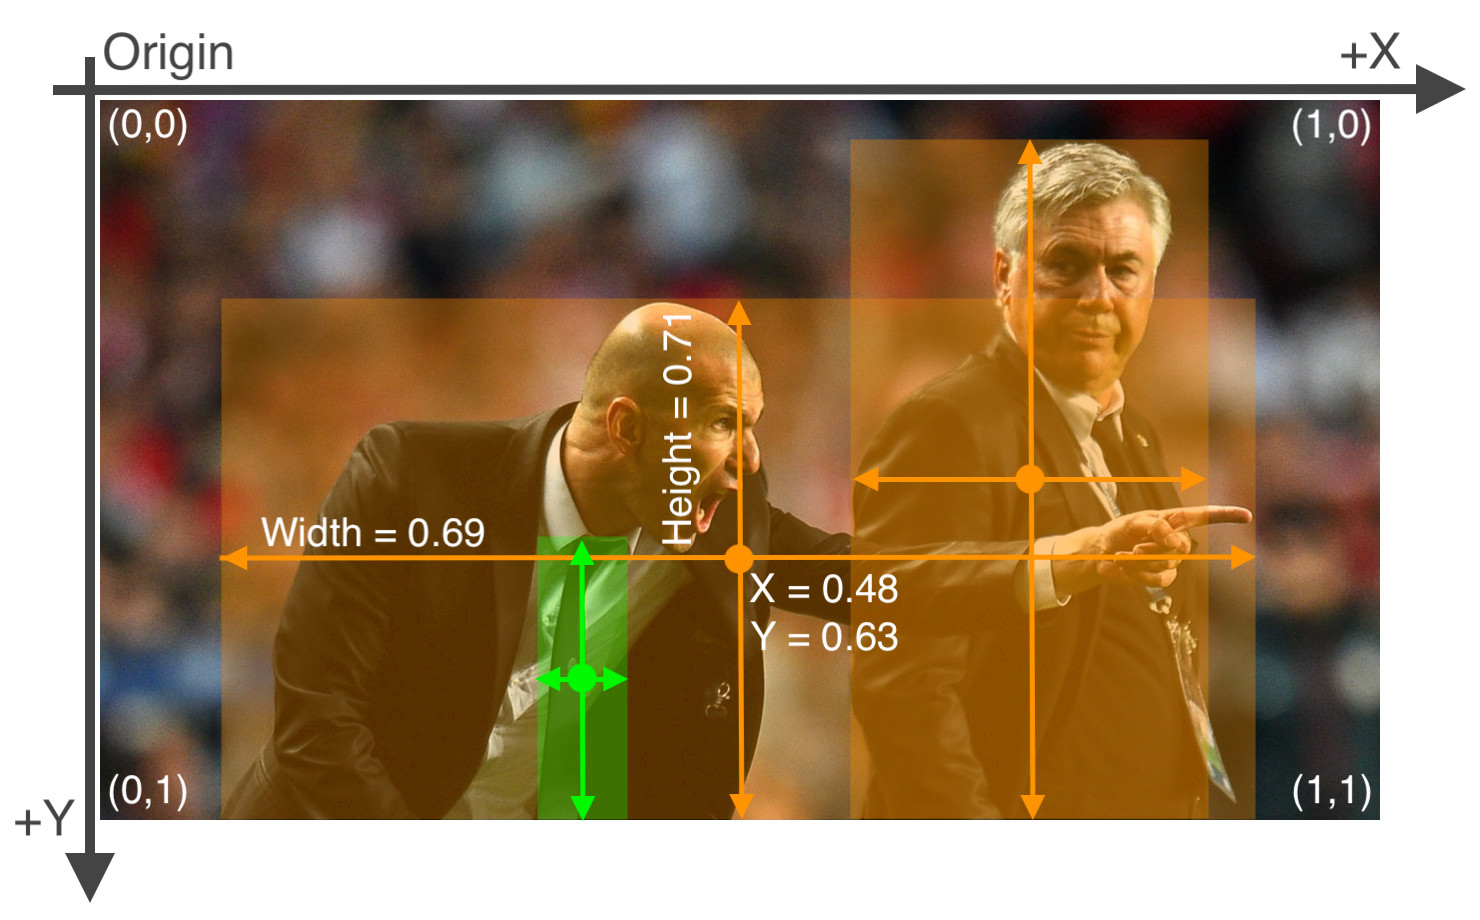
The label file corresponding to the above image contains 2 persons (class 0) and a tie (class 27):
Organize your train and val images and labels according to the example below. YOLOv5 assumes /coco128 is inside a /datasets directory next to the /yolov5 directory. YOLOv5 locates labels automatically for each image by replacing the last instance of /images/ in each image path with /labels/. For example:
../datasets/coco128/images/im0.jpg  # image
../datasets/coco128/labels/im0.txt  # label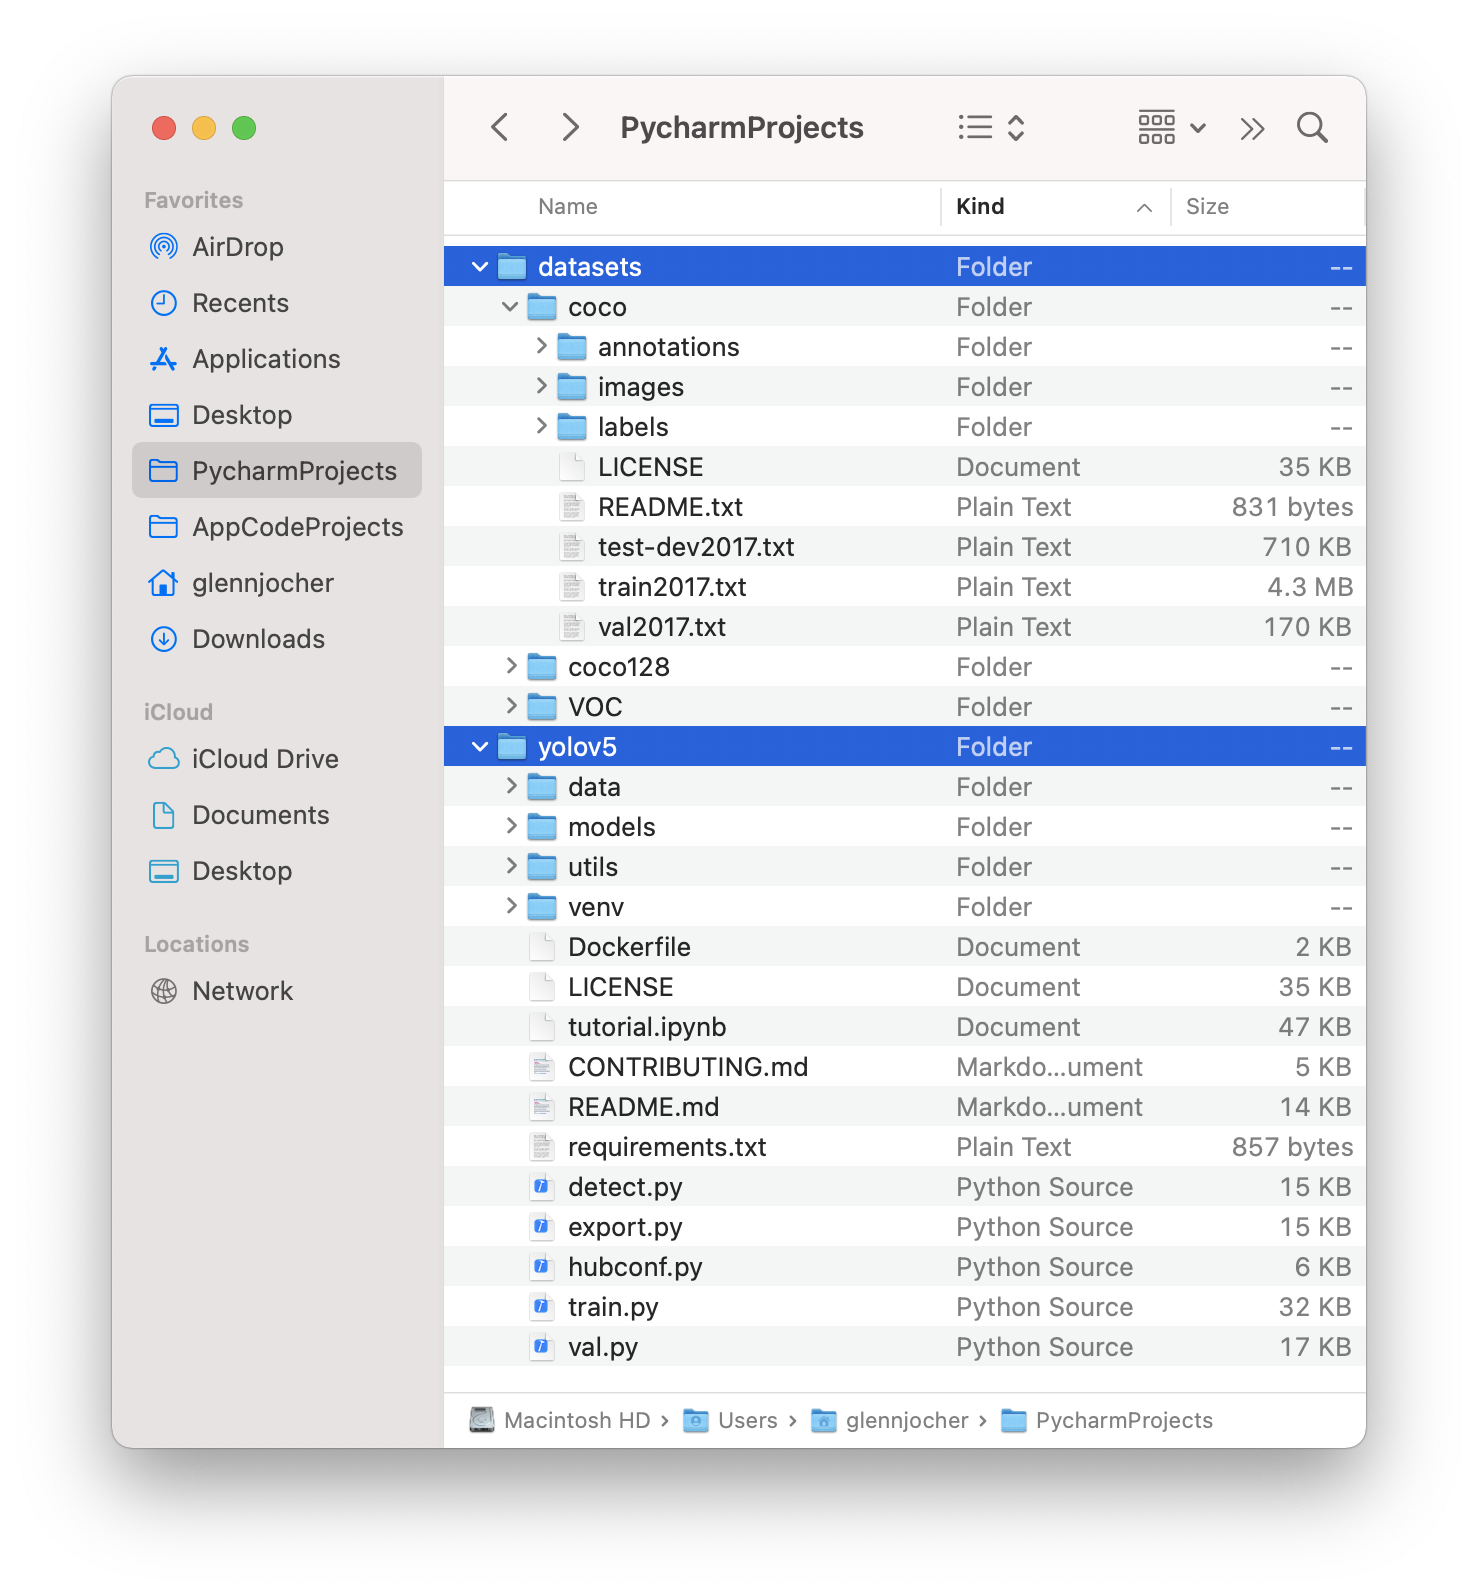
Select a pretrained model to start training from. Here we select YOLOv5s, the second-smallest and fastest model available. See our README table for a full comparison of all models.

Train a YOLOv5s model on COCO128 by specifying dataset, batch-size, image size and either pretrained --weights yolov5s.pt (recommended), or randomly initialized --weights '' --cfg yolov5s.yaml (not recommended). Pretrained weights are auto-downloaded from the latest YOLOv5 release.
# Train YOLOv5s on COCO128 for 3 epochs
$ python train.py --img 640 --batch 16 --epochs 3 --data coco128.yaml --weights yolov5s.pt
💡 ProTip: Add --cache ram or --cache disk to speed up training (requires significant RAM/disk resources).
💡 ProTip: Always train from a local dataset. Mounted or network drives like Google Drive will be very slow.
All training results are saved to runs/train/ with incrementing run directories, i.e. runs/train/exp2, runs/train/exp3 etc. For more details see the Training section of our tutorial notebook.
Comet is now fully integrated with YOLOv5. Track and visualize model metrics in real time, save your hyperparameters, datasets, and model checkpoints, and visualize your model predictions with Comet Custom Panels! Comet makes sure you never lose track of your work and makes it easy to share results and collaborate across teams of all sizes!
Getting started is easy:
pip install comet_ml  # 1. install
export COMET_API_KEY=<Your API Key>  # 2. paste API key
python train.py --img 640 --epochs 3 --data coco128.yaml --weights yolov5s.pt  # 3. train
To learn more about all of the supported Comet features for this integration, check out the Comet Tutorial. If you'd like to learn more about Comet, head over to our documentation. Get started by trying out the Comet Colab Notebook:

ClearML is completely integrated into YOLOv5 to track your experimentation, manage dataset versions and even remotely execute training runs. To enable ClearML:
pip install clearmlclearml-init to connect to a ClearML server (deploy your own open-source server here, or use our free hosted server here)You'll get all the great expected features from an experiment manager: live updates, model upload, experiment comparison etc. but ClearML also tracks uncommitted changes and installed packages for example. Thanks to that ClearML Tasks (which is what we call experiments) are also reproducible on different machines! With only 1 extra line, we can schedule a YOLOv5 training task on a queue to be executed by any number of ClearML Agents (workers).
You can use ClearML Data to version your dataset and then pass it to YOLOv5 simply using its unique ID. This will help you keep track of your data without adding extra hassle. Explore the ClearML Tutorial for details!

Training results are automatically logged with Tensorboard and CSV loggers to runs/train, with a new experiment directory created for each new training as runs/train/exp2, runs/train/exp3, etc.
This directory contains train and val statistics, mosaics, labels, predictions and augmentated mosaics, as well as metrics and charts including precision-recall (PR) curves and confusion matrices.

Results file results.csv is updated after each epoch, and then plotted as results.png (below) after training completes. You can also plot any results.csv file manually:
from utils.plots import plot_results
plot_results('path/to/results.csv')  # plot 'results.csv' as 'results.png'
Once your model is trained you can use your best checkpoint best.pt to:
YOLOv5 may be run in any of the following up-to-date verified environments (with all dependencies including CUDA/CUDNN, Python and PyTorch preinstalled):
![]()
If this badge is green, all YOLOv5 GitHub Actions Continuous Integration (CI) tests are currently passing. CI tests verify correct operation of YOLOv5 training, validation, inference, export and benchmarks on MacOS, Windows, and Ubuntu every 24 hours and on every commit.
Train different tasks at same time.
there always are multi gpu in a machine, We should have been able to train different models at same time, but outputs and results are stored in same directory now, it may be conflict.
split outputs and results include weights in separate directories.
I made a temporary change to train.py so i can train different tasks, but i really hope this funiction will be official support.
tkanks.
    wdir = 'weights' + os.sep + opt.name + os.sep  # weights dir
    if not os.path.exists(wdir):
        os.mkdir(wdir)
    last = wdir + 'last.pt'
    best = wdir + 'best.pt'
    results_dir = 'logs' + os.sep + opt.name + os.sep
    results_file = results_dir + 'results.txt'
A declarative, efficient, and flexible JavaScript library for building user interfaces.
🖖 Vue.js is a progressive, incrementally-adoptable JavaScript framework for building UI on the web.
TypeScript is a superset of JavaScript that compiles to clean JavaScript output.
An Open Source Machine Learning Framework for Everyone
The Web framework for perfectionists with deadlines.
A PHP framework for web artisans
Bring data to life with SVG, Canvas and HTML. 📊📈🎉
JavaScript (JS) is a lightweight interpreted programming language with first-class functions.
Some thing interesting about web. New door for the world.
A server is a program made to process requests and deliver data to clients.
Machine learning is a way of modeling and interpreting data that allows a piece of software to respond intelligently.
Some thing interesting about visualization, use data art
Some thing interesting about game, make everyone happy.
We are working to build community through open source technology. NB: members must have two-factor auth.
Open source projects and samples from Microsoft.
Google ❤️ Open Source for everyone.
Alibaba Open Source for everyone
Data-Driven Documents codes.
China tencent open source team.