


Media is a tool for managing Assets for TYPO3 CMS 6.1 and is logically built on the top of FAL. FAL, for those who are unfamiliar, is a the File Abstraction Layer introduced in TYPO3 6.0 which enables it to handle files in centralised way across the CMS. The basic idea of FAL is that every file has an entry in the database to leverage its use as an asset. Basically, Media provides the following set of features:
- Advanced metadata handling of Assets
- A user friendly BE module
- Mass upload of files and post processing of files
- Multi language handling of metadata
- File permission management
- Automatic Metadata extraction upon upload provided by EXT:metadata
- Integration with the text editor (RTE)
- ...

Home page of the project: https://github.com/fabarea/media
Stable version released on TER: http://typo3.org/extensions/repository/view/media
Development version from Git:
cd typ3conf/ext
git clone https://github.com/fabarea/media.git
Flash news about latest development are also announced on http://twitter.com/fudriot
Download the source code either from the Git repository or from the TER for the stable versions. Install the extension as normal in the Extension Manager.
Some settings, such as default categories applied upon upload, are global and must be configured in the settings of Media in the Extension Manager.
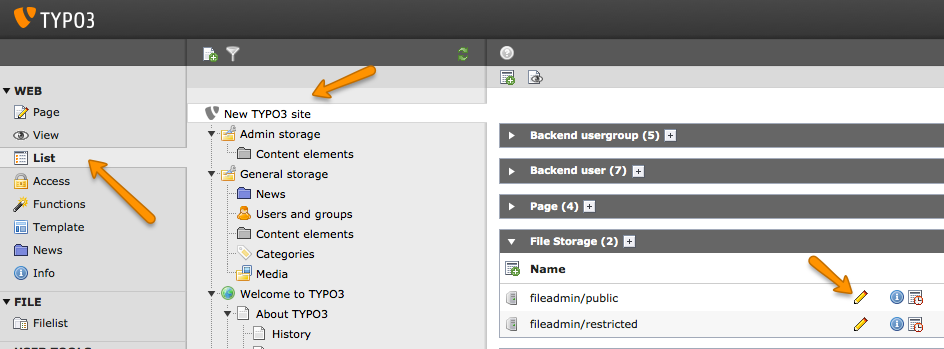
Besides, since Media is multi-storage capable, many settings are to be configured per storage. Make sure they are correctly set. This will not be a problem for new storage created after Media is installed, they will have default values. However, for existing storage, they will be no value.
Edit the settings of a Storage:
Apply different upload settings:
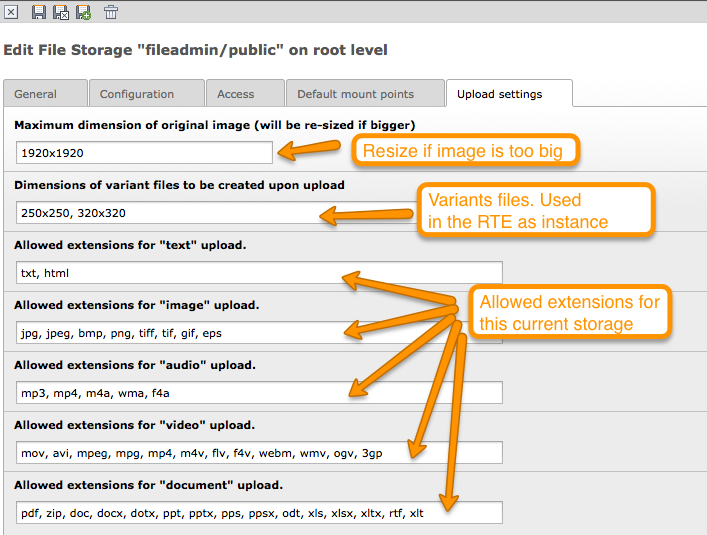
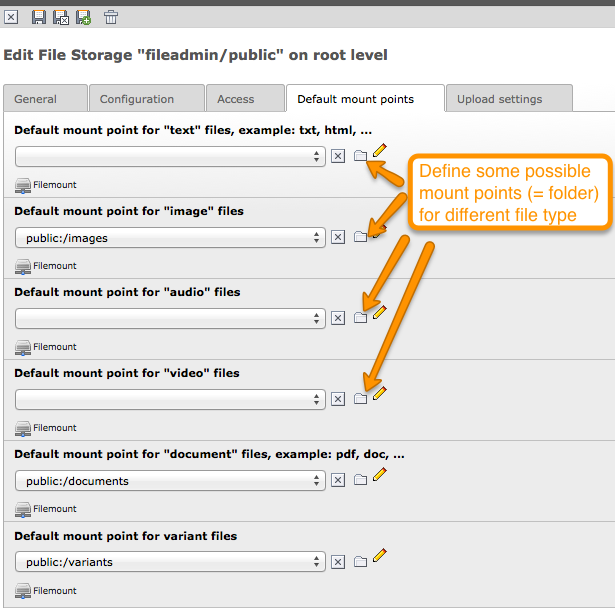
Configured target folder for each file type:
Following option can be set:
# Define whether to use default file picker or the one from Media (default = 1)
options.vidi.enableMediaFilePicker = 1
Please note that PHP setups with the Suhosin patch activated will have a default limit of 100 maximum number of variables that are allowed to be passed in the URL. This limit must be increased to 140:
suhosin.get.max_vars = 140
Important to notice the Media BE module is powered by Vidi which is a List Component for TYPO3 CMS. To know more about Vidi and how to configure the Grid, refer to the Grid chapter.
You can make use of a View Helper to retrieve a bunch of files. Let say we want to display a list of files "png" images coming from the storage "1" along with the associated categories. The code could look like this in your Fluid template:
<strong>Number of files: {v:content.count(matches: {storage: 1}, type: 'sys_file')}</strong>

<f:if condition="{v:content.find(matches: {storage: 1}, type: 'sys_file')}">
        <ul>
                <f:for each="{v:content.find(matches: '{storage: 1}', type: 'sys_file')}" as="file">
                        <li>
                                {file.uid} -
                                {file.metadata.title} -
                                <m:file.thumbnail file="{file}" output="imageWrapped"/>

                                <f:if condition="{file.metadata.categories}}">
                                        <ul>
                                                <f:for each="{file.metadata.categories}" as="category">
                                                        <li>{category.title}</li>
                                                </f:for>
                                        </ul>
                                </f:if>
                        </li>
                </f:for>
        </ul>
</f:if>

{namespace m=Fab\Media\ViewHelpers}
{namespace v=Fab\Vidi\ViewHelpers}
A more complex example here, we want to retrieve the same as before but all files belonging to categories 1,2 sorted by title as addition.
We must provide "aliases" as workaround since Fluid would not parse the expression matches: {metadata.categories: '1,2'} and will return an exception.
<f:for each="{v:content.find(
                                        matches: {storage: 1, extension: 'png', categories: '1,2'},
                                        orderings: {title: 'ASC'},
                                        type: 'sys_file',
                                        aliases: {categories: 'metadata.categories', title: 'metadata.title'}
                                )}"
       as="file">

        <li>..</li>
</f:for>
TODO: long term the aim would be to save a selection in the BE and retrieve on the Frontend as well. However, this is not yet implemented. Looking for some opportunities... ;)
<f:for each="{v:content.find(selection: 'my-selection')}" as="file">

        <li>..</li>
</f:for>
The same can be achieved in a programming way:
// Get the Content Repository for sys_file.
$contentRepository = \Fab\Vidi\Domain\Repository\ContentRepositoryFactory::getInstance('sys_file');

// Initialize a Matcher object.
/** @var \Fab\Vidi\Persistence\Matcher $matcher */
$matcher = \TYPO3\CMS\Core\Utility\GeneralUtility::makeInstance('Fab\Vidi\Persistence\Matcher');

// Add some criteria.
$matcher->equals('storage', '1');
$matcher->equals('metadata.categories', '1'); // "metadata" correspond to the join defined in the TCA of "sys_file".

// etc... you can add more criteria as instance a "like"
$matcher->like('metadata.title', 'foo');

// Fetch the objects.
$files = $contentRepository->findBy($matcher);
The thumbnail API is meant to render a preview of a file independently of its type (image, document, video, ...). Notice, only thumbnail service for "image" and "document" is well implemented. Video and audio are still on the todo list. In case no appropriate thumbnail service is found, a fallback service is called generating a dummy thumbnail.
The Thumbnail View Helper can be used as follow:
    # The minimum required:
    <m:file.thumbnail file="{file}"/>

    # Give more settings to the thumbnail:
    <m:file.thumbnail file="{file}"
            configuration="{width: 800, height: 800}"
            attributes="{class: 'file-thumbnail'}"
            output="image"/>

    # Required attributes:
    # --------------------
    #
    # file="{file}"

    # Default values:
    # ---------------
    #
    # configuration= array()
    # attributes = array()
    # output = image (possible values: "uri", "image", "imageWrapped")
    # preset = NULL

    # Pass some preset as for the dimension. Values can be:
    # - image_thumbnail => '100x100'  (where maximum width is 100 and maximum height is 100)
    # - image_mini => '120x120'
    # - image_small => '320x320'
    # - image_medium => '760x760'
    # - image_large => '1200x1200'
    <m:file.thumbnail file="{file}" preset="image_medium"/>

    {namespace m=Fab\Media\ViewHelpers}

    # Or if your template contains ``<section />``,
    # namespace declaration can be done with xmlns attribute as of TYPO3 6.1:
    <html xmlns:f="http://typo3.org/ns/typo3/fluid/viewhelpers"
            xmlns:m="http://typo3.org/ns/TYPO3/CMS/Media/ViewHelpers">

            <section>
                    <m:file.thumbnail file="{file}" preset="image_medium"/>
            </section>
</html>
Besides the View Helper, a thumbnail can be generated in a programming way. The example illustrates some possibilities. For more insight, refer to the class itself. Here we go:
/** @var $thumbnailService \Fab\Media\Thumbnail\ThumbnailService */
$thumbnailService = \TYPO3\CMS\Core\Utility\GeneralUtility::makeInstance('Fab\Media\Thumbnail\ThumbnailService', $file);
$thumbnail = $thumbnailService
        ->setConfiguration($configuration)
        ->setOutputType(\Fab\Media\Thumbnail\ThumbnailInterface::OUTPUT_IMAGE_WRAPPED)
        ->setAppendTimeStamp(TRUE)
        ->create();

print $thumbnail
<a href="..." target="_blank">
        <img src="..." alt="..." title="..." />
</a>
Tools are registered through the Tool API provided by Vidi in ext_tables.php and can be accessed by clicking the upper right icon in the BE
module. Those tools are visible for Admin only:
\Fab\Vidi\Tool\ToolRegistry::getInstance()->register('sys_file', 'Fab\Media\Tool\MissingFilesFinderTool');
Admin Users have access to a BE module allowing to analyse the index of files. The tool will search for missing files as well as duplicate entries in the database.
The module can be accessed by clicking on the top right icon of the main module. Notice, the same actions can also be performed by CLI and will send a email as report if anything is wrong.:
./typo3/cli_dispatch.phpsh extbase fileIndex:analyse
Tip! Configure a Scheduler Task (under Extbase task) for regularly checking the index and detecting problem early enough.
Generate a bunch of thumbnails in advance to speed up the output of the Media BE module. This process can take a lot of time. Prefer to run the CLI command:
./typo3/cli_dispatch.phpsh extbase thumbnail:generate
In the BE module, File upload is handled by Fine Uploader which is a Javascript plugin aiming to bring a user-friendly file uploading experience over the web. The plugin relies on HTML5 technology which enables Drag & Drop from the Desktop as instance.
On the server side, there is an API which transparently handles whether the file come from an XHR request or a POST request.
# Code below is simplified for the documentation sake.
# Check out for more insight EXT:media/Classes/Controller/AssetController.php @ uploadAction

/** @var $uploadManager \Fab\Media\FileUpload\UploadManager */
$uploadManager = \TYPO3\CMS\Core\Utility\GeneralUtility::makeInstance('Fab\Media\FileUpload\UploadManager');
try {
        /** @var $uploadedFileObject \Fab\Media\FileUpload\UploadedFileInterface */
        $uploadedFileObject = $uploadManager->handleUpload();
} catch (\Exception $e) {
        $response = array('error' => $e->getMessage());
}

$targetFolderObject = \Fab\Media\ObjectFactory::getInstance()->getContainingFolder();
$newFileObject = $targetFolderObject->addFile($uploadedFileObject->getFileWithAbsolutePath(), $uploadedFileObject->getName());
When a image is uploaded, there is a post-processing step where the image can be optimized. By default there are two pre-configured optimizations: resize and rotate. The resize processing will reduce the size of an image in case it exceeds a certain dimension. The maximum dimension allowed is to be configured per storage. The rotate optimizer read the exif metadata and automatically rotates the image. For the auto-rotation features, credits go to Xavier Perseguers where great inspiration was found in one of his extension.
If needed, it is possible to add additional custom optimizers. Notice that the class must implement an interface \Fab\Media\FileUpload\ImageOptimizerInterface and can be added with following code:
\Fab\Media\FileUpload\ImageOptimizer::getInstance()->add('Fab\Media\FileUpload\Optimizer\Resize');
Permissions management is about controlling accessibility of a file. Permissions can be defined on each file under tab "Access" where to connect a File to a Frontend Group.

Notice Media delegates file permission to third party extensions, such as extension naw_securedl. On the long term it should be considered to be used a secure local driver, however.
The extension ships two buttons that can be added at the RTE level for (1) linking a file and (2) inserting an image as part of the content.
The button name references are linkcreator and imageeditor respectively which can be added by TypoScript in Page / User TSConfig:
# Snippet to be copied / pasted in Page TSConfig
# Module List > Right click on a page > tab "Resources" > field "Page TSConfig"
RTE {

        // Default RTE configuration for all tables
        default {

                // Buttons to show
                showButtons := addToList(linkcreator,imageeditor)

                // Toolbar order
                toolbarOrder = bar, linkcreator, bar, imageeditor, ...
        }
}
# key where to define the visible buttons in the RTE
toolbarOrder = bar, linkcreator, bar, imageeditor, ...
Refer to the documentation of extension HtmlArea for more details.
As a basic metadata extractor service, Media will set a title when a file is uploaded or whenever the files get indexed
through the Scheduler task. The metadata title is basically derived from the file name e.g. my_report.pdf will
results as My report. This should help your Editors coping with this metadata and save them some typing.
Of course, the title will only be set, if no value exists beforehand.
Consideration for people migrating from CMS 6.1 to CMS 6.2.
As of Media 3 the asset API part has been removed along with the Asset Repository.
To give a short reason, it did not survive the table split between sys_file and sys_file_metadata
and if any re-implementation should be undertaken, it should be at the Core level.
It means you should migrate the findBy* method to your own repository or you can also take advantage of Vidi which provides flexible Custom Repository. See chapter "Display list of files of category X" above.
The extension provides JS / CSS bundles which included all the necessary code. If you need to make a new build for those JS / CSS files, consider that Bower and Grunt must be installed on your system as prerequisite.
Install the required Web Components:
cd typo3conf/ext/media

# This will populate the directory Resources/Public/WebComponents.
bower install

# Install the necessary NodeJS package.
npm install
Then you must build Fine Uploader from the source:
cd Resources/Public/WebComponents/fine-uploader

# Install the necessary NodeJS package inside "fine-uploader".
npm install

# Do the packaging works. It will create a "_dist" directory containing the build.
grunt package
Finally, you can run the Grunt of the extension to generate a build:
cd typo3conf/ext/media
grunt build
While developing, you can use the watch which will generate the build as you edit files:
grunt watch


