Giter Club home page Giter Club logo

blog's Introduction

πŸš€ Spaghetti code specialist | Python & Django 🐍 | Flutter & React Native πŸ“± | AWS Lightsail Containers ☁️

Hi, I'm Peter, a developer good with Python with a focus on the Django framework, crafting scalable and efficient solutions. For frontend I use Flutter and React Native for seamless cross-platform applications. Most of my solutions are hosted on AWS in Lightsail Containers.

πŸ’» Technical Proficiency:

  • Python & Django: Mastery in developing robust backends.
  • Flutter & React Native: Crafting seamless cross-platform experiences.
  • AWS Lightsail Containers: Specialized expertise in containerized hosting and scaling.

🌐 Collaboration:

Open to merge requests on my projects - show me what you got. Or freelance if you want me on your project as developer or product owner.

πŸ“« Contact:

Let's collaborate! Reach out via email at [email protected] or visit my website petervandoorn.com. πŸ’ΌπŸ’»

blog's People

Contributors

peibolsang avatar team20190405 avatar two-trick-pony-nl avatar

blog's Issues

Bussie

Bussie - Public transport live location tracking

Are you tired of standing at bus stops in the rain, unsure of when the next bus will arrive? Or are you constantly trying to figure out which train will get you to your destination on time? Look no further, as Bussie has got you covered!

Bussie is an innovative new app that shows you the live location of public transport in real-time. Whether you're commuting to work or going on a weekend getaway, Bussie provides you with all the information you need to plan your journey with ease.

With Bussie, you can see the exact location of buses, trains, trams and other forms of public transport in your area. The app updates in real-time, so you'll always have up-to-date information on the expected arrival time of your desired mode of transportation.

Not only does Bussie help you plan your journey, but it also provides you with information on the route, the estimated time of arrival, and the number of stops. This means you can spend less time waiting at the bus stop and more time enjoying your journey.

In conclusion, Bussie is the perfect companion for anyone who relies on public transport. Say goodbye to the frustration of waiting at bus stops and start using Bussie today!

216050534-367d8d3e-f561-4a25-a6cf-6280c79d720e

Why I love working with React Native

React Native is a popular framework for building mobile apps using JavaScript and React. One of the key reasons why React Native is easy to work with is its ability to reuse code across different platforms.

With React Native, developers can write code that can be shared between iOS and Android apps, allowing them to write code once and deploy it to multiple platforms.

This can save a lot of time and effort, as developers don’t have to write separate code for each platform

Instead they can focus on building the app’s functionality. Another reason why React Native is easy to work with is its flexibility and ease of integration with other technologies. React Native allows developers to use any JavaScript library or framework they prefer, and it can also be easily integrated with other popular mobile technologies such as Firebase and GraphQL. This flexibility allows developers to use the tools and technologies they are already familiar with and makes it easier for them to work with React Native. Additionally, React Native has a large and active community, which helps with troubleshooting and finding solutions to any challenges that may arise.

Django + AWS Lightsail + Github Action - How I build Continues Deployment

Building a continues integration pipeline with AWS, Django and Github Actions

On my side projects I need cheap and scalable hosting. I also want to be able to make production changes quick and often, with the flexibility to roll back if something goes wrong. To achieve this I built the following workflow:
Screenshot 2023-04-19 at 17 44 23

Components

Bring in AWS Lightsail

AWS Lightsail offers the AWS Scale without ALL the bells and whistles. It's UI Is simpler but don't let it fool you into thinking it's less capable. You can take your pick from different size of servers as well as have up to 20 replicas. Other plusses are: the ability to keep container images (Break something, just revert to the previous image) and loadbalancing and certificates come straight out of the box.

Django + nginx

Both NGINX and Django, have been around for 20 years. It's battletested and fast enough for my needs. Need to say more? The other upside of NGINX is that you can catch the AWS Lightsail healthcheck without it hitting Django as well as use it to host Django's static files and caching.

Automated testing and code quality

I focus on deploying from this workflow. But it is very simple to add pytest, linting and other CI tools to this workflow. I can highly recommend Snyk and Talisman for security testing and seeing if you spilled secret keyst. I'm very much in prototyping mode right now and therefor those tools bother me more than they help me right now. Once I move to production I'll add those back in, leave a comment if you want me to explain how.

Github Actions

Github is perfect not just for version control. But I also use it for Autscaling and deployment with Github actions. My workflow works as follows:

  1. Work on code
  2. Commit that code
  3. I get a telegram message the deployment started
  4. A github action is triggered to build a new docker container of my django code to my test environment
  5. It also creates another container of NGINX
  6. If that all succeeds it creates a pullrequest
  7. If I accept the pull request the same workflow runs again but then towards production
  8. If anything might happen and the server goes down: Lightsail checks for healthchecks, if none come it automatically reverts back to a previous version.
  9. If no new version comes up I get a text message
  10. If a new version is detectedI get a text message
  • I intend to add the automated pytests in there too, which should be fairly simple from here on.

Separate to that I have a workflow that runs a autoscaler: checking the Lightsail load and adjusts the power in Lightsail accordingly.

Workflow steps:

  1. The workflow starts by getting all my code from Github this is a standard Github Action
  2. I trigger a Telegram message from appleboy/telegram-action workflow
  3. then I update all services to latest version
  4. creating a .env file that is filled with github Secrets. Basically you add secrets in the repository that you can then call from the workflow. This way you don't have to expose your database settings or other keys but the container can still be created.
  5. install the AWS Client --> We need this to create the deployments
  6. Then we log in with the AWS Secrets --> This is done with public key and secret key both can be stored in the github secrets
  7. Then I install the Django dependancies
  8. Then Static files are collected --> This is also the moment to run migrations if you need to
  9. Then we bundle all of this up into a Docker container for Django
  10. Then we upload the image to the lightsail container registry
  11. Then we do the same for nginx
  12. Then we upload both images to AWS and kick of the deployment.

In the standard YML file this looks like this:

  • Take note that some of the commands reference a path in my repository. For instance in my rootfolder, I keep a folder with:
  • SRC for my Django files
  • Infrastructure with all my Devops code, there are also my requirements, AWS files and NGINX config.
    Folder structure of Infrasturcture
β”œβ”€β”€ src (All of my django app)
β”œβ”€β”€ AWS
β”‚Β Β  β”œβ”€β”€ autoscale.py
β”‚Β Β  β”œβ”€β”€ checkdeploymentsuccess.py
β”‚Β Β  β”œβ”€β”€ deploymentconfig.json
β”‚Β Β  β”œβ”€β”€ publicendpoint.json
β”‚Β Β  └── scaleupordown.py
β”œβ”€β”€ Docker
β”‚Β Β  β”œβ”€β”€ DockerfileDEV
β”‚Β Β  └── DockerfilePROD
β”œβ”€β”€ Mixpanel
β”‚Β Β  └── addannotation.py
β”œβ”€β”€ nginx
β”‚Β Β  β”œβ”€β”€ Dockerfile
β”‚Β Β  └── default.conf
└── requirements.txt

The Github Action

name: πŸ§ͺ Triage deployment
on:
  push:
    branches:    
      - '**'        # matches every branch
      - '!master'   # excludes master
permissions:
  contents: read

env:
  AWS_REGION: eu-central-1
  AWS_LIGHTSAIL_SERVICE_NAME: mapmaker 
concurrency:
  group: '${{ github.workflow }} @ ${{ github.event.pull_request.head.label || github.head_ref || github.ref }}'
  cancel-in-progress: true
jobs:
 
  buildcontainers:
    name: 🌎 Deploying to Triage env

    runs-on: ubuntu-latest
    steps:
      - name: πŸ—‚  Getting code from Github
        uses: actions/checkout@v2
      - name: βš™οΈ  Updating to the latest versions
        run: |
          sudo apt-get update
          sudo apt-get install -y jq unzip
      - name: 🀐 Make envfile
        uses: SpicyPizza/[email protected]
        with:
          envkey_EMAIL_HOST_USER: ${{ secrets.EMAIL_HOST_USER_GMAIL }}
          envkey_EMAIL_HOST_PASSWORD: ${{ secrets.EMAIL_HOST_PASSWORD_GMAIL }}
          envkey_DJANGO_SECRET_KEY: ${{ secrets.DJANGO_SECRET_KEY }}
          envkey_DB_USER: ${{ secrets.DATABASE_USER }}
          envkey_DB_PASSWORD: ${{ secrets.DATABASE_PASSWORD }}
          envkey_DB_HOST: ${{ secrets.DATABASE_HOST }}
          envkey_DB_NAME: "mapmaker_dev"
          envkey_HCTI_API_KEY: ${{ secrets.HCTI_API_KEY }}
          envkey_HCTI_API_USER_ID: ${{ secrets.HCTI_API_USER_ID }}
          envkey_MYSQL_ATTR_SSL_CA: ${{ secrets.MYSQL_ATTR_SSL_CA }}
          envkey_SECURE_SETTINGS: True
          envkey_DEBUG: True
          envkey_MIXPANEL_TOKEN: ${{ secrets.MIXPANEL_TOKEN}}
          directory: src/core
          file_name: .env
          fail_on_empty: false
      - name: 🏒 Install Amazon Client
        run: |
          curl "https://awscli.amazonaws.com/awscli-exe-linux-x86_64.zip" -o "awscliv2.zip"
          unzip awscliv2.zip
          sudo ./aws/install || true
          aws --version
          curl "https://s3.us-west-2.amazonaws.com/lightsailctl/latest/linux-amd64/lightsailctl" -o "lightsailctl"
          sudo mv "lightsailctl" "/usr/local/bin/lightsailctl"
          sudo chmod +x /usr/local/bin/lightsailctl
      - name: 🀐 Log in to AWS Lightsail with Secrets
        uses: aws-actions/configure-aws-credentials@v1
        with:
          aws-region: ${{ env.AWS_REGION }}
          aws-access-key-id: ${{ secrets.AWS_ACCESS_KEY_ID }}
          aws-secret-access-key: ${{ secrets.AWS_SECRET_ACCESS_KEY }}
      - name: Installing dependancies
        run: |
          sudo pip3 install --upgrade pip
          sudo pip3 install -r Infrastructure/requirements.txt
      - name: πŸ“¦ Collecting all static files
        run: |
          python3 src/manage.py collectstatic --noinput
          python3 src/manage.py makemigrations --noinput
          python3 src/manage.py migrate --noinput
      - name: 🐳 Create a Docker Container for DJANGO
        run: docker build -t mapmakerdev:latest -f ./Infrastructure/Docker/DockerfileDEV .
      - name: πŸ“¬ Upload Backend image to AWS container register
        run: |
          service_name=${{ env.AWS_LIGHTSAIL_SERVICE_NAME }}
          aws lightsail push-container-image \
            --region ${{ env.AWS_REGION }} \
            --service-name ${service_name} \
            --label mapmakerdev \
            --image mapmakerdev:latest
      - name: 🐳 Create a Docker Container for NGINX
        run: docker build -t nginx:latest -f ./Infrastructure/nginx/Dockerfile .
      - name: πŸ“¬ Upload NGINX image to AWS container register
        run: |
          service_name=${{ env.AWS_LIGHTSAIL_SERVICE_NAME }}
          aws lightsail push-container-image \
            --region ${{ env.AWS_REGION }} \
            --service-name ${service_name} \
            --label nginx \
            --image nginx:latest
      - name: =========== All done. Cleaning up ♻️  ===========
        run: ls
      - name: Build Alerts
        if: ${{ failure() }}
        uses: appleboy/telegram-action@master
        with:
          to: ${{ secrets.TELEGRAM_CHAT }}
          token: ${{ secrets.TELEGRAM_TOKEN }}
          message: |
            🚨 Deployment failed 🚨
            Build ${{ github.run_id }} failed
            Something went wrong while building the NGINX container the containers to AWS. See the details here:
            ${{ github.server_url }}/${{ github.repository }}/actions/runs/${{ github.run_id }}
      - name: πŸš€ Launching the Containers
        run: |
          aws lightsail create-container-service-deployment --service-name ${{ env.AWS_LIGHTSAIL_SERVICE_NAME }} \
          --containers file://Infrastructure/AWS/deploymentconfig.json \
          --public-endpoint file://Infrastructure/AWS/publicendpoint.json
            
  pull-request:
    needs: [buildcontainers]
    name: πŸ”ƒ Creating Pull request to merge with Master
    runs-on: ubuntu-latest
    steps:
      - uses: actions/checkout@v3
      - name: pull-request
        uses: repo-sync/pull-request@v2
        with:
          destination_branch: "master"
          assignees: "two-trick-pony-NL"
          pr_title: "πŸ€– Merge and Deploy ${{ github.ref }}"
          pr_body: "Verify the code is working on triage.mapmaker.nl If you merge this pull-request the code will be deployed to production. Check out the changes here: https://github.com/${{ github.repository }}/commit/${{github.sha}}"
          pr_label: "automatic-pullrequest"
          github_token: ${{ secrets.GH_TOKEN }} 

Lightsail specific commands:

In the workflow file above you'll see 2 commands:

      - name: πŸ“¬ Upload NGINX image to AWS container register
        run: |
          service_name=${{ env.AWS_LIGHTSAIL_SERVICE_NAME }}
          aws lightsail push-container-image \
            --region ${{ env.AWS_REGION }} \
            --service-name ${service_name} \
            --label nginx \
            --image nginx:latest
         

and

      - name: πŸš€ Launching the Containers
        run: |
          aws lightsail create-container-service-deployment --service-name ${{ env.AWS_LIGHTSAIL_SERVICE_NAME }} \
          --containers file://Infrastructure/AWS/deploymentconfig.json \
          --public-endpoint file://Infrastructure/AWS/publicendpoint.json

These are basically call to the AWS API using the AWS CLI tool. The AWS_LIGHTSAIL_SERVICE_NAME is set in your github secrets as well as your AWS Access keys so you can actually log in.

Then we reference 2 files that specify how we want the containers to be deployed. See my folder structure above but basically it's 2 json files:
This first one describes what images should be used, and what ports to open. I have 3 containers, 1 prod, 1 dev and one NGINX as reverse proxy. But feel free to add REDIS or a database.

{"prod-mapmaker-django": {
    "image": ":mapmaker.mapmaker.latest",
    "ports": {"8000": "HTTP"}
  },
  "dev-mapmaker-django": {
    "image": ":mapmaker.mapmakerdev.latest",
    "ports": {"8080": "HTTP"}
  },
  "mapmaker-nginx": {
    "image": ":mapmaker.nginx.latest",
    "ports": {"80": "HTTP"}
  }
  }

And this second one tells lightsail what the public endpoint should be. Basically: where to send all traffic. I made it a NGINX reverse proxy so I can split traffic. You also specify which endpoint to use fo the healthcheck. Mine just talks to NGINX so that my django logs don't have entries every few seconds.

{
    "containerName": "mapmaker-nginx",
    "containerPort": 80,
    "healthCheck": {
      "healthyThreshold": 2,
      "unhealthyThreshold": 10,
      "timeoutSeconds": 60,
      "intervalSeconds": 300,
      "path": "/healthcheck",
      "successCodes": "200-299"
  }
  }

Drawbacks:

consider that containers are emphemeral: basically they are throwaway. So don't store data or images in them. Otherwise the next time you deploy these will be gone. Use S3 buckets and a external database for that persistant information. It is also recommended that you do authentication in Django through the database as this allows you to add nodes in lightsail. This way each node can talk to any user and check in the database if they are logged in.

Frankly App

Ask for feedback without asking for too much

We've all been there - gathering feedback from customers can be a real hassle. As a developer I wondered, can't this be done in an easier way? With Frankly, it's now easier and more efficient than ever before!

Frankly offers a unique solution to collecting customer feedback through a seamless, multi-channel approach. You can easily get feedback through text, email and even QR codes.

With Frankly, you can send out a feedback request to your customers through a simple text message or email. They can then respond with their thoughts and opinions in real-time, providing you with valuable insights into their experience with your product or service.

And that's not all - Frankly also offers the option to use QR codes for feedback collection. Simply place a QR code at your store, restaurant, or any other location and let your customers scan it to provide their feedback. This feature is especially useful for in-person interactions and events, where collecting feedback on-the-spot is essential.

Frankly is designed with simplicity and convenience in mind. The platform is user-friendly and easy to navigate, so you can focus on gathering feedback and making improvements, rather than navigating complex software.

In conclusion, Frankly is the perfect solution for businesses looking to collect valuable customer feedback in a fast, convenient, and efficient manner. Say goodbye to the hassle of feedback collection and start using Frankly today!

Regenerate respons

Screenshots

Schermafbeelding 2022-05-23 om 14 46 48

Schermafbeelding 2022-05-23 om 14 45 53

WhatsApp Image 2022-03-30 at 6 30 49 PM
WhatsApp Image 2022-03-30 at 8 51 00 PM

Python 101

Python is a powerful and versatile programming language that is widely used for a variety of tasks, from web development to data analysis and machine learning. Whether you're a beginner looking to get started with coding or an experienced developer looking to add another language to your toolkit, learning Python can be an incredibly valuable investment.

One of the best things about Python is its simplicity and readability. The language is designed to be easy to understand, with a simple and consistent syntax that makes it easy to write and understand code. This makes it an excellent choice for beginners who are new to coding, as well as for experienced developers who want to learn a new language quickly.

Another great thing about Python is its versatility.

Python is used in a wide range of industries, including finance, healthcare, and education.

It's also commonly used for data analysis and machine learning, which makes it a great option for anyone interested in working in these fields.

To get started learning Python, there are plenty of resources available. One of the best places to start is with a beginner-friendly tutorial or course, such as Codecademy's Python course, which is designed to take you through the basics of the language and get you started with your first Python projects. Another great resource is the official Python documentation, which provides detailed information on the language and its various libraries and modules.

For more advanced learners, there are plenty of books and online tutorials available that cover more advanced topics such as machine learning, data analysis, and web development. Some popular books for learning Python include "Python Crash Course" by Eric Matthes, "Fluent Python" by Luciano Ramalho and "Python Machine Learning" by Sebastian Raschka and Vahid Mirjalili.

count = 1
while count <= 10:
    print(count)
    count += 1

Ultimately, learning Python is a great investment for anyone looking to improve their coding skills and open up new career opportunities. With its simplicity, readability and versatility, Python is a language that is well worth learning.

Photo Scavenger Backend

Photoscavenger API!

Already more than 100 downloads in less than 5 weeks!

This is the FastAPI backend that supports my PhotoScavenger Apps. It can detect certain objects from pictures. This API serves my iOS/Android apps for the game here: https://photoscavenger.petervandoorn.com
API dashboard is here: https://photoscavenger.vdotvo9a4e2a6.eu-central-1.cs.amazonlightsail.com/

Here is a in-game screenshot:

ezgif com-gif-maker

What does it do:

This backend can check images to see if a certain object is on the picture. For instance: you can check if there is a cat on a particular photo. The backend will then return a false or true for that object depending on whether it was found. It will also return a list objects it managed to find. This allows you validate in case of false negatives, to see what the model thought was on the picture. See an example below.

How does it work:

you make a POST request with a image in the formdata (content type 'file').
For instance this image:

Schermafbeelding 2022-06-18 om 11 26 33

and it returns an image with the detected objects:
scanned_imagee0dee0c1-3512-4617-8a3d-4d19b80c85e7

How to run:

Simply clone the repo and run:

gh repo clone two-trick-pony-NL/ScanGameBackend && cd ScanGameBackend
uvicorn main:app --host 0.0.0.0 --port 80 --reload

V1 vs V2

The V1 API has 18 objects to be detected and V2 can detect 80 different objects
Their endpoinsta are:

Request / Response -- Local

Call

http://localhost:80/v2/uploadfile/bicycle

or

http://localhost:80/uploadfile/person

Response (for bicycle)

{
    "Searchedfor:": "person",
    "Wasfound": "YES",
    "OtherObjectsDetected": [
        "person",
        "person",
        "person",
        "person",
        "chair",
        "person",
        "chair",
        "boat",
        "bird",
        "person",
        "person"
    ],
    "Processed_FileName": "imagecfb104fe-8347-4ef5-b733-2a0d3d8e6b88.jpg"
}

Supported objects in V1

["background", "earoplane", "bicycle", "bird", "boat", "bottle", "bus", "car", "cat", "chair", "cow", "diningtable", "dog", "horse", "motorbike", "person", "pottedplant", "sheep", "sofa", "train", "tvmonitor"]

Supported objects in V2

person
bicycle
car
motorcycle
airplane
bus
train
truck
boat
traffic light
fire hydrant
stop sign
parking meter
bench
bird
cat
dog
horse
sheep
cow
elephant
bear
zebra
giraffe
backpack
umbrella
handbag
tie
suitcase
frisbee
skis
snowboard
sports ball
kite
baseball bat
baseball glove
skateboard
surfboard
tennis racket
bottle
wine glass
cup
fork
knife
spoon
bowl
banana
apple
sandwich
orange
broccoli
carrot
hot dog
pizza
donut
cake
chair
couch
potted plant
bed
dining table
toilet
tv
laptop
mouse
remote
keyboard
cell phone
microwave
oven
toaster
sink
refrigerator
book
clock
vase
scissors
teddy bear
hair drier
toothbrush

Getting a new assignment

Note: Corrospond the right assignment API with the correct image detector API. As the V1 version will only know the 18 classes that AI model has. Also, the integer at the end of the call is the score the player currently has. The higher the score the more difficult the object is to find.

V1

http://localhost:8000/newassignment/2000

V2

http://localhost:8000/v2/newassignment/2000

response:

{"dog":"πŸ•"}

Monitoring deployment

Here is my command to keep track of deployment

gh run watch && watch -n 5 aws lightsail get-container-log --service-name photoscavenger --container-name photoscavenger --filter-pattern deployment

How I Automated investing through bunq, Zapier, DeGiro and a bit of Node.js

2020 is just a few weeks old, so I took the opportunity to reflect on my spending habits and reset my expenses in line with the goals of the new year. Usually this is a bit of a tedious task, but not this year. Because not only did January bring around a ton of new-years resolutions, it was also the month that ended with bunq update 13. bunq is one of the hottest fintechs around and it is basically a bank run as an IT company. bunq offers a full API and in their latest update they even introduced an integration with Zapier as well as a payment sorter that splits out your income over several sub-accounts. Mind you: We’re talking about a bank with an API and Zapier integration 😍.

The combination of these things makes that I found myself the perfect weekend project, with the goal to fully automate my finances. πŸ€–

bunq is one of the hottest fintechs around. It is basically a bank run as an IT company.

Current Set Up

As a financially responsible adult, I try to save up some money every month and move any surplus over to an investment account at DeGiro. This is a manual process and I do not like that. The main reason for disliking this is that every time I want to transfer money to DeGiro, I start negotiating with myself on the exact amount that I want to invest that month. The outcome: I invest less than I want. Because there is always a reason to buy XYZ.

Even worse: every time I log into DeGiro I see how my investments are doing. When they are doing good I start to think: β€œShould I take some of the profits now?”. When they are doing bad I think: β€œShould I sell?”. This is completely against the strategy that I had when I started investing. Which was:

Don’t time the market. So I intend to do Dollar-Cost averaging every month(read more on that here).
Sit out the bumps and look at the long term. So I decided to at least not touch it for 10 years*.

TL:DR By manually managing my investments, I save less than I want and fail to stick to my long-term investment strategy.

*I failed miserably at that in 2019 and took some money out of my portfolio.πŸ€¦πŸ»β€β™‚οΈ

The Goal

After concluding that my involvement does not bring me where I want to be, I see no other option than to remove me from the process and automate all of it. πŸŽ‰

This is the intended set up:

My paycheck comes in on bunq πŸ’Έ
The bunq salary sorter splits my paycheck over several bank accounts within bunq. (For rent, gasoline, groceries, Netflix and beer money 🍻)
The remainder is put into my savings. This money is for unexpected bills, holidays and will cover me for at least a few months in case I lose my job.
The surplus over a set limit moves to my account at DeGiro
Every 1st of the month the cash in DeGiro is invested in line with the strategy I intended.
When I’m old and grey. I’ll be loaded. πŸ€‘πŸ’Ή

Step 1. Getting the money automatically into DeGiro

Setting up the payment sorter could not be easier. Whenever your salary comes in bunq will prompt you to sort the amount over different sub-accounts. The next time you get your paycheck, it will sort automatically πŸ€–.

More information on the payment sorter can be found on bunq’s forum.

If you do not have bunq, you can always just schedule a regular SEPA transfer to your DeGiro Account, but apart from bunq there is no bank that supports draft payments through Zapier so bonus points for bunq.

Setting up Zapier

With Zapier you can connect your favorite apps to one another. In my case I connected bunq to bunq with some logic in between. The goal here is:

Whenever the balance of my savings account is updated, it triggers to do:

Check if the amount is more than €5.000,-
If it is more than €5.000,-
Calculate the surplus that should be transferred by subtracting:
Balance β€” 5.000 = Surplus

Move the surplus to the verified IBAN that is known to DeGiro (they only allow you to transfer from 1 account, I bet to prevent money laundering)
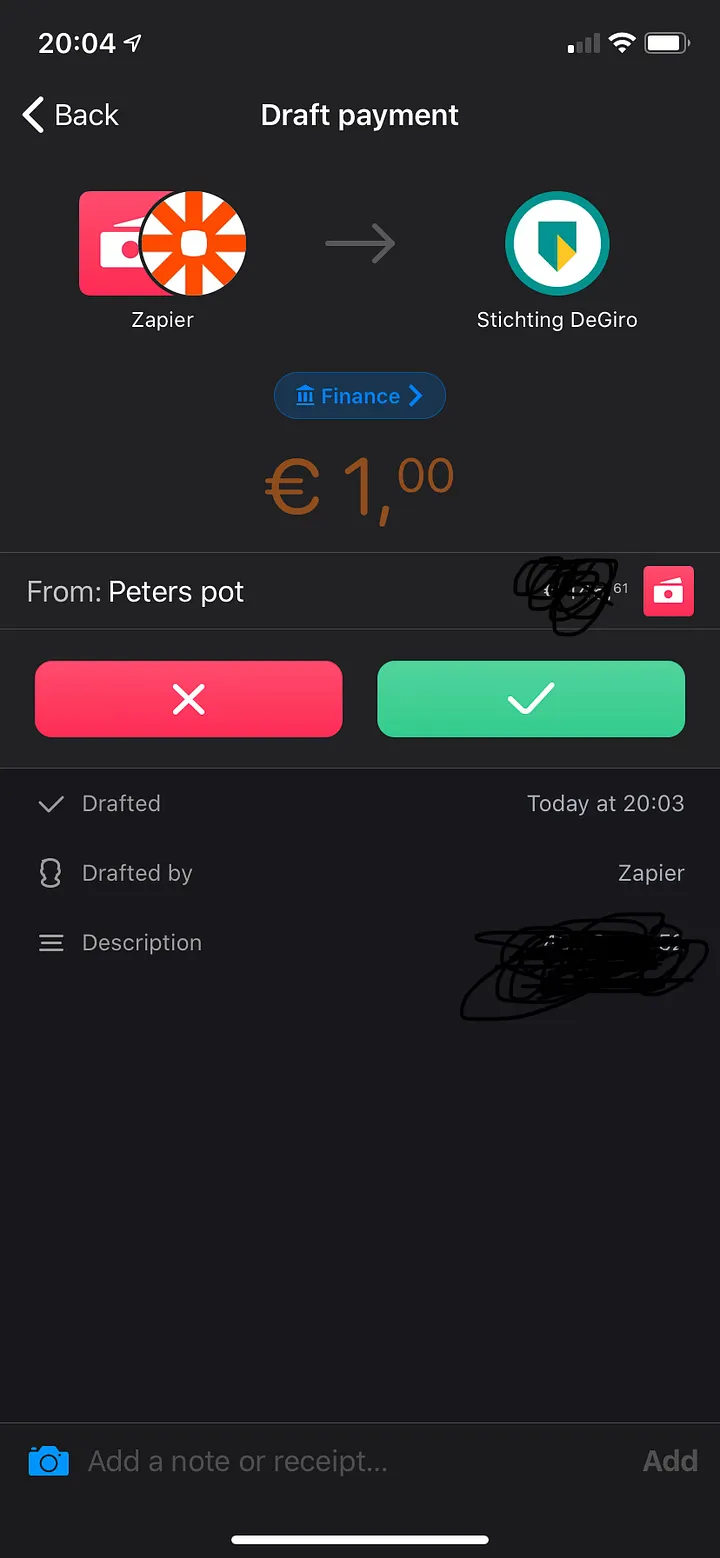
Create a draft Payment towards DeGiro. The advantage of the draft payment is that money never can leave my account without my approval
In Zapier this looks like this:

Approving draft payment

Now every time the balance of my savings account is updated and the balance is more than €5.000, the app will ask me to approve a payment to DeGiro. That looks like this:

Step 2: Automating Purchases in DeGiro

Now we managed to automatically move part of my paycheck into a savings account and then the surplus of the savings over to DeGiro. The next step is to invest the money that arrived in DeGiro in the products that I’d like to purchase.

DeGiro does not have an API, or Zapier integration like bunq does, but there are some people on the internet that did a terrific job on explaining how to set this up. I read into Bramton’s implementation for Python, but after fiddling about I decided to go with the node.js implementation that Pladaria wrote. To both: Many thanks for your incredible work πŸ‘ŒπŸ».

In order to get the script running, I needed a couple of things:

You will need to install NPM or YARN to your desktop or server if you do not have that already. This took me some time, as I never played around with node.js before. More on installing NPM here
Then you can install the package for DeGiro from the command line interface

using npm

npm install --save degiro

using yarn

yarn add degiro
Then download Pladaria’s files (here) and install them to a folder that you want to run them from
In that folder you’ll find some great examples and I used the buy.js file for example. But there is also a sell.js or get-client-info.js
In the file, you replace your DeGiro username and password and the type of product that you want to purchase. (Do keep in mind that these credentials give access to your account at DeGiro, so I highly recommend adding in the 2FA on your account). Instead of pasting your username and password you can also parse them along in the command. Here is the .js file:

const DeGiro = require('..');
// Set your username and password below or run from terminal as:
// DEGIRO_USER=username DEGIRO_PASS=password node examples/buy.js
const degiro = DeGiro.create({
    // username: 'your-username',
    // password: 'your-password',
});
degiro.login().then(() =>
    degiro.setOrder({
        buySell: DeGiro.Actions.buy,
        orderType: DeGiro.OrderTypes.limited,
        productId: '8066561', // Google
        timeType: DeGiro.TimeTypes.permanent,
        size: 1,
        price: 900,
    })
        .then(console.log)
        .catch(console.error));

Now you can run the command from the command line to see if it works.
node buy.js
It should output something like this if it worked:

{ orderId: '6e5cfad6-bd40-42e0-9bab-8t38d7f1f0pf' } When logging in to DeGiro we can confirm that it worked. In the order overview you should see that the transaction was successful:

Pro tip: if you build this over the weekend, you can order as much as you like. The orders are not executed since the markets are closed. You can then cancel the order from the DeGiro interface or leave them to be executed.

Step 3: Scheduling the purchase of shares

Now that we managed to trigger a transaction from our Command Line, we need to think about how to schedule this. I like the command to run on every first day of the month.

I first figured to trigger the task from my macbook using automator. But what if I was on a holiday or forget the task, then my command would not run. So not the best solution. A cronjob is also an option, however then it will not run if your computer is turned off. So I’ve decided to move to the clou

The easiest option for me was a Google Cloud Instance and to start the Cronjob from there. You just have to install NPM and node again on the cloud instance. If you have your own server (read Raspberry pi) running or have an AWS instance, you should be able to do the very same thing.

That’s it

And that’s it, fully automated my savings and investing. Many thanks to all the great people sharing their experiences on the internet.

A word about security and investing:

You can lose part of the money you invest, I specifically did not go into details on what stocks I invest in. The internet is full of tips. This is a decision everyone should make for theirself. The only advise I can give: spread your risk and keep a diverse portfolio. Never invest with money you cannot afford to lose.

I do not accept any responsibility for damages as a result of using the software mentioned above. You are free to try it out but at your own risk. I suggest testing with small amounts and use cheap stocks.

Future goals

I’ll let this job run for some time and if it works as intended, I’ll probably fix the 2 factor authentication and set up some system that will inform me when the the command is executed. If that all works I might hook up some algorithmic trading.

Building a dragable Hexagon Grid with HTMX and Django

The idea:

image

Creating a draggable grid can be a challenging task if you don't know JavaScript. However, a few weeks ago, a friend of mine asked me to build him a draggable hexagonal grid, and the catch was that I didn't know any JavaScript. I had to come up with a solution, and after some research, I found a way to create a hexagonal grid with plain CSS and HTMX.

First, I searched for other people who have built hexagonal grids with plain CSS before and came across an incredible post that helped me create the hexagonal grid.

With HTMX sortable, I was able to create a list of items that I could drag around. However, a list is not a grid. But, if you wrap a list in rows and columns, you end up with a grid. Every time you drag a tile around, the new order of the hexagons is posted to the server, which stores it in the backend so that the grid stays persistent.

For the backend, I used Django, which receives a call every time the grid is updated. The frontend also polls for the order of the grid to ensure it is up to date, even if multiple users look at it at the same time.

To put the code together, I added some JINJA templating with partials so that different types of cards end up with different colors and icons to match my design. I also added CSS for the hexagons andHTMX Headers for refreshing.

Overall, creating a draggable hexagonal grid without knowing JavaScript was possible thanks to CSS and HTMX.

Here is the code

<style type="text/css">
    .gridmain {
        display:flex;
        flex-wrap: nowrap;
        --s: 100px;  /* size  */
        --m: 1px;    /* margin */
        --f: calc(1.732 * var(--s) + 4 * var(--m)  - 1px);
        padding-bottom: 50px;
    }

    .gridcontainer {
      font-size: 0; /*disable white space between inline block element */
      width: 1800px; /* We need a fixed size so we know that the divs won't overflow*/
      height: 1200px; /* We need a fixed size so we know that the divs won't overflow*/
    }

    .gridcontainer div {
      width: var(--s);
      margin: var(--m);
      height: calc(var(--s)*1.1547); 
      display: inline-block;
      font-size:initial;
      clip-path: polygon(0% 25%, 0% 75%, 50% 100%, 100% 75%, 100% 25%, 50% 0%);
      margin-bottom: calc(var(--m) - var(--s)*0.2885); 
      overflow: hidden;
    }
    /*
    .gridcontainer div:nth-child(odd) {
      background:green;
    }
    */
    .gridcontainer::before {
      content: "";
      width: calc(var(--s)/2 + var(--m));
      float: left;
      height: 120%;
      shape-outside: repeating-linear-gradient(     
                       #0000 0 calc(var(--f) - 3px),      
                       #000  0 var(--f));
    }
    .hexagonhidden {
        padding-top: 50px;
        text-align: center;
        vertical-align: middle;
        color: #fff;
        font-size: 1;
        
    }
    .hexagonhidden:hover{
        background-color:#78E7BF;
        opacity: 0.5;
        padding-top: 45px;
    }
    .hexagon {
        padding-top: 10px;
        text-align: center;
        vertical-align: middle;
        color: #000000;
    }
</style>

<div hx-get="/dashboard/update" hx-target="#grid" hx-trigger="every 4s" hx-swap="morphdom"></div>
<div id="drawer"></div>
<div style="z-index: 999;" id="modal"></div>
<div id="grid" class="gridmain">
        <form class="gridcontainer sortable" hx-post="/dashboard/update" hx-trigger="end">
        {% for card in cards %}
        {% if card.cardtype == 'empty' %}
            <div class="hexagonhidden" hx-get="/card/{{ card.id }}/create" hx-trigger="dblclick" hx-target="#modal"><input type='hidden' name='item' value='{{ card.id}}'/>   
                <i class="fa-regular fa-2xl fa-plus"></i><br>         
            </div>
        {% elif card.cardtype == 'ambition' %}
            <div class="hexagon" hx-target="#drawer" hx-get="/card/{{ card.id }}/open" style="background: #000000; color: #fff"><input type='hidden' name='item' value='{{ card.id}}'/>            
                <i class="fa-solid fa-xl fa-eye"></i><br>
                {{ card.title|truncatechars:20}}
            </div>
        {% elif card.cardtype == 'challenge' %}E6799D
            <div class="hexagon" hx-target="#drawer" hx-get="/card/{{ card.id }}/open" style="background: #E6799D;"><input type='hidden' name='item' value='{{ card.id}}'/>            
                <i class="fa-regular fa-xl fa-mountain"></i><br>
                {{ card.title|truncatechars:20}}
            </div>
        {% elif card.cardtype == 'idea' %}
            <div class="hexagon"  hx-target="#drawer" hx-get="/card/{{ card.id }}/open" style="background: #51c1ff;"><input type='hidden' name='item' value='{{ card.id}}'/>            
                <i class="fa-regular fa-lightbulb fa-xl"></i><br>
                {{ card.title|truncatechars:20}}
            </div>
        {% elif card.cardtype == 'pro' %}
            <div class="hexagon"  hx-target="#drawer" hx-get="/card/{{ card.id }}/open" style="background: #ffeb39;"><input type='hidden' name='item' value='{{ card.id}}'/>            
                <i class="fa-solid fa-circle-up fa-xl"></i><br>
                {{ card.title|truncatechars:20}}
            </div>
            {% elif card.cardtype == 'con' %}
            <div class="hexagon" hx-target="#drawer" hx-get="/card/{{ card.id }}/open" style="background: red;"><input type='hidden' name='item' value='{{ card.id}}'/>            
                <i class="fa-solid fa-circle-down fa-xl"></i><br>
                {{ card.title|truncatechars:20}}
            </div>
        {% endif %}
        {% endfor %}
        </form>
    </div>
</div>

<!--Zoom function-->
<script>
function setZoom(zoom,el) {
    
    transformOrigin = [0,0];
    el = el || instance.getContainer();
    var p = ["webkit", "moz", "ms", "o"],
        s = "scale(" + zoom + ")",
        oString = (transformOrigin[0] * 100) + "% " + (transformOrigin[1] * 100) + "%";

    for (var i = 0; i < p.length; i++) {
        el.style[p[i] + "Transform"] = s;
        el.style[p[i] + "TransformOrigin"] = oString;
    }

    el.style["transform"] = s;
    el.style["transformOrigin"] = oString;
    
}

//setZoom(5,document.getElementsByClassName('container')[0]);

function showVal(a){
    var zoomScale = Number(a)/10;
    setZoom(zoomScale,document.getElementsByClassName('gridcontainer')[0])
}
</script>

Then in my view.py in django I have a endpoint that figures out what session is active, and sends the correct grid order to the user on GET requests. For POST request it updates the order of the grid to the database.

def handle_grid_update(request):
    if request.method == "POST":
        current_user = request.user
        current_workshop = current_user.active_workshop
        response = request.body.decode("utf-8")
        list_of_nodes_ordered = re.findall(r'\d+', response)
        jsonStr = json.dumps(list_of_nodes_ordered)
        t = Workshop.objects.get(id=current_workshop.id)
        t.card_order = jsonStr
        t.save() 
        return HttpResponse(status=204)
    elif request.method == "GET":
        current_user = request.user
        current_workshop = current_user.active_workshop
        cards = Card.objects.filter(workshop=current_workshop)
        if not current_workshop.card_order:
            ordered_cards = cards
        else:
            get_card_order_list = ast.literal_eval(current_workshop.card_order)
            order_cards = Case(*[When(pk=pk, then=pos) for pos, pk in enumerate(get_card_order_list)])
            ordered_cards = cards.filter(pk__in=get_card_order_list).order_by(order_cards)
        context = {'cards': ordered_cards }
        return render(request, 'grid.html', context)
    else:
        return HttpResponse(status=403)

def close(request):
    print("Card Closed")
    return render(request, 'empty.html')

PhotoScavenger

Introducing PhotoScavenger - Find, Photograph, Score!

Are you tired of playing the same old boring games on your phone? Look no further, as PhotoScavenger is here to bring some excitement to your life!

PhotoScavenger is a unique new app that combines photography and gaming to create a one-of-a-kind experience. The objective of the game is to photograph specific objects, creatures or landmarks and earn points for each successful find.

With PhotoScavenger, you can explore your surroundings in a whole new way. Whether you're walking down the street or taking a road trip, you'll be on the lookout for interesting things to photograph. And the best part? You'll earn points for each object you successfully capture, which you can use to compete with friends and family.

PhotoScavenger is designed to be fun and easy to play, with a user-friendly interface that makes it simple to participate. The app is also social, allowing you to share your photos with friends and see how they're doing on the leaderboard.

So why not put your photography skills to the test and see if you have what it takes to become a PhotoScavenger champion? Download the app today and join the adventure!

Download now

here

Here is a in-game clip:

183674037-eca7cc9b-4a19-494c-a449-af638fdd869c

ezgif com-gif-maker

Recommend Projects

  • React photo React

    A declarative, efficient, and flexible JavaScript library for building user interfaces.

  • Vue.js photo Vue.js

    πŸ–– Vue.js is a progressive, incrementally-adoptable JavaScript framework for building UI on the web.

  • Typescript photo Typescript

    TypeScript is a superset of JavaScript that compiles to clean JavaScript output.

  • TensorFlow photo TensorFlow

    An Open Source Machine Learning Framework for Everyone

  • Django photo Django

    The Web framework for perfectionists with deadlines.

  • D3 photo D3

    Bring data to life with SVG, Canvas and HTML. πŸ“ŠπŸ“ˆπŸŽ‰

Recommend Topics

  • javascript

    JavaScript (JS) is a lightweight interpreted programming language with first-class functions.

  • web

    Some thing interesting about web. New door for the world.

  • server

    A server is a program made to process requests and deliver data to clients.

  • Machine learning

    Machine learning is a way of modeling and interpreting data that allows a piece of software to respond intelligently.

  • Game

    Some thing interesting about game, make everyone happy.

Recommend Org

  • Facebook photo Facebook

    We are working to build community through open source technology. NB: members must have two-factor auth.

  • Microsoft photo Microsoft

    Open source projects and samples from Microsoft.

  • Google photo Google

    Google ❀️ Open Source for everyone.

  • D3 photo D3

    Data-Driven Documents codes.