Giter Club home page Giter Club logo

traefikturkey / onramp Goto Github PK

View Code? Open in Web Editor NEW
87.0 7.0 17.0 1.31 MB

Traefik with all the stuffing. Onramp is a docker compose setup designed to allow users to get up to speed quickly and securely using Traefik, LetsEncrypt, Cloudflare Tunnels and other popular self hosted home lab services.

License: GNU General Public License v2.0

Makefile 82.43% Shell 17.57%
traefik docker docker-compose traefik-docker cloudflare cloudflare-dns letsencrypt homelab homelab-setup make

onramp's Introduction

A docker-compose setup of common services with Traefik using Cloudflare dns-01 for letsencrypt certificates

Here is a complete list of available services and available games

This repo assumes that you are running a debian linux disto like Ubuntu!

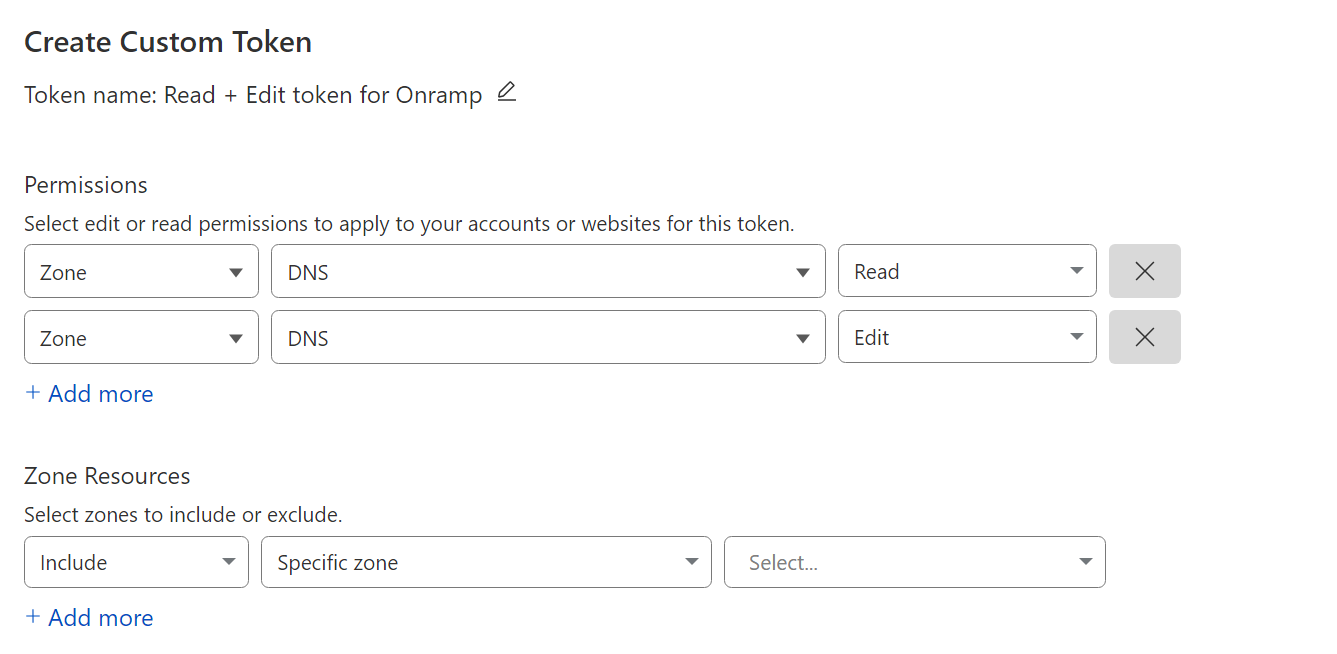
You'll need a personal domain that's setup with Cloudflare and an scoped API token created like shown below, https://dash.cloudflare.com/profile/api-tokens

Cloudflare api token

Download OnRamp

After getting your Cloudflare API key you can run the following to do the basic setup automagically:

sudo apt install git make -y

sudo mkdir /apps
sudo chown -R $USER:$USER /apps
cd /apps
git clone https://github.com/traefikturkey/onramp.git onramp
cd onramp

make install

Edit the .env file to include Cloudflare credentials, your domain and the hostname of the current machine, save the file and exit.

make start-staging

Traefik will start and attempt to obtain a staging certificate, wait and then follow the on screen directions.

make down-staging

You are now ready to bring things up with the production certificates

make

Docker Services

Other docker services are included in the ./services-available directory. The configuration files include links to the web page for the services which has the available documentation.

Note : This also includes cautions and notices for some of the different services, so be sure to look at them.

To list them:

make list-services

They can be enabled by running the following commands:

make enable-service uptime-kuma
make restart

Note: this creates a symlink file in ./services-enabled to the service.yml file in ./services-available

and disabled with the following:

make disable-service uptime-kuma
make restart

To create a new service:

make create-service name-of-service

This will create a file in /services-available that is built using the service.template

Docker Overrides

Several docker overrides are included that allow extending the functionallity of existing services to add features like NFS mounted media directories and Intel Quicksync or Nvidia GPU support to the Plex and Jellyfin containers.

To list avaliable overrides:

make list-overrides

To enable an override:

make enable-override plex-nfs
make restart

To disable an override:

make disable-override plex-nfs
make restart

Note: this creates a symlink file in ./overrides-enabled to the override.yml file in ./overrides-available In addition users can place there own custom docker compose files into ./overrides-enabled and they will be included on normal start up as well as included in the backup file created when running make create-backup for more info on docker compose overrides see: https://docs.docker.com/compose/extends/#adding-and-overriding-configuration

Docker Game servers

Docker based Game servers are included in the ./services-available/games directory. The configuration files include links to the web page for the services which has the available documentation.

To list available games:

make list-games

To enable a game:

make enable-game factorio
make restart

To disable a game:

make disable-game factorio
make restart

External Services

External services can also be proxied through Traefik to list the available configurations:

make list-external

They can be enabled by running the following commands:

make enable-external proxmox
make restart

And disabled with the following:

make disable-external proxmox
make restart

Backing up Configuration

Create backup file

make create-backup

This will create a traefik-config-backup.tar.gz in the project directory

Copy backup file to another machine

scp ./backups/traefik-config-backup.tar.gz <user>@<other_host>:/apps/onramp/backups/

Restore backup file on the other machine

make restore-backup

Other make commands

Then you can run any of the following:

make          # does a docker compose up -d
make up       # does a docker compose up (this will show you the log output of the containers, but will not stay running if you hit ctrl-c or log out)
make down     # does a docker compose down
make restart  # does a docker compose down followed by an up -d
make logs     # does a docker compose logs -f
make update   # does a docker compose down, pull (to get the latest docker images) and up -d

# You can run multiple commands at once like this
make; make logs

Environment Variables

Many parts of the available services, overrides and games can be customized using variables set in your .env file If you open an available file and view it you will likely see many variables such as ${UNIFI_DOCKER_TAG:-latest-ubuntu}

UNIFI_DOCKER_TAG is the variable name latest-ubuntu is the default value

You can override this value by placing the following line in your .env file

UNIFI_DOCKER_TAG=latest-ubuntu-beta

This will enable pulling the latest-ubuntu-beta version of the unifi container instead of the default stable version

Please see https://docs.docker.com/compose/environment-variables/ for more information about environment variable in docker compose

onramp's People

Contributors

actions-user avatar bladewdr avatar crack-kitty avatar dkarpinski avatar egonzalez7579 avatar ilude avatar lickitysplitted avatar mafen avatar salverius-tech avatar sudo-battlekafer avatar

Stargazers

 avatar  avatar  avatar  avatar  avatar  avatar  avatar  avatar  avatar  avatar  avatar  avatar  avatar  avatar  avatar  avatar  avatar  avatar  avatar  avatar  avatar  avatar  avatar  avatar  avatar  avatar  avatar  avatar  avatar  avatar  avatar  avatar  avatar  avatar  avatar  avatar  avatar  avatar  avatar  avatar  avatar  avatar  avatar  avatar  avatar  avatar  avatar  avatar  avatar  avatar  avatar  avatar  avatar  avatar  avatar  avatar  avatar  avatar  avatar  avatar  avatar  avatar  avatar  avatar  avatar  avatar  avatar  avatar  avatar  avatar  avatar  avatar  avatar  avatar  avatar  avatar  avatar  avatar  avatar  avatar  avatar  avatar  avatar  avatar  avatar  avatar

Watchers

 avatar  avatar  avatar  avatar  avatar  avatar  avatar

onramp's Issues

Issue with Makefile

Script fails due to wrong path and filename

Line 138

Is
cp .template/env.sample .env
Should be
cp .templates/env.template .env

Line 246

Is
envsubst .template/smtp.template | nc localhost 25
Should be
envsubst .templates/smtp.template | nc localhost 25

[Request] Crowedsec

Dont know where to apply for requests, maybe you guys should have a discord server or something, but for now i opening an issue instead.

Do you have any plans to add Crowdsec to this stack?

Cleanup, Test, & Document Cloudflare Tunnels

Either I'm missing several things (in which case, they should be documented), or the process of creating a cloudflare tunnel to access stuff behind traefik needs a bit of cleanup.

The major issues I ran into:

  • The makefile commands do not have the right service name
  • The makefile commands need to be told which docker compose file they're running against
  • The credentials file downloaded by make cloudflare-login cannot be kept between containers, as it does not get saved to a volume.

...all that is from the "create a tunnel via CLI" flow, not the "create a tunnel via GUI" flow. I haven't tried the GUI flow yet, and I'm not sure how much more time I can afford to spend on testing.

[Security] Traefik Dashboard

Just realized that traefik dashboard is wide open for everyone to browse, maybe should either lock it down with either WhiteIPs or basic-auth (or even better Authelia/Authentik if enebaled).

Trying out onramp on ubuntu 20.04 new install. Fails

Error is below.

fatal: [localhost]: FAILED! => {"changed": false, "msg": "Unable to start service disable-hugepages: Job for disable-hugepages.service failed because the control process exited with error code.\nSee "systemctl status disable-hugepages.service" and "journalctl -xe" for details.\n"

I've also tried on base install of 22.04 with same result.

Also as no Prerequisites are specified I have to assume Ubuntu works since its referenced in the ansible scripts, but as a Newbit it would be helpful to indicate what is needed to start. I had to install lots of dependencies before the script would even run.

apt install jq yq python3-php yamllint python3-pathspec ansible software-properties-common (required for apt-add-repository

Traefik settings

for more in-depth traefik configuration traefik should have a settings.yml (or something) in etc/traefik.

At the moment im doing changes in the main "docker-compose.yml" file which isn't the best if i in the future is going to upgrade onramp.

add license

Would be good if there was a licence similar to MIT/Apache added to the repro.

Like how this is all configured with Makefile and would like to do something similar.

Not really an issue

But how do i enable Authelia or Authentik to my apps?
I have enabled them with "make enable-service authelia" and restarted with "make" i can browse all apps pages but i dont get to the auth.domain.tld.

And in traefik dashboard i can not see any middleware to the routers.

Traefik Guide step by step๐Ÿ‘ฃ๐Ÿ‘Œ๐Ÿ˜Ž๐ŸŽ‰ WIP( Work In Progress) n00b friendly

Update: re-formatting documentation here:

https://github.com/dualizeo/docker-island/blob/main/README.md

This documentation is a simple written summary to assist newcomers using Treafik for Self Hosted services requiring SSL, Port mapping and internal routing of docker services. This guide is a Reference Point by Using Ubuntu Desktop for starting a docker self hosted network within a day (hopefully). Keep in mind the guide is a work in progress :)

  1. To start it is recommended but no necessary using ProxMox for creating Ubuntu environments. Instructions: https://www.youtube.com/watch?v=7OVaWaqO2aU
    Working as 2022 Q3 ^
    It is best to use a hypervisor ( ProxMox ) for creating virtual machines in order to run different Ubuntu environments such as setting up a reverse proxy's and for other additional benefits such as taking snapshots to revert back changes or testing different Ubuntu Setups which will save you a lot of time.
    (no need to view but this video but it provides you a list of benefits for using virtual machines:)
    https://www.youtube.com/watch?v=SVQmzaSabEQ

    (skip for now, needs more testing) In addition from a security a standpoint it is recommended but not necessary creating a Virtual LAN to avoid any attacks in your real LAN. https://www.youtube.com/watch?v=qTbeHpdHcqs
    ( if using a laptop or pc as your main setup, you can also purchase a USB to Ethernet Adapter for ProxMox to recognize it as an additional network which you can assign a VLAN, then you can start creating virtual machines on that VLAN )

  2. Ubuntu+Docker+Docker Compose, Fresh install
    Docker Installation and: https://www.youtube.com/watch?v=EL1Ex04iUcA ( watch up until 14:07 and be finished )

2. Before starting it is also recommended to have a DNS program to manage your Domain Name System entries,

Setup DNS 1. for example mapping your local 192.168.10.5:9000 translated into portainer.mydomain.com therefore making it easier for you to Name your docker services as sub domains for easier management. (in addition Traefik will help routing to the correct services) Having a DNS program will allow you to edit and manage your DNS entries using AdGuard or Pi-Hole DNS. Make sure to reload browser after adding a DNS entry if Installing Adguard from the SNAP store. * If you install Adguard ( Adgurd->Filters->DNS Rewrites)

Also CloudFlare allows you to add DNS entries from their website but it is not recommended as it exposes another attack vulnerability to your network. A better solution is to install a Local DNS management software on your network. so you can lessen attacks and keep your internal IP and ports routing Locally to your system and services. ( you can install it on the same system or an a external ProxMox virtual machine or on a Raspberry Pie to point it to your Treafik setup.

The easiest way is to install AdGuard from the Ubuntu Software App store (SNAP) on your ubuntu, simply search and download AdGuard. Or visit Pi-Hole website and run the automated script that will guide you through the process.
Pi-Hole One step automated install: https://github.com/pi-hole/pi-hole/#one-step-automated-install the gotcha's are changing your DNS on your resolv.conf to your local ip
You can watch this video up till 4:06 and be done: https://youtu.be/dH3DdLy574M

  1. To start using Treafik, it is Important to own a domain name as docker services will require SSL. You can purchase a cheap $6 dollar a year domain name preferably from CloudFlare or any other Service Provider. If purchased elsewhere make sure to point your NameServers to CloudFlare. ( 2022 Q3: cloudflare domain prices: .uk $4.76, .us $6.50, .com $8.57) or you can try free domains from https://www.freenom.com ( when searching for a domain it will trick you into thinking it has been taken but it's not true, just enter the ending of the domain you want, example: myfreedomain.tk to get it when searching for it )
    To buy a domain name from cloudflare you can find it via ( CloudFlare account -> Top Right, Add Site button ->Register a new domain with Cloudflare )
    https://www.cloudflare.com/products/registrar/
    It is necessary to create a CloudFlare account for using OnRamp, The CloudFlare account will be necessary as it will generate an API token which will be used to connect your free SSL to your Internal Treafik network.
    Reference video only ( stop at 5:20 ) to move on with this guide: https://www.youtube.com/watch?v=b83S_N1kkJM
    What I did was add a "A" Record to my internal IP and a CNAME pointing to my Treafik subdomain example treafik.mydomain.com ( you can name it whatever etc.mydomain.com)
    In CloudFlare make sure you create the api token before you proceed!

  2. Your Personal Router, It is also important to do Port Mapping on your router in order to point the incoming SSL from CloudFlare connection to your internal Treafik computer.. the Ports from CloudFlare to your Ubuntu machine running Treafik example 192.168.10.etc. You can YouTube your router model on how to do port forwarding, it might be under WAN ->Virtual Server / Port Forwarding.
    Enabling it and by entering your HTTP server External Port 80 to Internal Port 80 and adding another Entry for HTTP Server External Port 443 to Internal 80 TCP protocol.
    I managed to get it working before using Tim's Guide SSL on everything without port forwarding but it might not work for other services. There is also another guide made by DB Tech to avoid using Port Forwarding, just by using CloudFlare Zero Trust Tunnels ( not tested yet, but I heard people were getting banned in the comments due to TOS violations from using streaming services like kodi ) https://www.youtube.com/watch?v=m-RYTu-Qq3A or https://youtu.be/RUJy9fjoiy4

  3. Finally, Installing Treafik using https://github.com/traefikturkey/onramp
    Hopefully this guide will help you to finally get Docker running with Treafik services correctly, and Many Thanks! to contributors from TechnoTim's discord Community for making TreafikTurkey and OnRamp!
    So to finish off, Make sure You copy and paste the commands individually line by line in your terminal from onramp:

sudo apt install git make nano -y

sudo mkdir /apps

sudo chown -R $USER:$USER /apps

cd /apps

git clone https://github.com/traefikturkey/onramp.git onramp

cd onramp

sudo make start-staging

Remove placeholder content including the brackets: < replace > example:
HOST_NAME=< replace > with:
HOST_NAME=mypcname
^ If you don't know your hostname, in Ubuntu you can view it by:
right clicking on ubuntu desktop ->Display Settings -> left side, scroll all the way down to About -> Device Name ( you will find your host name) if you would like to change it will require a Restart.

  • Also Replace
    TZ= (with your Time zone ) just google it to find your proper format because Los Angeles requires an underscore Los_Angeles.

make sure it is in the correct directory ! don't clone it anywhere else. I believe the correct directory is Computer/apps/onramp. You can verify by clicking in Ubuntu Files -> Left Side +Other Locations -> Computer -> Apps -> onramp
That's where the make start-staging script should run.

Also if you mess up, don't stress out, you can edit the script again since you are in Staging ( Testing Mode )

*** Now that you have filled out your:**
CF_API_EMAIL=your email
CF_DNS_API_TOKEN=blablaToKenblablaEXAMPLE
HOST_NAME=PCname
HOST_DOMAIN=yourdomain.com
TZ=US/City

All there is to do is hit Left Ctrl + X to save! then it will say File Name to Write: .env
Hit ENTER

  • The make start-staging will run the Makefile script and will create a hidden .env file with your provided HOSTNAME and Token information, so if it's not working, you can always go back and edit the hidden file by running this command:
    cd /apps/onramp
    ls -lha
    ( you will see the .env listed )
    sudo nano .env
    ( to edit the file ^ )

go back and re-run the make start-staging
if something is not working, go back to check on your CloudFlare to make sure you "A" record is pointing to your home IP and as previously mentioned a CNAME record to your subdomain example: ( treafik.mydomain.com )

Once you get it working it the script will get you Staging SSL certificate for testing to make sure your connection went through. If you can confirm it's working, you can do so by click the url link it provided to you for your treafik dashboard ( from running the script in terminal. )

Finally if you can verify you have SSL via your browser then you are good to proceed to the final step which is taking down the staging certificates to get real SSL certificates
( just confirm you are getting SSL on your browser )
Awesome if you did! Last thing to do now, is to take down the staging certificates to get real ones by doing so:

make down-staging
and
make
^ this will get your real SSL certificates.

  • ๐ŸŽ‰Congrats now it's time to start spinning up instances of Docker services using the OnRamp commands:
    make list-services

and to install them for example:
make enable-service portainer
make restart
^ After enabling a service, make sure to run (make restart) in order for the service to show up in your treafik dashboard.

Hopefully this guide can help you to facilitate the process or if you come across problems.
Feel free to provide feedback for anyone reading this guide and if this worked for you, please provide feedback and how long it took you to get up and running Traefik thanks.

(Recommended but no necessary) installing an open source fast forwarding google chrome extension to go through YouTube videos at 2x or 3x the speed. https://github.com/igrigorik/videospeed

Other Collections of Self Hosted Treafik setups to consider:
https://github.com/PAPAMICA/docker-compose-collection
https://github.com/SimonHaas/homeserver
https://github.com/BaptisteBdn/docker-selfhosted-apps
https://github.com/VirtualEstatePlanner/MegaDocker
https://virtualestateplanner.github.io/MegaDocker/
https://github.com/caprover/caprover

Recommend Projects

  • React photo React

    A declarative, efficient, and flexible JavaScript library for building user interfaces.

  • Vue.js photo Vue.js

    ๐Ÿ–– Vue.js is a progressive, incrementally-adoptable JavaScript framework for building UI on the web.

  • Typescript photo Typescript

    TypeScript is a superset of JavaScript that compiles to clean JavaScript output.

  • TensorFlow photo TensorFlow

    An Open Source Machine Learning Framework for Everyone

  • Django photo Django

    The Web framework for perfectionists with deadlines.

  • D3 photo D3

    Bring data to life with SVG, Canvas and HTML. ๐Ÿ“Š๐Ÿ“ˆ๐ŸŽ‰

Recommend Topics

  • javascript

    JavaScript (JS) is a lightweight interpreted programming language with first-class functions.

  • web

    Some thing interesting about web. New door for the world.

  • server

    A server is a program made to process requests and deliver data to clients.

  • Machine learning

    Machine learning is a way of modeling and interpreting data that allows a piece of software to respond intelligently.

  • Game

    Some thing interesting about game, make everyone happy.

Recommend Org

  • Facebook photo Facebook

    We are working to build community through open source technology. NB: members must have two-factor auth.

  • Microsoft photo Microsoft

    Open source projects and samples from Microsoft.

  • Google photo Google

    Google โค๏ธ Open Source for everyone.

  • D3 photo D3

    Data-Driven Documents codes.