
Blend_My_NFTs is a work-in-progress Blender add on that can automatically generate thousands of images or 3D objects to help you launch your NFT colleciton! It is currently in development to launch This Cozy Place. This Cozy Place is an NFT image collection that will launch in November with a total of 10000 unique NFTs all rendered in Blender via Blend_My_NFTs. If you would like to learn more about Blend_My_NFTs or This Cozy Place, please visit our discord server: https://discord.gg/UpZt5Un57t
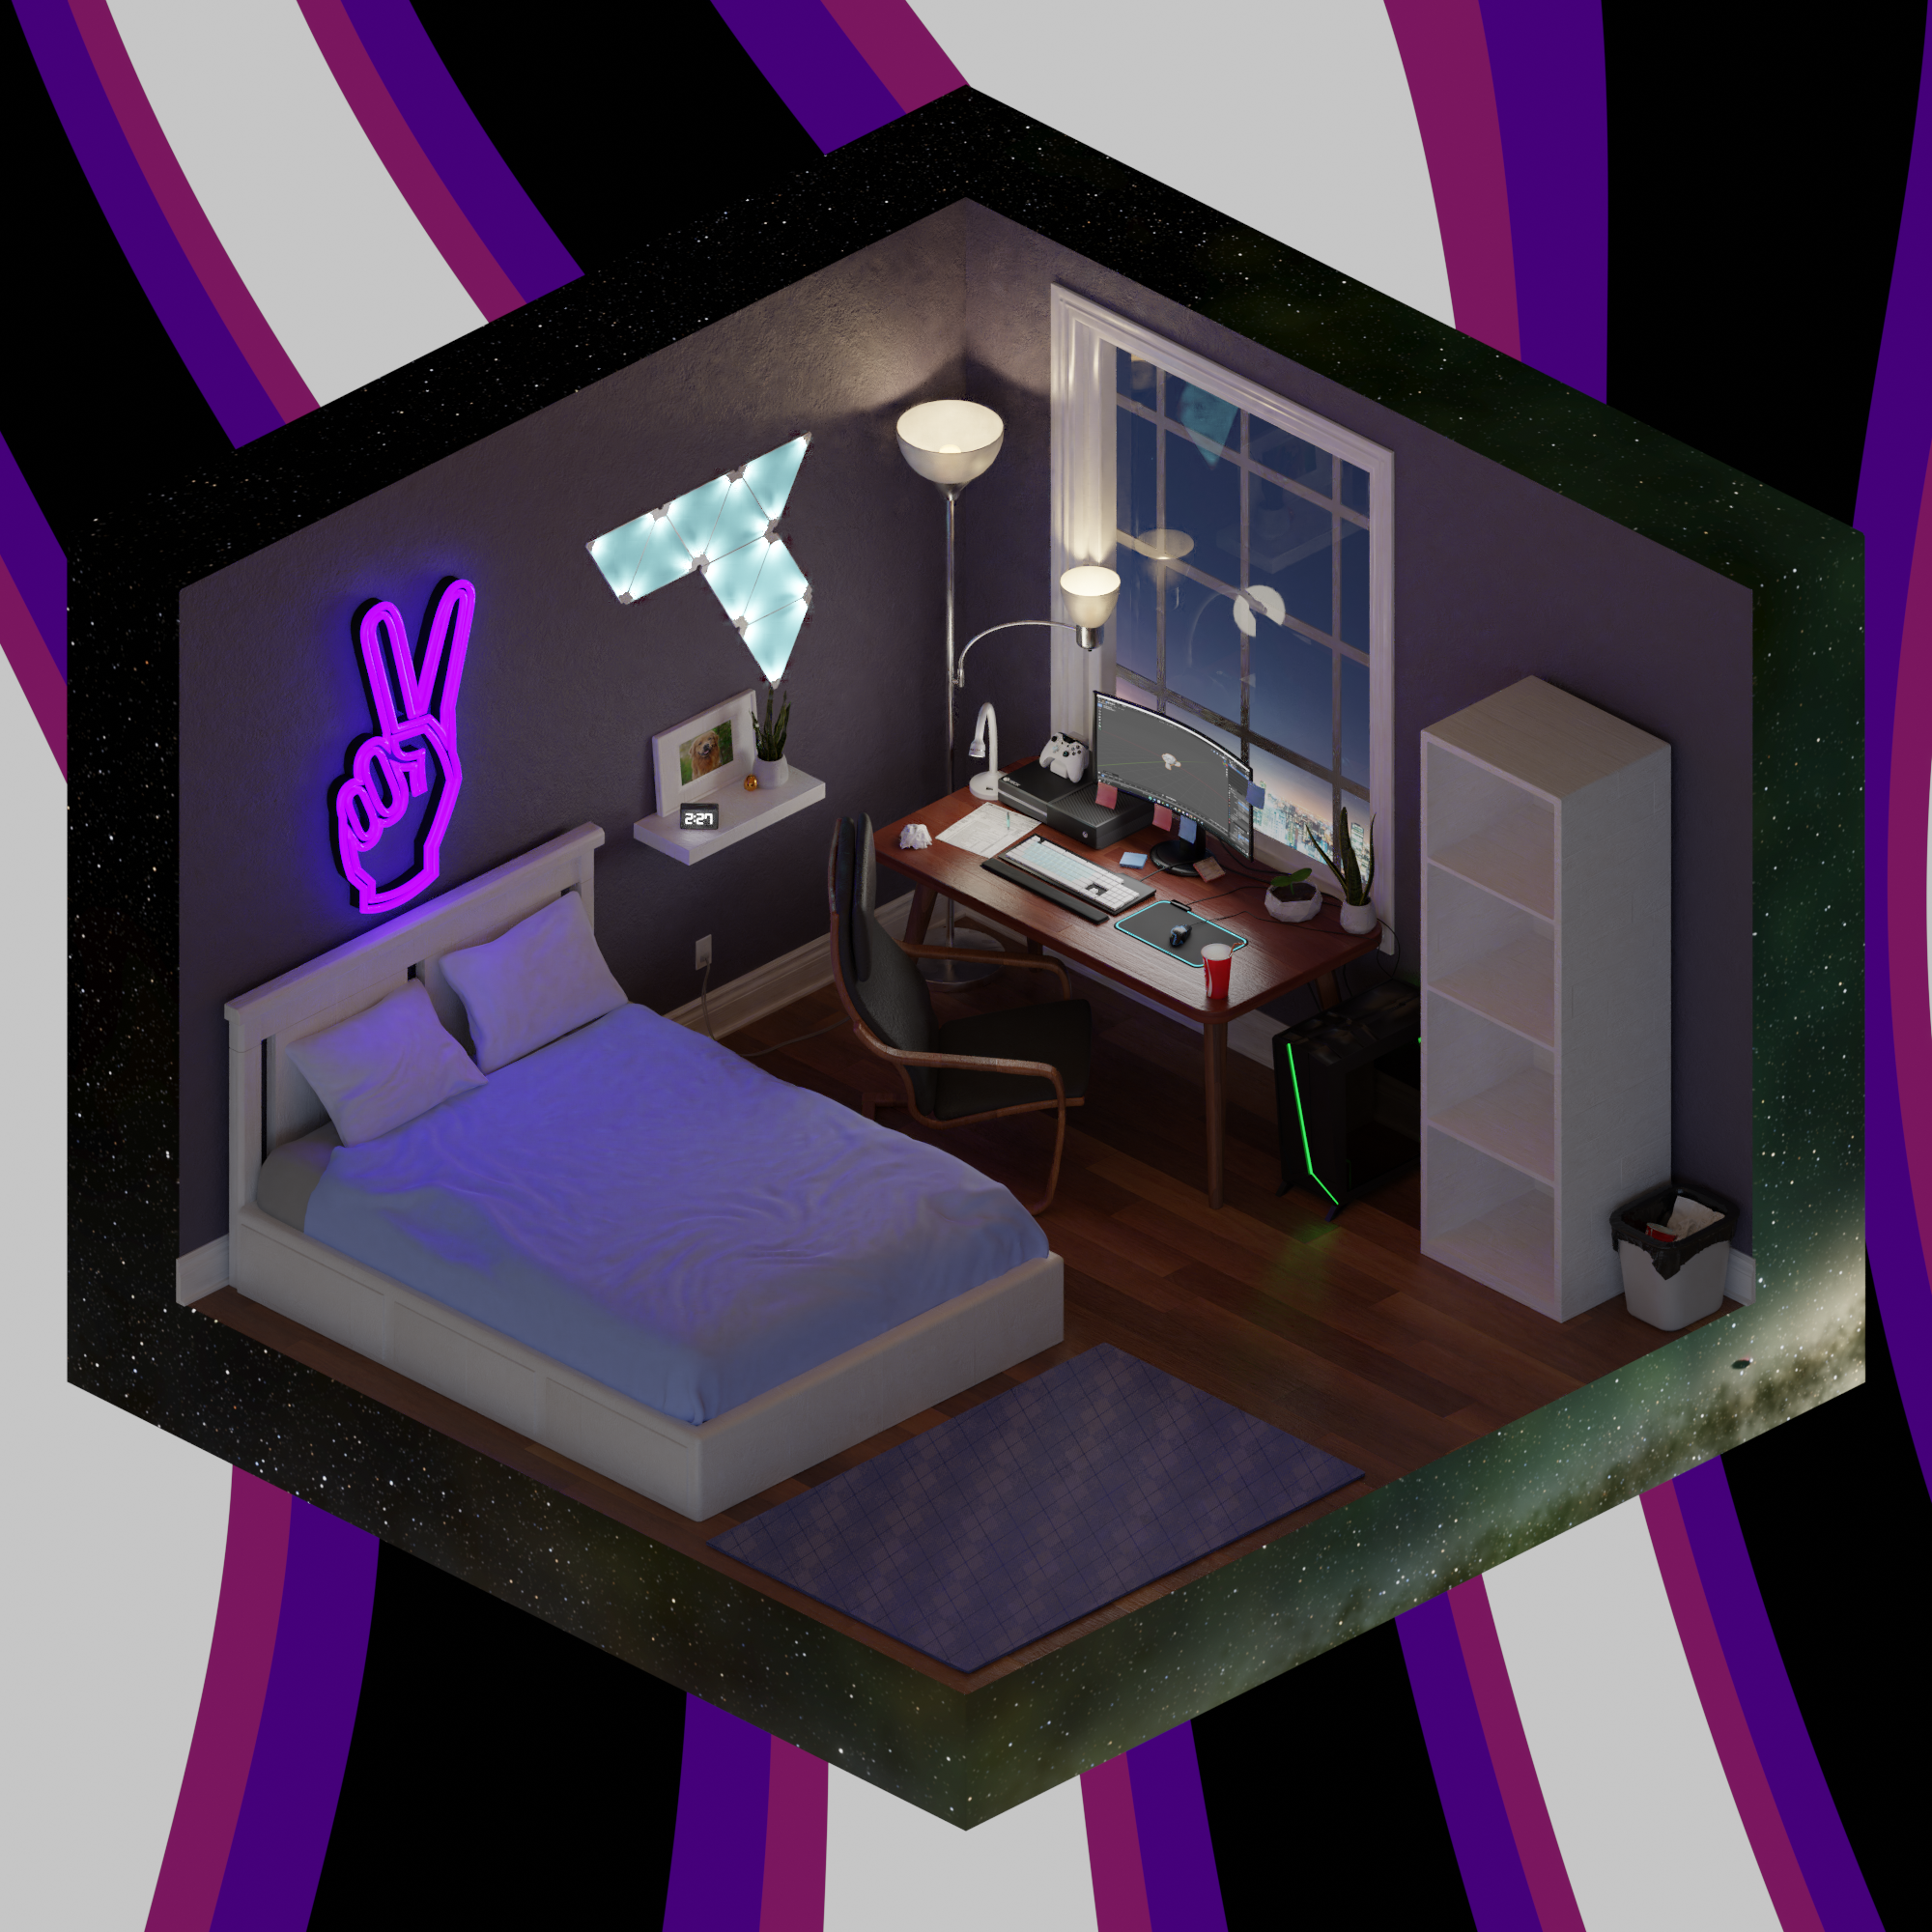 *Test sample of the NFT collection This Cozy Place rendered in Blender 2.93 using Blend_My_NFTs add on.
- Render thousands of unique images in blender!
- Have an object you want to turn multiple colours? We have multi colour functionality, no more hasteling with 20 differently coloured cubes.
- Generate all possible combinations of your NFT image/3D model repository! The only limit is your imagination! And your processing power...
- Looking to create 3D models for the metaverse instead? We got you covered! Generate thousands of 3D modeles with our Model_Generator.py script.
- Automatically import .x3d, .fbx, .obj, and .glb files!
- Specify the 3D object file you wish to export as.
- Raritize and weight your attributes (Coming soon...)
- Generate metadata for OpenSea, CNFT, SolonArt, and more! (Coming soon...)
- New features always dropping, join our discord to stay tuned for updates!
Website: http://thiscozyplace.com/ (Under construction...)
Discord: https://discord.gg/UpZt5Un57t
Instagram: https://www.instagram.com/this_cozy_place/
Twitter: https://twitter.com/CozyPlaceNFT
Reddit: https://www.reddit.com/r/ThisCozyPlace/
Blend_My_NFTs works with Windows 10 or macOS BigSure 11.6 on Blender 2.93.5.
Link to the Blend_My_NFTs Tuotrial series on Youtube: https://www.youtube.com/watch?v=dUajXAZzSPc&list=PLuVvzaanutXetnvsa2_xvXvpREUEYfpg1
- I recomend watching the tutorial videos to get a feel for how the software works, then follow along with this guide. They are both good recourses for learning to run the scripts, but I stress that this guide contains more detailed information. The videos are meant to be a complementary glossory of the topics covered in this readme.md.
Before we can continue there are terms that I will be using to describe the process of this software and make it a bit easier to understand. Refer to this section if you come accross an unfamiliar term.
For the following terms, lets say you are creating an NFT collection where the image is of a person wearing a hat:
- Attribute - A part of an NFT that can be changed. The hat on a man is an Attribute, there are many types of hats, but the hat itself I will refer to it as an attribute.
- Variants - These are the types of hats; red hat, blue hat, green hat, cat hat, etc. These can be swapped into the hat Attribute with one another to create different NFTs.
- DNA - DNA is a sequence of numbers that determins what Variant from every Attribute in an NFT collection to include in a single NFT image. This program generates a uniqe DNA sequence for every possible combination of Variants in Attributes.
- Batch - A Batch is a randomly selected subset of NFT DNA. It is a smaller portion of the total number of NFTs you want to generate. This makes the work load of rendering thousands of images easier to manage. It also gives you the option to render on multiple computers and ensures each computer renders seperate images with no overlap.
This segment discusses the setup and how to create images with Blend_My_NFTs. This youtube tutorial goes over the basic setup discussed in this section: https://www.youtube.com/watch?v=dUajXAZzSPc
This video is just a glossery and doesn't go to indepth on how to structure your Blender collections to work properly with Blend_My_NFTs. If you want more details about this, keep following the rest of this tutorial page as it will be necessary to render images with this software.
Follow these steps to setup Blend_My_NFTs:
- At the top of this page click the green "Code" button
- Click "Download Zip" - This will download the Blend_My_NFTs folder to your Downloads folder in zip format
- In your download folder, move Blend_My_NFTs-main.zip to your desktop or another easily accessable location
- Unzip the file:
- How to unzip a file on Mac: https://support.apple.com/en-ca/guide/mac-help/mchlp2528/mac
- How to unzip a file on Windows: https://support.microsoft.com/en-us/windows/zip-and-unzip-files-f6dde0a7-0fec-8294-e1d3-703ed85e7ebc
- Move the Blend_My_NFTs-main folder is located on your Desktop for easy access (recomended)
- Rename the Blend_My_NFTs-main folder to Blend_My_NFTs (optional)
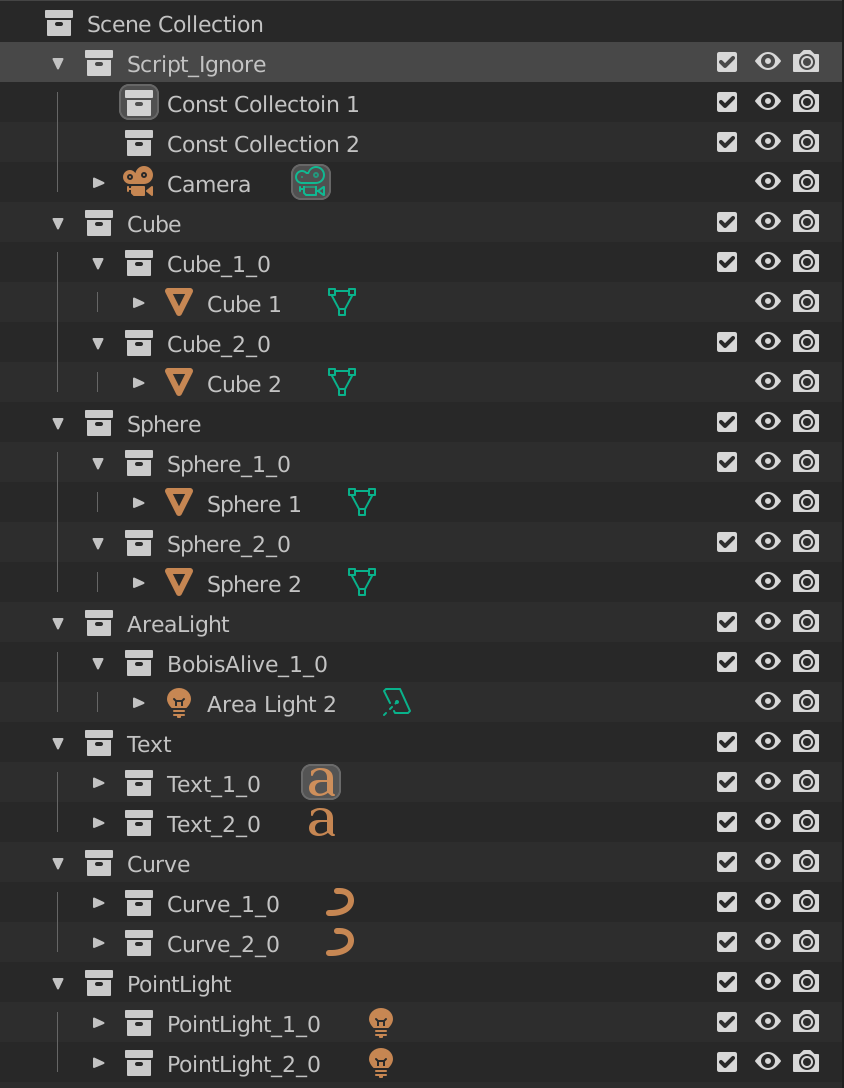
In order for Blend_My_NFTs to read your .blend file, you need to structure your scene in a specific way. Please follow all naming and collection conventions exactly, otherwise the scripts might not run properly.
Important Note
Your .blend file must be moved to the Blend_My_NFTs folder. When you run the script, the .blend file must be in the directory of the Blend_My_NFTs folder. The Blender text editor has some weird quirks that make finding the right directory a bit tricky. If you are interested, I suggest reading about it in the Blender API above. This is the only work around I could find for now.
Rules for .blend structure:
-
All Objects, collections, light sources, cameras, or anything else you want to stay constant for each NFT insert it into a collection named "Script_Ignore" exactly. This collection should be located directly beneath the 'Scene Collection' in your .blend file. Every thing in this Script_Ignore collection will be ignored by the collection (Attribute) fetcher. The state of the render and viewport camera of any objects/collections in Script_Ignore will remain unchanged during the scripts operation. The script will not turn the cameras of anything located in Script_Ignore on or off, so however you set them, will be how it renders.
-
Every Attribute of your NFT must be represented by a collection directly beneath the 'Scene Collection' in your .blend file. DO NOT USE NUMBERS OR UNDERSCORES IN THE NAME OF THESE COLLECTIONS, this will mess with the scripts. Only use capital letters and lowercase letters, no numbers(0-9) or the underscore symbol( _ ).
-
For each Variant of each Attribute create a collection containing everything that makes up that Variant. This Variant collection must be placed within the Attribute collection and named with the following format: VariantName_(variant number begining at 1)_0 (e.g. Cube_1_0, Cube_2_0, etc.). The VariantName CANNOT CONTAIN NUMBERS OR UNDERSCORES. Like above, this will mess with the scripts.
Here is an example of the collection format I used to create this script in my .blend file:
If you have no experience with Blender python or the Blender API, I recomend watch this tutorial on running python scripts in Blender: https://www.youtube.com/watch?v=cyt0O7saU4Q
There is also helpful documentation in the Blender API about running scripts here: https://docs.blender.org/api/current/info_quickstart.html#running-scripts
Note - You might want to install the Icon Viewer add-on for Blender: https://docs.blender.org/manual/en/latest/addons/development/icon_viewer.html
In the Blend_My_NFTs folder, open the config.py file in a text editor or IDE. Here you can customize some aspects of Blend_My_NFTs. The most important thing to do here is to add the path of Blend_My_NFTs on your computer to either save_path_mac or save_path_windows. (save_path_mac if your OS is MacOS based, and save_path_windows if it is Windows based)
- Open the Scripting tab in the menu of Blender:
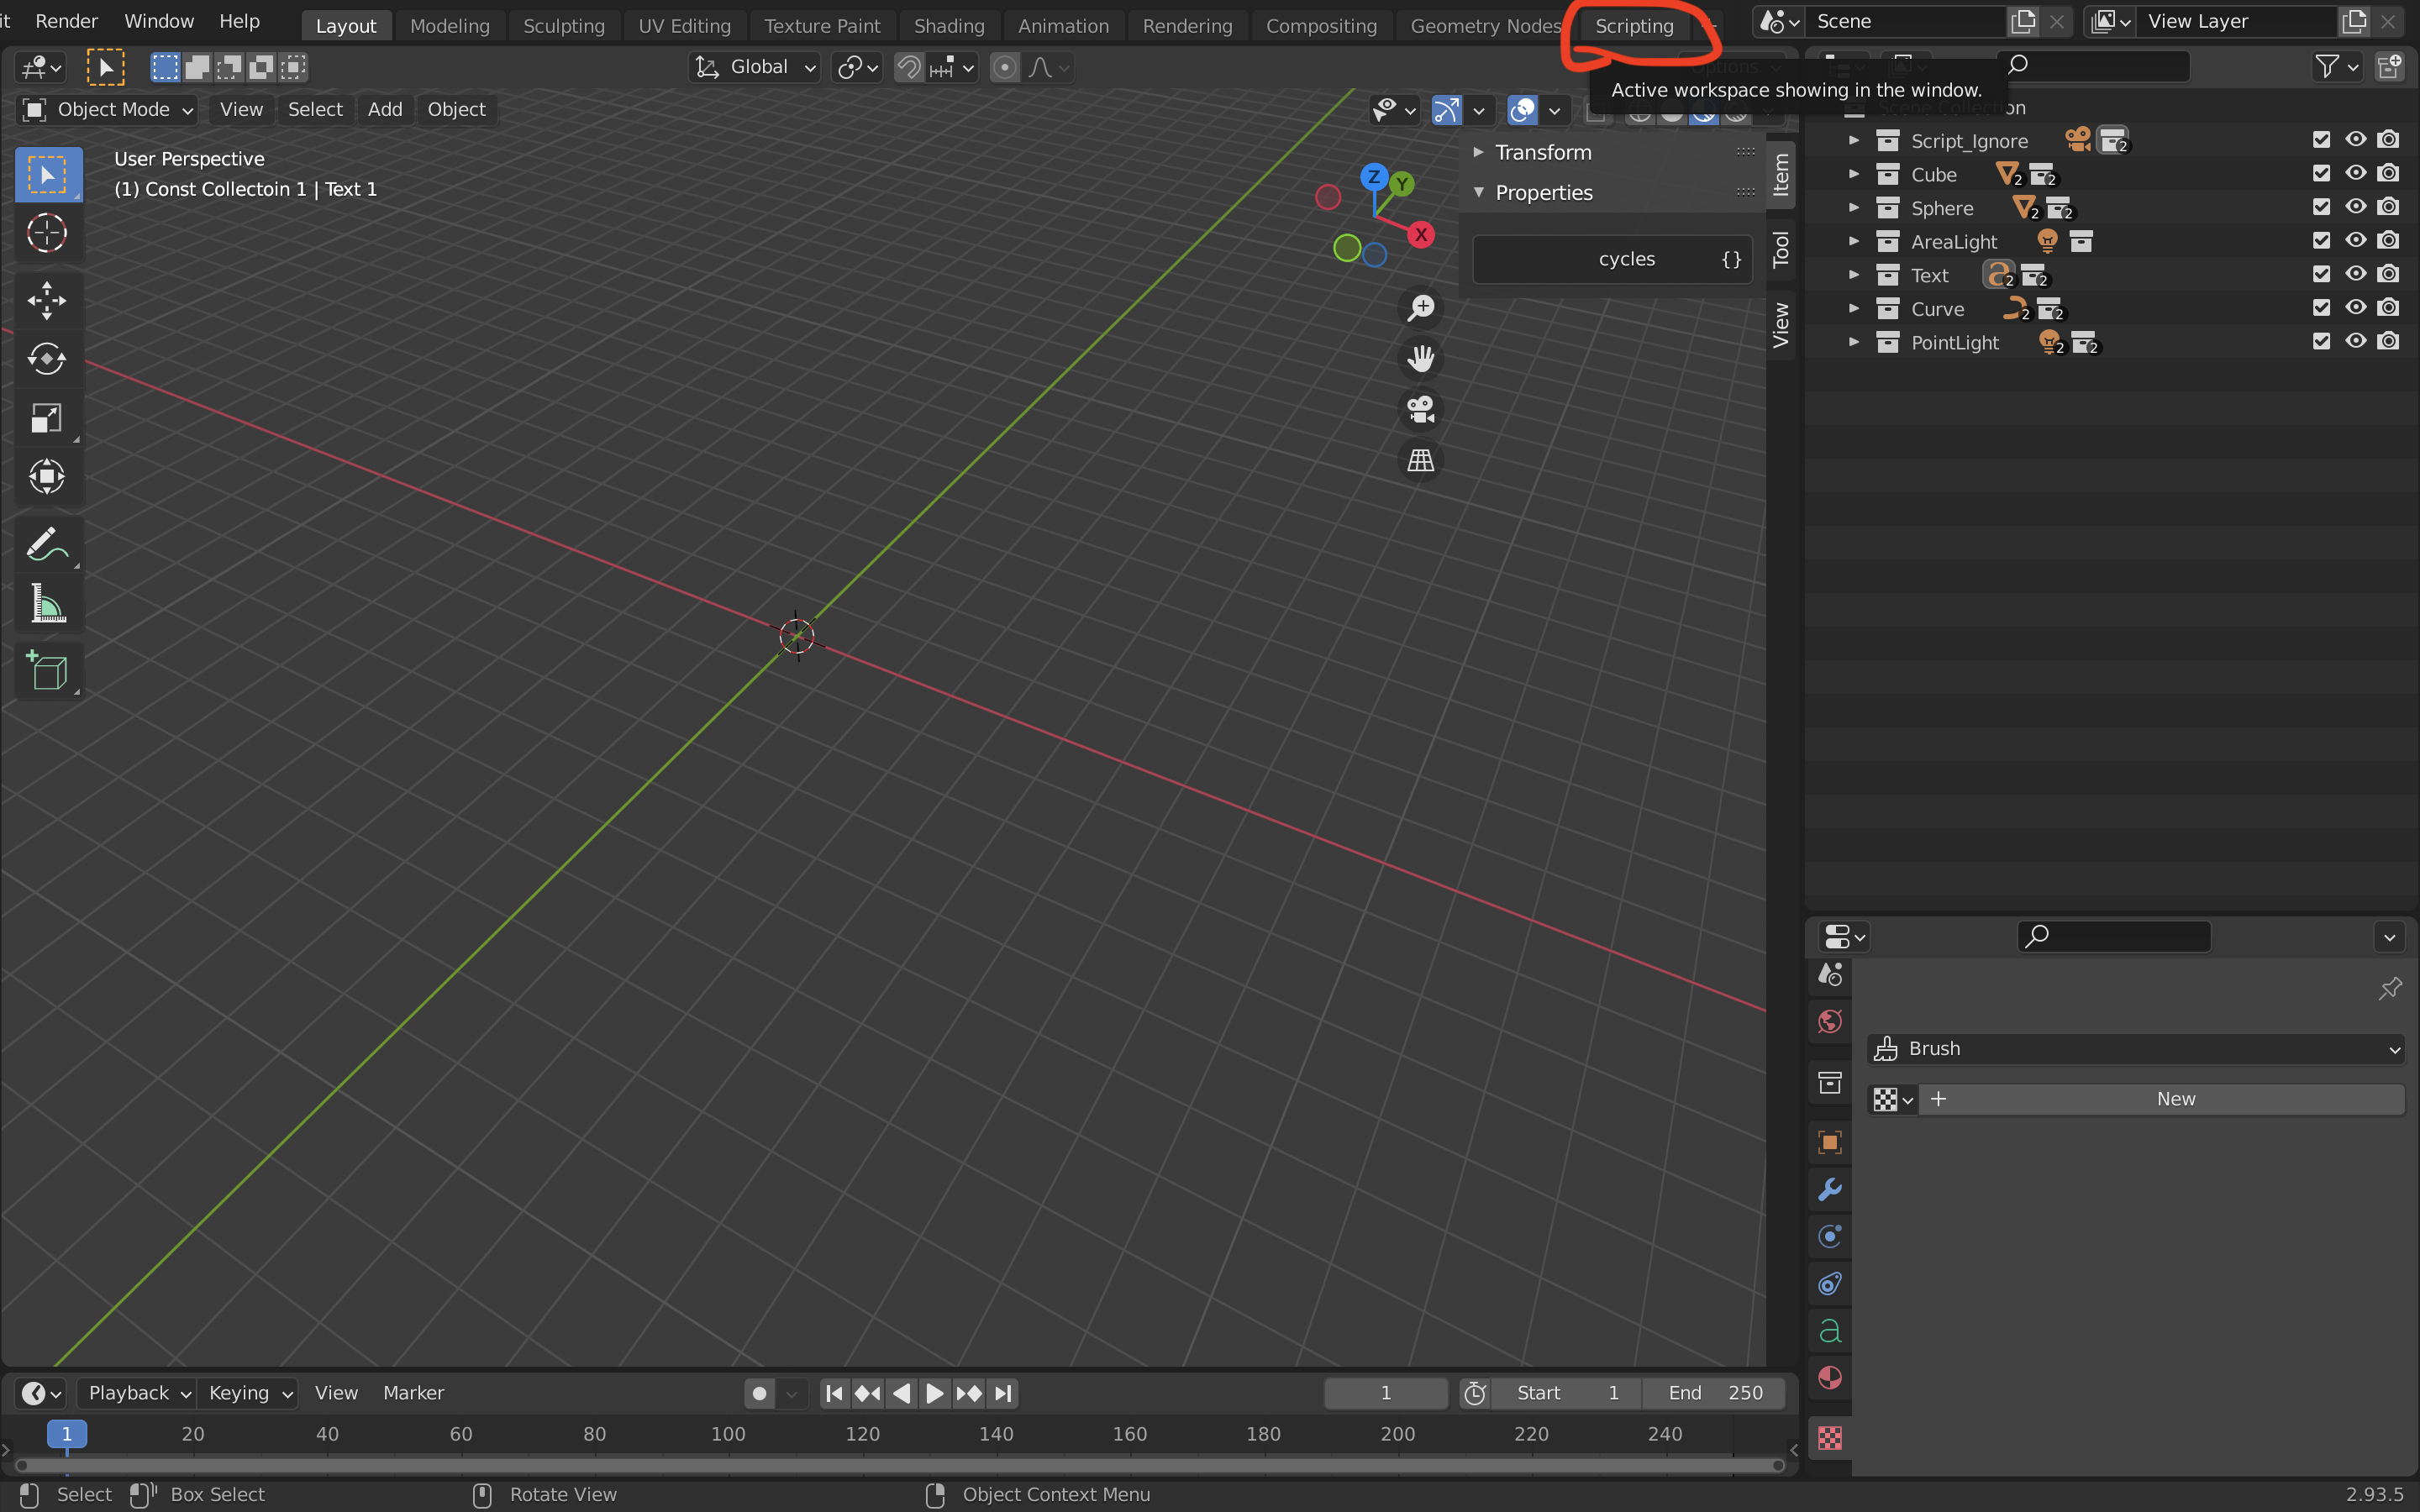
- Click the "Open" button in the Blender Text Editor:
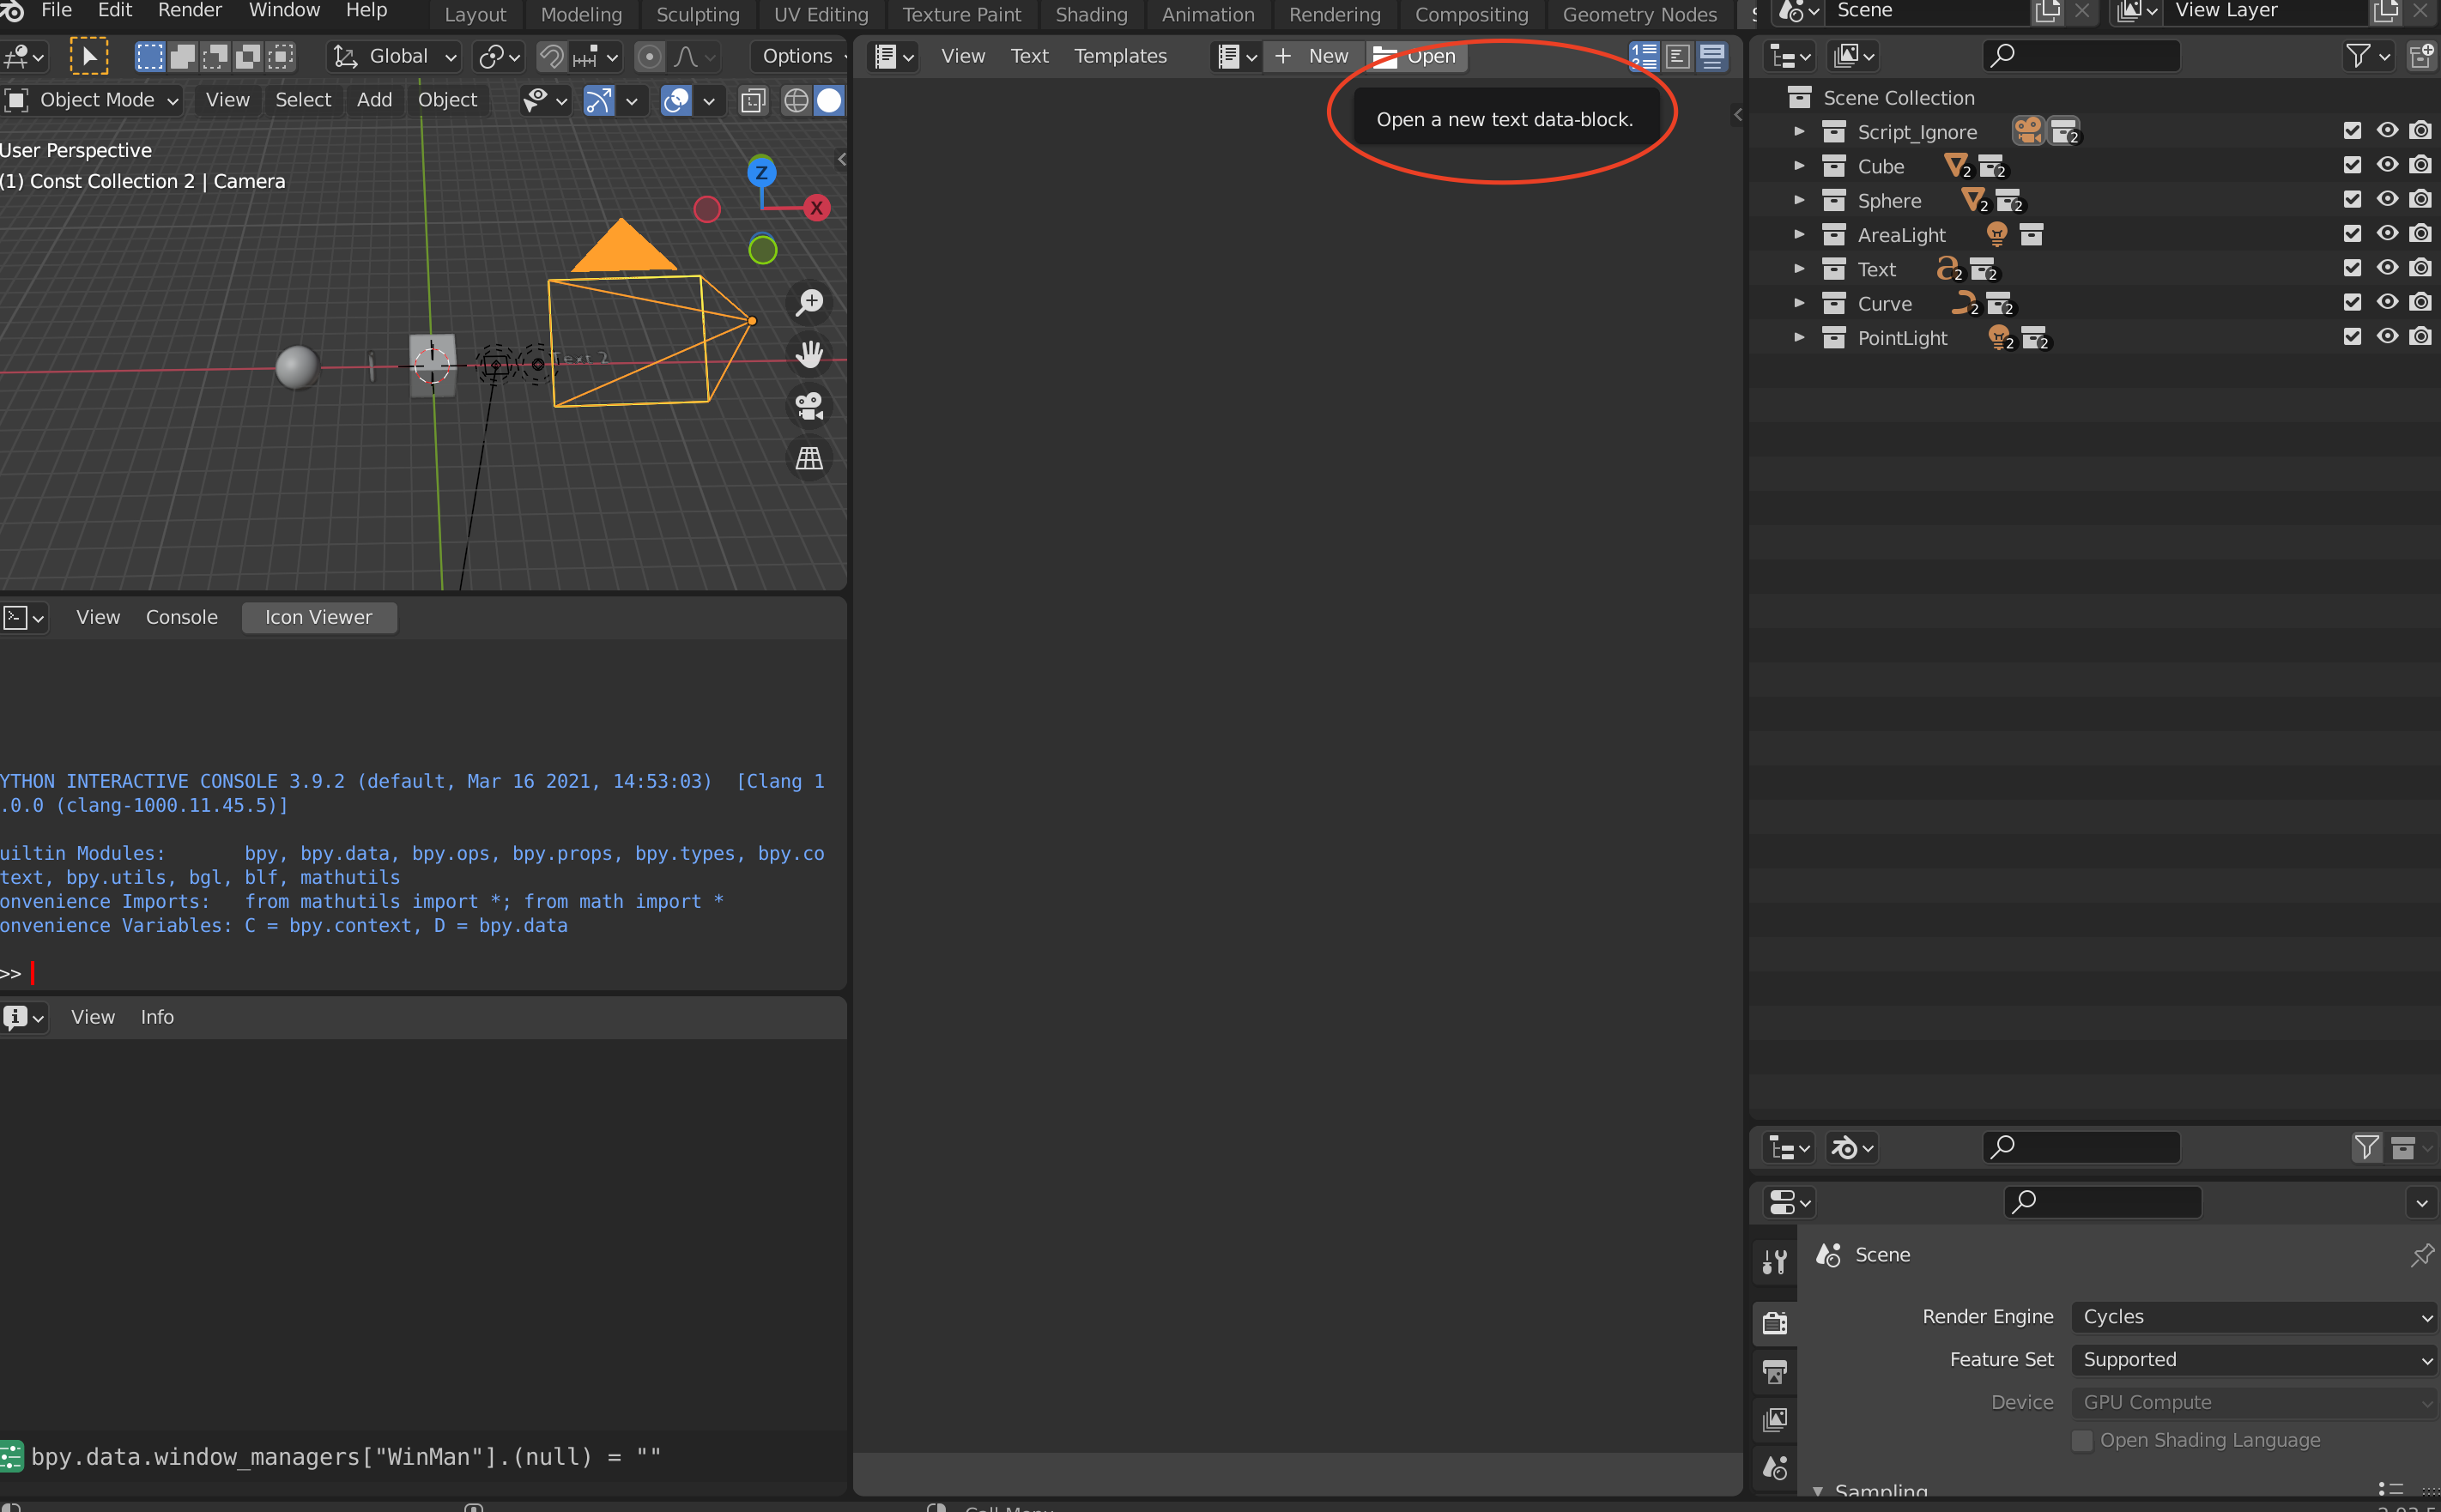
- With the Blender File View open, navigate to the Blend_My_NFTs folder, navigate to and select main.py. Click "Open" in the bottom right corner:

-
Repeat the previous step for Image_Generator.py file located in the Generators_and_Sorters folder.
-
To navigate to the a script click the drop down button shown circled below:

- To run a script click the run button shown circled below:

Run the scripts in the following order:
- main.py - Generates NFTRecord.json, a list of all possible NFT combinations then randomly selects NFTs from NFTReocord.json and adds them to a specified number of Batch#.json files
- PNG_Generator.py - Renders the NFTs from a specified Batch #number and exmports the image to "Images from PNG Generator"
This segment discusses setting up the 3D Model Generator. This youtube tutorial goes over a glossory of what is discussed in this section: https://www.youtube.com/watch?v=NonORFpVhLw
The 3D model generator combines 3D models together and exports all possible combinations of those 3D models to a folder.
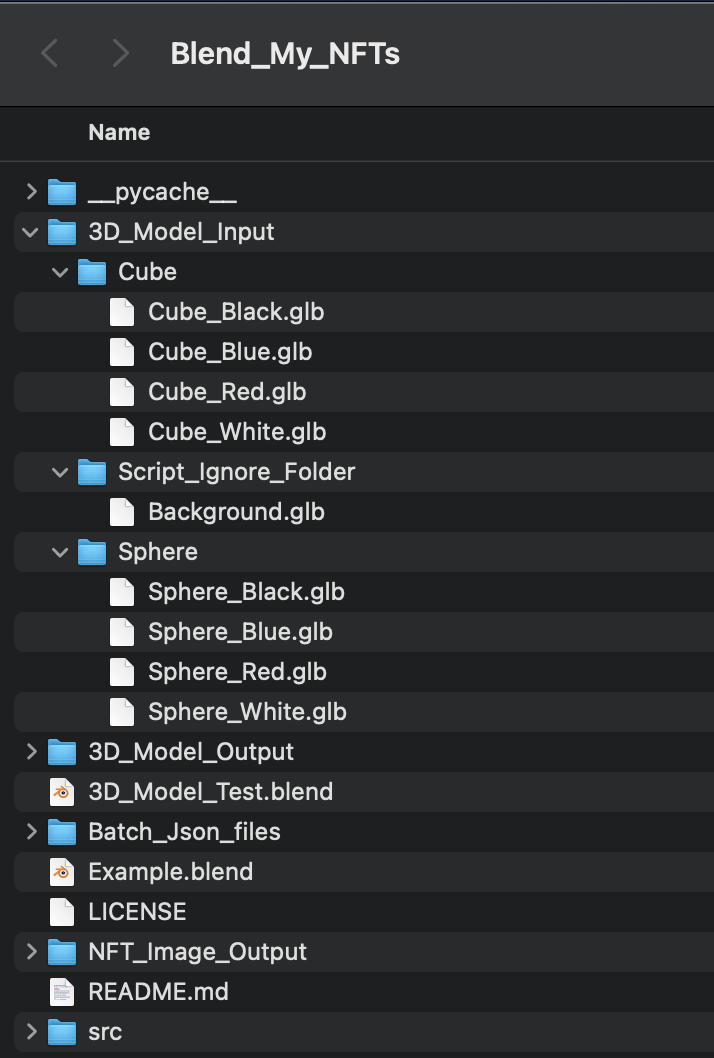
- Similarly to the Image Generator, there is a specific way to format 3d model repositors external to Blender. In the following photo we have a folder structure. In this example, "Sphere" and "Cube" are our attributes. Any object in the "Script_Ignore_Folder" will be added to all NFT 3D models generated, and such is an appropriate place to put constant scene elements you wish to appear in every NFT you generate.

- After you have formated the repository of 3D models to the above convention, copy and past it into the 3D_Model_Input folder located in Blend_My_NFTs:
- Next open config.py and change the variable "use3DModels = False" to "use3DModels = True"

-
In Blender open a new blend file and delete everything from the scene.
-
Save the .blend file to the Blend_My_NFTs folder and reload reload the .blend file.
-
Follow the previous steps to add and run scripts for main.py in your empty .blend file.
-
Run main.py
The generated 3D models will appear in the folder 3D_Model_Output
This Blender add on heaviliy relies on the Blender API and its documentation which you can find here: https://docs.blender.org/api/current/index.html
If you are interested in python I highly recomend getting familiar with some of the basic commands such as bpy.data, bpy.context, and bpy.ops. Also read the Quick Start, very helpful.
Blend_My_NFTs works with Windows 10 or macOS BigSure 11.6 on Blender 2.93.5. These are the operating systems I have tested the scripts on, I do not garuntee they will work on other operating systems. I do not garuntee this software will work with your setup. There are many variables and factors that go into running the software provided, it differs from system to system, and from blend file to blend file.
I encourage you to do some trouble shooting, read the Blender API documentation, read this tutorial, review the scripts, and do your own research before reaching out for help on our discord. If you are really stuck and are out of options I am available on our disord channel above for consulting. However! I am not a toutor. Although I enjoy teaching people, I simply do not have the time to work, build this project, teach people Blender/Python, and live my life. So please respect my time, I'd love to help!
To be honest I have no idea how to use Blender. I know some basic things, but I know the API and Python a lot better. This is my first Blender/Python project, so you may be wondering "how is he making a NFT collection with Blender??" Well I'm not, I write the code for the Blend_My_NFTs, and my team has three other members; Devlin and Caelin, who create the scenes and models in Blender, and the third is Quinn who is the lead web developer for our site.
If building an NFT collection in blender is something you really want to do and you have experience with Blender, I suggest you get familiar with some basic Python functionality and then how to run scripts in the Belnder Text Editor (an indepth knowledge is not required). However, if you don't use Blender but have a coding background, I would suggest watching some basic tutorials just to get a feel for the software (an indepth knowledge is not required).
This tutorial page is not finished! This page will be updated as I commit/merge new changes to the main branch. (Last updated Nov 10th, 2021)
I garuntee this will eventually be an add on to Blender and not just a script you run through the script editor. (I mostly just put this in here for personal motivation, please don't pester me about the date lol)
Nothing in this repository or its documentation is financial advice. If you create an NFT project or collection with Blend_My_NFTs, you do so at your own personal and financial risk. We are only providing a means of acomplishing a goal, not investment or financial information about that goal. Do your own research and come to your own conclusions before spending money on NFTs or any asset for that matter. We are not liable for any finacial losses you may encure while using this software. Any discussion about finances and cryptocurrencies in this repository or its documentation are done with the intent to educate and provide examples to help our users understand concepts relating to Blend_My_NFTs and This Cozy Place.
The creators of This Cozy Place will never, under any cricumstance, ask for your crypto wallet(s) secret phrase or private keys. If you come across anyone who is impersonating the founding members of This Cozy Place, please report it immediately to the admins on our discord channel and we will take appropriate action and warn our community of the behaviour.
This software is provided for free and is open source. We are not liable for any felones you may commit using this software, and we staunchly appose the malicious use of this software that in any way breaks any applicable law in your loction of residence.