This repository houses the latest releases, and up-to-date documentation for the Paddle framework.
- Latest Release Version: 2.18
- Release Date: 31st October 2014
- Upgrading from v1.x to 2.x
- Basic Setup
- Paddle Licensing
- Paddle Store Kit
If you've previously used version 1.x of the Paddle framework you'll find it very simple to upgrade:
- Replace Paddle.framework in your Xcode project with the most recent version
- Set your credentials on app start, outlined in basic setup
- Use the new
startLicensingmethod, outlined in Paddle Licensing
To setup the Paddle licensing framework there are just a few simple steps:
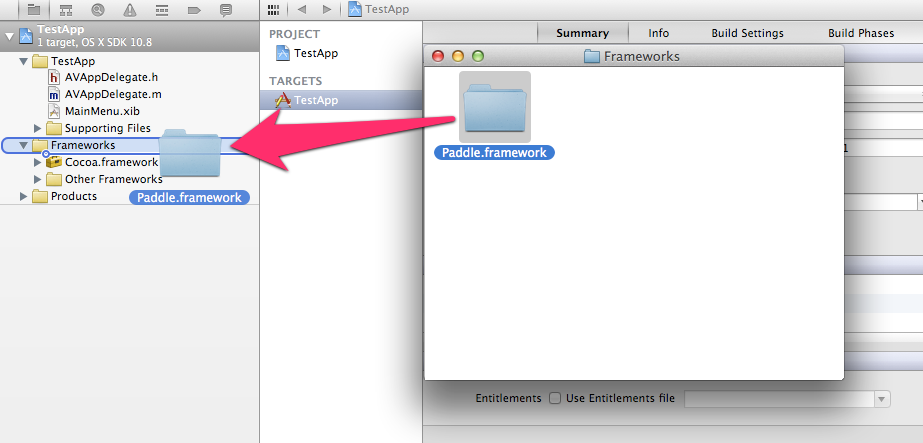
- Add the Paddle framework to your Xcode project by dragging from the finder.
Make sure you 'Add To Target' for your app.
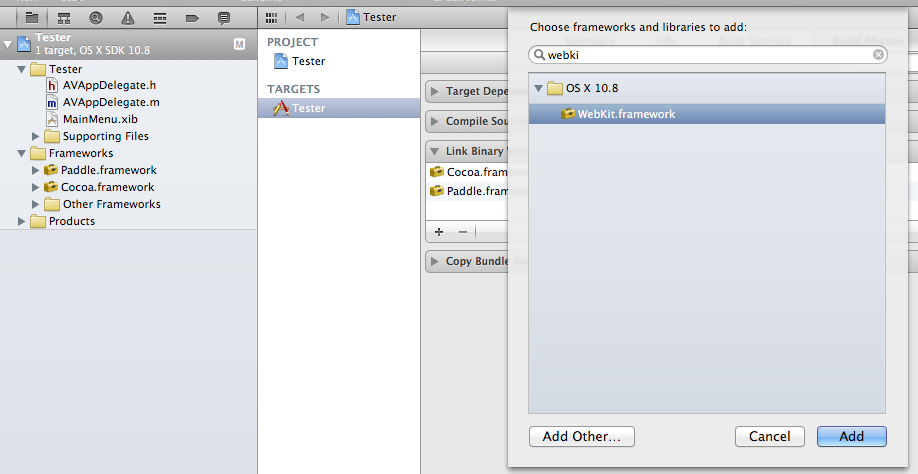
- The Paddle framework requires WebKit to be included in your project. Project->Target->Build Phases->Link Binary With Libraries->Add WebKit.
- Now you need to tell Xcode to copy the framework into your project. Still within 'Build Phases' add a build phase (New Copy Files Build Phase), make sure 'Destination' is set to 'Frameworks'.
- At the top of your AppDelegate.h import the Paddle framework
#import <Paddle/Paddle.h> - Before you use either PaddleLicensing or PaddleStoreKit, you will need to set your credentials. This would usually be done in
applicationDidFinishLaunching, for example:


	Paddle *paddle = [Paddle sharedInstance];
    [paddle setProductId:@"491452"];
    [paddle setVendorId:@"389"];
    [paddle setApiKey:@"e804e5ba7480af14e596d0272031bc01"];
After setting up the framework you can now implement either PaddleLicensing or PaddleStoreKit.
In applicationDidFinishLaunching you first need to create an NSDictionary containing the default values for your product, like so:
  NSDictionary *productInfo = @{kPADCurrentPrice:   @"10.00",
                                kPADDevName:        @"Test Developer",
                                kPADCurrency:       @"USD",
                                kPADImage:          @"http://www.macupdate.com/util/iconlg/17227.png",
                                kPADProductName:    @"Test Product 2",
                                kPADTrialDuration:  @"7",
                                kPADTrialText:      @"Thanks for downloading a trial of our product",
                                kPADProductImage:   @"paddleicon.png"}; // Image file in your project
Now you can start the Paddle licencing process with the startLicencing method. This method accepts your product information and main window to display the sheet from.
[[Paddle sharedInstance] startLicensing:productInfo timeTrial:YES withWindow:self.window];
The complete method in your AppDelegate.h, would look like:
- (void)applicationDidFinishLaunching:(NSNotification *)aNotification
{
	  NSDictionary *productInfo = @{kPADCurrentPrice:   @"10.00",
	                                kPADDevName:        @"Test Developer",
	                                kPADCurrency:       @"USD",
	                                kPADImage:          @"http://www.macupdate.com/util/iconlg/17227.png",
	                                kPADProductName:    @"Test Product 2",
	                                kPADTrialDuration:  @"7",
	                                kPADTrialText:      @"Thanks for downloading a trial of our product",
	                                kPADProductImage:   @"paddleicon.png"}; // Image file in your project

    	[[Paddle sharedInstance] startLicensing:productInfo timeTrial:YES withWindow:self.window];
Before using any of the methods below, ensure that the startLicensing method has been called.
At any time you can ask Paddle for the number of days remaining on a customer trial by using
- (NSNumber *)daysRemainingOnTrial;
For example
NSNumber *daysRemaining = [[Paddle sharedInstance] daysRemainingOnTrial];
If you haven't set your product up as a time-trial then this method will return 0 as the number of days remaining.
If you wish to use the framework to restrict features, rather than as a time trial, you can use the following method to discover if the product has or hasn't been activated
- (BOOL)productActivated;
For example
	BOOL productActivated = [[Paddle sharedInstance] productActivated];
	if (productActivated) {
		//Product has been activated - enable feature
	} else {
		//Product not activated - disable feature
	}
If at any point you wish to display the licencing views then simply use the following method
- (void)showLicencing;
For example
[[Paddle sharedInstance] showLicencing];
Once a user has activated your app you may wish to display the email address and licence code used to activate. There are two simple methods you can use to retrieve this information
- (NSString *)activatedEmail;
- (NSString *)activatedLicenceCode;
Both will return null if the product has not been activated. A simple example to use these would be
	NSString *email = [[Paddle sharedInstance] activatedEmail];
	NSString *licenceCode = [[Paddle sharedInstance] activatedLicenceCode];
You can also receive notifications when your app has been activated. If your app has already been activated then this notification will be sent when your app first starts the Paddle framework.
First of all, you should add an observer to receive the notifications
[[NSNotificationCenter defaultCenter] addObserver:self selector:@selector(handleNotification:) name:kPADActivated object:nil];
Then implement the handleNotification method to receive, and act, on the notification
  - (void)handleNotification:(NSNotification *)note {
	  NSLog(@"Product Activated");
  }
Depending on your app you may wish to display the licensing window before anything else and then show the MainWindow when a trial is continued or a license is activated.
To achieve this, first of all show the licensing window as usual but pass nil to the withWindow: parameter. This will display the licensing window as a modal window rather than an NSSheet attached to the mainWindow.
[[Paddle sharedInstance] startLicensing:productInfo timeTrial:YES withWindow:nil];
You should register an observer to receive notifications for either kPADContinue or kPADActivated.
	[[NSNotificationCenter defaultCenter] addObserver:self selector:@selector(handleNotification:) name:kPADContinue object:nil];
	[[NSNotificationCenter defaultCenter] addObserver:self selector:@selector(handleNotification:) name:kPADActivated object:nil];
When the observer receives either of these notifications you can continue the launch of your app and display the mainWindow.
	- (void)handleNotification:(NSNotification *)notification
	{
	    if ([notification isKindOfClass:[NSNotification class]])
	    {
	        if ([[notification name] isEqualToString:kPADContinue] || [[notification name] isEqualToString:kPADActivated])
	        {
	            [[NSNotificationCenter defaultCenter] removeObserver:self name:[notification name] object:nil];

	            //Show the main window, etc.
	        }
	    }
	}
You can now deactivate an active licence should you wish. The Paddle framework has introduced a delegate for this implementation.
To use this, simply set your delegate and call the deactivate method. Once you have called this method you could show an activity indicator or other appropriate UI element.
[[Paddle sharedInstance] setDelegate:self];
[[Paddle sharedInstance] deactivateLicence];
Then implement the licenceDeactivated delegate method to check if the licence was successfully deactivated or not. In this delegate method you could close your app or show the Paddle licensing window again, as well as hiding any UI elements indicating deactivation.
- (void)licenceDeactivated:(BOOL)deactivated message:(NSString *)deactivateMessage {
    if (deactivated) {
        //Licence was deactivated, show the licencing window again (trial will carry on as usual)
        [[Paddle sharedInstance] showLicencing];
    } else {
        //Licence failed to deactivate
    }
}
When a trial has expired, and no valid licence has been activated, the user can no longer continue the trial - instead they are only given licencing options or an option to quit the app.
When Paddle Framework quits the app, there are two methods it can use:
NSApp Terminateexit()
By default Paddle Framework uses exit() to quit an app. No notifications are sent to your app, it quits without warning. This limits the possibility of the user being able to continue using your app without paying.
If your app needs to perform some method/function before quiting and/or you want the terminate notification to be sent then you can allow this by setting canForceExit to NO. This should be done before startLicensing is called. You can set this using the following:
[[Paddle sharedInstance] setCanForceExit:NO];
followed by the usual process of starting licensing:
[[Paddle sharedInstance] startLicensing:productInf...
If you wish to start the licensing process, but not display the licensing window under circumstances you optionally (the window will show by default) disable this by setting willShowLicensingWindow to NO. This should be done before startLicensing is called. You can set this using the following:
[[Paddle sharedInstance] setWillShowLicensingWindow:NO];
followed by the usual process of starting licensing:
[[Paddle sharedInstance] startLicensing:productInf...
Before using PaddleStoreKit, please ensure you have followed the basic setup instructions above.
- At the top of your AppDelegate.h import the PaddleStoreKit framework:
#import <Paddle/PaddleStoreKit.h> - If you are planning to verify receipts and use the associated delegate methods you will also need to import the PSKReceipt object:
#import <Paddle/PSKReceipt.h> - You will also need to tell your AppDelegate (or class you will be using PSK from) to be a delegate of PSK:
@interface AppDelegate : NSObject <NSApplicationDelegate, PaddleStoreKitDelegate>
After the above, you're ready to start using PSK to offer In App Purchases.
PSK offers a simple implementation in which Paddle takes care of everything including verifying transactions, depending on your needs you can use any combination of these methods to produce the desired functionality within your app.
The quickest way to try PSK is to show the Paddle Store View. This will display a list of all products associated with your app, allow a user to view individual products and finally make a purchase. Once a user has made a purchase, a delegate method is called to give you details of the transaction.
After initial setup, to display the store view, simply use:
	PaddleStoreKit *psk = [PaddleStoreKit sharedInstance];
	[psk setDelegate:self];
	[psk showStoreView];
You can also, optionally, filter the products shown by passing an array of productId's:
[psk showStoreViewForProductIds:@[@"id1", @"id2"]];When a user has made a purchase, the following delegate method will be called:
- (void)PSKProductPurchased:(PSKReceipt *)transactionReceipt
You can use this delegate method to both verify the transaction (if required) as well as deliver the product to the user.
An example of this would be:
	- (void)PSKProductPurchased:(PSKReceipt *)transactionReceipt {
	//See documentation section 'Verifying Receipts'

        //Receipts contain the purchase/product id so you are able to deliver the purchase
        if ([transactionReceipt.productId isEqualToString:@"12345.1"]) {
            //In app purchase '1' for product '12345' has been purchased. Enable feature.
        }
}If you want to just display information about a particular product, that you know the Id of then you follow a similar process to display a single product. For example:
	PaddleStoreKit *psk = [PaddleStoreKit sharedInstance];
	[psk setDelegate:self];
	[psk showProduct:@"productId"];
Once completed this will still call the delegate method - (void)PSKProductPurchased:(NSDictionary *)productInfo transactionReceipt:(NSDictionary *)transactionReceipt;
Alternatively, you can just display a purchase view for a particular product. Again this will still call the PSKProductPurchased delegate method for you to deliver the product once completed.
An example of displaying a purchase view for a product would be:
	PaddleStoreKit *psk = [PaddleStoreKit sharedInstance];
	[psk setDelegate:self];
[psk purchaseProduct:@"productId"];PSK stores details of all receipts for your application allowing you to refer back to them at a later date. It also good practice to verify a receipt once returned before you deliver the purchased product.
You can request all locally stored valid receipts by calling - (NSArray *)validReceipts;. For example:
   PaddleStoreKit *psk = [PaddleStoreKit sharedInstance];
   NSArray *receipts = [psk validReceipts];
   for (PSKReceipt *receipt in receipts) {
           //Find appropriate receipt

}You can also request a receipt for a particular product. For example:
	PaddleStoreKit *psk = [PaddleStoreKit sharedInstance];
PSKReceipt *receipt = [psk receiptForProductId:@"productId"];PSKReceipt objects provide you with:
- productId (NSString) - The full product id is in the format: app_product_id.purchase_id (e.g 1234.1)
- token (NSString) - This is the token that was generated when PSK first verified the receipt
- userId (NSString) - This is the Paddle user_id of the purchaser. You can use this if you have user accounts in your app and would like to relate purchases to users
- lastActivated (NSDate) - Depending on your requirements you can use this to re-verify a receipt after a period of time
    receipt.delegate = self;
    if ([[receipt token] length] != 0) {
        NSTimeInterval diff = [[NSDate date] timeIntervalSinceDate:[receipt lastActivated]]/60;
        //If receipt was last verified over 12 hours ago
        if (diff > 720) {
            [receipt verify];
        } else {
            //Deliver product
        }
    }
When verify is called on a PSKReceipt object, it will call one of two delegate methods on completion:
- (void)verificationSuccess:(id)receipt;
- (void)verificationFail:(id)receipt;
Both of these delegate methods will return the receipt object which can use the process above to double check verification.
PSK also provides two other delegate methods to help with further implementation.
Whenever a user cancels any part of the process, the delegate method - (void)PSKDidCancel.
You can use this for many reasons, such as providing help to user or re-directing to a different purchase at a lower price.
Any errors, either PSK/Paddle specific or generic (such as lack of internet connection, etc) will be returned via the - (void)PSKDidFailWithError:(NSError *)error delegate method, always returning a valid NSError object.
PSK/Paddle specific errors will use the domain Paddle, a list of error codes can be found here:
- 100: Unable to find requested license
- 101: Bad method call
- 102: Bad api key
- 103: Timestamp is too old or not valid
- 104: License code has already been utilised
- 105: License code is not active
- 106: Unable to find requested activation
- 107: You don't have permission to access this resource
- 108: Unable to find requested product
- 109: Provided currency is not valid
- 110: Unable to find requested purchase
- 111: Invalid authentication token
- 112: Invalid verification token


