Follow the instructions on https://github.com/statianzo/sql-setup
Copy the contents of ./schema.sql, paste it into SQL Tabs and execute it.
Run a test query, select * from injuries and ensure you see some results.
Clone the repo (do not fork it).
The necessary dependencies are already added in package.json.
npm install
Start your application by running:
npm start
Open http://localhost:3000 to test.
In server.js, add to your list of imports:
const massive = require('massive');In server.js add code to connect
to your database. Use the same connection string URI as SQL Tabs. Wrap the
app.listen call to ensure your database is connected before accepting
requests.
Add the connection as a db setting to the app. This will allow the
connection object to be accessed in requests through req.app.get('db').
const connectionString = 'postgres://localhost/mycooldatabase';

massive(connectionString).then(connection => {
  app.set('db', connection);
  app.listen(port, () => {
    console.log('Started server on port', port);
  });
});
Use console.log(connection) to test that you're properly connected to Postgres.
Remove it when you're confident it works.
massive-js works by converting your SQL queries, held in files, into JS functions.
For example, the following file, held in the ./db directory of your project:
db/getAllInjuries.sql
SELECT * FROM injuries;Yields the following function:
db.getAllInjuries().then(injuries => {
  console.log(injuries) // injuries will contain an array of injuries
});
Create the ./db directory, and add a file, getAllIncidents.sql
(incidents, not injuries).
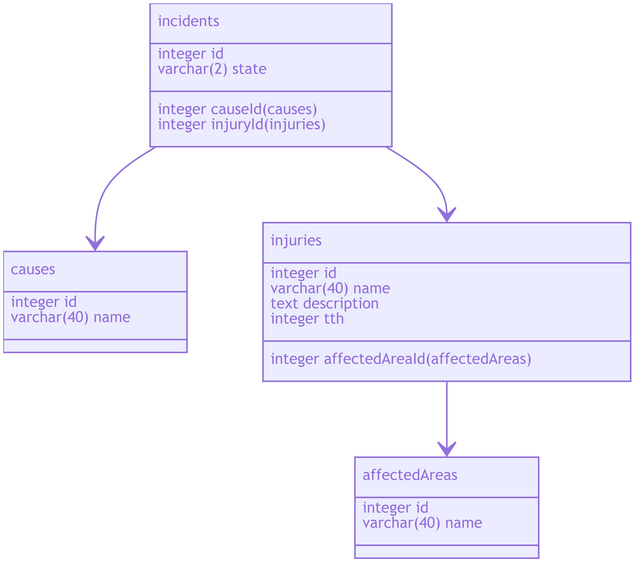
Now that you have a repository for SQL queries, add a query to your new file that shows you retrieves the following pieces of information for every incident in your database:
incidents.idincidents.stateinjuries.nameaffectedAreas.namecauses.name
Your query will require more than one join in a single statement (whoa!). When your query is ready, test it in SQL Tabs.
Now that you have a way to return basic information about incidents of injuries, upgrade the GET endpoint such that an HTTP request can return the information to a client (like Angular) in your response:
Hint:
db.getAllInjuries().then(injuries => {
  console.log(injuries) // injuries will contain an array of injuries
});
Using a client like Postman can help when making test requests.
If you've made it this far, great work. Now, upgrade your endpoint again, this
time accepting a query parameter, state=UT. When submitted as part of the
GET request, return the results of a different query, db/getIncidentsByState.sql.
Your query should return the same information, but only results that match the
value in the state query param.
Hint:
massive-js accepts arguments as part of your SQL using ${foo}, ${bar}, ...
SELECT * FROM Products
WHERE inStock = ${isAvailable} AND price < ${maxPrice};
Your arguments can be submitted as an object.
db.getProducts({isAvailable: true, maxPrice:1000}).then(products => {
  // products is a results array
});Upgrade the POST request to give yourself the ability to create a new incident. Here's a sample request body for Postman:
{
  "state": "WV",
  "injuryid": 1,
  "causeid": 5
}Let's keep our API consistent when reading and writing. After creating a new incident, return the incident with the same fields as step 7:
incidents.idincidents.stateinjuries.nameaffectedAreas.namecauses.name
Hint:
See the PostgreSQL INSERT docs
on the RETURNING keyword.
Add RETURNING id to your INSERT statement from step 11.
Hardcoding your connection string within code is not a good practice. It can lead to exposure of sensitive information and can make it difficult to switch between environments.
Instead of hard coding, we can use envrionment variables to tell our Node
process what connection string to use. Node exposes a global obect called
process with a property called env to read these variables.
const connectionString = process.env.DATABASE_URL;Environment variables can be passed into Node when starting by
defining them when calling node
DATABASE_URL=postgres://yoururl node server.jsRather than having to remember to type our local database credentials every
time we start, we can use a npm package called dotenv. It allows creating a
.env file in the project with a list of environment variables.
DATABASE_URL=postgres://yoururl
OTHER_VARIABLE=xyz
Be sure to add .env to .gitignore so it doesn't get committed.
One benefit to naming your connection string variable DATABASE_URL is that
Heroku will
automatically set it
when booting your application.


