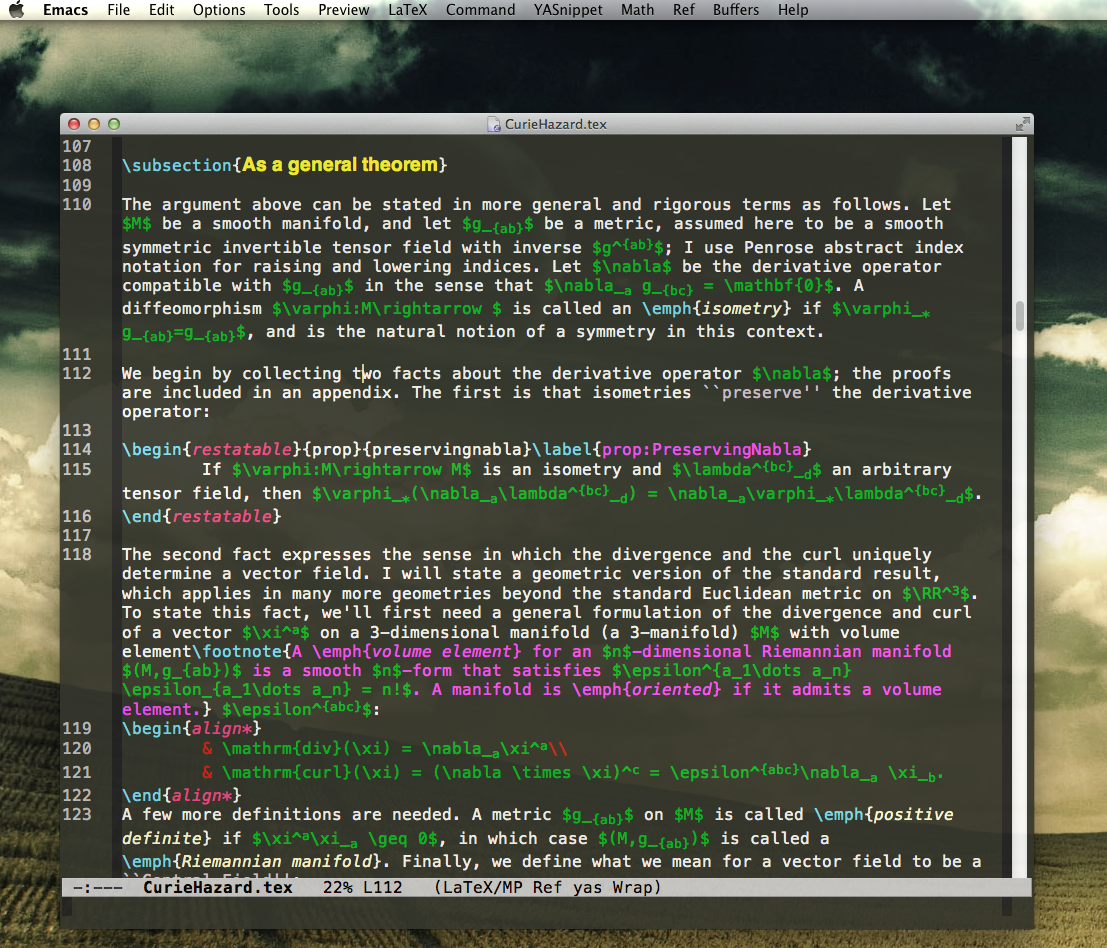
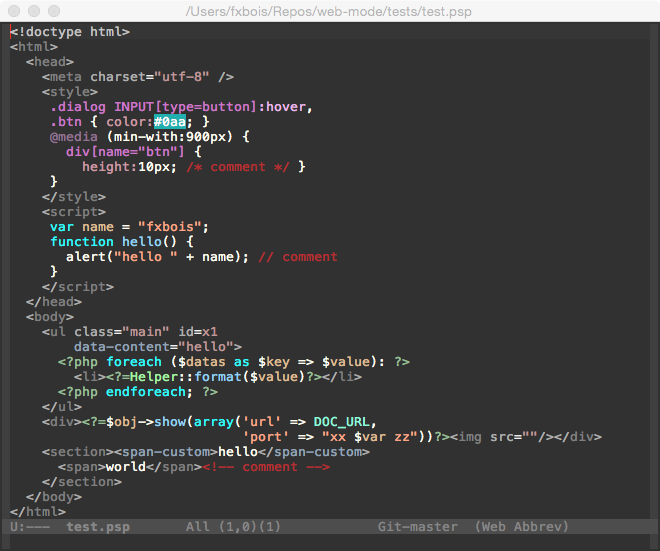
Emacs is the most powerful, most enlightened way to edit LaTeX, markdown and web markup like html, css and javascript. And it's 100% free.
In what follows I describe my minimalist emacs installation on Mac OS X. To copy my setup exactly just follow the instructions below. Or pick and choose what you want. There are many roads to Emacs Zen.
Nothing special is required for emacs. But I'm writing this from the perspective of someone using Mac OS X, and I will assume some familiarity with the command line and with basic emacs operations.
Make sure this folder is in your home directory ~/.emacs.d --- it's a hidden file, so if you don't have all hidden files revealed, you can access it through the Terminal by list using ls -a or just cd into it.
Even easier: create a Github account and fork this respository. Then use Github's desktop software to clone your .emacs.d folder to your home directory. You'll be able to repeat this process on all your machines, using Github to keep your Emacs preferences synced and shared on the web.
The first step is to install a better version of emacs. There are various distributions available, e.g. Aquamacs or Emacs for Mac. But Homebrew is the most hacker-friendly, and I'll assume here that you've installed that:
Of course your Mac comes pre-installed with emacs. But it's not kept up to date, e.g. at time of writing, Mac OS has emacs 22, but emacs is at emacs 24 which has all kinds of awesome and crucial stuff. So as to not mess with the factory-installed version, we use Homebrew to install and update a custom version. You can run this installation through the command line or through an Xwindows/GUI.
If you use Homebrew, note the comment at the end of the installation process that says where Emacs was installed. In my case it was in /usr/local/Cellar/emacs/24.3
You'll want to have Emacs sitting in your Applications folder with your other apps. And you'll want to be able to run it from the command line in the OS X terminal without screwing with the existing emacs installation. The former is accomplished by running the following in the command line:
brew linkapps
You'll then see Emacs.app appear in your /Applications folder. The latter is accomplished by creating a shell alias. You can do this by editing your bash profile following these steps:
- Open Terminal.app
- Open your bash profile by typing:
emacs ~/.bash_profile - Add this line to the end:
alias Emacs="/Applications/Emacs.app/Contents/MacOS/Emacs -nw" - Active you new settings by saving and quitting emacs (
C-x C-sC-x C-c) and running this command in the terminal:source .bash_profile - Now you'll be able to access your new Emacs installation by just running
Emacswith a capital E in the command line.
There are lots more great suggestions for bash profile customizations written up by Nate Landau.
We want to install a better package manager. The basic pre-installed package manager is called elpa. You can access it within emacs by going to M-x package-list --- but let's install the superior "melpa" manager first. The necessary code for this is included in the init.el file.
Auctex is the golden package for everything latex: an amazing reference manager, cool dropdown menus and completions, the works. It's all ready to go, but in general one uses the package manager to install such packages. Within your sparkling new Emacs installation:
M-x package-list- Search/scroll down to Auctex and hit enter, then click install.
Go ahead and check it out; emacs will tell you that it's already installed.
The basic compile command is C-c C-c. In general C-c will start you off with an Auctex command. You can see more from the Auctex menu. (You have explored all the menus, haven't you?)
With Auctex is installed, you can get Latex to sync properly with a PDF reader. You will have to set this up, since it involves putting a file in your home directory and installing a new application. But here's what you'll get:
-
Forward syncing: You can hit
C-c C-vin LaTeX with your cursor at some point in the tex document, and it will zip you to the corresponding line in the PDF. -
Backward syncing: As you're reading your PDF in Skim, you'll be able to Command-shift-click on a paragraph (e.g. when you see an error) and be zipped to the corresponding LaTeX line in emacs.
To set this up, first download Skim. It's free, is a solid PDF reader, and it is in my view the best PDF reader for syncing emacs.
The next step is to create a file called ~/.latexmkrc in your home directory and paste the following into it.
$pdflatex = 'pdflatex -interaction=nonstopmode -synctex=1 %O %S';
$pdf_previewer = 'open -a skim';
$clean_ext = 'bbl rel %R-blx.bib %R.synctex.gz';
Finally, to set up backwards syncing, open Skim and go to Preferences > Sync. Choose Emacs, then change it to Custom and replace emacsclient with the location of your emacsclient file. In my case, it is: /usr/local/Cellar/emacs/24.3/bin/emacsclient
That's it --- syncing zen will be yours.
I've installed the fancier package manager Melpa, which lets you install still fancier things like Yasnippet, an awesome tab-completion and snippet tool. It's already activated in the init.el file. This provides a rich set of pre-installed snippets for LaTeX and many other languages.
The path to bibliographic enlightenment begins by keeping all your bibliography items in one master .bib file and including it in all your LaTeX documents. When it's time to submit the article to a journal, just compile the LaTeX file. The exact bibliographic items you need can be found in the .bbl file created when LaTeX compiles.
Now here's the really great part. With Auctex installed, you automatically get a tool called Reftex that will read and automatically insert items from that master bibliography. Here are a few of the more helpful commands:
C-c [- dropdown with citations pulled automatically from a linked bib fileC-c ]- auto-end closest existing open environmentC-c (- insert label
Reftex is really powerful. As a test:
Open a document with an equation that is labeled with something like \label{eq:myequation}. Try typing the word Equation, then a space, and then hitting C-c C-) which calls Reftex's label-completion. A dropdown menu will appear with your file's section structure, and all the labeled equations highlighted for you to scroll through. Wow!
Auctex has a cool preview function, illustrated below. Notice in the preview menu that you can hit C-c C-c C-p to toggle a preview of latex-stuff, including math mode. This function uses ghostscript to display a little preview of the rendered results right in the buffer. It can be a little buggy for very complex maths environments, but for simple stuff it's great:
Requirements:
-
Ghostscript. On OS X, it's now installed automatically starting with TexLive 2014. If you prefer to use TexLive 2013 or earlier, you can run
brew install ghostscript -
Get emacs to find ghostscript. For some reason emacs wouldn't find ghostscript by itself on my installation, and would return baloney like
pdf2dsc: command not foundandNo such file or directory, gs. This is corrected by adding the location of the ghostscript bin to the PATH and executive path, with the following code (already in .emacs.d/init.el):(setenv "PATH" (concat "/usr/texbin" ":" "/usr/local/bin" ":" (getenv "PATH") ) ) (setq exec-path (append exec-path '("/usr/local/bin")))
Emacs Zen is also great for multimarkdown. It's pretty easy.
- Install markdown from the terminal with
brew install markdown - Add the markdown installation hooks (already in .emacs.d/init.el)
Especially nice features include C-c C-c m which will compile your markdown and open a web browser for you to look at it.
Editing html in emacs is also sublime. However, the default html-mode for emacs is pretty useless. To reach zen, you'll need a more serious html mode called web-mode, which is already all set up in this .emacs.d directory. The folder is in the .emacs.d file, and there's a hook to make it the default mode for html, css and js files is in init.el.
Apart from a number of helpful completion and tab conveniences, web-mode is smart enough to color html syntax, while also coloring css syntax when found within <style></style> tags, and js syntax when found within <script></script> tags.
Absolutely lovely.
Yasnippet has a rich set of built-in tab completions in html/css for almost everything you can think of. A quirk is just that it does not have a web-mode folder by default, and so these commands don't normally get loaded. This is easy to fix, and I have done so for this emacs setup. All I had to do is go to the yasnippet snippets folder and create a new folder called web-mode. Then I copied all the commands from html-mode and css-mode into it that new folder. The effect is lovely. For example, here are some of the built-in snippets:
p TAB→<p>[cursor here]</p>em TAB→<em>[cursor here]</em>img TAB→<img src="[1st tab]" class="[2nd tab]" alt="[3rd tab]" />
Lots of the built-in snippets are really intuitive like that, but there are others, and of course you can create your own.
I've added a couple of Mac OS X specific keystrokes to .emacs.d/init.el to make things pleasant on a Mac:
-
Up/Down Scrolling. Using the up and down arrows will scroll the screen. In Emacs.app you have a ton of mousey actions available, clicking, scrolling, etc. But I like the arrows for fine-scrolling control.
-
Easy Italics/Bold. I added hooks to LaTeX and markdown modes so that Cmd-i and Cmd-b will pop in italics and bold environments, respectively.
The OS X "command" key already does a lot of stuff you're used to: Cmd-s to save, Cmd-c to copy, Cmd-v to paste, etc. You can add more Cmd key bindings by using the code (kbd "s-") for your desired . See some examples in .emacs.d/init.el to get a feel for this.
Once you've achieved Emacs Zen, why not share the love? Create your own github repository for your .emacs.d folder, or create a fork for my github repository, and use Github's desktop application to keep your emacs folder synced across machines and forever shared on the web.


