
This lesson is a brief introduction to VS Code by Microsoft, the go-to text editor for web developers. You'll be spending a lot of time using this program, and the faster you are acclimated to it and become comfortable with it, the better coder you will be! In this lesson we'll review the basic layout, usage of common features, and review a few things that can take VS Code even further like hot keys and Extensions.
- Review the main features and layout of VS Code
- Practice several common hot-key commands and shortcuts
- Review and synchronize certain Settings to ensure we all start off on the same page
- Discuss common helpful and/or necessary Extensions for VS Code

- Fork and Clone this Repository into your class directory
- Open the repo in VS Code (open directly or use the code command in Terminal)
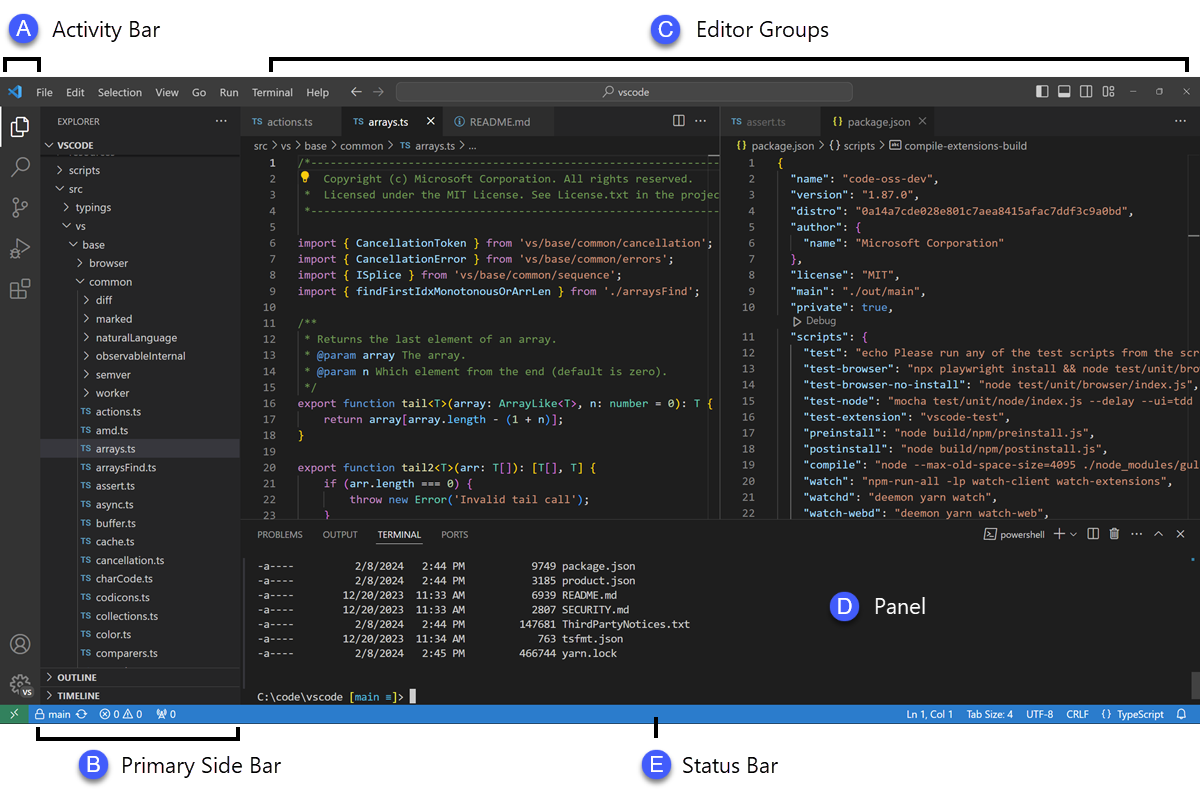
Take a look at the main UI (User Interface) layout in the image above. Your VS Code layout may not look exactly like this, but it'll be close. Let's look at each of these different sections:
A) Activity Bar - Use these icons to switch between and show/hide different views.
B) Side Bar - Contains views like the Explorer View to show your entire project in a compact and readable way.
C) Editor Groups - This is the main area for editing your code. Can be configured in any layout so you can view multiple files at once.
D) Panel - Can show panels for debugging, output, errors and warnings, but most importantly an integrated terminal (ooooh, ahhhh).
E) Status Bar - Shows relevant information about the current open project.

State Preservation - VS Code will always open in the same state you left it in. This is an extremely handy feature. Let's try opening a directory or something and then completely closing out of VS Code. Now let's reopen the project, and look! Everything is right how we left it! (If this didn't work for you, don't worry, it will later on.)
Side by Side Editing - You can rearrange your editor windows so that you can view several at once. This can be super handy. Let's try that! Click on a file in the side bar and hold and drag it to one side of the Editor Group section. You should see a hilighted section where the file will be opened.
MiniMap - You can also display a code outline or "minimap" for quick navigation through a lot of code. Try View -> Show Minimap. There's a bunch of fake code in code.js that we can jump around in with the minimap (don't worry it's all fake and non-working). Let's try! With the minimap enabled, you can see a miniature layout of your entire file displayed to the right of your code. Click anywhere on that display and you will jump to that section of the code.
Breadcrumbs - Above each open file is a path to help you keep track of the file locations. This can be a nice reference.

Open Terminal - Quickly open your built-in terminal by hitting Ctrl + `
Save - Save the file you're working on with Cmd + S (sub Ctrl for Cmd if using Windows going forward)
Open/Close Sidebar - Quickly hide/show the sidebar with Cmd + B. If this doesn't work, it could be because the current file you're in is the ReadMe file, which is in Markdown language. In Markdown, Cmd + B makes text bold.
Command Palette - Quickly open the Command Palette by hitting Shift + Cmd + P. From here, you can perform a whole bunch of tasks:
- Find any file or project by simply typing it's name.
- Cycle through recent files you've opened.
- Search for specific Settings.
- Type ? to bring up a list of everything you can do from the Command Palette.
Using this feature can save you time and make you a more productive dev.
Let's hit Cmd + , to quickly open Settings...

Settings can be set for the User overall, or for a specific workspace/project. For the most part, you'll want to configure the Settings for the User. As we go through each setting, search for it in the search bar to go straight to it.
Auto Save - There's a lot of debate about whether one should use Auto Save or not. However, best practice is to get used to saving your own work regularly. Having Auto Save turned on can overheat your machine as it attempts to re-render and re-compile entire projects with every keystroke. For this immersive, we will set Auto Save to off.
Tab Size - This will adjust how large the indents are for your code. For this immersive, we will set Tab Size to 2.
There are tons of other settings that you can adjust and change to customize your editor. But beware, don't change something if you aren't sure what it does. VS Code gives us access to a lot more settings than a standard program. It assumes you know what you're doing since the primary users are programmers. So just be careful.
Let's hit Shft + Cmd + X and look at some helpful Extensions we can add to VS Code...

VS Code allows for user-created extensions to be installed to add features, theming, and useful shortcuts and bonuses not provided by the base program. Search for each of these in the Extensions section install them. For each of these, only install the extension that has millions of downloads to ensure you're getting the correct one:
indent-rainbow - Colorizes your indentations to make it easy to tell which section you're in while coding. The one we want has 2.5M downloads...
Python - An extension that helps VS Code operate normally when using the Python coding language (that we'll learn and use in Unit 4). Be sure and install the extension offered by Microsoft that has 44.7M downloads...
Prettier - Code formatter - Enforces a built-in style guide on your code to ensure tabulation, spacing, indents, etc. are all uniform. There are a few steps to installing and configuring Prettier that we'll go through together:
- Search for and install the VS Code extension just like we did the previous ones. Get the one with 16.2M million downloads...
- Follow the next steps EXACTLY...
- Hit Ctrl + ` and in the built-in Terminal, enter the following commands EXACTLY. Feel free to copy and paste them:
npm i -g prettier- installs Prettier globally on our machines so we always have it
touch ~/.prettierrc- places a Prettier file in our root directory
echo "{"trailingComma": "none", "tabWidth": 2, "bracketSpacing": true, "useTabs": false, "semi": false, "singleQuote": true}" > ~/.prettierrc- this inserts certain settings into the file we just created that tell Prettier how to format our code
- Open the Command Palette with Shft + Cmd + P and search "settings". Open the first one that pops up. It should say: "Preferences: Open Settings (JSON)". These are just default settings for Prettier to be able to operate like we need it to. Paste the following inside the last closing bracket:
  "[json]": {
      "editor.defaultFormatter": "esbenp.prettier-vscode"
  },
  "[jsx]": {
    "editor.defaultFormatter": "esbenp.prettier-vscode",
    "editor.formatOnSave": true
  },
  "[javascript]": {
    "editor.defaultFormatter": "esbenp.prettier-vscode",
    "editor.formatOnSave": true
  },
"editor.bracketPairColorization.enabled": true- Hit Cmd + , again and let's adjust one more Setting in relation to Prettier. When Settings pops up, search "Format on Save". Make sure the checkbox for this option is selected. This will free up Prettier to reformat our code when we save and make it look, well, pretty!

There are myriad other extensions available for VS Code, but much like Settings, be careful what you install/change. Not all have been properly vetted and most make core changes to your VS Code environment that could directly influence your ability to code properly.
A general rule of thumb is: do not install an extension unless you a) have read the documentation for it, b) know what the extension does, c) have a specific need for it, and d) will actually use it. But if you find one you want to use, don't be afraid to try it! If it's no good, just uninstall afterward.
Hopefully you feel a little more comfortable using VS Code after this walkthrough. This is the primary tool you will use over the next 12 weeks (and beyond) as a web developer. The more comfortable you are with using it, the better and more efficient you will be!


