Giter Club home page Giter Club logo

seedsigner-os's Introduction

Build an offline, airgapped Bitcoin signing device for less than $50!

Image of SeedSigners in Mini Pill Enclosures


Project Summary

CI

The goal of SeedSigner is to lower the cost and complexity of Bitcoin multi-signature wallet use. To accomplish this goal, SeedSigner offers anyone the opportunity to build a verifiably air-gapped, stateless Bitcoin signing device using inexpensive, publicly available hardware components (usually < $50). SeedSigner helps users save with Bitcoin by assisting with trustless private key generation and multisignature (aka "multisig") wallet setup, and helps users transact with Bitcoin via a secure, air-gapped QR-exchange signing model.

Additional information about the project can be found at SeedSigner.com.

You can follow @SeedSigner on Twitter for the latest project news and developments.

If you have specific questions about the project, our Telegram Group is a great place to ask them.

Feature Highlights:

  • Calculate the final word (aka checksum) of a 12- or 24-word BIP39 seed phrase
  • Create a 24-word BIP39 seed phrase with 99 dice rolls or a 12-word with 50 rolls (Verifying dice seed generation)
  • Create a 12- or 24-word BIP39 seed phrase via image entropy from the onboard camera
  • Temporarily stores seeds in memory while the device is powered; all memory is wiped when power is removed
  • SD card removable after boot to ensure no secret data can be written to it
  • Guided interface to manually transcribe a seed to the SeedQR format for instant seed loading (demo video here)
  • BIP39 passphrase (aka "word 25") support
  • Native Segwit Multisig XPUB generation
  • PSBT-compliant; scan and parse transaction data from animated QR codes
  • Sign transactions & transfer XPUB data using animated QR codes (demo video here)
  • Live preview during image entropy seed generation and QR scanning UX
  • Optimized seed word entry interface
  • Support for Bitcoin Mainnet & Testnet
  • Support for custom user-defined derivation paths
  • On-demand receive address verification
  • Address Explorer for single sig and multisig wallets
  • User-configurable QR code display density
  • Responsive, event-driven user interface

Considerations:

  • Built for compatibility with Specter Desktop, Sparrow, and BlueWallet Vaults
  • Device takes up to 60 seconds to boot before menu appears (be patient!)
  • Always test your setup before transferring larger amounts of bitcoin (try Testnet first!)
  • Taproot not quite yet supported
  • Slightly rotating the screen clockwise or counter-clockwise should resolve lighting/glare issues
  • If you think SeedSigner adds value to the Bitcoin ecosystem, please help us spread the word! (tweets, pics, videos, etc.)

Planned Upcoming Improvements / Functionality:

  • Multi-language support
  • Significantly faster boot time
  • Reproducible builds
  • Port to MicroPython to broaden the range of compatible hardware to include low-cost microcontrollers
  • Other optimizations based on user feedback!

Shopping List

To build a SeedSigner, you will need:

  • Raspberry Pi Zero (preferably version 1.3 with no WiFi/Bluetooth capability, but any Raspberry Pi 2/3/4 or Zero model will work, Raspberry Pi 1 devices will require a hardware modification to the Waveshare LCD Hat, as per the instructions here)
  • Waveshare 1.3" 240x240 pxl LCD (correct pixel count is important, more info at https://www.waveshare.com/wiki/1.3inch_LCD_HAT)
  • Pi Zero-compatible camera (tested to work with the Aokin / AuviPal 5MP 1080p with OV5647 Sensor)

Notes:

  • You will need to solder the 40 GPIO pins (20 pins per row) to the Raspberry Pi Zero board. If you don't want to solder, purchase "GPIO Hammer Headers" for a solderless experience.
  • Other cameras with the above sensor module should work, but may not fit in the Orange Pill enclosure
  • Choose the Waveshare screen carefully; make sure to purchase the model that has a resolution of 240x240 pixels

Software Installation

A Special Note On Minimizing Trust

As is the nature of pre-packaged software downloads, downloading and using the prepared SeedSigner release images means implicitly placing trust in the people preparing those images; in our project the released images are prepared and signed by the eponymous creator of the project, SeedSigner "the person". That individual is additionally the only person in possession of the PGP keys that are used to sign the release images.

Starting with v0.7.0, the images distributed via GitHub are reproducible. This means you and others can verify the released images are byte-for-byte the same when built from source. You can contribute to this project by building from source and sharing the hash of the final images.

Instructions to build a SeedSigner OS image (using precisely the same process that is used to create the prepared release images) have been made available. We have put a lot of thought and work into making these instructions easy to understand and follow, even for less technical users. These instructions can be found here.

Downloading the Software

Download the current Version (0.7.0) software image that is compatible with your Raspberry Pi Hardware. The Pi Zero 1.3 is the most common and recommended board.

Board Download Image Link/Name
Raspberry Pi Zero 1.3 seedsigner_os.0.7.0.pi0.img
Raspberry Pi Zero W seedsigner_os.0.7.0.pi0.img
Raspberry Pi Zero 2 W seedsigner_os.0.7.0.pi02w.img
Raspberry Pi 1 Model B/B+ seedsigner_os.0.7.0.pi0.img
Raspberry Pi 2 Model B seedsigner_os.0.7.0.pi2.img
Raspberry Pi 3 Model B seedsigner_os.0.7.0.pi02w.img
Raspberry Pi 4 Model B seedsigner_os.0.7.0.pi4.img
Raspberry Pi 400 seedsigner_os.0.7.0.pi4.img

Note: If you have physically removed the WiFi component from your board, you will still use the image file of the original(un-modified) hardware. (Our files are compiled/based on the processor architecture). Although it is better to spend a few minutes upfront to determine which specific Pi hardware/model you have, if you are still unsure which hardware you have, you can try using the pi0.img file. Making an incorrect choice here will not ruin your board, because this is software, not firmware.

also download these 2 signature verification files to the same folder
The Plaintext manifest file
The Signature of the manifest file

Users familiar with older versions of the SeedSigner software might be surprised with how fast their software downloads now are, because since version 0.6.0 the software image files are now 100x smaller! Each image file is now under 42 Megabytes so your downloads and verifications will be very quick now (and might even seem too quick)!

Once the files have all finished downloading, follow the steps below to verify the download before continuing on to write the software onto a MicroSD card. Next, insert the MicroSD into your assembled hardware and connect the USB power. Allow about 45 seconds for our logo to appear, and then you can begin using your SeedSigner!

Our previous software versions are available here. Choose a specific version and then expand the Assets sub-heading to display the .img file binary and also the 2 associated signature files. Note: The prior version files will have lower numbers than the scripts and examples provided in this document, but the naming format will be the same, so you can edit them as required for signature verification etc.

Verifying that the downloaded files are authentic (optional but highly recommended!)

You can quickly verify that the software you just downloaded is both authentic and unaltered, by following these instructions. We assume you are running the commands from a computer where both GPG and shasum are already installed, and that you also know how to navigate on a terminal.

Step 1. Verify that the signature (.sig) file is genuine:

Run GPG's fetch-keys command to import the SeedSigner projects public key from the popular online keyserver called Keybase.io, into your computers keychain.

gpg --fetch-keys https://keybase.io/seedsigner/pgp_keys.asc

The result should confirm that 1 key was either imported or updated. Ignore any key ID's or email addresses shown.

SS - Fetchkeys-Keybase PubKey import with Fingerprint shown (New import or update of the key)v3-100pct

Next, you will run the verify command on the signature (.sig) file. (Verify must be run from inside the same folder that you downloaded the files into earlier. The *'s in this command will auto-fill the version from your current folder, so it should be copied and pasted as-is.)

gpg --verify seedsigner.0.7.*.sha256.txt.sig

When the verify command completes successfully, it should display output like this:
SS - Verify Command - GPG on Linux - Masked_v4-100pct
The result must display "Good signature". Ignore any email addresses - only matching Key fingerprints count here. Stop immediately if it displays "Bad signature"!

On the last output line, look at your rightmost 16 characters (the 4 blocks of 4).
Crucially, we must now check WHO that Primary key fingerprint /ID belongs to. We will start by looking at Keybase.io to see if it is the SeedSigner project 's public key or not.

About the warning message:

Since you are about to match the outputted fingerprint/ID against the proofs at Keybase.io/SeedSigner, and thereby confirm who the pubkey really belongs to-, you can safely ignore this warning message:

> WARNING: This key is not certified with a trusted signature!  
> There is no indication that the signature belongs to the owner.


More about how the verify command works:

The verify command will attempt to decrypt the signature file (sha256.sig) by trying each public key already imported into your computer. If the public key we just imported (via fetch-keys), manages to: (a) successfully decrypt the .sig file , and (b), that result matches exactly to the clear-text equivalent (.sha256) of the .sig file, then its "a good signature"!

Crucially, we must still manually check who exactly owns the Key ID which gave us that "Good signature". Thats what the warning message means- Who does the matching key really belong to? We will start by looking at keybase.io to see if it is "The SeedSigner project"'s public Key or not. Note that it is the file hashes of .sig and .sha256 that verify compares, not their raw contents.


Now to determine who the Public key ID belongs to: Goto Keybase.io/SeedSigner

SS - Keybase Website PubKey visual matching1_Cropped-80pct

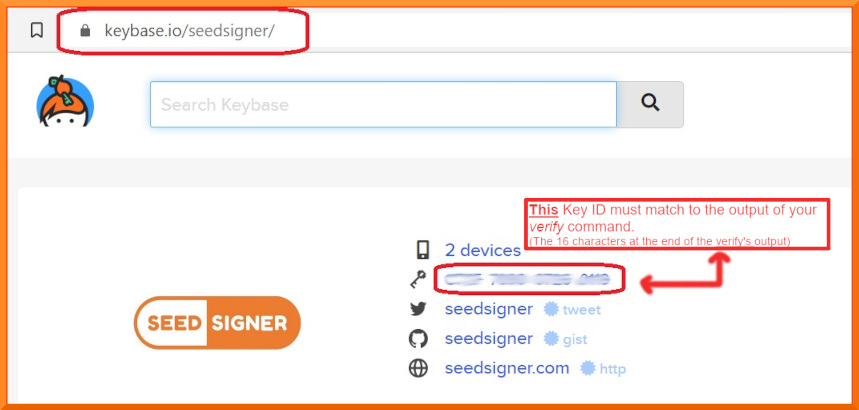
You must now manually compare: The 16 character fingerprint ID (as circled in red above) to, those rightmost 16 characters from your verify command.

If they match exactly, then you have successfully confirmed that your .sig file is authentically from the SeedSigner Project!

Learn more about how keybase.io helps you check that someone (online) is who they say they are:

Keybase.io allows you to independently verify that the public key saved on Keybase.io, is both authentic and that it belongs to the organization it claims to represent. Keybase has already checked the three pubkey file locations cryptographically when they were saved there. You can further verify the key publications if you would like:

  • via Keybase: By clicking on any of the three blue badges to see that the "proof" was published at that location. (The blue badge marked as tweet, is in the most human-readable form and it is also a bi-directional link on Twitter)
    or,
  • without keybase (out-of-band): By using these 3 links directly: Twitter, Github and SeedSigner.com. This method can be used if you would like to make an even deeper, independent inspection without relying on Keybase at all, or if the Keybase.io site is no longer valid or it is removed entirely.

Once you have used one of these methods, you will know if the Public Key stored on Keybase, is genuinely from the SeedSinger Project or not.


If the two ID's do not match, then you must stop here immediately. Do not continue. Contact us for assistance in the Telegram group address above.


Step 2. Verifying that the software images/binaries are genuine

Now that you have confirmed that you do have the real SeedSigner Project's Public Key (ie the 16 characters match) - you can return to your terminal window. Running the shasum command, is the final verification step and will confirm (via file hashing) that the software code/image files, were also not altered since publication, or even during your download process.
(Prior to version 0.6.0 , your verify command will check the .zip file which contains the binary files.)

On Linux or OSX: Run this command

shasum -a 256 --ignore-missing --check seedsigner.0.7.*.sha256.txt  

On Windows (inside Powershell): Run this command

CertUtil -hashfile  seedsigner_os.0.7.0.Insert_Your_Pi_Models_binary_here_For_Example_pi02w.img SHA256 

On Windows, you must then manually compare the resulting file hash value to the corresponding hash value shown inside the .SHA256 cleartext file.

Wait up to 30 seconds for the command to complete, and it should display:

seedsigner_os.0.7.x.[Your_Pi_Model_For_Example:pi02w].img: OK

If you receive the "OK" message for your seedsigner_os.0.7.x.[Your_Pi_Model_For_Example:pi02w].img file, as shown above, then your verification is fully complete!
All of your downloaded files have now been confirmed as both authentic and unaltered! You can proceed to create/write your MicroSD card😄😄 !!

If your file result shows "FAILED", then you must stop here immediately. Do not continue. Contact us for assistance at the Telegram group address above.


Please recognize that this process can only validate the software to the extent that the entity that first published the key is an honest actor, and their private key is not compromised or somehow being used by a malicious actor.

Writing the software onto your MicroSD card

To write the SeedSigner software onto your MicroSD card, there are a few options available:

Application Description Platform and official Source
Balena Etcher The application is called Etcher, and the company that wrote it is called Balena. Hence Etcher by Balena or Balena Etcher Available for Windows, Mac and Linux
Raspberry Pi Imager Produced by the Raspberry Pi organization. Available for Windows, Mac and Linux
DD Command Line Utility Built-in to Linux and MacOS, the DD (Data Duplicator) is a tool for advanced users. If not used carefully it can accidentally format the incorrect disk! Built-in to Linux and MacOS

Be sure to download the software from the genuine publisher.
Either of the Etcher or Pi Imager software is recommended. Some SeedSigner users have reported a better experience with one or the other. So, if the one application doesn’t work well for your particular machine, then please try the other one.

General Considerations:

The writing and verify steps are very quick from version 0.6.0 upwards, so please pay close attention to your screen. Make sure to set any write-protection physical slider on the MicroSD Card Adapter to UN-locked.
You also don’t need to pre-format the MicroSD beforehand. You dont need to unzip any .zip file beforehand. Current Etcher and Pi Imager software will perform a verify action (by default) to make sure the card was written successfully! Watching for that verify step to complete successfully, can save you a lot of headaches if you later need to troubleshoot issues where your SeedSigner device doesn’t boot up at power on.
Writing the MicroSd card is also known as flashing.
It will overwrite everything on the MicroSD card.
If the one application fails for you, then please try again using our other recommended application.
Advanced users may want to try the Linux/MacOS DD command instead of using Etcher or Pi Imager, however, a reminder is given that DD can overwrite the wrong disk if you are not careful !

Specific considerations for Windows users:

Use the Pi imager software as your first choice on Windows. Windows can sometimes flag the writing of a MicroSD as risky behaviour and hence it may prevent this activity. If this happens, your writing/flashing will fail, hang or wont even begin, in which case you should to try to run the Etcher/Pi-Imager app "As administrator", (right-click and choose that option). It can also be blocked by windows security in some cases, so If you have the (non-default) Controlled Folder Access option set to active, try turning that off temporarily.


Enclosure Designs

Open Pill

The Open Pill enclosure design is all about quick, simple and inexpensive depoloyment of a SeedSigner device. The design does not require any additional hardware and can be printed using a standard FDM 3D printer in about 2 hours, no supports necessary. A video demonstrating the assembly process can be found here. To access the design file and printable model, click here.

Orange Pill

The Orange Pill enclosure design offers a more finished look that includes button covers and a joystick topper. You'll also need the following additional hardware to assemble it:

  • 4 x F-F M2.5 spacers, 10mm length
  • 4 x M2.5 pan head screws, 6mm length
  • 4 x M2.5 pan head screws, 12mm length

The upper and lower portions of the enclosure can be printed using a standard FDM 3D printer, no supports necessary. The buttons and joystick nub should ideally be produced with a SLA/resin printer. An overview of the entire assembly process can be found here. To access the design files and printable models, click here.

Community Designs


SeedQR Printable Templates

You can use SeedSigner to export your seed to a hand-transcribed SeedQR format that enables you to instantly load your seed back into SeedSigner.

More information about SeedQRs

Standard SeedQR templates:

CompactSeedQR templates:

2-sided SeedQR templates - 8 per sheet Printing settings - (2-sided)("flip on long edge")("Actual Size") If printing on cardstock, adjust your printer settings via its control panel

A4 templates(210mm * 297mm):

Letter templates(8.5in * 11in):


Build from Source

See the SeedSigner OS repo for instructions.

Developer Local Build Instructions

Raspberry Pi OS is commonly used for development. See the Raspberry Pi OS Build Instructions

seedsigner-os's People

Stargazers

 avatar  avatar  avatar  avatar  avatar  avatar  avatar  avatar  avatar  avatar  avatar  avatar  avatar  avatar  avatar  avatar  avatar  avatar  avatar  avatar  avatar  avatar  avatar  avatar  avatar  avatar  avatar  avatar  avatar  avatar  avatar  avatar  avatar  avatar  avatar  avatar  avatar  avatar  avatar  avatar  avatar  avatar  avatar  avatar  avatar  avatar  avatar  avatar  avatar  avatar  avatar  avatar  avatar  avatar  avatar  avatar  avatar  avatar  avatar  avatar  avatar  avatar  avatar  avatar  avatar  avatar  avatar  avatar  avatar  avatar  avatar  avatar  avatar  avatar  avatar  avatar  avatar  avatar

Watchers

 avatar  avatar  avatar  avatar  avatar  avatar  avatar  avatar

seedsigner-os's Issues

Double button click instead of joystick click

Is there a way to use two buttons (of the 3-button row to the right) simultaniously instead of the joystick middle click? My joystick is broken and this would allow me to keep the device. Just getting into programming so I don´t know how feasible that is....

clean-up /opt/requirements-raspi.txt in build.sh script

Since seedsigner pr-339 (flow tests) is merged, python requirements are now split into two files.

Need to add:

rm -rf ${rootfs_overlay}/opt/requirements-raspi.txt

...to the below section of opt/build.sh to clean-up this new file.

 # Delete unnecessary files to save space
  rm -rf ${rootfs_overlay}/opt/.git
  rm -rf ${rootfs_overlay}/opt/.gitignore
  rm -rf ${rootfs_overlay}/opt/requirements.txt
  rm -rf ${rootfs_overlay}/opt/docs
  rm -rf ${rootfs_overlay}/opt/README.md
  rm -rf ${rootfs_overlay}/opt/LICENSE.md
  rm -rf ${rootfs_overlay}/opt/enclosures
  rm -rf ${rootfs_overlay}/opt/seedsigner_pubkey.gpg
  rm -rf ${rootfs_overlay}/opt/setup.py
  rm -rf ${rootfs_overlay}/opt/tests
  rm -rf ${rootfs_overlay}/opt/tools
  rm -rf ${rootfs_overlay}/opt/pytest.ini

reproducible build mismatch: d34fb89f5 instead of a380cb93e

I followed the Linux Docker instructions for reproducible build https://github.com/SeedSigner/seedsigner-os/blob/main/docs/building.md#-quickstart-seedsigner-reproducible-build-

and got a different hash

build-images-1  | /opt/buildroot
build-images-1  | d34fb89f552d4aa8b4df277782ee807c9369412205bd56e9d08137eab3622089  /opt/../images/seedsigner_os.0.7.0.pi0.img

expected hash is from sig file in the release notes https://github.com/SeedSigner/seedsigner/releases/tag/0.7.0:

a380cb93eb852254863718a9c000be9ec30cee14a78fc0ec90708308c17c1b8a  seedsigner_os.0.7.0.pi0.img

attaching last 3k lines of the build log
seedsigner-os-BUILD.log

My build environment was:
seedsigner-os commit 83e8cac

cat /proc/cpuinfo | grep Model
Model           : Raspberry Pi 4 Model B Rev 1.5

docker --version
Docker version 26.0.1, build d260a54

uname -a
Linux raspberrypi 6.1.21-v8+ #1642 SMP PREEMPT Mon Apr  3 17:24:16 BST 2023 aarch64 GNU/Linux


$ file /lib/systemd/systemd
/lib/systemd/systemd: ELF 64-bit LSB pie executable, ARM aarch64, version 1 (SYSV), dynamically linked, interpreter /lib/ld-linux-aarch64.so.1, Build
ID[sha1]=33113bf93a1240aab27c7cdd73fdb9a5ba686842, for GNU/Linux 3.7.0, stripped

How to troubleshoot blank screen?

I get a blank screen on the display and splash screen on HDMI forever, no cpu light after it blinks a few times on boot.
How can I troubleshoot this? are there any logs persisted on the sd card that I can read?

Umount MicroSD issue

After this change: fde3582 we are not able to umount the MicroSD from the menu.

Changes needed:

drawing

@ is needed. Not *. Because we run this only after creating the device. (Reference)
For umounting we do directly from SeedSigner. So we don't need to use *.


Then $ACTION variable is needed because we need to verify by the condition add or remove by $1.

drawing

🔁 Reproducible builds

Keep track of reproducible builds here


  • Libcamera Issue ( See )
  • The rest of files have only different timestamp when building.

  • PR will be added ASAP

Files remaining:

Docker Compose does not create an image

Following the instructions I installed docker and docker compose, verified that docker compose is installed using docker compose version (it returns: Docker Compose version v2.19.1).

I then ran SS_ARGS="--pi0" docker compose up (couldn't use docker-compose because I have v2. This is something else that should be clarified in the build instructions) and waited while it did a bunch of stuff and then when it finished I checked the images directory and there's only a Readme.md file in there.

The following are the last lines shown in terminal after running docker compose:

seedsigner-os-build-images-1  |       -DGITBRANCH="\"`LC_ALL=C `\"" \
seedsigner-os-build-images-1  |       -o Modules/getbuildinfo.o ./Modules/getbuildinfo.c
seedsigner-os-build-images-1  | /output/host/bin/ccache /usr/bin/gcc -L/output/host/lib -Wl,-rpath,/output/host/lib -Wl,--enable-new-dtags -L/output/host/lib -Wl,-rpath,/output/host/lib   -o Programs/_freeze_importlib Programs/_freeze_importlib.o Modules/getbuildinfo.o Parser/token.o  Parser/pegen.o Parser/parser.o Parser/string_parser.o Parser/peg_api.o Parser/myreadline.o Parser/tokenizer.o Objects/abstract.o Objects/accu.o Objects/boolobject.o Objects/bytes_methods.o Objects/bytearrayobject.o Objects/bytesobject.o Objects/call.o Objects/capsule.o Objects/cellobject.o Objects/classobject.o Objects/codeobject.o Objects/complexobject.o Objects/descrobject.o Objects/enumobject.o Objects/exceptions.o Objects/genericaliasobject.o Objects/genobject.o Objects/fileobject.o Objects/floatobject.o Objects/frameobject.o Objects/funcobject.o Objects/interpreteridobject.o Objects/iterobject.o Objects/listobject.o Objects/longobject.o Objects/dictobject.o Objects/odictobject.o Objects/memoryobject.o Objects/methodobject.o Objects/moduleobject.o Objects/namespaceobject.o Objects/object.o Objects/obmalloc.o Objects/picklebufobject.o Objects/rangeobject.o Objects/setobject.o Objects/sliceobject.o Objects/structseq.o Objects/tupleobject.o Objects/typeobject.o Objects/unicodeobject.o Objects/unicodectype.o Objects/unionobject.o Objects/weakrefobject.o Python/_warnings.o Python/Python-ast.o Python/asdl.o Python/ast.o Python/ast_opt.o Python/ast_unparse.o Python/bltinmodule.o Python/ceval.o Python/codecs.o Python/compile.o Python/context.o Python/dynamic_annotations.o Python/errors.o Python/frozenmain.o Python/future.o Python/getargs.o Python/getcompiler.o Python/getcopyright.o Python/getplatform.o Python/getversion.o Python/hamt.o Python/hashtable.o Python/import.o Python/importdl.o Python/initconfig.o Python/marshal.o Python/modsupport.o Python/mysnprintf.o Python/mystrtoul.o Python/pathconfig.o Python/preconfig.o Python/pyarena.o Python/pyctype.o Python/pyfpe.o Python/pyhash.o Python/pylifecycle.o Python/pymath.o Python/pystate.o Python/pythonrun.o Python/pytime.o Python/bootstrap_hash.o Python/structmember.o Python/symtable.o Python/sysmodule.o Python/thread.o Python/traceback.o Python/getopt.o Python/pystrcmp.o Python/pystrtod.o Python/pystrhex.o Python/dtoa.o Python/formatter_unicode.o Python/fileutils.o Python/suggestions.o Python/dynload_shlib.o    Modules/config.o Modules/getpath.o Modules/main.o Modules/gcmodule.o Modules/posixmodule.o  Modules/errnomodule.o  Modules/pwdmodule.o  Modules/_sre.o  Modules/_codecsmodule.o  Modules/_weakref.o  Modules/_functoolsmodule.o  Modules/_operator.o  Modules/_collectionsmodule.o  Modules/_abc.o  Modules/itertoolsmodule.o  Modules/atexitmodule.o  Modules/signalmodule.o  Modules/_stat.o  Modules/timemodule.o  Modules/_threadmodule.o  Modules/_localemodule.o  Modules/_iomodule.o Modules/iobase.o Modules/fileio.o Modules/bytesio.o Modules/bufferedio.o Modules/textio.o Modules/stringio.o  Modules/faulthandler.o  Modules/_tracemalloc.o  Modules/symtablemodule.o  Modules/xxsubtype.o -lcrypt -ldl  -lm   -lm 
seedsigner-os-build-images-1  | # Regenerate Python/importlib_external.h
seedsigner-os-build-images-1  | # from Lib/importlib/_bootstrap_external.py using _freeze_importlib
seedsigner-os-build-images-1  | ./Programs/_freeze_importlib importlib._bootstrap_external \
seedsigner-os-build-images-1  |     ./Lib/importlib/_bootstrap_external.py \
seedsigner-os-build-images-1  |     ./Python/importlib_external.h.new
seedsigner-os-build-images-1  | python3 ./Tools/scripts/update_file.py ./Python/importlib_external.h ./Python/importlib_external.h.new
seedsigner-os-build-images-1  | make[2]: python3: No such file or directory
seedsigner-os-build-images-1  | make[2]: *** [Makefile:754: regen-importlib] Error 127
seedsigner-os-build-images-1  | make[1]: *** [package/pkg-generic.mk:292: /output/build/host-python3-3.10.4/.stamp_built] Error 2
seedsigner-os-build-images-1  | make: *** [Makefile:23: _all] Error 2
seedsigner-os-build-images-1  | /opt
seedsigner-os-build-images-1 exited with code 0
billybob@ubuntu-vm:~/seedsigner-os$ ls
docker-compose.yml  Dockerfile  docs  images  LICENSE.md  opt  README.md
billybob@ubuntu-vm:~/seedsigner-os$ cd images
billybob@ubuntu-vm:~/seedsigner-os/images$ ls
README.md

You can see there's an error at the end but I'm not sure what to make of it or how to fix it considering this is a docker container that should have everything.

Help for people who forget to remove the SD card before entering their seeds

I've forgotten to remove the SD card before entering my seed data on multiple occasions, even with the message saying to remove the card. Then I become paranoid about the off chance my seed data could be written to the card (maliciously, or due to a bug). I can think of two things that might be helpful for forgetful, paranoid people like me:

  1. Have a larger (maybe full-screen) warning requiring clicking (maybe a few) buttons to make sure users have been throughly reminded to remove the SD card, before being allowed to proceed with entering sensitive data. I am living proof that the small-ish message currently displayed isn't enough for some of us.
  2. Add a utility to completely wipe the SD card from the SeedSigner, so you don't have to be paranoid that inserting the card into a computer and wiping it from there gives a chance for seed data to escape, after you mistakenly entered seed data on a SeedSigner with the SD card still in the device.

Warning on scan screen if micro SD card is still inserted

Seed signer allows for the SD card to be removed from the device after boot. This eliminates any possibility of the seed being written to the card. However, if one forgets to remove the SD card this security advantage is lost.

Solution:

If the SD card remains in when the scan menu is selected, warn user.

"WARNING SD card still inserted!
Are you sure you wish to proceed"

Why is there a "write" to microsd on the very first boot?

Inspired by questions and a convo w/ "Robert Brian" this mornign in the seedsigner telegram group.

I've found that SeedSignerOS appears to write to the microsd during the very first boot after writing the microsd.

tl;dr: I'm trying to use dd to get a checksum of a microsd as a baseline, and then be able to verify it has not changed in the future, after much activity, by comparing my baseline checksum.

My write-up, intended for Mr. Brian...

I'd mentioned that I suspect we can verify that our microsd has not been touched, so here is my hypothesis for how we might do so:

  1. start by zeroing the microsd... this way we can compare it to what other users might see. Better than this would be to /dev/random our microsd. I'll call my microsd /dev/microsd even though it's really /dev/sdf for me.
    dd if=/dev/zero bs=8M of=/dev/microsd status=progress
    this took the better part of an hour for my 32GB microsd, I killed it with sudo pkill dd after it ran out of space and wouldn't exit on its own.

To make sure I've got all zeros, I compared the first 64M of my microsd to 64M of /dev/zero.
dd if=/dev/zero bs=64M count=1| sha256sum and
dd if=/dev/microsd bs=64M count=1 | sha256sum both gave me the same output

1+0 records in
1+0 records out
67108864 bytes (67 MB, 64 MiB) copied, 0.328032 s, 205 MB/s
3b6a07d0d404fab4e23b6d34bc6696a6a312dd92821332385e5af7c01c421351  -

This is enough because:

  1. I know that SeedSignerOS is going to be written on the first 36M of my microsd, and
  2. we sort of have to cut this corner if we expect to be comparing against others with different microsd sizes.

Write SeedSigner OS onto the microsd
sudo dd if=~/Downloads/SeedSignerOS_0_5_1_EXP.img of=/dev/microsd status=progress gives me output like:

28439040 bytes (28 MB, 27 MiB) copied, 3 s, 9.5 MB/s 
69633+0 records in
69633+0 records out
35652096 bytes (36 MB, 34 MiB) copied, 5.93515 s, 6.0 MB/s

OK, Let's see what that checksum looks like, being careful to only look at the blocks written to our microsd.
sudo dd if=/dev/microsd count=69633 | sha256sum gives me output like:

69633+0 records in
69633+0 records out
35652096 bytes (36 MB, 34 MiB) copied, 1.80364 s, 19.8 MB/s
ac74b29ca9194c0a1e0eef8427b166336d1d1d3ba451753940a843a4aaa69193  -

Cool, that happens to be the same hash that our repo says we should have downloaded when installing the 0.5.1 SeedSigner OS image.

Now let's see what the checksum is for the first 64M, assuming that we'll catch any future writes as long as they change existing bits or extend that filesystem.
sudo dd if=/dev/microsd bs=64M count=1| sha256sum

1+0 records in
1+0 records out
67108864 bytes (67 MB, 64 MiB) copied, 3.68302 s, 18.2 MB/s
5431895fe9640a490bf26d9880ed4fd13b7048939c71b4e86911d595783603df  -

This is close, but it is not yet our baseline.

  1. It is my experience that the microsd will get written the very first time we boot. I don't know why but I'm going to ask @DesobedienteTecnologico about it.
  2. We want to setup our persistent settings to our liking, so that will write to the microsd as well.

So, remove the microsd from the computer, insert it into seedsigner, and let seedsigner boot fully, then setup your persistent settings however you like. DO NOT LOAD ANY SEEDS. Just pull power, and remove your microsd card so that we can get a final baseline hash using the steps above.

With the microsd back in your computer, get your new baseline.
sudo dd if=/dev/microsd bs=64M count=1| sha256sum

If what I'm suggesting is sound, it should not change in the future unless we change our persistent settings with the microsd inserted.

Unfortunately, I'm using an old pi2 and a self-built SeedSigner OS w/ version 0.5.2, so my baseline is going to look different than yours (maybe yours will look different than everyone else's because of that un-explained write that happens on the very first boot.). My microsd card is returning the same hash as my baseline after a few reboots, after a few loads of different seeds, and after 1 signed transaction on testnet. I'll reference this message in the future if I notice that my microsd changes after repeated activity.

(for my own future reference), with a self-built seedsigner_0.5.2 for pi2 having hash 8eef773e71751fbba30ccc292d4bde2ca9e8076ed65f3404dddb9013b0e510f8,
my baseline after first boot (and much activity aftewards, never saving persistent settings) looks like:

sudo dd if=/dev/sdf bs=64M count=1| sha256sum
1+0 records in
1+0 records out
67108864 bytes (67 MB, 64 MiB) copied, 3.5751 s, 18.8 MB/s
9b1e01f5f3e0220959d4eb3639e23518b2e88edb5342bf7f52d9adf4ea226599  -

PATH Errors occur when executing under WSL (Windows Subsystem for Linux)

Thanks for starting this project !! :)

When running ./buildfile i
on Ubuntu (2004.2022.1.0), I get a dependency and then a PATH error. can you assist me please? the full console output is attached.
Error returned is below:

`
&& Configuration written to /home/marc-user/seedsigner-os/build_workdir/.config

Your PATH contains spaces, TABs, and/or newline (\n) characters.
This doesn't work. Fix you PATH.
make[1]: *** [support/dependencies/dependencies.mk:27: dependencies] Error 1
make: *** [Makefile:23: _all] Error 2`

Console output_1 - Seedsigner-os.txt
Thanks!

Feature Request: Export/Load seed via encrypted file on microSD card

A common criticism against SeedSigner is the requirement for the seed phrase to be in plaintext form, either as words typed manually or as a SeedQR code. This limits the storage options of the seed's physical backup for users that spend frequently. The response to this has been to use strong passphrases to protect the wallet and/or use multisig, but this does not solve the issue of being able to improve the physical backup's security.

Additionally, traveling with a SeedSigner requires bringing the plaintext seed phrase (as words or in QR form) with you, or to memorize them. When a traditional hardware wallet user can bring the device only, and leave their backup at home (or in a safe place). This still creates a risk to those users, though, because hardware wallets are becoming more popular and can be easily identified. Storing an encrypted seed on a microSD card raises almost zero alarms on the traveler, since they are general purpose and extremely common. The user would have to be specifically targeted in order for any authorities to even know that there is encrypted data on the card.

This proposal/feature request provides the user with an additional option for seed storage, but is likely to break the "single location of a key" property, which is popular in the community. This option also allows the project to avoid secure elements entirely, which have been discussed in the community on several occasions, by storing the keys in an encrypted state on a microSD card. It should also be stressed that this is not a replacement for BIP39 passphrases, and as will be shown in the user workflows, passphrases can (and should) still be used.

Foundation Devices recently made a blog post on encrypted microSD backups which provides more information on the benefits and tradeoffs. Their format for storing the seed is available in their docs. There exists an opportunity to work with the Foundation Devices team to develop a standard for both encrypting/decrypting backups, and the format in which the data is stored (currently a simple text file).

High-Level Points

  • The microSD card should never need to be plugged into a computer (it should be able to remain airgapped).
  • The SeedSigner remains a stateless device.
  • The BIP39 passphrase is never exported/stored to the microSD card.
  • Using an encrypted backup does not replace the need for BIP39 passphrases.
  • Exporting/Loading a seed with a microSD card is optional, not a requirement.
  • An encryption password should be different than a wallet's passphrase for best practices.

A final point that needs more detail: this is not a replacement for multisig or passphrases, is not specific to singlesig setups, and should still fully support multisig setups. Loading a seed from an encrypted backup is simply another option for loading a seed, and can be used in combination with multiple encrypted seeds stored on multiple microSD cards, written/memorized mnemonics, and SeedQRs.

Downsides

  • Breaks the single-backup property by introducing a copy of the seed if the user already has a physical backup.
  • It's up to the user to never plug the microSD card containing the encrypted backup into a computer to retain it's airgapped property.
  • Requires the user to type an encryption/decryption password for use, which is difficult to do on the SeedSigner.
  • Requires the user to memorize or otherwise securely store yet another password.
  • Introduces a third party encryption protocol to SeedSigner, which could have its own vulnerabilities.

User Workflows

Exporting Workflow

  • With a seed phrase already loaded in the SeedSigner, the user selects Seeds, the fingerprint of the desired seed, Backup Seed, and a new "Export to microSD" option is available.
  • A Caution page is displayed, stating "Exporting to a microSD card is not a replacement for a strong physical backup or a passphrase" (or similar wording).
  • User selects I Understand and is brought to a page notifying the user to remove the existing microSD card and insert a new one.
  • When a new card is detected (or the user selects "Okay"), the user may either set a password or have one generated for them to encrypt the backup.
    • If a password is generated for them, an additional prompt is displayed with the password.
  • A confirmation page is displayed informing the user with the filename.
  • Upon confirmation, the encrypted file should be saved to the microSD card.
  • A success dialog is displayed to the user and prompts if they would like to store the encrypted backup on another card.
    • If the user selects Yes, they are asked to remove the current microSD card and insert a new one.
    • When a new card is detected (or the user selects "Okay"), the same backup is written to the card.
    • (Repeat) A success dialog is displayed to the user and prompts if they would like to store the encrypted backup on another card.

Loading Workflow

  • User selects Seeds, Load a seed, and a new "Insert microSD" option is available.
  • Upon selection, a page is displayed instructing the user to remove the existing microSD card and insert their card containing the encrypted backup.
  • When a new card is detected (or the user selects "Okay"), the user is able to choose an encrypted file from the card (filter by the relevant file type).
    • If not detected, display a prompt to the user that no backup was detected.
  • Upon selection, prompt the user for the encryption password.
    • If the wrong password is supplied, prompt an error to the user.
  • With a successful password supplied, display the seed's fingerprint and prompt the user to enter a passphrase or load the seed as-is (continues the current process of loading a seed).

Feature Request: Temporarily cache multi-sig wallet configuration on device and allow users to select it during transaction signing.

I've been playing around with multi-sig vaults on Blue Wallet and I'm using SeedSigner to manage all the keys. Everything works well until I try to send from the multi-sig wallet.

The Context: Once you enter a receiving address and amount to be sent, Blue Wallet displays a screen asking for the required number of signatures. After clicking "Provide signature" under a specific key (see here for a visual), Blue Wallet generates a QR code that needs to be scanned by the SeedSigner. Once scanned, SeedSigner shows the transaction info but can't confirm the change address until you scan the multi-sig configuration information.

The Problem: In order to get back to the multi-sig configuration information in Blue Wallet, you need to back out of the current transaction which means it's not possible to confirm the change address without scanning that info from a QR code that you've saved outside of Blue Wallet.

The Feature Request:
Allow users to scan multi-sig configuration information into the SeedSigner and temporarily cache that information so that it can be referenced during transaction signing.

Does that make sense?

Thank you all for your work on this project. It's awesome.

Reconcile Python versions between SS & SSOS before next release

TLDR: @jean identified conflicting Python versions when working on review of Seedsigner PR 347 @kdmukai says "So I'd say: IF SeedSigner OS can trivially version up to 3.10.10, then we should PR that in for the next release. But if it can't, THEN we'll make sure the manual build steps match whatever minor version SeedSigner OS is stuck at."

Additional Context:

Jean Do:
Just a note that I've run through pr #347 today (how-to install python 3.10 on the pi board) from start to finish and didnt have any critical problems (though I did leave notes). ACK-tested from me.

I did this because during dev/testing I've been switching between virtualenvs with python 3.7 and python 3.10... and I've finally moved on to 3.10 only, which is ahead of this pr and therefore ahead of what other devs might be using. I feel #347 is ready as soon as other devs would agree.

Jean Do:
@klockenga , I didnt run into problems with numpy 1.21.1 and was not forced to use 1.21.6, but I recall this being mentioned in the past.

Jean Do:
@kdmukai, your notes helped me to install python 3.10 originally (2months ago?) and for some reason, I ended up originally installing 3.10.4 instead of 3.10.10. That caught my eye this morning and but I followed your pr exactly... but I'm wondering how we chose different versions. How can I verify exactly what is included in the seedsigner-os 0.6.0 image that everyone up-to-date is running?

added: I'm thinking that I originally followed seedsigner-os/opt/buildroot commit b634d.... and stumbled onto this
https://github.com/buildroot/buildroot/blob/b634d504cb5a0b621f115f36c50a712e85fc8027/package/python3/python3.hash

I realize that #347 is still a draft. If instead of 3.10.10 we should have manual instructions for 3.10.4 (because that's what all of our seedsigner-os users have installed), then just confirm and I'll restart my verification run of your #347 pr for that earlier python 3.10.

Keith says:
I can't recall if there was any specific reason for 3.10.10 vs 3.10.4, other than opting for the latest bugfixes. I think I noted somewhere that there should be a matching PR in the SeedSigner OS to version up to the matching minor release, if possible.

It would be ideal if they matched, but I'm not that worried about it as I wasn't even aware that SeedSigner OS was using 3.10 in the first place. I think my local dev build was still on 3.8 or 3.9.

So I'd say: IF SeedSigner OS can trivially version up to 3.10.10, then we should PR that in for the next release. But if it can't, THEN we'll make sure the manual build steps match whatever minor version SeedSigner OS is stuck at.

Jean says: ty, I'll remember this point when nick or dt add their input. my raincheck to rerun this morning's end-to-end manual-installation verification of #347 for another minor version of python remains open, if it's not trivial to bump in ss-os

How to run docker without root privileges?

(Just leaving notes here as I figure out how to run docker without root privs.)

It has bothered me to run docker commands as "root", hence my preference for building seedsigner-os on Ubuntu w/o using docker. For verifying reproducible builds, I've been making an exception; but today I've done the following which seems to work.

From the Docker docs website

  • disabled docker.service and docker.socket which were running as root at startup.
  • installed uidmap
  • ran curl to run a script from get.docker.com/rootless as a normal user, and setup some ENV variables.
  • started the daemon from my ~/bin/ directory installed via previous step.

Now, without using the four-letter "s" word, I can run docker without permissions errors.

Since I had already built in the past with docker as root, some files need ownership changes in seedsigner-os:

sudo chown mylogin:mylogin images/*
sudo chown -R mylogin:mylogin opt/rootfs-overlay/opt

From within the ~/seedsigner-os directory, I verified the correct seedsigner-os version:

git log | head -3

commit 2723caa2f395261a8b2602795c177769134c94b0
Author: Nick Klockenga <[email protected]>
Date:   Mon Jun 12 08:01:19 2023 -0500

Then started the container, leaving it running:

SS_ARGS="--no-op" docker-compose up

...in one terminal.

In another terminal, I ran an interactive shell:

docker exec -it seedsigner-os_build-images_1 /bin/bash

...then once inside the container, I started Nick's historic reproducible build:

root@containerid:/opt# time ./build.sh --pi0X --app-commit-id=dbb1d6b
...
real	57m54.859s
user	94m13.333s
sys	13m48.622s

root@containerid:/opt# sha256sum ../images/seedsigner_os.dev.pi0X.img
31e1532aacee8ff474a2a88db572203dc18df0ae1b14149fa65bcdc936932a97  ../images/seedsigner_os.dev.pi0X.img

It works!

I notice that "~/.local/share/docker" is growing with each container I build. I'm not sure how this gets cleaned-up, maybe by hand when I see "no space left on disk" errors. Will have to watch that /home doesn't fill-up. There was a mention of this while reading the rootless-docker docs.

I hope this is helpful for others that prefer not running docker as root.

Recommend Projects

  • React photo React

    A declarative, efficient, and flexible JavaScript library for building user interfaces.

  • Vue.js photo Vue.js

    🖖 Vue.js is a progressive, incrementally-adoptable JavaScript framework for building UI on the web.

  • Typescript photo Typescript

    TypeScript is a superset of JavaScript that compiles to clean JavaScript output.

  • TensorFlow photo TensorFlow

    An Open Source Machine Learning Framework for Everyone

  • Django photo Django

    The Web framework for perfectionists with deadlines.

  • D3 photo D3

    Bring data to life with SVG, Canvas and HTML. 📊📈🎉

Recommend Topics

  • javascript

    JavaScript (JS) is a lightweight interpreted programming language with first-class functions.

  • web

    Some thing interesting about web. New door for the world.

  • server

    A server is a program made to process requests and deliver data to clients.

  • Machine learning

    Machine learning is a way of modeling and interpreting data that allows a piece of software to respond intelligently.

  • Game

    Some thing interesting about game, make everyone happy.

Recommend Org

  • Facebook photo Facebook

    We are working to build community through open source technology. NB: members must have two-factor auth.

  • Microsoft photo Microsoft

    Open source projects and samples from Microsoft.

  • Google photo Google

    Google ❤️ Open Source for everyone.

  • D3 photo D3

    Data-Driven Documents codes.