
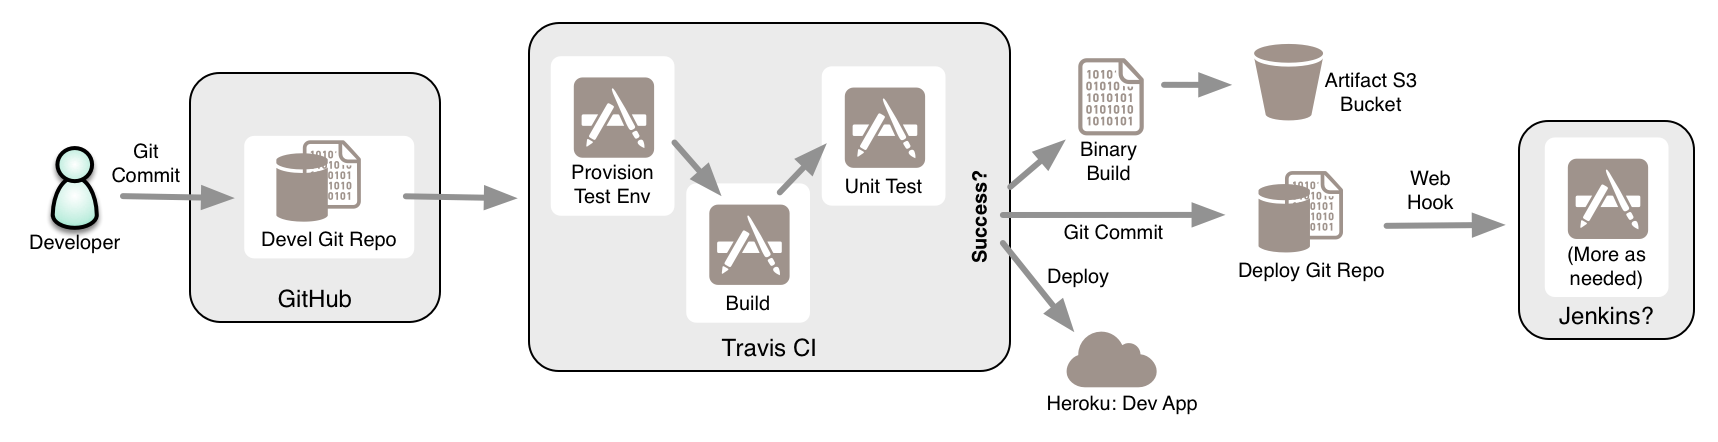
This repository, based on https://github.com/chrissearle/web-hello-world demonstrates using common CI and CD services to build a continuous deployment pipeline.
The pipeline looks like this:
Clone this respository, and modify this README.md and .travis.yaml file to point to this new repository.
See
Create a Travis CI account based on your GitHub account, and note the token.
Once setup, on GitHub browse to the settings of the repository you want do CI with (i.e. this one?) and add a new Travis CI service. Provide the Travis CI username and token; use the "profile" tab on Travis CI to find these values. Once added, save and then make a trivial change to the repo and commit it. You should see the build happen automatically under Travis CI, and a status under this README.
To use Heroku, signup and create a new Java App by following the directions under this link: Java App. Make sure you create a new ssh key, and name it after this particular app. This will be a "service" key, just used for deploying this app:
cd ~/.ssh/
ssh-keygen -f minimal-cdp-demo-heroku
and don't use a passphrase on it.
The run heroku login and register the key. Next create a Heroku webapp for the repository by changing directory to this repository, and running
heroku create
and confirm the URL
heroku open
You can deploy directly from the repository (skipping the CI steps) by pushing directly to Heroku as follows:
git push heroku master
Once you have an app in heroku ready to deploy to, we'll need to setup Travis CI to deploy as per the docs here. You'll need to capture the API key for heroku by executing
heroku auth:token
and copying that value. Treat in securely, since it represents a token credential. Next, cd to the root of the repo we want to automate, and encrypt that token for Travis CI:
cd minimal-cdp-demo
travis encrypt $(heroku auth:token) --add deploy.api_key
This edits your .travis.yaml and inserts an encrypted version of this token. You can then commit this edited file into a public repo with minimal risk of exposure.
One more step before you can deploy. You need to make sure that the app name in the deploy section matches the once created by heroku.
Once these things are aligned, make a minor change, and then visit the URL of the heroku app from the above command. If all goes well, you should see it deployed there.
Instead of deploying to production straight from Travis CI, we may want to push a successful build to a "golden master" repository instead. This allows you to create a "gatekeeping" process to ensure that code that fails your tests doesn't end up in the repository you want to deploy from.
To start, we'll create a "service account" keypair that is only used for this push from a sucessful travis build to a "production" repository:
ssh-keygen -f minimal-cdp-demo-deploy
Be sure not to set a passphrase on it.
Then register that public key with github using the GUI, ideally using a service account, and not a real-person user account; this let's you restrict the use of the account to just one or two repositories.
The private key we'll encrypt in Travic CI, and add to the repository. To do this, make a .travis/ directory in the root of the repository, copy over the key, encrypt it and then remove the encrypted version. This we can safely add to the repository.
cp ~/.ssh/minimal-cdp-demo-service-key ./.travis/
cd .travis/
travis encrypt-file minimal-cdp-demo-service-key --add
This will encrypt a copy of the key, and modify the /.travis.yml file to properly decrypt the encrypted file before use. Once done, commit the .travis.yml and encrypted key to the repo. DO NOT add the unencrypted key, however.
Next create a repository in GitHub to be the "Golden Master" repository (we'll name it minimal-cdp-demo-golden in this example). Make sure the service account key has push access to this new repositiory in GitHub.
Then add to your .travis.yml a stanza that sets up SSH and pushes a successful build to a separate repository.
after_success:
  - eval `ssh-agent`
  - chmod 600 .travis/minimal-cdp-demo-production-deploy
  - ssh-add .travis/minimal-cdp-demo-production-deploy
  - git remote add deploy [email protected]:robparrott/minimal-cdp-demo-golden.git
  - git push deploy master
  - echo "Completed push..."
Once that's completed, then all successful builds of the repository will be pushed to this deployment repository automatically.
To cpature binary build artifacts, you can use the built-in artifact feature of Travis CI to push build objects to an S3 bucket. For details see the Travis CI docs here: (http://docs.travis-ci.com/user/uploading-artifacts/)
The result should look something like this:
addons:
  artifacts:
    key: AKIAJT7QVC6TBFAUILKQ
    secret:
      secure: (some stuff)
    bucket: "cdp-demo-deploy-harvard-edu"
    paths:
    - build
You'll need to use Travis CI's command line interface to encrypt your AWS secret.
This artifacts stanza captures everything in the build/ directory to the S3 bucket. To set up this directory, the asiest thing to do is to add a line to the after_success stanza that captures the target directory to one named for the git commit hash as follows:
mkdir build && cp -av target build/$(git log | head -1 | awk '{print $2}')
When done, all successful build artifacts will be copied into your S3 bucket at a url of the form
s3://[bucket name]/[github user]/[repo name]/[build #]/[step number (i.e. 40.1) ]/[git commit hash]

