phptestr is framework for writing unitests for PHP and GUI for displaying the results. The project aims to provide flexible environment that makes writing tests quick and easy. By providing GUI environment for testing it further encourages test driven development. The project is divided into "host" and "script" part. The host starts each test script in a new sandbox thus ensuring no kind of error could break it and no error will remain untraced.
Features:
- Easy to start and use, no dependencies to install.
- Short and uncomplicated tests.
- Code coverage.
- Stack traces for errors and exceptions with realtime source display.
Warning: GitHub's zip files are broken and ignore some files from the repository. You can either do full checkout (with submodules) or I will upload a proper zip file soon when I have some spare time.
testCase( 'My Test', function () {
	test( true ); // this condition will pass
	test( false ); // this condition will fail so will the test case
} );Color coded display for tests that passed or failed:
Code coverage for each separate test case or for the whole test script:

Stack traces for errors and exceptions with realtime source display:

This is release version 1.0, stable release, tested under Windows, OSX and Linux.
- Assuming you already have
PHP 5.3or higher installed in your path. - Go to where you have downloaded phptestr and start
phptestr -target=example- this should open a new browser window for the addresshttp://127.0.0.1:3355/phptestr?target=exampleand show the results of the tests.
Further:
- By starting phptestr, it will create a micro server where it listens for commands from your browser.
- Examples are found in the
examplefolder, they are really short, nothing requiring a lot of effort to learn. - From these docs you are only concerned with thepackage
phptestr.test_environment- this is the environment for the test scripts. - Very quick explanation of the examples is found in the docs in the file
lib/test_environment.phpunder the packagephptestr.test_environment(this would be docs/index.html#file/lib/test_environment.php).
Since this is tester for PHP, you need to have PHP 5.3 or higher installed
and it must be configured to accept short tags, there are no other
dependencies.
You can start the tests in either GUI (browser) mode or CLI mode. This is
selected by command line arguments. By just starting phptestr it will start
in GUI mode, opening your default browser and listening on a specific port for
commands issued by the browser. List of all available command line options is
found below.
To start the tests just run phptestr and point it to the location of your
tests, e.g. http://127.0.0.1:3355/phptestr?target=example - this will run
the example tests that come with the project. Alternatively you can start
phptestr -target=example directly. The target argument is directory
relative to the directory where phptestr is located.
If you like to run only a selection of the tests found in this directory you
can add filter argument. For example
http://127.0.0.1:3355/phptestr.php?target=example&filter=*_3*.php or
phptestr -target=example -filter=*_3*.php will run only the files
'test_3a.php' and 'test_3b.php'. Filter patterns are explained below.
Finally you can interact with the test scripts by passing them some arguments
with the argument called args. For example
http://127.0.0.1:3355/phptestr?target=example&filter=test_5.php&args=1&args=2
or phptestr -target=example -filter=test_5.php -args=1 -args=2 will start
the fifth example of phptestr, which can accept arguments, and it will display
the value of 'args'.
For code coverage to work you will need to install and configure xdebug with
your PHP installation. Finally you need to pass -coverage argument to
phptestr if you want it to collect code coverage information. You can specify
this option in the config (enabled by default) and then you don't need to pass
extra command line arguments. More information how to enable code coverage in
xdebug is found here.
By loading the directory 'example', phptestr checks for the presence of a file
named phptestr.json. This file could be used to specify additional options
for your project. None of these settings is mandatory.
{
	"dir": "",
	"init": "",
	"pattern": "*.php:.*|_*",
	"coverage": false,
	"phpbin": "php",
	"phpini": ""
}dir- can be used to override the base directory of your scripts.init- can be used to specify initialization script for your project. E.g. to include some prerequisites or to boot your __autoload function.pattern- can be used to override which files will be recognized as test scripts (see below). The default pattern is the one above - includes all '.php' files, non recursively, excluding all files starting with dot or underscore.coverage- boolean value to enable or disable collection of code coverage information for tests. This is disabled by default for individual test suites, but is enabled in the default configuration.phpbin- PHP binary to use for executing the scripts.phpini- php.ini file to use for configuring PHP.
On startup phptestr will attempt to load phptestr.json from its own
directory. This file has the same format as in the previous section and
whatever is found there will be used as default configuration. This is a good
place to configure the directory of your PHP installation. By default code
coverage is enabled for all tests through this file.
Patterns are simple regular expressions. * matches everything but forward
slash /, and ** matches everything. Non greedy and only forward slashes
are supported (they work fine on Windows). For example *.php will match all
files with extension 'php' in the same directory. **.php will match all
files with extension 'php' in the same directory and all sub directories.
Multiple patterns can be delimited with a pipe |. For example
*.php4|*.php5 will match all files with extension 'php4' or 'php5'.
Additionally a list of exclude patterns can be appended after a colon :.
Files and directories matching one of the exclude patterns will be filtered
out.
Lets say we have a folder named 'tests' where we will place our test scripts.
We create a file named phptestr.json in this folder and place this inside
the file:
{
	"init": "init_tests.php",
	"pattern": "*/**.php:**/_*"
}
This will tell phptestr to test all files with extension 'php' in all
subfolders, but not in the same folder (we don't want our init script to be
treated as a test script) and also to include a file named 'init_tests.php'
before loading each test script.
So we have a nice setup and only have to run phptestr -target=../myproject/tests.
Be mindful that phptestr expects the error logging configuration of PHP to be in a certain way. It sets this configuration before running a test script, but you should take care that your init script or any library it may include will not change these settings. If you do change them it is possible that errors in your scripts are not properly tracked. If you need to check exactly what the error logging settings are check the file 'lib/run_test_script.php'. Additionally, your scripts should not output anything to the console (stdout) or you will get errors in your tests. If you need to output something while testing use the appropriate functions provided by the test environment.
Test are created by writing PHP files describing groups of test conditions. The groups are called "test cases". And each condition is a test.
The simplest test looks like this (the name is optional):
testCase( 'My Test', function () {
	test( true ); //this condition will pass
	test( false ); //this condition will fail so will the test case
} );
Two ways to make a test case:
// number 1
testCase( 'Description of the test', function () {
	//test a condition and mark the case as failed
	test( 1 === true, '1 is not identical to true' );
} );

// number 2
testCaseBegin();
	test( null !== 0, 'null is not identical to 0' );
testCaseEnd();
It is popssible to test program flow:
// like this
testCase( function () {
	if ( 1 ) {
		// fail the test explicitly
		testFailed( 'Unexpected program flow' );
	}
} );

// or like this
testCase( function () {

	// set some expectations
	testExpect( 1, 2, 3 );
	if ( 1 ) {
		// output something expected
		testOut( 1 );
	}

	if ( 0 ) {
		// output something expected
		testOut( 2 );
	}

	if ( 3 ) {
		// output something expected
		testOut( 3 );
	}

	// the test case will fail because the output is 1, 3 and 1, 2, 3 is expected
	testCheckExpect();
} );
It is also possible to test scripts that will crash:
testCase( function () {
	// this test case will succeed only if the script crashes
	testWillCrash();
	$a->crash();
} );
Test scripts can run themselves again with arguments:
$args = testGetArgs();

// this echo is for debugging the test script, it won't break any test case
testEcho( $args === null ? 'Script started w/o arguments' : 'Script started with arguments' );

if ( $args === null ) {
	testReRun( 'fork myself' );
}
These example can be found live in the example folder.
For overview of all supported functions in the test environment (e.g. testCase(), test(), etc.) look in the docs for file 'test_environment.php' under the package 'phptestr.test_environment'. In this file you will find short overview of all functions with examples how to use them. These examples are found as working scripts in the example subfolder of phptestr. In the docs, under the same section, you can also check the reference for each individual function.
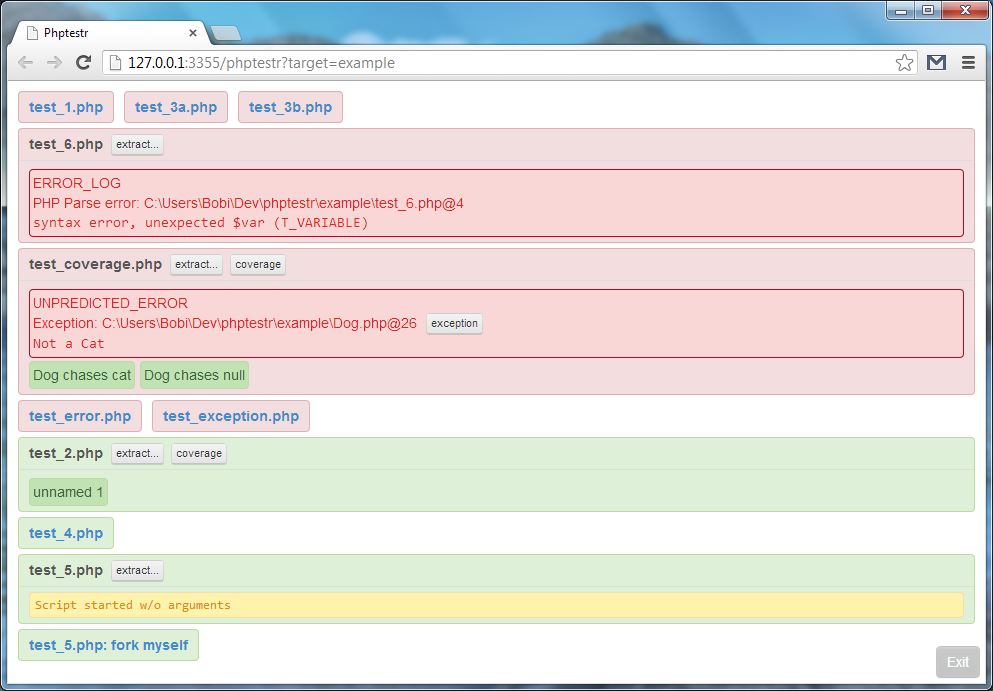
Starting phptestr -target=example will show the results in a simple
graphical interface. Each test script is represented by a box with the title
of the file. Scripts that passed all tests will be green and will be collapsed
by default. You can expand them by clicking on the title. Scripts which failed
to pass all tests or have errors in them will be put on the top of the list
and will be expanded by default. In the test script you will see green boxes
with the names all test cases that were successful. Test cases that were not
successful are red and will display what failed or what the error was and on
which line of the script it happened. Sometimes you can find additional
details if there is a button "exception" or "trace" in the box. Information
echoed by the scripts will be shown in yellow boxes. There is additional link
called "extract..." next to the title of the file. This will open the selected
script, without other scripts, in a new browser tab. Useful while developing
or debugging. Finally if code coverage is enabled you should will find a
"coverage" button in the title. Coverage is only available for test scripts
with successful test cases.
Screenshot of the results of the example tests can be found in example/tests.png.
phptestr [OPTIONS]
Where OPTIONS is:
-target=directory|file
Directory where to look for tests or phptestr.json or the full path to the json file. Optional when starting in GUI mode as it can be chosen from the browser.
-coverage
Optional. Enables collecting of code coverage information from tests. Depends on xdebug.
-cli
Optional. Will not start a browser but run the tests and display the results in the console. This mode does not support all features and is meant for automation.
-remotemode
Optional. Will not start a browser and the "Open" button for scripts in the GUI will be disabled. This is so phptestr can be run on remote machine.
-noexit
Optional. Will hide the exit button from the UI, for use with remote mode.
-phpbin=path
Optional. Path to the PHP binary to use for starting the tests. Defaults to 'php' and it must be installed in the system path for the default to work.
-phpini=path
Optional. Path to file or directory with php.ini configuration. This will be passed as argument to PHP.
-host=hostname
-port=portnumber
Optional, only supported in GUI mode. Will make phptestr listen for browser commands on a different host (ip) and port. Defaults to port 3355 on all hosts.
phptestr test will check that phptestr is working as expected.
Third-party software used:
Borislav Peev (borislav.asdf at gmail dot com) Tino Jahnke (tino.jahnke at web dot de)

