Hi, I'm Dat. I've taken the CKA exam September this year (2021) and passed. These are the practices I did and recorded so I can remember them better. Hope it is useful to you.
For more useful resources, please check out my site datmt.com.
Create a cluster with 1 master and 2 worker nodes
Do step 1 to step 4 in all nodes(3)
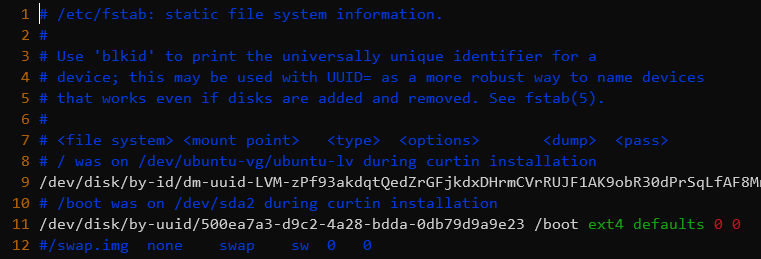
To disable swap, simply remove the line with swap in /etc/fstab
sudo vim /etc/fstabComment out the line with swap
 sudo apt-get update
 sudo apt-get install \
    apt-transport-https \
    ca-certificates \
    curl \
    gnupg \
    lsb-release

curl -fsSL https://download.docker.com/linux/ubuntu/gpg | sudo gpg --dearmor -o /usr/share/keyrings/docker-archive-keyring.gpg

echo \
  "deb [arch=amd64 signed-by=/usr/share/keyrings/docker-archive-keyring.gpg] https://download.docker.com/linux/ubuntu \
  $(lsb_release -cs) stable" | sudo tee /etc/apt/sources.list.d/docker.list > /dev/null


 sudo apt-get update
 sudo apt-get install docker-ce docker-ce-cli containerd.io
Switch to root and run
cat > /etc/docker/daemon.json <<EOF
{
  "exec-opts": ["native.cgroupdriver=systemd"],
  "log-driver": "json-file",
  "log-opts": {
    "max-size": "100m"
  },
  "storage-driver": "overlay2",
  "storage-opts": [
    "overlay2.override_kernel_check=true"
  ]
}
EOF

systemctl restart docker
sudo curl -fsSLo /usr/share/keyrings/kubernetes-archive-keyring.gpg https://packages.cloud.google.com/apt/doc/apt-key.gpg

echo "deb [signed-by=/usr/share/keyrings/kubernetes-archive-keyring.gpg] https://apt.kubernetes.io/ kubernetes-xenial main" | sudo tee /etc/apt/sources.list.d/kubernetes.list

sudo apt-get update
sudo apt-get install -y kubelet kubeadm kubectl
sudo apt-mark hold kubelet kubeadm kubectl
Now, that's all the common commands you need to run on all nodes. Next comes the command you only run on the master node:
kubeadm initYou should see similar message after a few minutes:
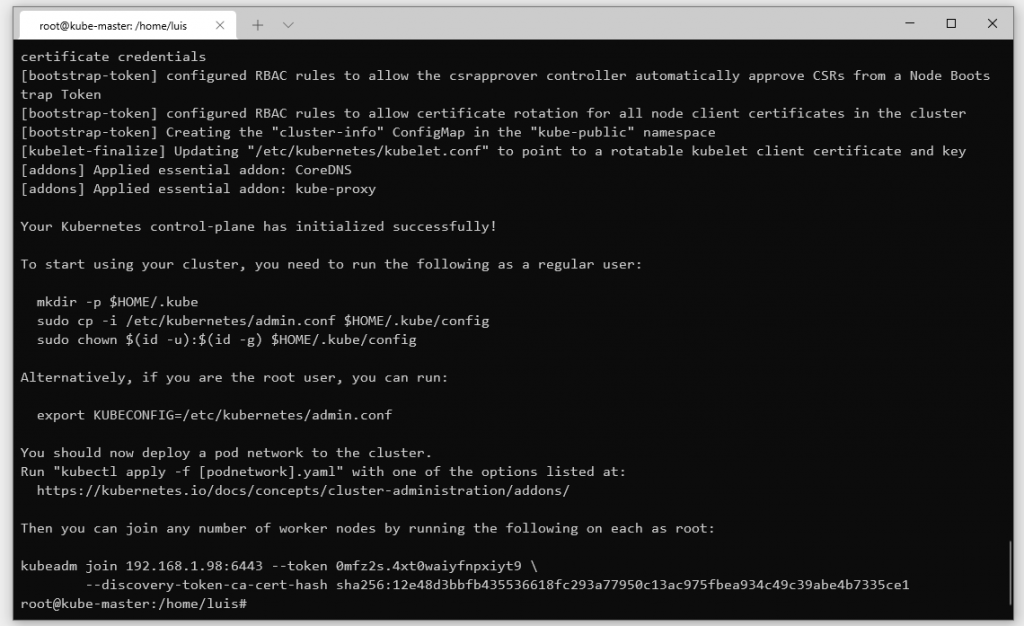
Copy the kubeadm join... command to later run on worker nodes.
Finally, you need to install network plugin for the master node (super important!)
sudo kubectl apply -f "https://cloud.weave.works/k8s/net?k8s-version=$(sudo kubectl version | base64 | tr -d '\n')"Wait for a few minutes for the master node to be ready. You can run:
kubectl cluster-infoand wait until the status of the master node is Ready
Then, switch to the worker node and run the join command (the one you got after kubeadm init)
kubeadm join 192.168.1.98:6443 --token 0mfz2s.4xt0waiyfnpxiyt9 \
        --discovery-token-ca-cert-hash sha256:12e48d3bbfb435536618fc293a77950c13ac975fbea934c49c39abe4b7335ce1
Back to the master node and run
watch kubectl get nodesIt will watch the cluster and after a few minutes, you should see all the nodes are ready:
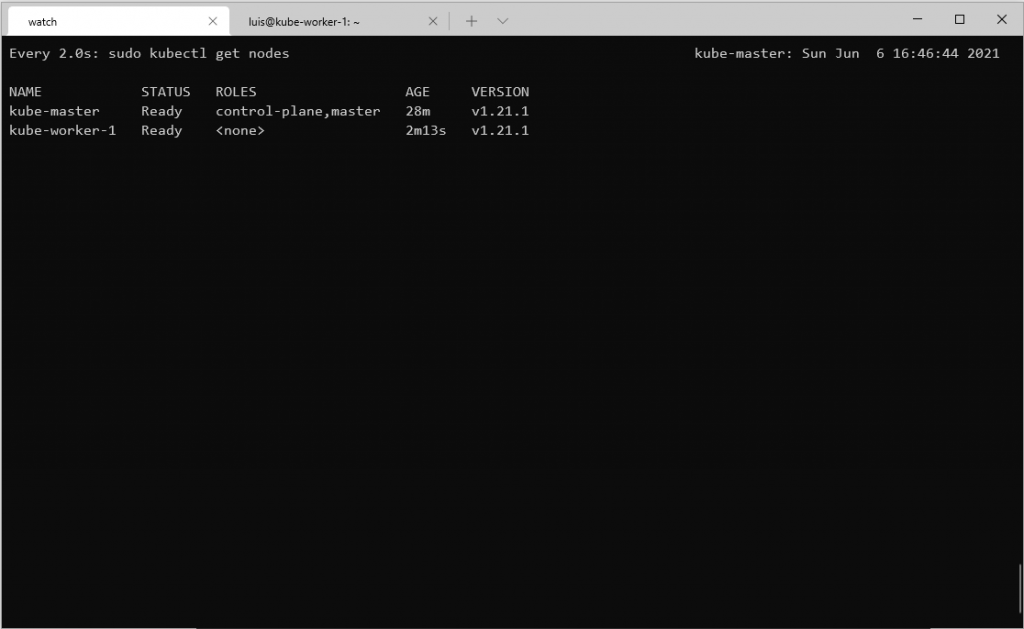
Congratulations! You have successfully setup a kubernetes cluster
Use curl instead of kubectl to get information about the cluster (pods...)
kubectl uses curl to access the Kubernetes API.
Use kube-proxy to avoid using certificate files
kubectl proxy --port=9900 &
Now you can access the Kubernetes API using curl
    # Remember, it's http, not https
    curl http://localhost:9900
Some examples accessing resources using curl
## Get pods in all namespaces
curl http://localhost:9900/api/v1/pods


## Get pods in the default namespace

curl http://localhost:9900/api/v1/namepsaces/default/podsCreate a deployment that run one nginx pod in every node of the cluster, including the master node
Daemonset is perfect to meet the requriements Daemonset makes sure the pod run one instance in all nodes of the cluster. Tolerations are needed to make sure pod runs on master node too.
Create this yaml file (name it, for example, nginx-daemon.yaml):
apiVersion: apps/v1
kind: DaemonSet
metadata:
  name: nginx-daemon
  labels:
    app: nginx-daemon
spec:
  selector:
    matchLabels:
      name: nginx-daemon-pod
  template:
    metadata:
      labels:
        name: nginx-daemon-pod
    spec:
      tolerations:
      - key: node-role.kubernetes.io/master
        operator: Exists
        effect: NoSchedule
      containers:
      - name: nginx-daemon
        image: nginx
kubectl apply -f nginx-daemon.yamlCheck if the pods are up and available at all nodes:
kubectl get nodes -o wide
Create a deployment using nginx image with 1 replica. Then, scale the deployment to 2 replicas
To quickly create a deployment, use kubectl create
kubectl create deploy nginx-deployment --image=nginx --replicas=1
Now scale the deployment to 2 replicas:
kubectl scale deployment nginx-deployment --replicas=2 
The scale command can also be used with replicaset, statefulset, replicationcontroller(deprecated)
- Create a deployment named
nginx-rollingwith 3 pods using nginx:1.14 image - Update the deployment to nginx:1.16
- Rollback the deployment to 1.14 using rollout history
- During the update, max unavailable is 2
Create deployment using kubectl create using dry-run (so we can quickly create the deployment) and
add the additional info about the rolling update.
kubectl create deploy nginx-rolling --image=nginx:1.14 --replicas=3 --dry-run=client -o yaml > nginx-rolling.yaml
Edit the yaml file to add maxUnavailable value:
apiVersion: apps/v1
kind: Deployment
metadata:
  creationTimestamp: null
  labels:
    app: nginx-rolling
  name: nginx-rolling
spec:
  replicas: 3
  selector:
    matchLabels:
      app: nginx-rolling
  strategy:
    rollingUpdate:
      maxUnavailable: 2
  template:
    metadata:
      creationTimestamp: null
      labels:
        app: nginx-rolling
    spec:
      containers:
      - image: nginx:1.14
        name: nginx
        resources: {}
status: {}
Next, create the deployment
kubectl apply -f nginx-rolling.yamlNow, update the deployment to use nginx:1.16 by editing the deployment yaml file,
change nginx:1.14 to nginx:1.16 the run kubectl apply -f nginx-rolling.yaml again:
kubectl apply -f nginx-rolling.yaml
Now, let's rollback to the previous deployment First, get the rollout history:
kubectl rollout history deploy nginx-rolling
You can check the details of the revisions to make sure the version of the image is correct:
kubectl rollout history deployment nginx-rolling --revision=1

It seems we need to roll back to revision 1
kubectl rollout undo deployment nginx-rolling --to-revision=1
Checking the details of the nginx-rolling deployment should show nginx image at 1.14

- Create a deployment name init-box using busybox as init container that sleep for 20 seconds.
- After 20 seconds, that container writes "wake up" to stdout (which can be seen )
- That deployment should also use nginx 1.16 as main container
Create this yaml file named sleep.yaml or whatever name you like
apiVersion: apps/v1
kind: Deployment
metadata:
  labels:
    app: init-box
  name: init-box
spec:
  replicas: 1
  selector:
    matchLabels:
      app: init-box
  template:
    metadata:
      labels:
        app: init-box
    spec:
      initContainers:
        - image: busybox
          name: busy-start
          command: ['/bin/sh', '-c']
          args: ["sleep 20; echo 'wake up'"]
      containers:
      - image: nginx:1.16
        name: nginx
        resources: {}
status: {}
Now run:
kubectl apply -f sleep.yaml
Get the pods:

After 20 seconds, you can see the log using:
kubectl logs init-box-6b7b74854d-jlj8s -c busy-start

As you can see, you can use -c container_name to get the log of a specific container. As in the yaml file above,
the init container is named busy-start, you can get its log by using -c busy-start
TODO
- Create a pod with two busybox containers: busy1 and busy2
- Create a volume where busy1 writes current date every 1 seconds and busy2 watch the file and print to stdout (using tail)
For requirement like this, emptyDir volume is a good choice.
Create an yaml like this and name it share-vol.yaml for example:
apiVersion: v1
kind: Pod
metadata:
  name: share-vol
spec:
  containers:
  - image: busybox
    name: busy1
    command: ['/bin/sh', '-c']
    args: ['while true; do date >> /share/date; sleep 1; done']
    volumeMounts:
    - mountPath: /share
      name: share-volume

  - image: busybox
    name: busy2
    volumeMounts:
    - mountPath: /share
      name: share-volume
    command: ['/bin/sh', '-c']
    args: ['tail -f /share/date']

  volumes:
  - name: share-volume
    emptyDir: {}
Create the pod by kubectl apply -f share-vol.yaml
Now, check the file /share/date in pod 1 using kubectl exec:
kubectl exec -it share-vol -c busy1 -- cat /share/dateYou'll see the file is updated every 1 second:

Now, let's check the log in the container `busy2'
kubectl logs share-vol -c busy2
As you can see, container busy1 can write to /share/date and container busy2 can read from the same location.
- Create a persistent volume that is used by two pods pod1 and pod2
- Both pods use busy box, one pod write the current date to a file and other pod read and print the content of the file to stdout
We need to create persistent volume and persistent volume claim. Since many pods (2) can read/write to the volume, the persistent volume and persistent volume claim's access mode could be: - ReadWriteMany - ReadWriteOnce and ReadOnlyMany
Let's create the persistent volume and persistent volume claim first. Let's name the following file pv-share.yaml
apiVersion: v1
kind: PersistentVolume
metadata:
  name: share-pv
  labels:
    app: share-pv
spec:
  capacity:
    storage: 10Mi
  accessModes:
    - ReadWriteOnce
    - ReadOnlyMany
  hostPath:
    path: "/tmp/share"
---
apiVersion: v1
kind: PersistentVolumeClaim
metadata:
  name: share-pvc
spec:
  selector:
    matchLabels:
      app: share-pv
  storageClassName: "" # specify this to avoid dynamic provisioning
  accessModes:
    - ReadWriteOnce
    - ReadOnlyMany
  resources:
    requests:
      storage: 10Mi
Now create pv and pvc:
kubectl apply -f pv-share.yaml The PV, PVC should be created and with status Bound

Let's create the two pods that read and write to that PV. Let's call the file name 'share-pv-pods.yaml'
apiVersion: v1
kind: Pod
metadata:
  name: pod1
spec:
  volumes:
    - name: share-pv-vol
      persistentVolumeClaim:
        claimName: share-pvc
  containers:
    - name: busybox
      image: busybox
      command: ['/bin/sh', '-c']
      args: ['while true; do date >> /tmp/share-pod-1/date; sleep 1; done']
      volumeMounts:
        - mountPath: "/tmp/share-pod-1"
          name: share-pv-vol

---

apiVersion: v1
kind: Pod
metadata:
  name: pod2
spec:
  volumes:
    - name: share-pv-vol
      persistentVolumeClaim:
        claimName: share-pvc
  containers:
    - name: busybox
      image: busybox
      command: ['/bin/sh', '-c']
      args: ['tail -f /tmp/share-pod-2/date']
      volumeMounts:
        - mountPath: "/tmp/share-pod-2"
          name: share-pv-vol
Create the pods
kubectl apply -f share-pv-pods.yaml
Let's log the pod2

You can see that it successfully reads the data written by pod1
- Create a ConfigMap that serves a custom nginx config file
- The default index file is other.html and its content is 'Hello from the other!'
For this task, we actually need to create TWO ConfigMap, one for the nginx config file, the other for other.html file.
nginx.conf
server {
    listen 80;
    server_name localhost;
    location / {
        root /usr/share/nginx/html;
        index other.html;

    }
}
other.html
Hello from the other!
Let's create two ConfigMap for these two files:
nginx-cm
kubectl create cm nginx-conf-cm --from-file=nginx.confother-cm
kubectl create cm other-cm --from-file=other.htmlLet's verify the two cm were created:

It's time to create the pod that uses these two ConfigMaps. Let's create a file called pod-cm.yaml with content as follow:
apiVersion: v1
kind: Pod
metadata:
  name: nginx-cm-pod

spec:
  containers:
  - name: nginx-cm
    image: nginx
    volumeMounts:
    - name: config
      mountPath: /etc/nginx/conf.d
    - name: other-vol
      mountPath: /usr/share/nginx/html

  volumes:
  - name: config
    configMap:
      name: nginx-conf-cm
      items:
      - key: nginx.conf
        path: default.conf

  - name: other-vol
    configMap:
      name: other-cm
      items:
      - key: other.html
        path: other.html
Now, if you try to get the content of the file at /usr/share/nginx/html/other.html, the expected content should be shown:
kubectl exec -it nginx-cm-pod -- cat /usr/share/nginx/html/other.html
And, to make sure the config works, let's curl the localhost inside the container and you should get the expected content:
kubectl exec -it nginx-cm-pod -- curl http://localhost

- Create a configmap with two pairs of keys and values
- Use the two keys as environment variables in an nginx pod
First, create the configmap
kubectl create cm env-cm --from-literal=key1=value1 --from-literal=key2=value2
Next we are going to assign value1 and value2 to two environment variables in an nginx pod.
Let's create a yaml file like this and call it nginx-cm.yaml:
kind: Pod
apiVersion: v1

metadata:
  name: nginx-cm
spec:
  containers:
    - name: nginx-cm
      image: nginx
      env:
        - name: ENV_KEY_1
          valueFrom:
            configMapKeyRef:
              key: key1
              name: env-cm
        - name: ENV_KEY_2
          valueFrom:
            configMapKeyRef:
              key: key2
              name: env-cm
Let's create the pod:
kubectl apply -f nginx-cm.yaml
Now, if you run the command env inside the pod, you should see the two environment variables has been set:
kubectl exec -it nginx-cm-pod -- env | grep "ENV"

- Instead of specifying single variables like task 4.2, let's create a config map with 3 values (from yaml file)
- Then use all key/value pairs as environment variables
First, let's create the configmap with three random values. Let's call the file some-cm.yaml
apiVersion: v1
kind: ConfigMap
metadata:
  name: some-cm
data:
  first_env: "10000"
  second_env: "20000"
  third_env: "something else"
Let's create the configmap by running:
kubectl apply -f some-cm.yamlNow, create a pod to use the configmap. Create the following file and name it some-pod.yaml
apiVersion: v1
kind: Pod
metadata:
  name: some-pod

spec:
  containers:
    - name: some-pod
      image: nginx
      envFrom:
        - configMapRef:
            name: some-cm
Let's create the pod:
kubectl apply -f some-pod.yamlNow, check the environment variables inside that pod:
kubectl exec -it some-pod -- env
Sure enough, you got the environment variables there:

- Create a secret
- Use it as mariadb password
Create a password for mariadb using secret
kubectl create secret generic mariadb-secret --from-literal=pw=abc123This should create a secret named mariadb-secret
If you run:
kubectl get secret mariadb-secret -o yamlYou should get the following output:
apiVersion: v1
data:
  pw: YWJjMTIz
kind: Secret
metadata:
  creationTimestamp: "2021-08-21T05:31:39Z"
  name: mariadb-secret
  namespace: default
  resourceVersion: "17672707"
  selfLink: /api/v1/namespaces/default/secrets/mariadb-secret
  uid: e7fc5f82-50d0-4843-a512-96b113f0eb24
type: Opaque
Notice the data field. It contains the key and values of the secret, of course, it's base64 encoded.
Let's use that secret as password for a mariadb pod. Create the following file and name it maria-pod.yaml
kind: Pod
apiVersion: v1
metadata:
  name: maria-secrets
spec:
  containers:
    - name: maria-secets
      image: mariadb
      env:
        - name: MYSQL_ROOT_PASSWORD
          valueFrom:
            secretKeyRef:
              key: pw
              name: mariadb-secret
You may wonder why the environment name is MYSQL_ROOT_PASSWORD. It's specified here in mariadb docker page: https://hub.docker.com/_/mariadb
Let's create the pod
kubectl apply -f maria-pod.yaml
Make sure the pod is running. If you run this:
kubectl get pods NAME READY STATUS RESTARTS AGE
maria-secrets 1/1 Running 0 43s
Let's go to the pod and try to login with root and the password abc123
kubectl exec -it maria-secrets -- /bin/bash

mysql -u root -p'abc123'
You should get this output:

- Create a pod running nginx with the following CPU and RAM specs:
- requests: 10Mi RAM, 100m (millicpu)
- limits: 30Mi RAM, 200m (millicpu)
The specs for memory/cpu limits/requests are defined in the spec section of a pod definition as follow:

Create a definition file called nginx-limit.yaml with the following content:
apiVersion: v1
kind: Pod
metadata:
  name: nginx-limit
spec:
  containers:
  - name: nginx-limit
    image: nginx
    resources:
      requests:
        memory: "10Mi"
        cpu: "100m"
      limits:
        memory: "30Mi"
        cpu: "200m"
Now create the pod:
kubectl apply -f nginx-limit.yaml