This project is an example of how to use Apache Kafka as the main method of communication between microservices using the Akka Streams library Reactive-Kafka. There is no domain/business logic implemented here and the idea would be to use this as a template to then customise for your own microservices. This template provides examples of the following:
- Creating consumer and producer Akka Streams using Reactive-Kafka
- Batch committing the Kafka Offsets of consumed messages
- Integrating the consumer and producer streams with Akka Actors using backpressure
- Akka HTTP frontend API for manually starting/stopping the consumer streams
- JSON (un)marshalling to/from Scala case classes
- Local Event Sourcing using Akka EventBus
- Logging
- Akka HTTP, Actor, and Stream unit and integration testing
The core function of this microservice example is to publish some example messages to Kafka from an Akka Actor which acts as a Source for an Akka Stream by making use of backpressure. We call this producer Actor the "data" producer. There is another Akka Stream connected to that same Kafka topic to then consume the messages off the queue. This second stream sends the messages to an Akka Actor (the "data consumer Actor") which acts as a Sink for the Akka Stream. Once this Sink Actor receives the messages he simply prints the results to the console.
During application startup, the streams are created which triggers local events to be published to the ActorSystems built in EventBus. Then, there is an "event" producer Actor who is subscribed to that local EventBus who gets the Events and then publishes them via another Akka Stream to Kafka. Again, there is a consumer stream who is subscribed to this event topic channel on Kafka whose "event" Consumer Actor stream Sink then prints the results to the console.
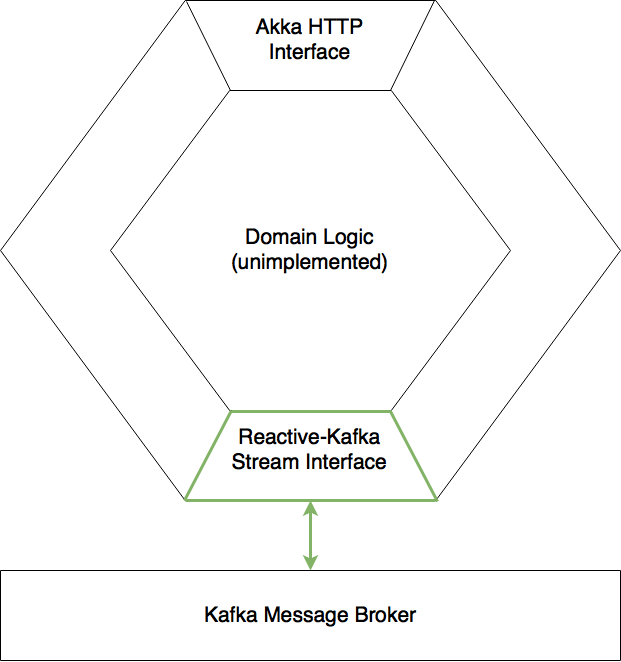
Finally, there is an Akka HTTP interface which allows the user to tell the "data" producer Actor to publish messages to Kafka, as well as start and stop both the "data" consumer stream and the "event" consumer stream.
Thus, in total there are 4 Akka Streams which are materialised. Two consuming Streams which pull data from the Kafka Message Broker, and two publishing Streams which push messages to the Kafka Message Broker.
The following diagram shows the 4 Akka Streams which are created (in green), along with the Akka Actors which serve as the Sinks (for consumer Streams) and Sources (for producer Streams). The Akka Actors and Akka Streams are integrated using Source.queue(_,OverflowStrategy.backpressure) for the producer Streams and Sink.actorRefWithAck for the consumer Streams so that we have full backpressure both ways as per the Akka documentation.
There are two Kafka topics TestDataChannel and AppEventChannel on the Kafka message broker. Then, (case class) messages KafkaMessage and ExampleAppEvent are converted to JSON and are published/consumed to/from their respective Kafka topics.
The process of creating a consumer Stream involves the following steps as illustrated in the below animation. The ConsumerStreamManager is an Actor who is responsible for the lifecycle of the consumer Akka Stream, i.e. he creates, runs and can terminate them. A consumer Actor serves as the messages endpoint (the Sink) of the Streams. Once a Consumer Actor (who will act as the Stream Sink) and the ConsumerStreamManager are created:
- An
InititializeConsumerStreammessage is sent to the manager with the reference to the Consumer Actor and the message type (case class) the consumed JSON data from Kafka must be converted to - Upon receiving this message, the StreamManager initialises the Akka Stream using information from the
application.confsettings file using the Reactive-Kafka library. - Once the stream has started, the message type and stream reference is saved to a collection so the Stream can be terminated on command if necessary. The StreamManager then tells the Consumer Actor the stream has materialised by sending it an
ActivatedConsumerStream(Topic)message and also emits a event to the local EventBus associated to the ActorSystem. - Upon receiving the
ActivatedConsumerStreammessage from the ConsumerStreamManager, the ConsumerActor saves the address of the ConsumerStreamManager. The Actor stays in its "non-consuming state" until it receives theSTREAM_INITmessage from the Akka Stream in which case the Actor then changes state to Consuming mode bia Akka'sbecomemethod. The reference to the ConsumerStreamManager is kept in order to manually terminate the stream (which can be done by the Akka HTTP front end as described below).

The process of creating a producer Stream is essentially the same concept as creating the Consumer Stream, except now the Producer Actor is the Akka Stream Source. Again, we create an instance of the ProducerStreamManager. This Actor is responsible for the lifecycle of the producer Akka Stream, i.e. he creates and runs them. Once a Producer Actor and the ProducerStreamManager are created:
- An
InititializeProducerStreammessage is sent to the manager with the reference to the Producer Actor and the message type (case class) the consumed JSON data from Kafka must be converted to - Upon receiving this message, the StreamManager initialises the Akka Stream using information from the
application.confsettings file using the Reactive-Kafka library. - Once the stream has started, the StreamManager then tells the Producer Actor the stream has materialised and passes it the streams reference in the message
ActivatedProducerStream(streamRef, Topic). An event describing what has occurred is then published to the local EventBus associated to the ActorSystem. - Upon receiving the
ActivatedProducerStreammessage from the ProducerStreamManager, the Producer Actor then changes state to be in Publishing mode via Akka'sbecomemethod.
There are many online tutorials and guides on how to install and setup Apache Kafka so only the basics are explained here. To use Apache Kafka, a running Apache Zookeeper server instance is required. The Kafka download comes with a Zookeeper server automatically as described in the installation guide/tutorial for Reactive-Kafka here. In my setups, I usually separately install each of the components to get things up and running: Apache Zookeeper, Apache Kafka. First download and install Zookeeper and Kafka components as described by their respective installation guides. This project currently is currently running with Kafka 0.10.0.1, Zookeeper 3.4.8 (but should work with newer releases of Zookeeper).
Note:
Kafka does not currently come bundled with a nice web UI like some other message broker technologies so this tutorial will show how to create Kafka topics via a Terminal. Kafka Manager is a nice UI tool I can recommend which runs a little server that connects to Kafka and allows you to visualise/create/delete Kafka brokers, topics, partitions, logs...etc.
Then start the Zookeeper server instance from Terminal:
>zkServer start
Now start a Kafka instance by pointing it to a properties file that was installed by default
>kafka-server-start /usr/local/etc/kafka/server.properties
Note:
If the Kafka server returns an error that it cannot find the Zookeeper instance, verify that the server.properties and server.default.properties files in
/usr/local/etc/kafkahavezookeeper.connect=localhost:2181as the Zookeeper server location.
To create new Topics in Kafka enter
>kafka-topics --zookeeper localhost:2181 --create --topic MyBrandNewKafkaTopic --replication-factor 1 --partition 5
To check the topics:
>kafka-topics --describe --zookeeper localhost:2181
which should show that Kafka your newly created MyBrandNewKafkaTopic. With these details sorted out, we can now run our application.
We assume the user has already configured Apache Kafka to be running locally. The two Topics we will be publishing/consuming to/from are "TestDataChannel" and "AppEventChannel", as expressed in the application.conf resource file. Furthermore, an additional two channels which are used for "End-to-End" testing are called "TempChannel1" and "TempChannel2", as expressed in the reference.conf resource file. These 4 topics must be created with 5 partitions each. For an introduction to setting up and running Apache Kafka
To run from Terminal:
// From root of project directory which contains the build.sbt file
>sbt run
There are two main classes inside this repository. The Main.scala application starts all 4 Streams during initialisation. Starting the Main.scala app starts the Akka HTTP interface. The user is first prompted to select the port the server is to be hosted at.
// From root of project directory which contains the build.sbt file
>sbt run
[info] Running example.Main
Specify the TCP port do you want to host the HTTP server at (e.g. 8001, 8080..etc)?
Hit Return when finished: 8080
Once running, navigate to (or via cURL) the following endpoints to start/stop the consumer streams and to produce 'n' messages.
/data_consumer/start
/data_consumer/stop
/event_consumer/start
/event_consumer/stop
/data_producer/produce/n
Example:
Running
Main.scalaapp and selecting port 8080 from the Terminal for the Akka HTTP server, we can make the producer Actor produce 50 messages to Kafka
curl localhost:8080/data_producer/produce/50returns the response
50 messages Produced as Ordered, Boss!then in the Terminal window which is running the
Main.scalaapp we see the messages have been consumed by both the Event Stream and Data Stream from KafkaExampleAppEvent(15:01:17:20:59:52.579,akka://akka-reactive-kafka app/user/dataProducer#1828074211,MessagesPublished(50)) KafkaMessage(15:01:17:20:59:52.579, send me to kafka, yo!,1) KafkaMessage(15:01:17:20:59:52.579, send me to kafka, yo!,2) KafkaMessage(15:01:17:20:59:52.579, send me to kafka, yo!,9) KafkaMessage(15:01:17:20:59:52.579, send me to kafka, yo!,15) KafkaMessage(15:01:17:20:59:52.579, send me to kafka, yo!,23) KafkaMessage(15:01:17:20:59:52.579, send me to kafka, yo!,3) . .
In separate Terminals you can now run additional instances of the application and see that these new Kafka consumer streams (
DataConsumerandEventConsumer) will share the messages which are published to the topics "TestDataChannel" and "AppEventChannel".
// From root of project directory which contains the build.sbt file
>sbt test
If you have any questions about this project please email Corey OMeara @ [email protected]. This code is open source software licensed under the Apache 2.0 License. For additional information please see the LICENSE file.


