Lightwork simplifies the process of mapping complex arrangements of LEDs, removing the limitations of straight lines and grids from your light based creations.
- Compatible with Fadecandy, Pixelpusher, sACN and ArtNet driven LED arrays
- Network discovery for Pixelpusher and ArtNet nodes
- GUI controls for LED array configuration and OpenCV mapping calibration
- Sequential mapping - Fire and detect LEDs one at a time, sequentially. Slow for large arrays but more reliable in some cases
- Binary mapping - LEDs flash a unique binary pattern, and all LEDs are mapped simultaneously. Exponentially faster for large arrays, but more suceptible to lighting/environmental interference
- Save as CSV for use with the included Scraper, or applications like MadMapper / Touchdesigner
- Lightweight scraper that can be added to your application to drive LEDs
- Seamless map updates while the scraper is running, over OSC
- (Experimental) Stereo mode captures 3D coordinates by mapping from 2 camera locations
Lightwork uses OpenCV to detect and map your LED arrangements. Set up your LEDs, point a webcam at them, run Lightwork and you'll have a comprehensive map that enables you to put content on them as if they were a screen.
Here's a video walking through the binary mapping process:
Libraries: PixelPusher, OpenCV, ControlP5, eDMX, oscP5
Most available from the Sketch > Import Library > Add Library dialog in the Processing IDE.
- ArtNet P5 - included in this repo or clone from https://github.com/sadmb/artnetP5
- eDMX - (will be added to repo shortly) https://github.com/jwarwick/processing-edmx
*Scraper includes Syphon (Mac) and Spout (Win) client to receive content from another application. You'll need the appropriate library for your platform. This is optional, comment and remove the PDE if you don't need this functionality.
Operating System
Tested and developed in OSX 10.12 and Windows 10, may not behave well in other operating systems.
A Webcam
We recommend, and have built this using the Logitech C920 webcam. It's cheap, is tripod mount compatible, and generally provides high quality and high speed capture.
Hardware
PixelPusher, Fadecandy or Artnet controller and individually addressable LEDs are required.
1440x900 or higher resolution monitor recommended.
This readme assumes you have set up your driver hardware and LEDs first. Here are some references to get you started if this is your first time:
PixelPusher setup reference: https://sites.google.com/a/heroicrobot.com/pixelpusher/home/getting-started
FadeCandy: https://github.com/scanlime/fadecandy
This guide is very useful for setting up a raspberry pi to drive FadeCandy controllers over network: https://learn.adafruit.com/1500-neopixel-led-curtain-with-raspberry-pi-fadecandy/fadecandy-server-setup
ArtNet: Consult your hardware’s manual for setup. (ArtNet support is currently incomplete)

The application used to map your LED array. Use an attached webcam to capture LED states and translate their physical locations into screen locations. Outputs a normalized CSV of LED locations for use in the Lightwork Scraper, or any software of your choice.
Set up your LEDs, their controller and ensure you can connect to it either locally or over network.
Connect your webcam, and point it at the LED array. We recommend a tripod to allow positioning your cam as needed, and keeping it stable. Any movement will throw off your mapping results. Be sure to turn off "Auto" features on your webcam, like auto focus and auto white balance, these will make adjustments between frames while mapping, affecting results.
Select your camera from the dropdown, and its output should appear. If it's not in the list, hit "Refresh"
Select your LED controller type from the dropdown, and enter the appropriate details. Make sure to hit enter after changing settings. Once your settings are correct hit "Connect". On successful connect, the button will change to "Refresh", allowing you to reconnect with different settings.
Now that you're connected, you can calibrate the OpenCV view to your LEDs and lighting conditions. Default is pattern mode, but you can also choose sequential for more challenging setups. Adjust the contrast and threshold until your lit LEDs appear well defined white blobs in the right window. In general, keep the LED brightness as low as possible to prevent flaring in the camera.
Once you have the CV settings looking good, you're almost ready to map. The settings on the right are mapping controls. Frameskip controls the number of frames between captures, or the speed mapping runs at. Turn this up for more reliable results. Blob size controls the allowed size of blobs. The minimum should be set to detect actual LEDs but filter our noise. Max should be set to around the size of LEDs but small enough to filter out blobs that blend together due to flaring. Blob distance is used to filter duplicate blobs or blobs that appear very close together, often caused by flaring. These settings will depend on your setup and environmental settings, so adjust until you get the desired result.
Now you can stop calibrating, and try mapping. Binary will capture a sequence of frames, then analyze them for patterns before returning the number of matched LEDs. Adjust your settings until you get the expected number of matched LEDs. Sequential will show an ellipse at the location of detected LEDs, but not the total number.
Once Mapping is complete, press "Stop" and "Save Layout". This will open a save dialog that should default to the Lightwork Scraper directory. The window may appear behind other open windows, which is a java issue, just al+tab to it. Make sure you add .csv to the saved file name.
And that's it! You can now use the generated map in the Lightwork Scraper or another software of your choice.
Camera: select a connected USB webcam
Refresh: refreshes the list of connected webcams - if a camera only shows black, unplug it and then refresh (this is to do with OS drivers not releasing properly)
Stereo Toggle: Enable multiple captures for depth mapping. Estimates Z depth based on 2 captures. Once enabled, you'll need to use Map Left and Map Right before saving the layout.
FPS: Number in the top right is the current framerate, useful for performance testing.
Driver: LED driver hardware. Currently FadeCandy and PixelPusher are supported (Artnet is incomplete). Selecting a driver from the dropdown will reveal the required settings to connect. Pixelpusher configuration is stored on its USB, and will be discovered over network.
IP: The local IP of the driver hardware. Use 127.0.0.1 for a USB connected fadecandy. Press enter to set the value.
Strips: Number of strips connected to the driver hardware. Press enter to set the value.
LEDs per strip: Number of LEDs on each attached strip. Use the longest string if they aren’t consistent. Note that FadeCandy supports a max of 64 per channel, and PixelPusher supports a max of 480 per channel. Press enter to set the value.
Connect: Connect to driver hardware using current settings. Button turns green on successful connection. Once connected, this button can be used to update the strip settings on the driver hardware.
Contrast: Adjusts the contrast on the OpenCV input. Useful for compensating for ambient lighting.
Threshold: OpenCV is performed on a binary image (black and white). Pixels above the threshold become white, pixels below the threshold become black. Use to isolate your LEDs in a noisy scene.
LED Brightness: 0-255. This can help reduce lens flaring, or compensate for ambient light in a scene.
Pattern/ Sequence: Select mapping method.
Sequence fires the LEDs in order of their address, and associates them with a physical location one at a time. Sequential can be very accurate, but is slower on large arrays. Sequential is also beneficial on arrays where the LEDs are very close together or when their light blends.
Pattern flashes the full LED array in binary patterns, capturing a video frame for each bit of the pattern. Once captured, the patterns are associated with their physical location, all at once. Binary mapping is an exponential decrease in mapping time as the number of LEDs increases, but is not suitable for all arrangements.
Calibrate: Run a test to check physical connections and ensure all LEDs are working. Also useful for adjusting settings to compensate for ambient lighting or other environmental factors. Press Calibrate again to stop.
Map: Run the selected mapping method. This will display detected LED locations in the output window. Runs until mapping is complete.
Frameskip Amount of frames to wait between animator actions. Lower numbers speed up mapping but can reduce accuracy.
Min/ Max Blob Size: Isolate size of blobs elegible for detection. Increasing minimum size helps eliminate noise, increasing maximum size helps compensate for larger LEDs.
Min Blob Distance: Minimum distance between detected blobs. Blobs closer than this will be filtered out as erroneous.
Save Layout: Saves a CSV of the mapping layout, to be used in the Lightwork Scraper.
ALT-SHIFT-S : Save UI properties to file
ALT-SHIFT-L : Load UI properties to file
Note: ALT also enables dragging in ControlP5, try to release the alt key first after using these commands. If it's releases last it can enable dragging.
SHIFT-H : Disable dragging (if activated with alt)
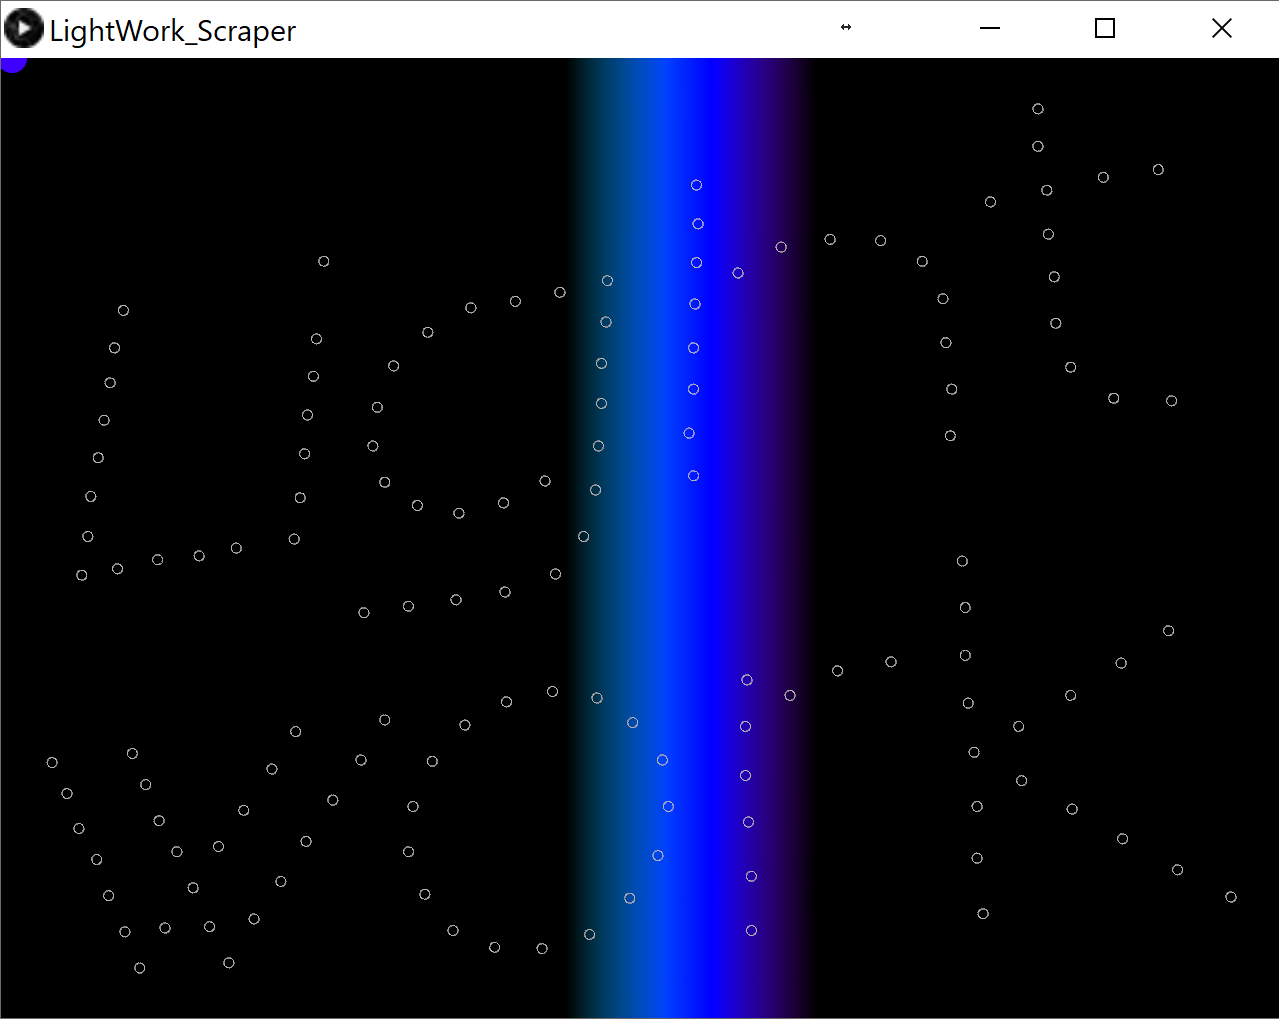
Use with your own sketch to map your content onto the LED array.
Requires Interface.pde, OPC.pde and Scraper.pde in your sketch folder, as well as a layout CSV in the sketch or data folder.
Replace the drawing code in the example to display your own content, or use Syphon/Spout to pipe in input from another application.
Example Setup:
void setup() {
  size(1280, 960, P3D);

  //initialize scraper
  //replace with your filename, make sure it's in the sketch or /data folder
  scrape = new Scraper("layout.csv");

  //initialize connection to LED driver - replace with adress and LED config for your setup
  //(Device type, address (not required for PixelPusher), number of strips, LEDs per strip)
  network = new Interface(device.FADECANDY, "fade2.local", 3, 50);
  network.connect(this);

  //update scraper after network connects
  scrape.update();
}
Example draw loop:
void draw() {
  //Your drawing code here

  //Scraper functions
  scrape.update(); //Update colors to be sent to LEDs
  network.update(scrape.getColors()); //Send colors to LEDs
  scrape.display(); //Show locations loaded from CSV
}
Developed with the participation of Creative BC, the Province of British Columbia and the British Columbia Arts Council.


