This repository contains Terraform and Ansible configurations to launch and set up some basic infrastructure on DigitalOcean. As server deployments and development teams continue to get larger and more complex, the practice of defining infrastructure as version-controlled code has taken off. Tools such as Ansible and Terraform allow you to clearly define the servers you need (and firewalls, load balancers, etc.) and the configuration of the operating system and software on those servers.
This demo will create the following infrastructure using Terraform:
- Two 512mb Droplets in the NYC3 datacenter running Ubuntu 16.04
- One DigitalOcean Load Balancer to route HTTP traffic to the Droplets
- One DigitalOcean Cloud Firewall to lock down communication between the Droplets and the outside world
We will then use Ansible to run the following tasks on both Droplets:
- Update all packages
- Install the DigitalOcean monitoring agent, to enable resource usage graphs in the Control Panel
- Install the Nginx web server software
- Install a demo
index.htmlthat shows Sammy and the Droplet's hostname
You will need the following software installed to complete this demo:
- Git: You'll use Git to download this repository to your computer. You can learn how to install Git on Linux, macOS, or Windows by reading our Getting Started with Git guide
- Terraform: Terraform will control your server and load balancer infrastructure. To install it locally, read the Install Terraform section of How To Use Terraform with DigitalOcean
- Ansible: Ansible is used to configure the servers after Terraform has created them. The official Ansible documentation has installation instructions for a variety of operating systems
You will also need an SSH key set up on your local computer, with the public key uploaded to the DigitalOcean Control Panel. You can find out how to do that using our tutorial How To Use SSH Keys with DigitalOcean Droplets.
Finally, you will need a personal access token for the DigitalOcean API. You can find out more about the API and how to generate a token by reading How To Use the DigitalOcean API v2
When you have the software, an SSH key, and an API token, proceed to the first step.
First, download the repository to your local computer using git clone. Make sure you're in the directory you'd like to download to, then enter the following command:
$ git clone https://github.com/do-community/terraform-ansible-demo.git
Navigate to the resulting directory:
$ cd terraform-ansible-demo
We need to update a few variables to let Terraform know about our keys and tokens. Terraform will look for variables in any .tfvars file. An example file is included in the repo. Copy the example file to to a new file, removing the .example extension:
$ cp terraform.tfvars.example terraform.tfvars
Open the new file in your favorite text editor. You'll see the following:
do_token = ""
ssh_fingerprint = ""
Fill in each variable:
-
do_token: is your personal access token for the DigitalOcean API
-
ssh_fingerprint: the DigitalOcean API refers to SSH keys using their fingerprint, which is a shorthand identifier based on the key itself.
To get the fingerprint for your key, run the following command, being sure to update the path (currently
~/.ssh/id_rsa.pub) to the key you're using with DigitalOcean, if necessary:$ ssh-keygen -E md5 -lf ~/.ssh/id_rsa.pub | awk '{print $2}'The output will be similar to this:
MD5:ac:eb:de:c1:95:18:6f:d5:58:55:05:9c:51:d0:e8:e3Copy everything except the initial
MD5:and paste it into the variable.
Now we can initialize Terraform. This will download some information for the DigitalOcean Terraform provider, and check our configuration for errors.
$ terraform init
You should get some output about initializing plugins. Now we're ready to provision the infrastructure and configure it.
We can provision the infrastructure with the following command:
$ terraform apply
Terraform will figure out the current state of your infrastructure, and what changes it needs to make to satisfy the configuration in terraform.tf. In this case, it should show that it's creating two Droplets, a load balancer, a firewall, and a null_resource (this is used to create the inventory file for Ansible).
If all looks well, type yes to proceed.
Terraform will give frequent status updates as it launches infrastructure. Eventually, it will complete and you'll be returned to your command line prompt. Take note of the IP that Terraform outputs at the end:
Apply complete! Resources: 5 added, 0 changed, 0 destroyed.

Outputs:

ip = 203.0.113.11
This is the IP of your new load balancer. If you navigate to it in your browser, you'll get an error: the Droplets aren't serving anything yet!
Let's fix that by running Ansible to finish setting up the servers:
$ ansible-playbook -i inventory ansible.yml
Ansible will output some status information as it works through the tasks we've defined in ansible.yml. When it's done, the two Droplets will both be serving a unique web page that shows the hostname of the server.
Go back to your browser and enter the load balancer IP again. It may take a few moments to start working, as the load balancer needs to run some health checks before putting the Droplets back into its round-robin rotation. After a minute or so the demo web page with Sammy the shark will load:

If you refresh the page, you'll see the hostname toggle back and forth as the load balancer distributes the requests between both backend servers (some browsers cache more heavily than others, so you may have to hold SHIFT while refreshing to actually send a new request to the load balancer).
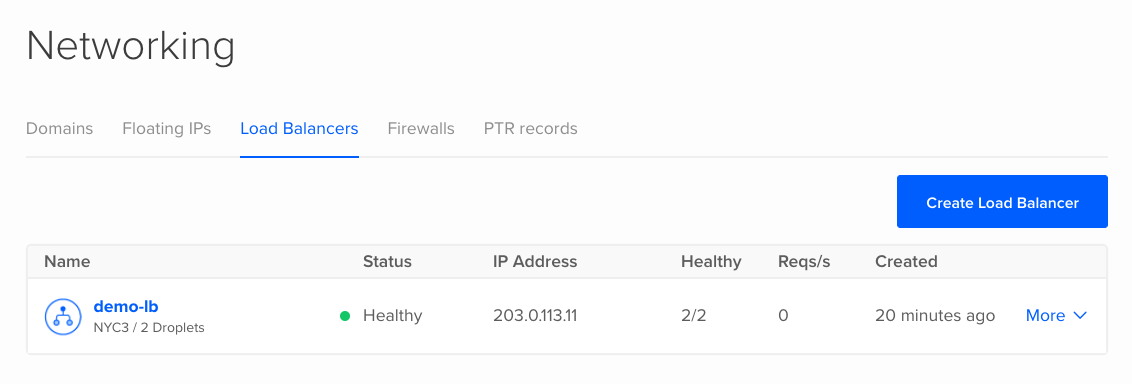
Take some time to browse around the DigitalOcean Control Panel to see what you've set up. Notice the two Droplets, demo-01 and demo-02 in your Droplets listing. Navigate to the Networking section and take a look at the demo-lb load balancer:
In the Firewalls tab, you can investigate the demo-firewall entry. Notice how the Droplets are set up to only accept web traffic from the load balancer:

When you're done exploring, you can destroy all of the demo infrastructure using Terraform:
$ terraform destroy
This will delete everything we set up for the demo. Or, you could build upon this configuration to deploy your own web site or application! Read on for suggestions of further resources that might help.
This demo was a quick intro into Terraform and Ansible. You are encouraged to take a look at the terraform.tf file to learn more about what we did with Terraform, and ansible.yml to see the tasks that Ansible performed. For more information on Ansible and Terraform, check out the following sources:
- How To Use Terraform with DigitalOcean
- How to Install and Configure Ansible on Ubuntu 16.04
- The official Terraform documentation
- The official Ansible documentation
- The DigitalOcean API documentation can be useful when specifying DigitalOcean resources in Terraform

