Simple Custom Navigation Page Back Button Style Demo for Xamarin Forms.
A simple demo application demonstrating how to change the Back Button Icon and Style in a Navigation Bar of a Navigation Page, per individual page using Xamarin Forms and Custom Renderers.
Changing the Back Button Style in a Navigation Bar of a Navigation Page directly from within the common Xamarin.Forms code is not possible. To be able to change the icon and style of the Back Button, a custom renderer implemented in the platform specific projects (iOS, Android…) is needed.
As the Navigation Bar is part of the NavigationPage, we need to override this class to be able to change the Back Button Style as we render it.
To do this, we need to firstly create a CustomNavigationPage in our Xamarin common project which will inherit from NavigationPage and which we will use as a reference for our renderers in the platform specific projects.
public class CustomNavigationPage : NavigationPage
    {
        public CustomNavigationPage(Page startupPage) : base(startupPage)
        {
        }
    }
On startup, this is the page we will assign to our MainPage.
public App()
        {
            InitializeComponent();

            MainPage = new CustomNavigationPage(new StartPage()); // note that we are calling a standard content page here;
}Somehow, we need to intercept the rendering of the CustomNavigationPage therebye allowing us to change the Back Button Style to the one we desire. This is done by creating a NavigationPageRenderer class in the platform specific projects and declare that the class will be called when the CustomNavigationPage is being requested. We do this as follows in the iOS project (Android is similar):
[assembly: ExportRenderer(typeof(CustomNavigationPage), typeof(NavigationPageRendererIOS))]
namespace CustomBackIconDemo.iOS
{
    public class NavigationPageRendererIOS : NavigationRenderer
    {
See the 'assembly' line that links CustomNavigationPage to the NavigationPageRendererIOS class? From now on, everytime a we need to render the CustomNavigationPage, the system will use the NavigationPageRendererIOS provided. Also, notice of course that our NavigationPageRendererIOS inherits from the real NavigationRenderer class (Again, Android is similar).
Remember, a NavigationPage holds amongst other things a Navigation Bar and a ContentPage (our actual content) so, therefore we now have a class that is called every time we render a page.
Time to implement some methods in the NavigationPageRendererIOS class allowing us to inject our own code before rendering .
For this, we can use the OnPop and OnPush methods. The OnPush method is called as a page is pushed onto the stack of the NavigationPage and OnPop is called when a page is removed from the stack. The reason we need to use 2 methods to inject our own code is because a NavigationPage has only 1 instance of the Navigation Bar. Whenever we render the page, we need to decide what Back Button we would like to display both as we add a page(Push) or when we remove a page (Pop).
For iOS this looks something like this:
protected override Task<bool> OnPushAsync(Page page, bool animated)
	{
            var retVal = base.OnPushAsync(page, true); // IMPORTANT: First call base
            SetBackButtonBasedOnInterface(page);
	    return retVal;
        }

        protected override Task<bool> OnPopViewAsync(Page page, bool animated)
        {
            var retVal = base.OnPopViewAsync(page, true); // IMPORTANT: First call base
            var returnPage = ((INavigationPageController)base.Element).StackCopy.ToArray()[1]; // get the page we are returning to
            if (returnPage != null)
            {
                SetBackButtonBasedOnInterface(returnPage);
            }

            return retVal;
        }
Functionally, these methods are very simple. We start by calling the base methods and then overwrite the Back Button Style with whatever we decided. We finish by returning the result of calling our base method.
Important to know is that the Page provided in the OnPushAsync is the page we are about to show. However, the Page provided for the OnPopViewAsync is not the page about to be displayed but the page to be removed. If we want the page that is about to be displayed, we need to retrieve it from the stack first.
var returnPage = ((INavigationPageController)base.Element).StackCopy.ToArray()[1]; // get the page we are returning toRetrieving the correct page to be displayed is needed as per page, we want to be able to decide what Back Button Style to show. To do this, we set a property per page that allows us to instruct the renderer which Back Button Style to show.
As you can see we are calling in both the POP and PUSH the method SetBackButtonBasedOnInterface(PAGE).
void SetBackButtonBasedOnInterface(Page page)
        {
            if (page is INavigationActionBarConfig incomingPage)
            {
                switch (incomingPage.BackButtonStyle)
                {
                    case 0:
                        SetDefaultBackButton();
                        break;

                    case 1:
                        HideBackButton();
                        break;

                    case 2: // 2=Image & Text
			SetImageTitleBackButton("Down", "Close", -15);
                        break;
		...
This method basically takes a property(incomingPage.BackButtonStyle) from the Page to be displayed and decides which Back Button Style to show. In the implementation above, the methods SetDefaultBackButton, HideBackButton, SetImageTitleBackButton... implement the different styles we request for iOs (a similar implementation is created in the Android custom renderer (NavigationPageRendererDroid).
There are multiple ways to pass data from the common Xamarin project to the individual platform projects but, in our case we choose to define an Interface containing a Style property.
public interface INavigationActionBarConfig
{
	int BackButtonStyle { get; set; }
	//Possible Values
            // 0=default
            // 1=Hide
            // 2=Image & Text
            // 3=Image only
            // 4=Text only
	    ...
}
We then make our pages inherit from this interface and implement the property whenever we want to influence the style of the Back Button.
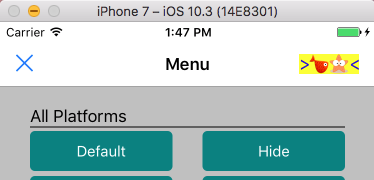
public partial class MenuPage : ContentPage, INavigationActionBarConfig
{
	public int BackButtonStyle { get; set; } // implementing INavigationActionBarConfig

	public MenuPage(int backButtonStyle) : this()
	{
		BackButtonStyle = backButtonStyle; // see INavigationActionBarConfig for possible values
	}
	...
As a page implements the property, we can now inject the requested style into the constructor of our page thereby providing a Back Button Style at creation time. This is the behavior we want for our demo as we are now able to request a different Back Button Style for the ResultPage simply by injecting different values into the constructor at creation time.
Check the rest of MenuPage.xaml.cs to see this in action as in our demo our Result Page simply changes according to what we pass along.
public partial class MenuPage : ContentPage, INavigationActionBarConfig
{
	...
	async void Handle_DefaultAsync(object sender, System.EventArgs e)
        {
            await Navigation.PushAsync(new ResultPage(0)); // 0=default
        }

		async void Handle_HideAsync(object sender, System.EventArgs e)
		{
			await Navigation.PushAsync(new ResultPage(1)); // 1=Hide
		}

		async void Handle_ImageAndTextAsync(object sender, System.EventArgs e)
		{
			await Navigation.PushAsync(new ResultPage(2)); // 2=Image & Text
		}
		...
How each value changes the Style is up to you in the platform specific renderers. You decide what the style for ‘0’ or ‘1’ means on iOS or on Android. Each platform can implement something similar or implement a style more in line with the design guidelines of the platform.
Let’s recap; we created and used a custom NavigationPage to initiated our Main. We then created render classes per platform and referenced back to our Custom Navigation Page to make sure the renderer is used every time we POP or PUSH a page. Lastly, we added a property per page using an Interface which allows us to set a Style ‘flag’, which will be picked up in the renderer and used to display the correct style for that platform. Time for us to now actually set the Style we want.
The classes and properties to set the new Back Button Style are very different per platform. This is normal as we are now directly talking to the structures within the platforms. Multiple practical samples with comments are provided for both iOS and Android which demonstrate different types of Styles.
For iOS, it is possible to set 1 button (LeftBarButtonItem property) or multiple (LeftBarButtonItems property). A button can contain an image or a text. So to set a Back arrow image and ‘Close’ text you need to set 2 buttons (image+text). Once you have set those buttons, you can configure the Horizontal offset to further configure the spacing between both buttons. Note that you can do exactly the same on the right with the RightBarButtonItem(s).
One of the main difference when assigning buttons to the LeftBarButtonItem(s) is the ability to follow the Tint property or not. A Tint is used to quickly set all buttons on the Navigation Bar to a certain color and can be very useful. On the other hand, sometimes you just want more control both in spacing and in colors. Adding buttons directly to the LeftBarButtonItem(s) follows the Tint but adding those buttons to a Toolbar first before asigning to LeftBarButtonItem(s) does not. Using a toolbar has other benefits such as multi colored buttons and greater layout control. In the code you will see that most methods follow the Tint property but methods CreateRightToolbarButtons and CreateLeftToolbarButtons were provided to set multi colored buttons.
To see this in action, simply uncomment ‘CreateRightToolbarButtons();’ in the OnPush method of the ‘NavigationPageRendererIOS’ class.
Android’s code to set the style seems a little compacter and so many configurations are set directly in the switch statement instead of in seperate methods.
case 6: // 2=Image, Icon & Text
        actionBar.SetHomeAsUpIndicator(CustomBackIconDemo.Droid.Resource.Drawable.backman_icon); // Show custom image
        actionBar.SetIcon(CustomBackIconDemo.Droid.Resource.Drawable.icon); // set Brand icon
        break;
The scenarios mostly demonstrate how to replace the back image and show or hide the different elements.
The Android specific Xamarin project can choose to run with or without AppCompat classes (AppCompat provides more compatibility with older Android devices). Today, when creating a new Xamarin.Froms project a template is created using the AppCompat package allowing for greater compatibility. So, AppCompat seems to be the way to go.
However, the demo at this stage is only able to work using the Non AppCompat configuration due to an internal Xamarin bug. AppCompat and non AppCompat use different Navigation Renderers and while developing this demo, we discovered a bug where OnPop and OnPush are not accessible from the customer renderer thereby preventing us from injecting our own code. The bug was reported and a pull request was added (see https://bugzilla.xamarin.com/show_bug.cgi?id=57578). I will update the code and documentation as soon as a fix has been released.
Using Custom renderers is the only way to configure the Back Button Style on the different platforms. Once we implement this we can pretty much take full control of what is shown without losing the power of the underlying classes of Xamarin Forms.
Enjoy and any question or improvements, please let me know.
Laobu!
- ‘Change the Back Button’ by Xamarin @ https://developer.xamarin.com/recipes/ios/content_controls/navigation_controller/change_the_back_button/
- ‘Custom Renderers’ by Xamarin @ https://developer.xamarin.com/guides/xamarin-forms/application-fundamentals/custom-renderer/
- ‘How to change the navigation page back icon?’ by JESSEJIANG @ https://jessejiang.xyz/2016/01/17/how-to-change-the-navigation-page-back-icon/
- ‘Reduce Toolbar Icon Padding(Xamarin.Forms)’ by Cameron Wood @ https://stackoverflow.com/questions/39144099/reduce-toolbar-icon-paddingxamarin-forms
- ‘NavigationRender Issue’@ https://forums.xamarin.com/discussion/27745/navigationrender-issue
- ‘iOS and Android Design Guidelines Cheat Sheet’ by Jake McKibben @ https://www.kinvey.com/ios-and-android-design-guidelines-cheat-sheet/
Laobu – Bernard Blanckaert


