

Creating a Django project with the tutorial given on the official website of Django-REST-Framework.
• Key Features • Installation • Run it • How to use it • Extras • Credits
Basic aspects about Django REST Framework:
- Serialization.
- Requests & Responses.
- Class-based views.
- Authentication & permissions.
- Relationships & hyperlinked APIs.
- Viewsets & routers.
- Schemas & client libraries.
- Donwload Python 3 from https://www.python.org/downloads/.
- Install Pip with this link: https://pip.pypa.io/en/stable/installing/ , if you don't know if you have pip, type this command
# Verify pip
$ pip -V
Once you have pip installed, update pip with this command
# Update pip
$ pip install -U pip- Download or clone this repository in your folder
# Clone this repository
$ git clone https://github.com/luisfelipe7/Learning-Django-REST-Framework- Go into the repository
# Go into the repository
$ cd Learning-Django-REST-Framework- Create a virtual environment
# Install virtualenv
$ sudo pip install virtualenv
# Create a virtual environment with Python3, env is the name of the environment
$ virtualenv env --python=python3 # Activate your environment
$ cd env
$ source bin/activate - With the activated environment, install the requirements:
# Install requirements
$ pip install -r requirements.txt- Run it.
- Install Postgresql
# Install postgresql
$ sudo apt-get install postgresql- Connecting to PostgreSQL for first time
a) Run the psql command from the postgres user account
# Enter with the user postgres
$ sudo -u postgres psql postgres
b) Set the password
# Enter this command for set the password
$ \password postgres
c) Enter a password
d) Close psql
# Close psql
$ \q- Create a new user and database
a) Enter to Postgresql
# Enter with the user postgres
$ su - postgres
b) Create the new user and database
postgres=# CREATE USER admin WITH PASSWORD 'admin';
postgres=# CREATE DATABASE mydatabase OWNER admin;- Configure your database, paste in settings.py file of your Django project the next configuration:
DATABASES = {
    'default': {
        'ENGINE': 'django.db.backends.postgresql',
        'NAME': 'mydatabase',
        'USER': 'admin',
        'PASSWORD': 'admin',
        'HOST': '127.0.0.1',
        'PORT': '5432',
    }
}- Allow local connections, edit the file pg_hba.conf (/etc/postgresql/9.6/main/pg_hba.conf) as a superuser and replace the final lines of the file with these lines:
# Database administrative login by Unix domain socket
local   all             postgres                                md5

# TYPE  DATABASE        USER            ADDRESS                 METHOD

# "local" is for Unix domain socket connections only
local   all             all                                     md5
# IPv4 local connections:
host    all             all             127.0.0.1/32            md5
# IPv6 local connections:
host    all             all             ::1/128                 md5
# Allow replication connections from localhost, by a user with the
# replication privilege.
#local   replication     postgres                                peer
#host    replication     postgres        127.0.0.1/32            md5
#host    replication     postgres        ::1/128                 md5
If you want to allow remote connections, visit this link: http://suite.opengeo.org/opengeo-docs/dataadmin/pgGettingStarted/firstconnect.html
- Sync your models
# Apply Migrations
$ python manage.py migrate- Create a superuser for admin views
# Create a superuser
$ python manage.py createsuperuser- Run your development server
# Run a development server
$ python manage.py runserverEnter to these URL's:
How to install and use Pgadmin :
- First, Pgadmin require Flask, so we need to install it with pip:
# Install flask
$ pip install flask- Donwload the Pgadmin from the next url ( I don't recommend to download the last version, because it have some bugs ) : https://www.postgresql.org/ftp/pgadmin/pgadmin4/
- According to the dowloaded file, install it with the next command:
# Install Pgadmin
$ pip install pgadmin4-3.2-py2.py3-none-any.whl- For run it use this command:
# Python Version - pgAdmin4.py file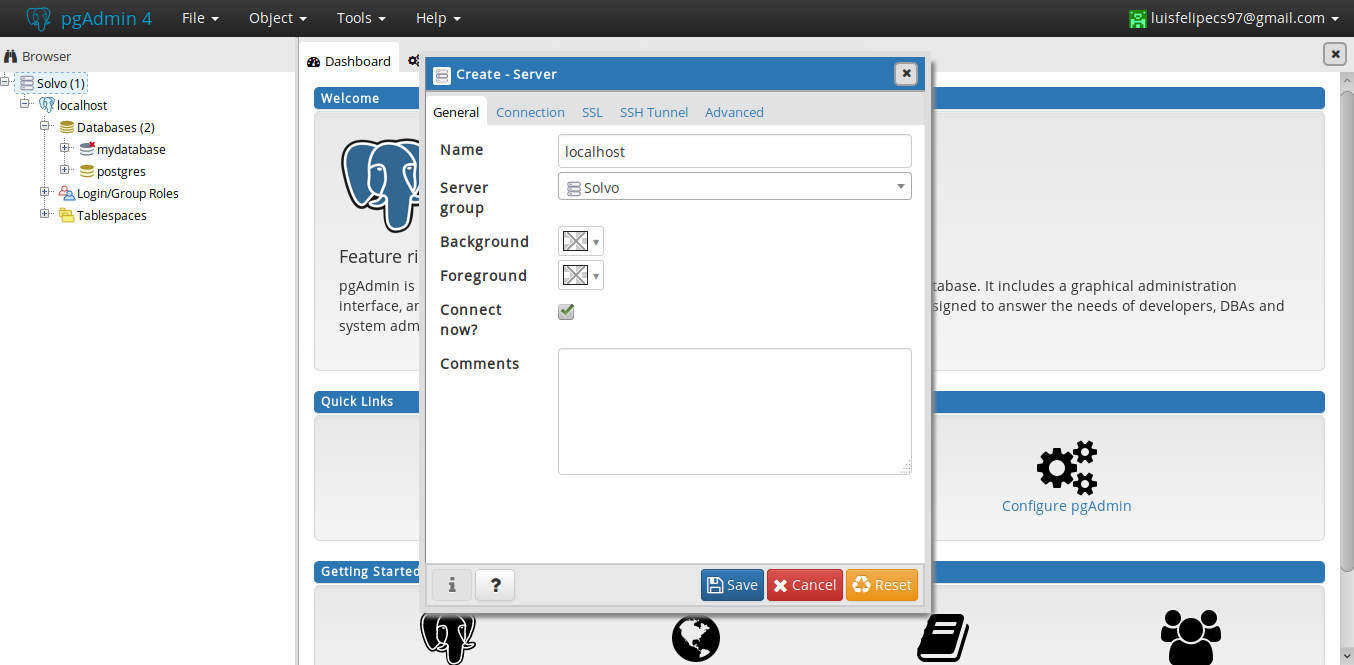
$ sudo python3.5 "/home/felipe/Escritorio/Solvo/Documentacion Tecnica/Proyectos/Entornos Virtuales/env2/lib/python3.5/site-packages/pgadmin4/pgAdmin4.py"- Configure it for your local databases, click on create server and follow these images:

Thanks to Django-REST-Framework for the tutorial given on the official website.
GitHub @luisfelipe7 ·
