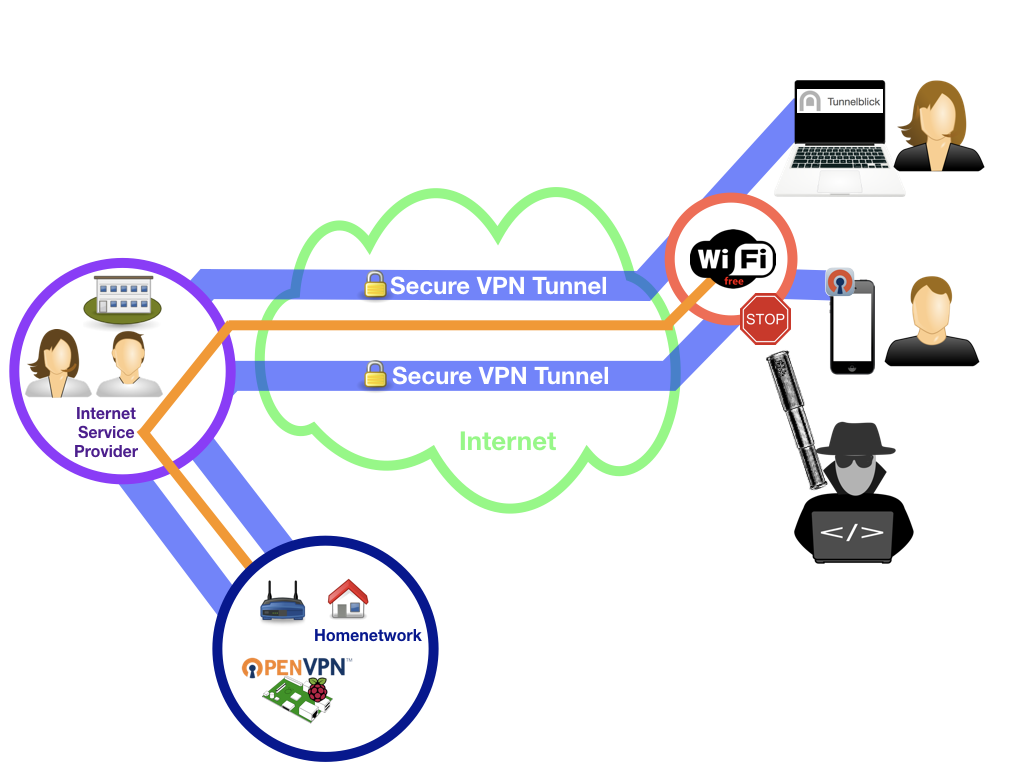
This is a guide to install an OpenVPN server on a RaspberryPi in your local network to be able to reach your network from your clients (Laptops, Smartphones) from anywhere and secure your data connection when using public WIFI. These are the main design goals:
- Hide as many technical details as possible, especially on all the OpenVPN configuration details. But it will still require IT skills.
- Automatic installation of the RaspberryPi, that can be reproduced at any time, with little effort.
- Immediate automatic updates of the operating system (e.g. Security updates)
- Some IT skills
- know how to issue shell commands.
- Know what Dynamic DNS is (https://en.wikipedia.org/wiki/Dynamic_DNS) and be able to configure this on your home router. This is not covered by this tutorial.
- A mac with docker (https://www.docker.com/) installed.
- A RaspberryPi Version 1 (Tested on RPI 1 B+). Others should also work, but are not tested by me.
- A configured and active Dynamic DNS (DynDNS) service on your internet router and you know your DynDNS name.
- The IP address of your local DNS server in your home network, which is typically the IP address of your internet router.
- The smtp server and port of your EMail provider (Email is used to send notifications on unattended installation on raspbian security update).
Let's assume we have the following setup:
- DynDNS Name: myname.mydyndnsprovider.com
- IP of local DNS server: 192.168.0.1
- Your Email address: [email protected]
- Your EMail password: verysecret
- The smtp server and port of your E-Mail provider: smtp.foo.bar.com:587
git clone https://github.com/luckynrslevin/openvpnserver.git
cd openvpnserver./1-InitCAandCreateServerKeys.sh -d myname.mydyndnsprovider.com -i 192.168.0.1 -e [email protected] -s smtp.foo.bar.com:587 -p verysecretFollow the instructions (e.g. if you are not root, you can use sudo and have to provide your sudo password.)
The script will check if docker is installed and available, if not it will give you a hint and exit. You have to install docker first.
If everything is working fine, you should see the following command prompt, where you have to type in a long and secure password and repeat it. The PEM pass phrase is your central key to all certificates you will generate. It has to be secure, so make sure you use a long and complex password. It is something like the key to your flat or house. You will need it later on to generate the server and client certificate, so make sure you can remember it.
...
Enter PEM pass phrase:
Verifying - Enter PEM pass phrase:
...
You now will be asked for the name of your Certificate Authority (CA). Leave the default value.
...
Common Name (eg: your user, host, or server name) [Easy-RSA CA]:
...
Now the server certificates are created, this will take some time, but only for a small cup of coffee.
The certificates now have to be signed and you will need the PEM pass phrase you remembered to do this. You will have to do enter the pass phrase two times.
...
Enter pass phrase for /etc/openvpn/pki/private/ca.key:
...
Maybe you get asked for the sudo password again, if the certificate generation took too long.
ATTENTION: Remember the passwords for the vpn and the root user that are shown on your terminal. These passwords are generated for your installation only. If you like, you can change them later on by logging into your server via ssh and the issue the passwd command.
Step 2 finished - You created the server certificates, congratulations. Have you ever tried this manually before? How long did it take you to figure out the settings? If you never tried it I tell you, you saved a lot of time now, but you are not aware :-). Send your appreciations to the person who has created this perfect docker image (see References below).
./2-DownloadIMG.shFollow the instructions on the screen, you have to copy the image to the SD-CARD. I recommend to use etcher (https://etcher.io/) for this.
Your SD-CARD has to be plugged-in to your mac and be mounted. In Finder you should be able to see a Volume with the name 'NO NAME'.
Now copy the configuration to the SD-CARD:
./3-CopyConfiguration2SDCard.shNow unplug the SD-CARD from your mac, plug it into the RaspberryPi and power on you RaspberryPi. The fully-automatic installation will start. Since it will download the latest raspbian packages this will take some time. But it will not only download the latest raspbian packages, it will also completely configure your OpenVPN server. After this you should have a fully functional Open VPN Server in your home network! Congratulations!
Again, this takes some time, but afterwards everything is setup with the latest raspbian software and you OpenVPN server is fully configured and working. I won't ask again, but if you tried to do this before you know how long it takes and if you want to reproduce it after some month ....
If you have a monitor attached you can watch the progress. If not, you have to wait approx. 30 minutes (this very much depends on your internet bandwidth, since we will download all the raspbian packages). Afterwards you should be able to ssh to your RaspberryPi:
ssh vpn@homevpnIf something goes wrong all LEDs of the RaspberryPi are blinking SOS · · · − − − · · · . See the logfile for details: https://github.com/FooDeas/raspberrypi-ua-netinst#logging.
For the clients to be able to reach your VPN server from the internet, you have to ensure the following two things:
- DynDNS is configured correctly.
- You have configured a forward filter in your router to forward all upd traffic on port 1194 to your raspbarrypi.
I can't help a lot in this tutorial, since this very much depends on your router and DynDNS provider.
- Create a client configuration including all necessary certificates
./4-Client -c clientname -d myname.mydyndnsprovider.comFor more options of the Client script (get, remove, ...) use:
./4-Client -?On a mac you can use tunnelblick software as VPN client. You can directly load the generated .ovpn configuration to tunnelblick. On iOS devices use OpenVPN client from the appstore. You also can directly load the configuration file. But avoid to send the configuration via E-Mail or any other insecure method to your iOS device.
This Guide is inspired by the work of the following people, providing the basis to be able to build this:
OpenVPN Docker:
https://hub.docker.com/r/kylemanna/openvpn/
RaspberryPi (minimal) unattended netinstaller:
https://github.com/FooDeas/raspberrypi-ua-netinst
Guide to setup OpenVPN server on debian:
https://linuxconfig.org/how-to-setup-a-vpn-with-openvpn-on-debian-9-stretch-linux

