Giter Club home page Giter Club logo

esp32_screenshotreceiver's Introduction

ESP32_ScreenShotReceiver

movie

PCの画面をJPEGにしてTCPで送信し、ESP32で受信して表示します。
Send the screen of your PC as a JPEG, send it by TCP, receive it by ESP32, and display it.

対応環境 Environment

LCDの設定に LovyanGFX を使用します。LovyanGFXが動作するESP32環境に対応しています。
Use LovyanGFX to set up the LCD. It is compatible with the ESP32 environment in which LovyanGFX runs.

M5Stack / M5StickC / TTGO T-Watch / ODROID-GO / ESP-WROVER-KIT / and more...

使い方 Usage

受信側 Receiver : ESP32 ScreenShotReceiver

起動すると、WiFi接続を試行し、接続できない場合はSmartConfigが起動します。
お手持ちのスマートフォンにSmartConfigアプリを入れて設定を行ってください。
WiFi接続に成功すると、シリアルモニタとLCDにIPアドレスを表示してWindowsアプリからの接続を待ちます。

When launched, will attempt to connect to WiFi, and if it can't connect, SmartConfig will start.
Put the SmartConfig app on your smartphone and set it up.
If the WiFi connection is successful, the serial monitor and LCD will display the IP address and wait for the connection from the Windows app.

送信側 Sender : Windows ScreenShotSender

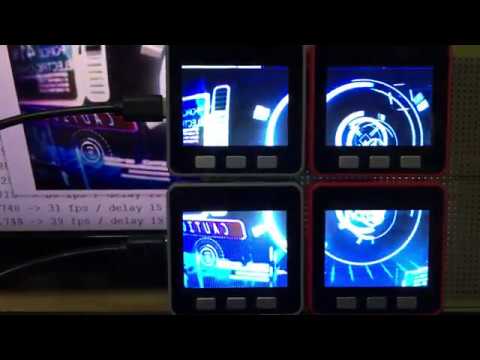
受信側のIPアドレスを入力して接続すると、Windowsの画面の一部がESP32のLCDに表示されます。
画像の幅・高さ・画質の各パラメータとJPEG化する範囲が設定できます
受信側が複数ある場合は、Col・Row で列数・行数を増やして画像を分割することができます。

When you enter the IP address of the receiver and connect, a portion of the Windows screen appears on the ESP32's LCD.
Allows you to set the width, height, quality of the image and the area to be JPEG'd
If there is more than one receiver, you can split the image by increasing the number of columns and rows.

キャプチャウィンドウはマウス操作とキーボードのカーソルキーで移動およびサイズ調整ができます。
Ctrlキー + カーソルキー操作 : ウィンドウの移動距離が増えます。
Shiftキー + カーソルキー操作 : ウィンドウの幅と高さが調整できます。

The capture window can be moved and resized using the mouse and the keyboard cursor keys.
hold down the Ctrl key and use the cursor keys : Increase the move distance.
Hold down the Shift key and use the cursor keys : Adjust the width and height.

必要なライブラリ Requirement library

含まれているライブラリ Included library

TJpgDec を改造して使用しています。

Licence

MIT

Author

lovyan03

esp32_screenshotreceiver's People

Contributors

lovyan03 avatar

Stargazers

 avatar  avatar  avatar  avatar  avatar  avatar  avatar  avatar  avatar  avatar  avatar  avatar  avatar  avatar  avatar  avatar  avatar  avatar  avatar  avatar  avatar  avatar  avatar  avatar  avatar  avatar  avatar  avatar  avatar  avatar  avatar  avatar  avatar  avatar  avatar  avatar  avatar  avatar  avatar  avatar  avatar  avatar  avatar  avatar  avatar  avatar  avatar  avatar  avatar  avatar  avatar  avatar  avatar  avatar  avatar  avatar  avatar  avatar  avatar  avatar  avatar  avatar  avatar  avatar  avatar  avatar  avatar  avatar  avatar  avatar  avatar  avatar  avatar  avatar  avatar  avatar  avatar  avatar  avatar  avatar  avatar  avatar  avatar  avatar  avatar  avatar  avatar  avatar  avatar  avatar  avatar  avatar  avatar  avatar  avatar  avatar  avatar  avatar  avatar  avatar

Watchers

 avatar  avatar  avatar  avatar  avatar  avatar  avatar  avatar  avatar  avatar  avatar  avatar  avatar

esp32_screenshotreceiver's Issues

Multiple screen on one ESP32

Hello, I really love your project and decided to use it as a base for a simple A.R. project I'm working on.
I want to know if it's possible to use the C.S . pin to use two displays on one esp32 instead of using two esp32 with one diplay each ?
I tried defining the CS pin by myself by using #define TFT_CS -1 in tft e_SPI and defined the CS pin myself in the codes only output an error because "recv.setup(.." will not work with TFT_CS is undefined. I can post my codes if you want,
Thanks

Feed support

Hi Just see your project and it's very very great looking. Congrats ! As on the lcd support, was all the st7789 lcd that was working with the eSpi lib are just gonna work and faster with your system ? Also, can we pick or foward an ip stream, like from an ip camera ?
thanks

ESP32 and ILI9488

I've configured and tested LovyanGFX with the example codes and it displays properly. No issues on the config part but i cant get the display to work with the ScreenShotReceiver. it shows up like this on the screen.
streamv1

When using ST7789V parallel port 8 bit in ESP32-S2, there is a color problem

ST7789V-I2S-8BIT

// v1.0.0 を有効にします(v0からの移行期間の特別措置です。これを書かない場合は旧v0系で動作します。)
#define LGFX_USE_V1

#include <esp_wifi.h>

#include "src/TCPReceiver.h"
#include <LovyanGFX.hpp>

class LGFX : public lgfx::LGFX_Device
{

   lgfx::Panel_ST7789 _panel_instance;

   lgfx::Bus_Parallel8 _bus_instance;

   lgfx::Touch_FT5x06  _touch_instance; 

public:
   // コンストラクタを作成し、ここで各種設定を行います。
   // クラス名を変更した場合はコンストラクタも同じ名前を指定してください。
   LGFX(void)
   {
      {                                     // バス制御の設定を行います。
         auto cfg = _bus_instance.config(); // バス設定用の構造体を取得します。

         // 8ビットパラレルバスの設定
         cfg.i2s_port = I2S_NUM_0;  // 使用するI2Sポートを選択 (0 or 1) (ESP32のI2S LCDモードを使用します)
         cfg.freq_write = 20000000; // 送信クロック (最大20MHz, 80MHzを整数で割った値に丸められます)
         cfg.pin_wr = 40;           // WR を接続しているピン番号
         cfg.pin_rd = 42;           // RD を接続しているピン番号
         cfg.pin_rs = 41;           // RS(D/C)を接続しているピン番号
         cfg.pin_d0 = 0;            // D0を接続しているピン番号
         cfg.pin_d1 = 1;            // D1を接続しているピン番号
         cfg.pin_d2 = 2;            // D2を接続しているピン番号
         cfg.pin_d3 = 3;            // D3を接続しているピン番号
         cfg.pin_d4 = 4;            // D4を接続しているピン番号
         cfg.pin_d5 = 5;            // D5を接続しているピン番号
         cfg.pin_d6 = 6;            // D6を接続しているピン番号
         cfg.pin_d7 = 7;            // D7を接続しているピン番号

         _bus_instance.config(cfg);              // 設定値をバスに反映します。
         _panel_instance.setBus(&_bus_instance); // バスをパネルにセットします。
      }

      {                                       // 表示パネル制御の設定を行います。
         auto cfg = _panel_instance.config(); // 表示パネル設定用の構造体を取得します。

         cfg.pin_cs = -1;   // CSが接続されているピン番号   (-1 = disable)
         cfg.pin_rst = -1;  // RSTが接続されているピン番号  (-1 = disable)
         cfg.pin_busy = -1; // BUSYが接続されているピン番号 (-1 = disable)

         // ※ 以下の設定値はパネル毎に一般的な初期値が設定されていますので、不明な項目はコメントアウトして試してみてください。

         cfg.memory_width = 240;   // ドライバICがサポートしている最大の幅
         cfg.memory_height = 320;  // ドライバICがサポートしている最大の高さ
         cfg.panel_width = 240;    // 実際に表示可能な幅
         cfg.panel_height = 320;   // 実際に表示可能な高さ
         cfg.offset_x = 0;         // パネルのX方向オフセット量
         cfg.offset_y = 0;         // パネルのY方向オフセット量
         cfg.offset_rotation = 0;  // 回転方向の値のオフセット 0~7 (4~7は上下反転)
         cfg.dummy_read_pixel = 8; // ピクセル読出し前のダミーリードのビット数
         cfg.dummy_read_bits = 1;  // ピクセル以外のデータ読出し前のダミーリードのビット数
         cfg.readable = true;      // データ読出しが可能な場合 trueに設定
         cfg.invert = false;       // パネルの明暗が反転してしまう場合 trueに設定
         cfg.rgb_order = false;    // パネルの赤と青が入れ替わってしまう場合 trueに設定
         cfg.dlen_16bit = false;   // データ長を16bit単位で送信するパネルの場合 trueに設定
         cfg.bus_shared = true;    // SDカードとバスを共有している場合 trueに設定(drawJpgFile等でバス制御を行います)

         _panel_instance.config(cfg);
      }
    { // タッチスクリーン制御の設定を行います。(必要なければ削除)
      auto cfg = _touch_instance.config();

      cfg.x_min      = 0;    // タッチスクリーンから得られる最小のX値(生の値)
      cfg.x_max      = 239;  // タッチスクリーンから得られる最大のX値(生の値)
      cfg.y_min      = 0;    // タッチスクリーンから得られる最小のY値(生の値)
      cfg.y_max      = 319;  // タッチスクリーンから得られる最大のY値(生の値)
      cfg.pin_int    = -1;   // INTが接続されているピン番号
      cfg.bus_shared = false; // 画面と共通のバスを使用している場合 trueを設定
      cfg.offset_rotation = 0;// 表示とタッチの向きのが一致しない場合の調整 0~7の値で設定

// I2C接続の場合
      cfg.i2c_port = 0;      // 使用するI2Cを選択 (0 or 1)
      cfg.i2c_addr = 0x38;   // I2Cデバイスアドレス番号
      cfg.pin_sda  = 8;     // SDAが接続されているピン番号
      cfg.pin_scl  = 9;     // SCLが接続されているピン番号
      cfg.freq = 400000;     // I2Cクロックを設定

      _touch_instance.config(cfg);
      _panel_instance.setTouch(&_touch_instance);  // タッチスクリーンをパネルにセットします。
    }

      setPanel(&_panel_instance); // 使用するパネルをセットします。
   }
};

static LGFX lcd;
static TCPReceiver recv;

void setup(void)
{
  Serial.begin(115200);
  Serial.flush();

  lcd.begin();
//lcd.setColorDepth(24);
  lcd.setRotation(0);
  if (lcd.width() < lcd.height())
    lcd.setRotation(1);

  lcd.setFont(&fonts::Font2);

  Serial.println("WiFi begin.");
  lcd.println("WiFi begin.");
  // 記憶しているAPへ接続試行
  WiFi.mode(WIFI_MODE_STA);
  WiFi.begin();

  // 接続できるまで10秒待機
  for (int i = 0; WiFi.status() != WL_CONNECTED && i < 100; i++) { delay(100); }

  // 接続できない場合はSmartConfigを起動
  // https://itunes.apple.com/app/id1071176700
  // https://play.google.com/store/apps/details?id=com.cmmakerclub.iot.esptouch
  if (WiFi.status() != WL_CONNECTED) {
    Serial.print("SmartConfig start.");
    lcd.println("SmartConfig start.");
    WiFi.mode(WIFI_MODE_APSTA);
    WiFi.beginSmartConfig();

    while (WiFi.status() != WL_CONNECTED) {
      delay(100);
    }
    WiFi.stopSmartConfig();
    WiFi.mode(WIFI_MODE_STA);
  }

  Serial.println(String("IP:") + WiFi.localIP().toString());
  lcd.println(WiFi.localIP().toString());

  recv.setup( &lcd );
}

void loop(void)
{
  recv.loop();
}

@lovyan03 Hi! How can I solve the color problem?

How to make it for TFT_ESPI

Sorry, I dont have that board but I have an 38p wroom(same chip) and the exactly same display ST7789 1.3" (same display) Can you please make an TFT_ESPI version of this :(

How to get in touch with you?

Hello Lovyan03, it's been a few months since I've bothered you,
but I'm still working on the same project as before and was able to make it a lot better,
I want to know if you would like to have an early prototype of my AR goggles,
here's the PCB (i.g. link), and here's what the goggles video 1 [video 2] look like.
I will open-source once I'm sure they won't catch fire. :)
Let me know if you're interested. I will gladly make you a full kit.
Cheers,

Arnaud

Issues running ScreenShotReceiver

I'm trying to run this code but I'm having some issues. I'm compiling the source code with the latest version of ESP32 Core (2.0.14) for Arduino and the latest version of LovyanGFX (1.1.12), when I send a screenshot, it does not reach render completely. It renders up to about 25% and then restarts rendering from scratch, that loop repeats 3 or 4 times and then the ESP32 crashes.
Log:

 0 fps
 0 fps
data request
Guru Meditation Error: Core  0 panic'ed (StoreProhibited). Exception was unhandled.

Core  0 register dump:
PC      : 0x40089a14  PS      : 0x00060f30  A0      : 0x800d3194  A1      : 0x3ffd2b50  
A2      : 0x00000000  A3      : 0x3ffd2c2c  A4      : 0x00000030  A5      : 0x00000000  
A6      : 0x19252525  A7      : 0x22221919  A8      : 0x00000000  A9      : 0x80000000  
A10     : 0x00000000  A11     : 0x00000000  A12     : 0x80000020  A13     : 0x00000007  
A14     : 0x00000005  A15     : 0x00000001  SAR     : 0x00000001  EXCCAUSE: 0x0000001d  
EXCVADDR: 0x00000000  LBEG    : 0x40089a10  LEND    : 0x40089a26  LCOUNT  : 0x00000002  

Backtrace: 0x40089a11:0x3ffd2b50 0x400d3191:0x3ffd2b60 0x40153865:0x3ffd2b80 0x400d420d:0x3ffd2bb0 0x400d427e:0x3ffd2c20

ELF file SHA256: e06386c8f8d5a86b

Rebooting...
ets Jun  8 2016 00:22:57

rst:0xc (SW_CPU_RESET),boot:0x13 (SPI_FAST_FLASH_BOOT)
configsip: 0, SPIWP:0xee
clk_drv:0x00,q_drv:0x00,d_drv:0x00,cs0_drv:0x00,hd_drv:0x00,wp_drv:0x00
mode:DIO, clock div:1
load:0x3fff0030,len:1184
load:0x40078000,len:13260
load:0x40080400,len:3028
entry 0x400805e4
TCPReceiver setup.
display byte per pixel:3
color depth: 18 
TCPReceiver setup done.

0 fps
data request
Guru Meditation Error: Core  0 panic'ed (StoreProhibited). Exception was unhandled.

Core  0 register dump:
PC      : 0x40089a14  PS      : 0x00060f30  A0      : 0x800d3194  A1      : 0x3ffd2b50  
A2      : 0x00000000  A3      : 0x3ffd2c2c  A4      : 0x00000030  A5      : 0x00000000  
A6      : 0x19252525  A7      : 0x22221919  A8      : 0x00000000  A9      : 0x3ffd2af0  
A10     : 0x3ffca4d8  A11     : 0x3ffca4d8  A12     : 0x3ffca4d8  A13     : 0x00060523  
A14     : 0x00060520  A15     : 0x00000001  SAR     : 0x00000001  EXCCAUSE: 0x0000001d  
EXCVADDR: 0x00000000  LBEG    : 0x40089a10  LEND    : 0x40089a26  LCOUNT  : 0x00000002  

Backtrace: 0x40089a11:0x3ffd2b50 0x400d3191:0x3ffd2b60 0x40153865:0x3ffd2b80 0x400d420d:0x3ffd2bb0 0x400d427e:0x3ffd2c20

ELF file SHA256: e06386c8f8d5a86b

Rebooting...

Another test I did was to compile the firmware with the original versions of both the LovyanGFX library and the ESP32 Core from when the project was created:
Arduino 1.8.12
ESP32 Core 1.0.4
LovyanGFX 0.1.14

As a result, the display is not initialized but it sends the image and fps correctly. I have come to this conclusion based on the information in the log. The amount of FPS and the delay are displayed. Even so, random restarts of the ESP32 occur as in the first test.
Log:

58 fps / delay214
57 fps / delay238
58 fps / delay212
Guru Meditation Error: Core  1 panic'ed (LoadProhibited). Exception was unhandled.
Core 1 register dump:
PC      : 0x400d5550  PS      : 0x00060630  A0      : 0x800d5624  A1      : 0x3ffb1b00  
A2      : 0x00000000  A3      : 0x3ffc153c  A4      : 0x0000044b  A5      : 0x00000001  
A6      : 0x00000020  A7      : 0x000000ea  A8      : 0x00000000  A9      : 0x00000000  
A10     : 0x00000003  A11     : 0x00060023  A12     : 0x00060021  A13     : 0x00000008  
A14     : 0x00000004  A15     : 0x3ffc10a0  SAR     : 0x0000001f  EXCCAUSE: 0x0000001c  
EXCVADDR: 0x00000008  LBEG    : 0x40142ab6  LEND    : 0x40142ac0  LCOUNT  : 0x00000000  

Backtrace: 0x400d5550:0x3ffb1b00 0x400d5621:0x3ffb1b20 0x400d1a55:0x3ffb1b40 0x40142a4f:0x3ffb1b60 0x400d48fd:0x3ffb1b90 0x400d5145:0x3ffb1bf0 0x400d42c5:0x3ffb1f50 0x400d7da5:0x3ffb1fb0 0x40088dc1:0x3ffb1fd0

Rebooting...

Hardware used:
LCD TFT 4" ILI9486 SPI (4 wires) 480x320 Display
DO IT ESP32 DevKit V1 Board

Any kind of help will be appreciated.
Thanks in advance.
Best regards.

TCP message type

Hello, I've been trying to quite unsuccessfully to write my own version of the screenShotSender,
I can connect to the esp32, see that it is receiving some bytes, but I can't get the display to turn on. the serial message I get from the device is "Broken data" so that probably means the data isn't right,

My question is, how should I format the data? I'm sure I'm missing something, could you please direct me on how to format the image to be sent,
thanks,

Arnaud

Recommend Projects

  • React photo React

    A declarative, efficient, and flexible JavaScript library for building user interfaces.

  • Vue.js photo Vue.js

    🖖 Vue.js is a progressive, incrementally-adoptable JavaScript framework for building UI on the web.

  • Typescript photo Typescript

    TypeScript is a superset of JavaScript that compiles to clean JavaScript output.

  • TensorFlow photo TensorFlow

    An Open Source Machine Learning Framework for Everyone

  • Django photo Django

    The Web framework for perfectionists with deadlines.

  • D3 photo D3

    Bring data to life with SVG, Canvas and HTML. 📊📈🎉

Recommend Topics

  • javascript

    JavaScript (JS) is a lightweight interpreted programming language with first-class functions.

  • web

    Some thing interesting about web. New door for the world.

  • server

    A server is a program made to process requests and deliver data to clients.

  • Machine learning

    Machine learning is a way of modeling and interpreting data that allows a piece of software to respond intelligently.

  • Game

    Some thing interesting about game, make everyone happy.

Recommend Org

  • Facebook photo Facebook

    We are working to build community through open source technology. NB: members must have two-factor auth.

  • Microsoft photo Microsoft

    Open source projects and samples from Microsoft.

  • Google photo Google

    Google ❤️ Open Source for everyone.

  • D3 photo D3

    Data-Driven Documents codes.