很久没有打理自己的博客,一直忙着业务开发,后期也没有把总结文档上传。现在开始有时间进行学习和总结。 文档不定期更新
lisarao / blog Goto Github PK
View Code? Open in Web Editor NEWlisa blog
lisa blog
很久没有打理自己的博客,一直忙着业务开发,后期也没有把总结文档上传。现在开始有时间进行学习和总结。 文档不定期更新


postcss是一个使用js转换css的工具,其中有许多许多的相应的插件,这些插件可以做css的处理器。
postcss最优秀的插件有 autoprefixer , cssnano,postcss-cssnext
在gulpfile.js中
var postcss = require('gulp-postcss');
var precss = require('precss');
var processors = [
  precss
];
gulp.task('css', function() {
    return gulp.src('src/css/*.css')
        .pipe(sourcemaps.init())
        .pipe(postcss(processors))
        .pipe(sourcemaps.write())
        .pipe(gulp.dest('build/'))
});
style.css
.menu {
    width: 100%;
    a {
        text-decoration: none;
    }
    &::before {
        content: '';
        width: 50%;
    }
}


@each $icon in (foo, bar, baz) {
    .icon-$(icon) {
        background: url('icon/$(icon).png');
    }
}
执行后
.menu {
    width: 100%;
}

.menu a {
    text-decoration: none;
}

.menu::before {
    content: '';
    width: 50%;
}


.icon-foo {
    background: url('icon/foo.png');
}


.icon-bar {
    background: url('icon/bar.png');
}


.icon-baz {
    background: url('icon/baz.png');
}
var webpack = require('webpack');
var path = require('path');


var autoprefixer = require('autoprefixer');
var cssnext = require('postcss-cssnext');

var processors = [
    autoprefixer,
    cssnext
];

module.exports = {
    entry: './page/index.js',
    output: {
        path: path.join(__dirname, 'dist'),
        publicPath: "/assets/",
        filename: 'bundle.js'
    },
    devtool: '#eval-source-map',
    resolve: {
        extensions: ['', 'js']
    },
    module: {
        loaders: [{
            test: /\.css$/,
            loader: 'style-loader!css-loader!postcss-loader'
        }]
    },
    postcss: function() {
        return processors
    }
}
UGC为用户生产内容,常见于个人自媒体
OGC为品牌生产内容,常见于企业自媒体;
PGC为专业生产内容,常见于个人自媒体的变现转化;
转自 知乎[回答](自媒体里的内容,是UGC?PGC?OGC? - 沈小四的回答 - 知乎
https://www.zhihu.com/question/28166725/answer/112273541)
关键意见领袖(Key Opinion Leader,简称KOL)是营销学上的概念,
通常被定义为:拥有更多、更准确的产品信息,且为相关群体所接受或信任,并对该群体的购买行为有较大影响力的人。
关键意见领袖(Key Opinion Leader,KOL) 基本上就是在微博上有话语权的那些人。包括在行业内有话语权的人。
基于位置的服务,它是通过电信移动运营商的无线电通讯网络(如GSM网、CDMA网)或外部定位方式(如GPS)获取移动终端用户的位置信息(地理坐标,或大地坐标),
在地理信息系统(外语缩写:GIS、外语全称:Geographic Information System)平台的支持下,为用户提供相应服务的一种增值业务。
PEST分析是指宏观环境的分析,
在所选时间段内用户启动应用一次且停留时长超过 5s 即算活跃用户。
指在所选时间段内每天活跃人数的平均值。
App 在所选月份每人每天使用时长的平均值。
指标是指某个 App 的用户占该 App 所属领域整体用户比例。
指固定时段某个综合音乐 App 的用户占移动互联网用户的比例。
MCN可以理解为“有能力和资源扶持内容生产者的公司”,说白了就是网红经纪公司,帮助短视频的达人们成名赚钱。
下面的一些通用情况的约定
在提交信息前用 # type # message...
type类型常用的有
以前一直捣鼓css从预处理器sass、compass、lesss。一直想着怎么能把css有模块化和方法继承方面靠。
后面大略了解了一下后处理器postcss。预处理器和后处理器都需要依赖构建工具最终还是生产css文档。但在写的时候就简便多了。最近草草看了一下webpack4,跟着文档配置了一下,后发现居然可以直接在css-loader中配置module。类名成了hash形式。
webpack 配置片段
  {
    test: /\.css$/,
    use: [
      {
        loader: "style-loader"
      },
      {
        loader: "css-loader",
        options: {
          modules: true,
          importLoaders: 1,
          localIdentName: "[name]_[local]_[hash:base64]",
          sourceMap: true,
          minimize: true
        }
      }
    ]
  }
index.css
.button {
  display: block;
  height: 32px;
  margin: 20px auto;
  line-height: 32px;
  text-align: center;
  padding: 10px 15px;
  border-radius: 10px;
  background-color: pink;
  color: #fff;
  font-size: 12px;
  cursor: pointer;
}
react文件中使用
import styles from './index.css';
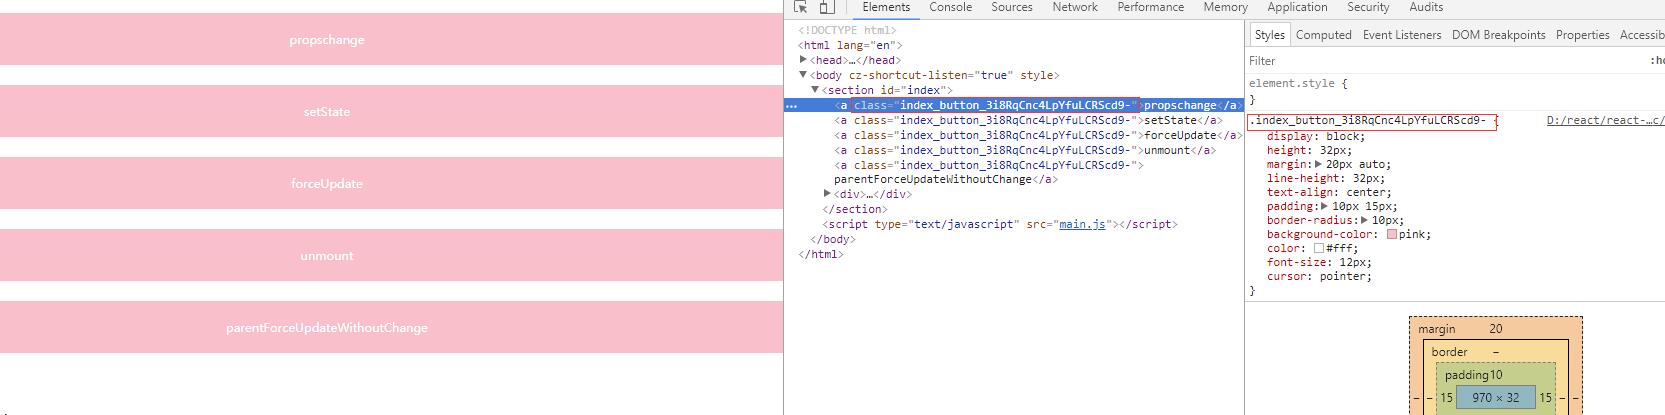
<a key="propschange-button" className={styles.button} onClick={this.propsChange.bind(this)}>propschange</a>编译后会将类名按配置 [name]_[local]_[hash:base64]的规则生产。所以看到的类名就如下图。
按module的css。把css分了局部和全局的概念依赖在构建工具上的一个方式。即
css文档中书写
:local(.test) {
  color: #f00;
}

:global(.test) {
  color: green;
}
组合基础
.className {
  background-color: blue;
}

.title {
  composes: className;
  color: red;
}.title {
composes: className from './another.css';
color: red;
}app.js中引用和上面一样
import style from './index.css';
<div className={style.title}>
最后生产的css文件和html的class名都会根据配置生成带hash的形式。如图片(css in module类名唯一)
解决了以下几点问题
CSS 使用全局选择器机制来设置样式,优点是方便重写样式。缺点是所有的样式都是全局生效,样式可能被错误覆盖,因此产生了非常丑陋的 !important,甚至 inline !important 和复杂的选择器权重计数表,提高犯错概率和使用成本。Web Components 标准中的 Shadow DOM 能彻底解决这个问题,但它的做法有点极端,样式彻底局部化,造成外部无法重写样式,损失了灵活性。
由于全局污染的问题,多人协同开发时为了避免样式冲突,选择器越来越复杂,容易形成不同的命名风格,很难统一。样式变多后,命名将更加混乱。
less或者sass都无法跨文件使用变量
有以下几点劣势
个人感觉css in module是一种构建工具上的便利,在这便利上约束写css的规范。对于不能使用多个class,嵌套等。这和css原本的概念完全背驰了。不推荐使用在大型业务开发。如是开源项目或者公共组件等可以试用。
原文cssnext: http://julian.io/tomorrows-css-syntax-with-cssnext/
正如你可能知道的,没有什么保持一直不变。所有的事情需要进步和改善。用css也一样。现在,css3已经有很多很酷的东西。但它还缺乏一些特性,像有预处理器作用等一些特性,来真正的提现css有用和必要。接下来讲到的postcss虽然没有css 4那么多新特性,但还是会给你带来诸多帮助。下面本文中将告诉你如何使用postcss及其一些插件的使用。
你可能会问css未来语法讲的是什么。我们在过去在css中使用变量,你可能通过sass或者less来实现。css未来语法,现在是不可能跟css3一样得到主流浏览器支持,但是在将来,浏览器支持会得到改善。你可以使用新css的选择器语法,像:matches, :not 或者 :any-link 。你也可嵌套自己的选择器和使用许多新的function像 color(), hwb(), gray()。现在怎么将这些实现,我们可以使用 PostCSS 和 cssnext插件 来实现。
:root {
    --mainColor: red;
}

a {
    color: var(--mainColor);
}

h1 {
  color: var(--mainColor);
}
从上面代码中可以看到,我们可以在 :root 选择器中中定义一个变量 --mainColor,在后面代码中可以使用var来调用
未来css的一个非常cool的语法,和sass,less非常相似,可以用 &来嵌套选择器。下面例子来说明
a {
  & span {
    color: #fff;
  }
  &.black {
    color: #000;
  }
}
这个和sass类似,其实和下面代码一样
a span {
  color: #fff;
}
a.black {
  color: #000;
}
我记得一些插件预处理器能够创建简单的混合媒体查询。例如stylus中的rupture插件,提供了一个简单的function ,像 +below(784px) etc.所以你不必写长css媒体查询。
看下面例子
@custom-media --small-viewport (max-width: 30em);
@media (--small-viewport) {
    /* css style */
}
在媒体查询中可以用 <= 替换 min- , >= 替换 max- , 看下面例子
@meida (width >= 500) and (width <= 1200px) {
    /* your styles */
}

/* or coupled width custom media queries */
@custom-media --only-medium-screen (width >= 500px) and (width <= 1200px);

@media (--only-medium-screen) {
    /* your styles */
}
:any-link 官方说明
html5中超链接标签 <a> <area> <link>
nav :any-link {
    border-color: yellow;
}
:matchs
p:matches(:first-child, .special) {
    color: red;
}
:not
p:not(:first-child, .special) {
    color: red;
}
color()
a {
    color: color(red alpha(-10%));
}
a:hover {
    color: color(red blackness(80%));
}
gray()
.foo {
    color: gray(85);
}
.bar {
    color: gray(10%, 50%);
}
iPhone x 一出来因为有刘海受到了外形上的争议,作为一枚前端看到的是 适配问题。
各iphone设备分辨率,retina值见下图

iPhone X除去刘海和下面的操作栏还有margin区域就是安全区域,如下图蓝色区域。
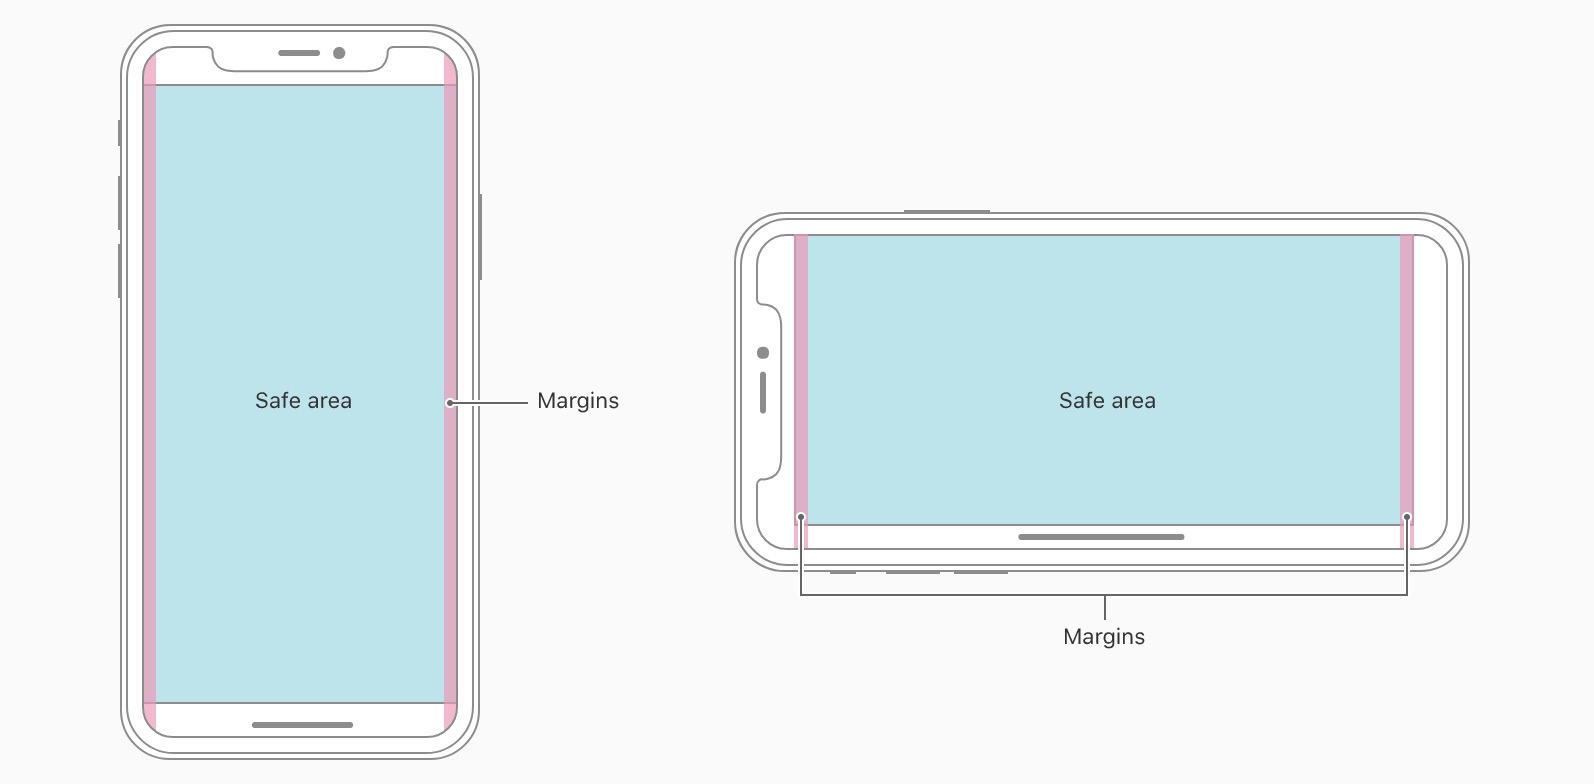
h5页面为了刘海屏不影响显示,下面操作栏不影响操作所以需要做适配。
适配方式有3种
iphone-x.css文件iphone-x.css
@media only screen
and (device-width : 375px)
and (device-height : 812px)
and (-webkit-device-pixel-ratio : 3) {
/*需要特殊处理的部分*/
/*header*/
.has-x-header {
padding-top: 44px; /*刘海屏高度为44px*/
}
/*footer*/
.has-x-footer {
padding-bottom: 34px; /* iphone x 下面操作一横的高度为34px*/
}
}具体是通过链接中增加参数来进行适配:
css新属性。方法如下meta<meta name="viewport" content="viewport-fit=cover">viewport-fit 可设置3个值,解释如下
cover = 全部覆盖 网页内容完全覆盖可视窗口
contain = 网页内容完全覆盖可视窗口
auto =  contain
注意: 这个设置在UIWebview和 WKWebview 中都生效。如果不生效则是因客户端设置问题。UIScrollViewContentInsetAdjustmentNever方法的设置。
constant 和 env.header {
/* Status bar height on iOS 10 */
padding-top: 44px;
/* Status bar height on iOS 11.0 */
padding-top: constant(safe-area-inset-top);
/* Status bar height on iOS 11+ */
padding-top: env(safe-area-inset-top);
}关于safe-area-inset-xxx如下图

safe-area-inset-xx可以用在margin padding top bottom值中。遇到支持的就会覆盖掉上面的值。
首先说明什么是组件
组件是指在UI界面中,可以被独立划分的、可复用的、独立的模块。每个组件都有自己独立的生命周期。
组件生命周期是指什么
每个组件都有自己的props和state。
每一个组件都有几个你可以重写以让代码在处理环节的特定时期运行的“生命周期方法”。方法中带有前缀 will 的在特定环节之前被调用,而带有前缀 did 的方法则会在特定环节之后被调用。
下面这些方法会在组件实例被创建和插入DOM中时被调用
constructorstatic getDerivedStateFromProps()componentWillMount()/ UNSAFE_componentWillMount()render()componentDidMount()属性或状态的改变会触发一次更新。当一个组件在被重渲时,这些方法将会被调用
componentWillReceiveProps() / UNSAFE_componentWillReceiveProps()static getDerivedStateFromProps()shouldComponentUpdate()componentWillUpdate() / UNSAFE_componentWillUpdate()render()getSnapshotBeforeUpdate()componentDidUpdate()当一个组件被从DOM中移除时,该方法被调用
componentWillUnmount()渲染中出现错误,调用下面方法
componentDidCatch()每一个组件还提供了其他的API
setState()forceUpdate()实例属性
propsstate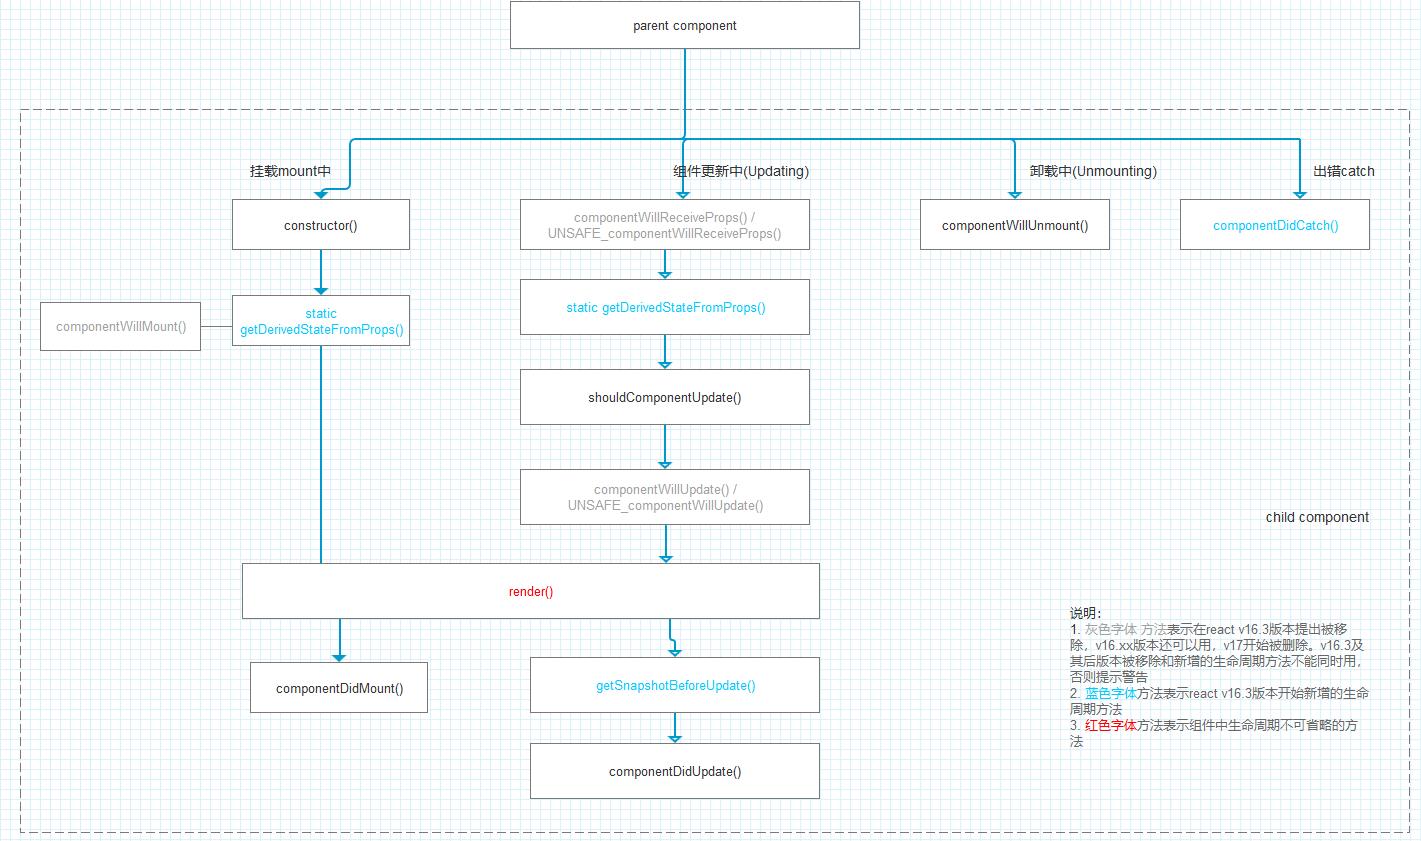
render()当被调用时,其应该检查this.props 和 this.state并返回以下类型中的一个
React元素。 通常是由 JSX 创建。该元素可能是一个原生DOM组件的表示,如<div />,或者是一个你定义的合成组件。
字符串和数字。 这些将被渲染为 DOM 中的 text node。 return 'aaa'
null。 什么都不渲染
Protal. reactDOM.creatProtal创建的对象。
新API,在一般的 React 结构中,组件的嵌套关系和渲染出来的 DOM 的嵌套关系是一致的(子组件渲染出的 DOM 一定是在父组件渲染出的 DOM 的内部的)。但某些情况下,这样的限制会导致问题,例如实现一个模态框(Modal),虽然模态框所在的组件在它的父组件内部,但是通常需要被渲染在 body 元素下。 文档参考
  render() {
    // React does *not* create a new div. It renders the children into `domNode`.
    // `domNode` is any valid DOM node, regardless of its location in the DOM.
    return ReactDOM.createPortal(
      this.props.children,
      domNode,
    );
  }
布尔值。 什么都不渲染。通常存在于 return test && <Child />写法,其中 test 是布尔值。
数组. dom数组。之前的版本render 多个元素需要用<div></div>包起来。现在可一直使用
render() {
  return [
    <li key="key_1"> 1</li>,
    <li key="key_2"> 2</li>,
    <li key="key_3"> 3</li>,
  ]
}
若 shouldComponentUpdate()返回false,render()函数将不会被调用。
一. 组件装载过程中(Mount)生命周期有以下几个
constructor()实例化之前调用。当为一个React.Component子类定义构造函数时,你应该在任何其他的表达式之前调用super(props)。否则,this.props在构造函数中将是未定义,并可能引发异常。
如果不需要初始化状态且不绑定方法,那你也不需要为你的React组件定义一个构造函数。
static getDerivedStateFromProps()组件实例化后和接受新属性时将会调用getDerivedStateFromProps。它应该返回一个对象来更新状态,或者返回null来表明新属性不需要更新任何状态。
注意,如果父组件导致了组件的重新渲染,即使属性没有更新,这一方法也会被调用。如果你只想处理变化,你可能想去比较新旧值。调用this.setState() 通常不会触发 getDerivedStateFromProps()。
componentWillMount()/ UNSAFE_componentWillMount()在此函数中设置state也不会生效。因为这个方法在render()前调用,不会再次触发render()重新渲染。所以不建议异步数据请求放在此方法中。
componentWillMount()是v16.3及之前版本可以用。v16.3使用别名UNSAFE_componentWillMount()。v17版前都还可以使用。
render()前面已经详细描述了
componentDidMount()初始化DOM节点render真实DOM前会执行这个方法。官方推荐数据加载,ajax fetch数据等放在这个方法中。在这个function中setState会重新触发render。在浏览器渲染时,用户察觉不到2次render。
二. 组件更新(update)
componentWillReceiveProps(nextProps) / UNSAFE_componentWillReceiveProps(nextProps)该函数在组件进行更新以及父组件render函数(不管数据是否发生了改变)被调用后执行,this.props取得当前的props,nextProps传入的是要更新的props。通常使用this.props 和 nextProps 进行比较进行其他逻辑处理
此属性在v16.3版本提出删除,官方建议使用getDerivedStateFromProps()
这一生命周期之前叫做componentWillReceiveProps。这一名字在17版前都有效。
static getDerivedStateFromProps()组件实例化后和接受新属性时将会调用getDerivedStateFromProps。它应该返回一个对象来更新状态,或者返回null来表明新属性不需要更新任何状态。
调用this.setState() 通常不会触发 getDerivedStateFromProps()。
注意,如果父组件导致了组件的重新渲染,即使属性没有更新,这一方法也会被调用。如果你只想处理变化,你可能想去比较新旧值。
shouldComponentUpdate(nextProps, nextState)返回bool值,true表示要更新,false表示不更新,使用得当将大大提高React组件的性能,避免不需要的渲染。
该方法并不会在初始化渲染或当使用forceUpdate()时被调用
componentWillUpdate(nextProps, nextState)初始化不会调用。更新渲染前被立即调用。不能在此方法this.setState()。react v17版被删除
getSnapshotBeforeUpdate(prevProps, prevState)更新重新渲染render后DOM输出前调用。在异步渲染中,优化有很大的作用。
componentDidUpdate(prevProps, prevState)同初始化这个componentDidMount。此方法在组件更新中触发。
三、卸载中(unmounting)
componentWillUnmount()在组件被卸载和销毁之前立刻调用。可以在该方法里处理任何必要的清理工作,例如解绑定时器,取消网络请求,
清理任何在componentDidMount环节创建的DOM元素。
四、 错误处理
componentDidCatch(error, info)组件render出错catch错误的一个函数。
是指在子组件树的任何地方捕获JavaScript错误的响应组件,记录这些错误,并显示回退的UI,而不是崩溃的组件树。错误catch在绘制过程中捕获错误,在生命周期方法中,以及在它们下面的整棵树的构造函数中捕获错误。
在商业后台项目中用的最多的生命周期函数是componentWillReceiveProps()和componentDidMount(),
还用过componentWillMount()。
componentWillReceiveProps()``componentWillReceiveProps()和componentDidMount() 使用没问题。componentWillReceiveProps()多用于路由切换或子组件中重新设置state。react v16.3版本后 建议使用 static getDerivedStateFromProps()。
componentDidMount()用于异步数据请求。setState后会重新渲染。
错误用法指出
dva中 在componentWillReceiveProps()生命周期函数中dispatch数据,导致请求循环。因设置了dva 中state会出发重新渲染,导致进入死循环。
tree.js中
componentWillMount()使用在设置静态state参数,动态设置是没用的。正确做法应该可以直接在state中直接设置。
container.js

import React from "react";
import ReactDOM from "react-dom";
import LifeCycle from './lifecycle';
import styles from './index.css';
class Container extends React.Component {
  constructor(props) {
    super(props);
    this.state = {
      num: Math.random()*100,
    };
  }
  propsChange() {
    this.setState({
      num: Math.random()*100
    });
  }

  setLifeCycleState() {
    this.refs.rLifeCycle.setTheState();
  }

  forceLifeCycleUpdate() {
    this.refs.rLifeCycle.forceItUpdate();
  }

  unmountLifeCycle() {
    ReactDOM.unmountComponentAtNode(document.getElementById('index'));
  }

  parentForceUpdate() {
    this.forceUpdate();
  }

  render() {
    return [
      <a key="propschange-button" className={styles.button} onClick={this.propsChange.bind(this)}>propschange</a>,
      <a key="setState-button" className={styles.button} onClick={this.setLifeCycleState.bind(this)}>setState</a>,
      <a key="forceUpdate-button" className={styles.button} onClick={this.forceLifeCycleUpdate.bind(this)}>forceUpdate</a>,
      <a key="unmount-button" className={styles.button} onClick={this.unmountLifeCycle.bind(this)}>unmount</a>,
      <a key="parentForceUpdateWithoutChange-button" className={styles.button} onClick={this.parentForceUpdate.bind(this)}>parentForceUpdateWithoutChange</a>,
      <LifeCycle key="lifecycle" ref="rLifeCycle" num={this.state.num}></LifeCycle>,
    ]
  }

}

export default Container;lifecycle.js
import React from "react";
import ReactDOM from "react-dom";
class Lifecycle extends React.Component {
constructor(props) {
// 组件初始化
console.log('initial render');
console.log('1. constructor');
super(props);
this.state = {
str: 'hello'
}
}
// static getDerivedStateFromProps(nextProps, prevState) {
// console.log('2. this is getDerivedStateFromProps function');
// console.log('getDerivedStateFromProps nextprops:', nextProps);
// console.log('getDerivedStateFromProps prevState:', prevState);
// return {str: nextProps.str };
// }
componentWillMount() {
this.setState({str: 'hello world!!'})
}
componentDidMount() {
console.log('4. componentDidMount function');
}
UNSAFE_componentWillReceiveProps(nextProps) {
console.log('5. UNSAFE_componentWillReceiveProps');
console.log('UNSAFE_componentWillReceiveProps:', nextProps);
}
shouldComponentUpdate(nextProps, nextState) {
// 不会在初始化渲染或当使用forceUpdate()时被调用。
// 如果shouldComponentUpdate()返回false,而后UNSAFE_componentWillUpdate(),render(), 和 componentDidUpdate()将不会被调用。
// 这个方法一般用作 react渲染性能优化。详细请查阅 Component 和 PureComponent
console.log('shouldComponentUpdate');
return true;
}
componentWillUpdate() {
console.log('componentWillUpdate');
}
// v16.4
// getSnapshotBeforeUpdate() {
// console.log('getSnapshotBeforeUpdate');
// }
componentDidUpdate() {
console.log('componentDidUpdate');
}
componentWillUnmount() {
console.log('componentWillUnmount');
}
forceItUpdate() {
this.forceUpdate();
}
setTheState() {
let words = 'hello react';
if(this.state.str === words) {
words = 'HELLO REACT';
}
this.setState({
str: words
});
}
render() {
console.log('3. render function');
return (
<div>
<p className="lifecycle-p">show props: <em>{parseInt(this.props.num)}</em></p>
<p className="lifecycle-p">show state: <em>{this.state.str}</em></p>
</div>
);
}
}
export default Lifecycle;ant-design是一套组件库。由蚂蚁金服设计统一的一套规范提供的一套react基础组件库。
用到的组件有
Button // 按钮 可通过属性设置
Icon  // 图标 (有点鸡肋)
Grid  // 栅格化(这个被乱用的最严重, 通常gutter设置后然后用样式又复写固定死。也有直接用flex,然后混写。)
Layout  // 布局
Affix   // 图钉 固定在页面某个位置
Breadcrumb  // 面包屑,这个配合路由来设置。
Menu  // 菜单
Pagination  //分页
Steps // 步骤条
Checkbox  // 复选框
DatePicker  // 日历 (使用时需要和monent插件一起用)
Form  // 表单
Input // 单行文本框
Radio // 单选
Select  //  选择器
Upload  // 上传
Card  // 卡片 (鸡肋)
Popover // 气泡卡 (效果一般般)
Tooltips // 文字提示
Table   // 表格
Modal   // 对话框 ()
Tree    // 树
Message // 全局提示(message tips)
因多人开发,多人设计。导致从设计没统一规范,到前端每个人都写自己的业务模块。后面再统一规范就出现大量的样式复写和改写。感觉违背了插件本身的初衷。(笑)
ant-design大多数都是基础显示组件,一些无交互性的建议要么统一规范,共用组件在component中,要么直接用原html DOM,更优雅简洁。
ant-design-pro 是一个企业级中后台前端/设计解决方案,也就是一套拥有基础功能的后台源码。可做二次开发。
暂时没有进行二次开发,下次补上。
前公司使用了eslint ,但很多时候并未发展到很好的作用,大多是用来检测简单的语法书写规范问题。(笑)
早期直接简单粗暴的使用了这套,会直接对rule进行调整
eslint-config-standard
后面以阿里eslint-config作为底层的配置
eslint-config-ali,主要用到了base中的 variables.js
关于 .eslintrc 配置大概如下,rules规则件eslint rules , eslint config配置
{
    "extends": "eslint-config-ali",
    "rules": {
        // 自定义规则 可以覆盖 原配置
    }
}.eslintignore 对需要eslint的文件进行屏蔽 // 例如
build/*.js项目中通常还会加入 .editorconfig 书写规范配置,配置如下。也可参editorconfig照官网
# editorconfig.org
root = true

[*]
indent_style =space
indent_size = 4
end_of_line = lf
charset = utf-8
trim_trailing_whitespace = true
insert_final_newline = true

[*.md]
trim_trailing_whitespace = false
这个定义时参考了腾讯团队代码规范 做了一些根据业务场景的细小调整例如 样式文件命名使用中划线
sass或less 换行等
附上一个简单编写规范配置的eslint
{
    "extends": "eslint-config-ali",
    "parser": "babel-eslint",
    "env": "windows",
    "globals": {
        "GLOBAL": true
    },
    "rules": {
        "arrow-body-style": ["error", "always"],
        "no-const-assign": "error",
        "no-var": "error",
        "no-new-symbol": "error",
        "no-useless-rename": ["error"],
        "prefer-const": "error",
        "rest-spread-spacing": ["error", "always"],
        "lines-around-directive": ["error", { "before": "always", "after": "never" }],
        "array-bracket-spacing": ["error", "never"],
        "capitalized-comments": [
            "error",
            "always",
            {
                "ignorePattern": "pragma|ignored",
                "ignoreInlineComments": true
            }
        ],
        "eol-last": ["error", "always"],
        "line-comment-position": ["error", { "position": "above" }],
        "linebreak-style": ["error", "windows"],
        "multiline-comment-style": ["error", "starred-block"],
        "no-mixed-spaces-and-tabs": "error",
        "no-trailing-spaces": "error",
        "no-multiple-empty-lines": ["error", {"max": 2}]
    }
}
1、盒模式margin 和 padding 不能简写
写样式的时候,虽然官方写支持margin 写法,但实际上 如
margin: 10px 20px 15px 0;
这种是不支持的,需要写成
margin-top: 10px;
margin-right: 20px;
margin-bottom: 15px;
slider组件官方(http://weex.alibaba-inc.com/builtin-components/slider)写设置是否显示小圆点是
show-indicators 设置为true
下面列子为列
<template>
    <container class="banner-box">
        <slider class="slider" interval="{{intervalValue}}" auto-play="{{isAutoPlay}}" >
            <div class="slider-pages" repeat="{{mockList}}" onclick="bannerShowDetail">
                <image class="thumb" src="{{pictureUrl}}"></image>
            </div>
            <indicator class="indicator"></indicator>
        </slider>
    <container>
</template>
weex,webpack打包各函数不支持调用
module.exports = name
必须写成
module.name = name
在css中颜色值有 5中书写方式:
rgb故名思议是(red,green,blue)不同色值设置。
rgb值设置有4中方式,其中有2种可以用在css中,另外的2种只是一种定义。
.black { /* I’m black! */
	color: rgb(0, 0, 0);
	color: rgb(0%, 0%, 0%);
}

.white { /* I’m white! */
	color: rgb(255, 255, 255);
	color: rgb(100%, 100%, 100%);
}

.purple { /* I’m medium purple! */
	color: rgb(128, 0, 128);
	color: rgb(50%, 0%, 50%);
}

.light-purple { /* I’m fuchsia! */
	color: rgb(255, 0, 255);
	color: rgb(100%, 0%, 100%);
}

.dark-purple { /* I’m deep purple! */
	color: rgb(64, 0, 64);
	color: rgb(25%, 0%, 25%);
}
上面的rgb值设置,百分比和 int 都表示同一个值,大多经常使用int设置色值
rgba 指的是 (red,green,blue,alpha) ,alpha 指alpha 通道。
alpha值设置一般用 0——1 的float(浮点型)设置如(0.1-1)。
一般的rgb值就是默认alpha值为1
/*下面的 每个类里的color 都表示同一个色值*/
.black { /* I’m half transparent black! */
	color: rgba(0, 0, 0, 0.5);
	color: rgba(0%, 0%, 0%, 0.5);
}

.white { /* I’m 2/3 transparent white! */
	color: rgba(255, 255, 255, 0.33);
	color: rgba(100%, 100%, 100%, 0.33);
}

.red { /* I’m fully transparent red, so kind of invisible */
	color: rgba(255, 0, 0, 0);
	color: rgba(100%, 0%, 0%, 0);
}
rgba 用法 下面例子
.parent {
	background-image: url(‘my-picture.jpg’);
}

.child {
	background: rgba(255, 255, 255, 0.75);
	color: rgb(51, 51, 51);
}
这个例子设置child色值为透明度为75%的白色,而不影响parent background的可读性等。
alpha设置时(0.5)等,可以省略前面的 0 直接 rgba(0,0,0,.5)
rgba的兼容性不是很好,不支持IE6,IE7,IE8
Hexadecimal = 十六进制
什么是css colors 十六进制呢?
css colors十六进制是由 3到6位字符组成其中包含 0-9整型数和A-F的字母,例如红色(red) 是 (#f00)。
详细的说,十六进制字符是由rgb 生成,6位字符串,前2位代表 red,3-4位值代表 green,5-6位代表 blue 。
rgb可以直接替换成十六进制字符
看到上面有 3位字符的,是因为red值是#ff0000 这种连续2个数值相同的才可以简写。如果连续2个值不一样不能用简写方式
    .red { /* I'm  red */
        color: #ff0;
    }
    .white { /* I'm white */
        color: #ffffff;
}这里的keywords指的是 color keywords。事实上最常用的十六进制表示色值这个并不友好。并不能一目了然的知道是什么颜色。rgb 比十六进制稍微好点。
color keywords指 red,green等这些,在html4.01提出了16个不同keywords 标准。
Aqua
Black
Blue
Fuchsia
Gray
Green
Lime
Maroon
Navy
Olive
Purple
Red
Silver
Teal
White
Yellow
css2.1的时候添加了orange 这个特殊的关键词,到css3的时候又添加130个,一共有147个,其中有 134个 non-gray, 13个gray。
参照网站有
http://meyerweb.com/eric/css/colors/
https://developer.mozilla.org/en-US/docs/Web/CSS/color_value
147个keywords兼容性非常好,除了IE6
有2个比较特殊的keywords,不是rgb三种色彩的组合。
transparent 和 currentColor
transparent在css1时代,只用于background属性。现在transparent可以作为color,border-color,background,shadow,granints等等。
transparent其效果是非常直接的:它使颜色或背景颜色或其他元素的透明,因为它是在默认情况下,当没有指定颜色。
transparent 用于如果设置不能删除重设的地方,和设置默认透明。
currentcolor是 css3的值。是继承临近属性的color值。
    .my-element { /* 这里的currentColor继承了上面的color值 */
        color: red;
    	border-color: 5px solid currentColor;
    }
可继承的属性有 border-color,box-shadow中的color设置,text-shadow等
如下例子
.my-element {
	color: red;
	border-color: 5px solid;   /* This will be red */
	box-shadow: 10px 10px 5px; /* This will be red */
	text-shadow: 0 2px 1px;    /* This will be red */
}
如上面的例子,currentColor这个关键字中的C 可大写,可小写也可省略
HSL 是指 Hue(色相),Saturation(饱和度),Lightness(透明度)组合,是rgb的另一种表示方式。
Hue 是从 0% 到 360%,从0°是 red, 120°是 green, 240°是blue 具体理解可以看下图
![Hue 色相][1]
Saturation 饱和度 跟Photoshop中的一样,使用white or black 颜色混合。
Lightness 透明度 跟Photoshop 中的一样。
.white { /* I’m white! */
	color: hsl(0, 0%, 100%);
}

.black { /* I’m black! */
	color: hsl(0, 0%, 0%);
}

.red { /* I’m red! */
	color: hsl(0, 100%, 50%);
}
note:当你想设置 黑色 或者白色的时候,hue不是起决定性的作用, 如hsl(0,0%,100%),hsl(120,0%,100%),hsl(240,0%,100%) 这3个颜色都是白色
note: hue 设置时是不需要写单位的,即使写了浏览器也不能解析
hsl 跟 rgb一样,设置alpha 就是设置rgba,hsl则 是hsla 其中a 的设置范围也是 0-1.
.parent {
	background-image: url(‘my-picture.jpg’);
}

.child {
	background: hsla(0, 0%, 100%, 0.75);
	color: hsl(0, 0%, 30%);
}系统颜色在 css 3 规范中被放弃,而且由于各个系统不同,不好控制。
以下面代码为例
/* This will be red, whatever you pick */
.red { color: red; }
.red { color: #f00; }
.red { color: #ff0000; }
.red { color: rgb(255, 0, 0); }
.red { color: rgb(100%, 0%, 0%); }
.red { color: rgba(255, 0, 0, 1); }
.red { color: rgba(100%, 0%, 0%, 1); }
.red { color: hsl(0, 100%, 50%); }
.red { color: hsla(0, 100%, 50%, 1); }
以上都是表示 红色,自己喜欢那种写法就选那种。
css preprocessors 指css 预处理器 [less,sass]
css预处理器提供了很多颜色的内置方法,比如saturate,darken,hue rotation等等
less doc
lighten(@color, @percentage);               /* Makes lighter */
darken(@color, @percentage);                /* Makes darker */

saturate(@color, @percentage);              /* Makes more saturated*/
desaturate(@color, @percentage);            /* Makes less saturated*/

fadein(@color, @percentage);                /* Makes more opaque */
fadeout(@color, @percentage);               /* Makes more transparent */
fade(@color, @percentage);                  /* Gives the color 50% opacity */

spin(@color, @degrees);                     /* Rotates the hue wheel 10° */

mix(@color1, @color2, @percentage);         /* Mixes 2 colors with a default weight of 50% */
contrast(@color1, @darkcolor, @lightcolor); /* Returns @darkcolor if the color is >50% luma (i.e. is a light color) otherwise return @lightcolor */
sass doc
rgba($color, $alpha)               /* Convert a hex color into a RGBa one 返回颜色值 */
red($color)                        /* Gets the red component 如果是 red 颜色直接返回 255 其他的返回 0 */
green($color)                      /* Gets the green component  如果是 green 颜色直接返回 255 其他的返回 0*/
blue($color)                       /* Gets the blue component  如果是 blue 颜色直接返回 255 其他的返回 0*/
mix($color-1, $color-2, [$weight]) /* Mixes 2 colors together with a default weight of 50% 同上 */

hue($color)                         /* Gets the hue component 返回相应的颜色($color)hue色相值*/
saturation($color)                  /* Gets the saturation component 返回相应的颜色($color)saturation值 */
lightness($color)                   /* Gets the lightness component返回相应的颜色($color)lightness值 */
adjust-hue($color, $degrees)        /* Rotates the hue wheel 返回颜色值 */
lighten($color, $percentage)        /* Makes lighter 返回颜色值 */
darken($color, $percentage)         /* Makes darker 返回颜色值*/
saturate($color, $percentage)       /* Makes more saturated  饱和度*/
desaturate($color, $percentage)     /* Makes less saturated 饱和度*/

grayscale($color)                   /* Converts to grayscale 添加灰度 */
complement($color)                  /* Returns the complement 补光 比如$color:green,生成的就是purple */
invert($color)               /* Returns the inverse 反相 ,反色,比如$color:green,最后生成#ff7fff */

alpha($color)                       /* Gets the alpha component (opacity) 返回$color opacity值*/
opacity($color)                     /* Gets the alpha component (opacity) 返回$color opacity值 */
opacify($color, $percentage)        /* Makes more opaque 这里的$percentage 只能设置 0-1范围内的数值*/
fade-in($color, $percentage)        /* Makes more opaque 同上*/
transparentize($color, $percentage) /* Makes more transparent 0.4设置透明度 */
fade-out($color, $percentage)       /* Makes more transparent 同上*/
[翻译文章 color in css](http://hugogiraudel.com/2012/11/27/css-colors/"color in css")
最后自己补充,alpha通道在IE7一下不能设置,需要使用微软提供的一个方法,设置filter。
filter:progid:DXImageTransform.Microsoft.Alpha(opacity=56);opactiy 设置。
[1]: http://hugogiraudel.com/images/css-colors/color-wheel.png
当一个项目多个人开发的时候,就会出现“百花齐放”的局面。小到缩进是Tab是2个字符还是4个字符,单引号和双引号...之类的编写方式。大到变量为定义使用,重复定义等情况。为了代码质量高,阅读性好,后期易维护。团队使用了eslint。基于airbnb制定的规则。
yarn add 安装 eslint, eslint-friendly-formatter, babel-eslint,eslint-config-airbnb 等一系列依赖包(目前项目中已经写入 package.json中,直接 yarn就好了)
在开发编辑工具中安装 eslint
工具配置 以vscode为例,点开 文件 -> 首选项 -> 用户设置 (目前没啥需要再次设置,当然也可以根据自己喜好进行一些配置,例如保存自动格式化eslint.autoFixOnSave。)
可以再次配置eslint rules。现以店铺图业务模块进行了通用的配置(如下.eslintrc文件)。后续根据具体业务可以添加或调整。(可以参考
.eslintrc

{
  "env": {
    "browser": true
  },
  "parser": "babel-eslint",
  "extends": "airbnb",
  "rules": {
    // generator 的 * 前后空格使用规则
    "generator-star-spacing": [0],
    // 禁止函数在不同条件下返回不同类型的值
    // @off 有时候会希望通过参数获取不同类型的返回值
    "consistent-return": [0],
    // 禁止prop类型 @off prop可以为任何类型
    "react/forbid-prop-types": [0],
    // react文件扩展名 不仅仅是 .jsx 允许 .js
    "react/jsx-filename-extension": [1, {
      "extensions": [".js"]
    }],
    // require 必须在全局作用域下
    "global-require": [1],
    // import 更倾向default @off
    "import/prefer-default-export": [0],
    // bind
    "react/jsx-no-bind": [0],
    // prop类型
    "react/prop-types": [0],
    // 最优组件无state 设置 @off
    "react/prefer-stateless-function": [0],
    // 禁止出现 if (cond) { return a } else { return b },应该写为 if (cond) { return a } return b
    // @off 有时前一种写法更清晰易懂
    "no-else-return": [0],
    // 禁止使用特定的语法 @off
    "no-restricted-syntax": [0],
    // import 规定, 禁止import没在package中的依赖
    "import/no-extraneous-dependencies": [0],
    // 禁止在变量被定义之前使用它
    "no-use-before-define": [0],
    // 禁止 静态element
    "jsx-a11y/no-static-element-interactions": [0],
    // 禁止嵌套的三元表达式
    "no-nested-ternary": [0],
    // 箭头函数的书写规则
    "arrow-body-style": [0],
    // import 扩展
    "import/extensions": [0],
    // 禁止位运算
    "no-bitwise": [0],
    // 禁止在 if、for、while 中出现赋值语句,除非用圆括号括起来
    "no-cond-assign": [0],
    // import 禁止不明确模块和文件
    "import/no-unresolved": [0],
    // generator 函数内必须有 yield
    "require-yield": [1],
    // 换行符使用规则
    "linebreak-style": ["error", "windows"],
    // obj = { a: a } 必须转换成 obj = { a }
    "object-shorthand": ["error", "always"],
    // arr = [ 1, 2, 3 ]必须转化成 arr = [1,2,3] 都可自动格式化
    "array-bracket-spacing": ["error", "never"],
    // 定义对象的花括号前后是否要加空格
    "object-curly-spacing": ["error", "always"],
    // 禁止变量名中使用下划线
    "no-underscore-dangle": ["error", {"allow": ["_this"]}],
    // 禁止 console
    "no-console": ["error", {"allow": ["log", "warn", "error"]}],
    // 必须使用解构
    "prefer-destructuring": ["error", {"object": true}],
    // 所有锚点是有效的, 例如 <a>标签必须有href
    // 这里设置了<Link>标签link为 to是允许的
    "jsx-a11y/anchor-is-valid": ["error",
      {
        "components": ["Link"],
        "specialLink": ["to"],
        "aspects": ["noHref", "invalidHref", "preferButton"]
      }
    ],
    // 禁止出现无用的表达式
    "no-unused-expressions": [2, { "allowTernary": true }],
    // 点击事件后还需要有其他键盘事件 @off
    "jsx-a11y/click-events-have-key-events": 0,
    // react中属性属性顺序 @off
    "react/sort-comp": 0,
    // 数组的 map、filter、sort 等方法,回调函数必须有返回值
    "array-callback-return": ["error", { "allowImplicit": false }],
    // 所有的箭头函数有回调
    "prefer-arrow-callback": 0,
    // 执行JSX多行元素的关闭括号位置。
    "react/jsx-closing-bracket-location": 0,
    // 强制多行JSX元素的结束标记位置
    "react/jsx-closing-tag-location": 0,
    // 禁止在return中赋值
    "no-return-assign": 0,
    // 限制单行代码的长度 @off
    "max-len": 0,
    // react 循环中key 禁止使用 index, 确实建议这样做,
    // 但这个规则 连 `pro_${index}_xx` 这种都是禁止的,由于数据返回有// 时候没有 唯一表示,所以建议用组装 字符串+index 来做key
    "react/no-array-index-key": 0
  },
  "parserOptions": {
    "ecmaFeatures": {
      "experimentalObjectRestSpread": true
    }
  }
}
说明:off = 0 ; 1= warning; 2 = error
package.json中的scripts中配置"lint": "eslint --fix --format node_modules/eslint-friendly-formatter src/config/ src/routes/erp/project/ src/services/erp/project/"
eslint-friendly-formatter 可以配置多个文件夹进行检查
参照 eslint-friendly-formatter使用
在项目根目录中执行 npm run lint根据提示一一更正不合规范代码。
哪个模块不想进行eslint检测则可以在根目录下.eslintignore文件中配置相应文件
eslint-loader插件在webpack配置, 配置如下module.exports = {
// ...
module: {
rules: [
{
test: /\.js$/,
exclude: /node_modules/,
loader: "eslint-loader",
options: {
// eslint options (if necessary)
}
},
],
},
// ...
}具体参数配置请参照 eslint-loader
.eslintrc文件中配置{
"parser": "babel-eslint",
"rules": {
// rules config
}
}直接执行命令可以在终端中看到检验结果及错误提示
增加pre-commit 钩子,在package.json中配置
"pre-commit": [
  "eslint"
]
在每次提交之前,都会运行eslint命令进行检测,如果检测到有违反代码规则的情况,则会返回1,导致git commit失败。
现在流行的一种,但坑太多了。感兴趣的可以玩一波。欢迎一起讨论。
一开始想使用eslint + Prettier(vscode编辑器上的插件) 偷懒,在保存的时候就直接格式化代码了。语法类的编辑器也有提示。捣鼓了2个晚上,晚上在家用os系统,然后白天在公司用win系统。切换时,没那么顺利,只在家里的mac配置成功了。(例如: eslint 中的linebreak-style不同,vscode配置项一样也会出现问题。后面有时间再试一试)
关于eslint + prettier保存自动配置的,网络上很多文件。我在mac中vscode 编辑器 配置的文件如下。
eslint 和 prettier 插件{
"workbench.colorTheme": "Visual Studio Dark",
"editor.fontSize": 14,
"editor.tabSize": 2,
"editor.wordWrap": "wordWrapColumn",
"javascript.format.insertSpaceAfterKeywordsInControlFlowStatements": true,
"prettier.eslintIntegration": true,
"eslint.trace.server": "messages",
"team.showWelcomeMessage": false,
"prettier.singleQuote": true,
"prettier.semi": false,
"eslint.autoFixOnSave": true,
"eslint.validate": [
"javascript",
"javascriptreact",
{
"language": "react",
"autoFix": true
}
],
"prettier.trailingComma": "all"
} yarn add eslint-config-prettier eslint-plugin-prettier prettier -D.eslintrc.js配置eslint 配置如下
{
  "env": {
    "browser": true
  },
  "parser": "babel-eslint",
  "extends": "airbnb",
  "plugins": ["prettier"],
  "rules": {
    "prettier/prettier": [
      "error",
      {
        "singleQuote": true,
        "trailingComma": "all"
      }
    ],
    "generator-star-spacing": [0],
    "consistent-return": [0],
    "react/forbid-prop-types": [0],
    "react/jsx-filename-extension": [1, { "extensions": [".js"] }],
    "global-require": [1],
    "import/prefer-default-export": [0],
    "react/jsx-no-bind": [0],
    "react/prop-types": [0],
    "react/prefer-stateless-function": [0],
    "no-else-return": [0],
    "no-restricted-syntax": [0],
    "import/no-extraneous-dependencies": [0],
    "no-use-before-define": [0],
    "jsx-a11y/no-static-element-interactions": [0],
    "no-nested-ternary": [0],
    "arrow-body-style": [0],
    "import/extensions": [0],
    "no-bitwise": [0],
    "no-cond-assign": [0],
    "import/no-unresolved": [0],
    "require-yield": [1],
    "camelcase": "off",
    "no-new": "off",
    "space-before-function-paren": "off",
    "no-plusplus": "off",
    "max-len": "off",
    "func-names": "off",
    "no-param-reassign": "off",
    "no-underscore-dangle": ["error", { "allow": ["_this"] }],
    "no-console": ["error", {"allow": ["log", "warn", "error"] }]
  },
  "parserOptions": {
    "ecmaFeatures": {
      "experimentalObjectRestSpread": true
    }
  }
}保存的时候回直接格式化文件。例如{}Object中留空格,Array中不留,语句后自动添加 ;,单双引号等等。主要是开启了 eslint.autoFixOnSave。
有兴趣的可以试试。
在 windows, unix, OS系统默认换行不同
windows是 CRLF 即 \r\n, unix是 LF 即 \n, MAC OS V9之前是CR, v9 之后都是 LF;
\r是光标回到开头,\n是光标往下移一行。
为了规范统一,项目中设置了
"linebreak-style": ["error", "unix"]在 windows下会提示有异常,可以通过两种方式解决。
一种是在项目根目录添加一个 .eitorconfig,配置如下
root = true

[*]
charset = utf-8
indent_style = space
indent_size = 2
end_of_line = lf
insert_final_newline = true
trim_trailing_whitespace = true
第二种是在git命令操作,在提交前统一处理。
# 提交时转换为LF,检出时不转换
git config --global core.autocrlf input
有时候直接在chrome中开启设备开发,到真机上也还是会有各种小问题,那么就需要来调试。分iphone设备和android设备。
这次需求中引入第三方聊天框,在不同设备上显示有些差异,未解决这些问题,进行了真机调试。
下面说说方法:
安卓设备调试。
chrome://inspect/#devices,安卓设备在移动端chrome中输入需要调试的页面地址,然后就会在windows chrome中见到如下图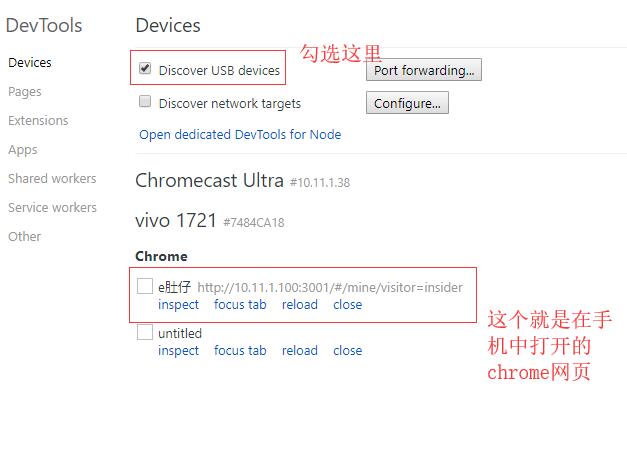
然后在点开 inspect 可以直接进行调试,如下图

iphone设备使用mac safari进行调试

开发的tab
开发选项中看到看到已连接的设备weinre 工具调试
安装weinre工具
npm install -g weinre接着执行
weinre --boundHost -all-如下截图

然后在浏览器中打开 http://localhost:8080/, 出现下面页面

点击进入调试

需要在html页面插入<script src="http://10.11.1.61:8086/target/target-script-min.js#anonymous"></script>这段代码
A declarative, efficient, and flexible JavaScript library for building user interfaces.
🖖 Vue.js is a progressive, incrementally-adoptable JavaScript framework for building UI on the web.
TypeScript is a superset of JavaScript that compiles to clean JavaScript output.
An Open Source Machine Learning Framework for Everyone
The Web framework for perfectionists with deadlines.
A PHP framework for web artisans
Bring data to life with SVG, Canvas and HTML. 📊📈🎉
JavaScript (JS) is a lightweight interpreted programming language with first-class functions.
Some thing interesting about web. New door for the world.
A server is a program made to process requests and deliver data to clients.
Machine learning is a way of modeling and interpreting data that allows a piece of software to respond intelligently.
Some thing interesting about visualization, use data art
Some thing interesting about game, make everyone happy.
We are working to build community through open source technology. NB: members must have two-factor auth.
Open source projects and samples from Microsoft.
Google ❤️ Open Source for everyone.
Alibaba Open Source for everyone
Data-Driven Documents codes.
China tencent open source team.