Here you can find the materials for the 3rd and 4th week of the "Data Infrastructure in Production" course, part of the MSc in Business Analytics at CEU.
- Schedule
- Week 3: Using R in the Cloud
- Welcome to AWS!
- Getting access to EC2 boxes
- Create and connect to an EC2 box
- Install RStudio Server on EC2
- Connect to the RStudio Server
- Set up an easy to remember domain name
- Play with R for a bit
- Schedule R scripts
- ScheduleR improvements
- Job Scheduler exercises
- First steps with interactive R-driven apps: Shiny
- Shiny exercises
- Shiny Server
- Further exercises
- If in doubt
- 11:00 - 12:30 Session 1
- 12:30 - 13:30 Lunch
- 13:30 - 15:00 Session 2
- 15:00 - 15:30 Coffee break
- 15:30 - 17:00 Session 3
Goal: learn how to run and schedule R jobs and apps in the cloud.
-
Use the central CEU AWS account: https://ceu.signin.aws.amazon.com/console
-
Set up 2FA: https://console.aws.amazon.com/iam
-
Secure your access keys:
"When I woke up the next morning, I had four emails and a missed phone call from Amazon AWS - something about 140 servers running on my AWS account, mining Bitcoin" -- Hoffman said
PS probably you do not really need to store any access keys, but you may rely on roles and KMS
-
Let's use the
eu-west-1Ireland region
Note: we follow the instructions on Windows in the Computer Lab, but please find below how to access the boxes from Mac or Linux as well when working with the instances remotely.
-
Create (or import) an SSH key in AWS: https://eu-west-1.console.aws.amazon.com/ec2/v2/home?region=eu-west-1#KeyPairs:sort=keyName
-
Get an SSH client:
-
Windows -- Download and install PuTTY: https://www.putty.org
-
Mac -- Install PuTTY for Mac using homebrew or macports
sudo brew install putty sudo port install putty -
Linux -- probably the OpenSSH client is already installed, but to use the same tools on all operating systems, please install and use PuTTY on Linux too, eg on Ubuntu:
sudo apt install putty
-
-
Convert the generated pem key to PuTTY format
-
GUI: https://docs.aws.amazon.com/AWSEC2/latest/UserGuide/putty.html#putty-private-key
-
CLI:
puttygen key.pem -O private -o key.ppk
-
-
Make sure the key is readable only by your Windows/Linux/Mac user, eg
chmod 0400 key.ppk
-
Create a tiny EC2 instance
- Optional: create an Elastic IP for your box
- Go the the Instances overview at https://eu-west-1.console.aws.amazon.com/ec2/v2/home?region=eu-west-1#Instances:sort=instanceId
- Click "Launch Instance"
- Pick the
Ubuntu Server 16.04 LTS (HVM), SSD Volume TypeAMI - Pick
t2.microinstance type (see more instance types) - Click "Review and Launch"
- Pick a unique name for the security group
- Click "Launch"
-
Connect to the box
- Specify the hostname or IP address
- Specify the key for authentication
- Set the username to
ubuntuon the Connection/Data tab - Save the Session profile
- Click the "Open" button


-
Look at the docs: https://www.rstudio.com/products/rstudio/download-server
-
Download Ubuntu
aptpackage listsudo apt update -
Install dependencies
sudo apt install r-base gdebi-core -
Try R
R -
Install RStudio Server
wget https://download2.rstudio.org/rstudio-server-1.1.423-amd64.deb sudo gdebi rstudio-server-1.1.423-amd64.deb -
Check process and open ports
sudo ps aux| grep rstudio sudo rstudio-server status sudo systemctl status rstudio-server sudo netstat -tapen|grep LIST -
Look at the docs: http://docs.rstudio.com/ide/server-pro/
-
Confirm that the service is up and running and the port is open
ubuntu@ip-172-31-12-150:~$ sudo netstat -tapen|grep LIST tcp 0 0 0.0.0.0:8787 0.0.0.0:* LISTEN 0 49065 23587/rserver tcp 0 0 0.0.0.0:22 0.0.0.0:* LISTEN 0 15671 1305/sshd tcp6 0 0 :::22 :::* LISTEN 0 15673 1305/sshd -
Try to connect to the host from a browser on port 8787, eg http://foobar.eu-west-1.compute.amazonaws.com:8787
-
Realize it's not working
-
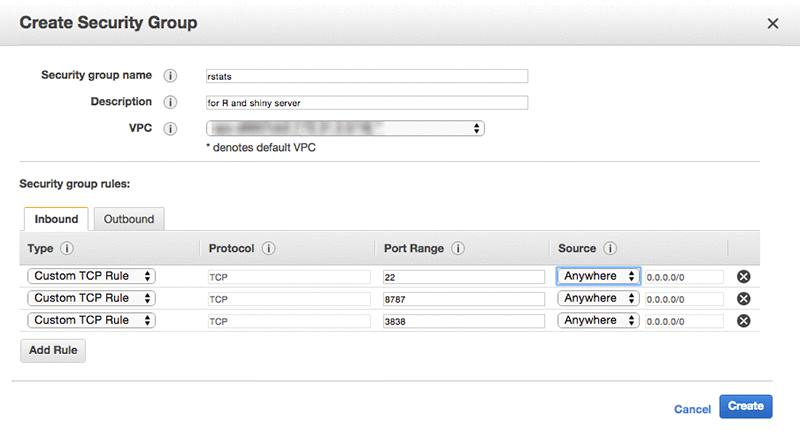
Open up port 8787 in the security group
-
Authentication: http://docs.rstudio.com/ide/server-pro/authenticating-users.html
-
Create a new user:
sudo adduser ceu -
Login & quick demo:
1+2 plot(mtcars) install.packages('beanplot') system('whoami') -
Reload webpage (F5)
-
Demo the terminal:
$ sudo whoami ceu is not in the sudoers file. This incident will be reported. -
Grant sudo access to the new user:
 sudo apt install -y mc
 sudo mc
 sudo mcedit /etc/sudoers
 sudo adduser ceu admin
 man adduser
 man deluser
Note 1: might need to relogin
Note 2: you might want to add NOPASSWD to the sudoers file:
ceu ALL=(ALL) NOPASSWD:ALL
Although also note (3) the related security risks.
- Custom login page: http://docs.rstudio.com/ide/server-pro/authenticating-users.html#customizing-the-sign-in-page
- Custom port: http://docs.rstudio.com/ide/server-pro/access-and-security.html#network-port-and-address
-
Go to Route 53: https://console.aws.amazon.com/route53/home
-
Go to Hosted Zones and click on
ceudata.net -
Create a new Record, where
- fill in the desired
Name(subdomain) - paste the public IP address or hostname of your server in the
Valuefield - click
Create
- fill in the desired
-
Installing packages:
## don't do this at this point! ## install.packages('ggplot2') -
Use binary packages instead via apt & Launchpad PPA:
sudo add-apt-repository ppa:marutter/rrutter sudo add-apt-repository ppa:marutter/c2d4u sudo apt-get update sudo apt-get upgrade sudo apt-get install r-cran-ggplot2 -
Ready to use it from R after restarting the session:
library(ggplot2) ggplot(mtcars, aes(hp)) + geom_histogram() -
Get some real-time data and visualize it:
-
Install devtools in the RStudio/Terminal:
sudo apt-get install r-cran-devtools r-cran-data.table r-cran-httr r-cran-futile.logger r-cran-jsonlite r-cran-data.table r-cran-snakecase -
Install an R package from GitHub to interact with crypto exchanges:
devtools::install_github('daroczig/binancer') -
First steps with live data:
library(binancer) klines <- binance_klines('BTCUSDT', interval = '1m', limit = 60*3) str(klines) summary(klines$close) -
Visualize the data
ggplot(klines, aes(close_time, close)) + geom_line() -
Create a candle chart
library(scales) ggplot(klines, aes(open_time)) + geom_linerange(aes(ymin = open, ymax = close, color = close < open), size = 2) + geom_errorbar(aes(ymin = low, ymax = high), size = 0.25) + theme_bw() + theme('legend.position' = 'none') + xlab('') + ggtitle(paste('Last Updated:', Sys.time())) + scale_y_continuous(labels = dollar) + scale_color_manual(values = c('#1a9850', '#d73027')) # RdYlGn -
Compare prices of 4 currencies in the past 24 hours on 15 mins intervals:
library(data.table) klines <- rbindlist(lapply( c('ETHBTC', 'ARKBTC', 'NEOBTC', 'IOTABTC'), binance_klines, interval = '15m', limit = 4*24)) ggplot(klines, aes(open_time)) + geom_linerange(aes(ymin = open, ymax = close, color = close < open), size = 2) + geom_errorbar(aes(ymin = low, ymax = high), size = 0.25) + theme_bw() + theme('legend.position' = 'none') + xlab('') + ggtitle(paste('Last Updated:', Sys.time())) + scale_color_manual(values = c('#1a9850', '#d73027')) + facet_wrap(~symbol, scales = 'free', nrow = 2) -
Some further useful functions:
binance_ticker_all_prices()binance_coins_prices()binance_credentialsandbinance_balances
-
Create an R script that reports and/or plots on some cryptocurrencies
-

-
Install Jenkins from the RStudio/Terminal: https://pkg.jenkins.io/debian-stable/
wget -q -O - https://pkg.jenkins.io/debian-stable/jenkins.io.key | sudo apt-key add - echo "deb https://pkg.jenkins.io/debian-stable binary/" | sudo tee -a /etc/apt/sources.list sudo apt update sudo apt install jenkins ## installs Java as well sudo netstat -tapen | grep java -
Open up port 8080 in the related security group
-
Access Jenkins from your browser and finish installation
-
Read the initial admin password from RStudio/Terminal via
sudo cat /var/lib/jenkins/secrets/initialAdminPassword -
Proceed with installing the suggested plugins
-
Create your first user (eg
ceu)
-
-
Create a new job:
-
Enter the name of the job:
get current Bitcoin price -
Pick "Freestyle project"
-
Click "OK"
-
Add a new "Execute shell" build step
-
Enter the below command to look up the most recent BTC price
R -e "library(binancer);binance_coins_prices()[symbol == 'BTC', usd]" -
Run the job

-
-
Install R packages system wide from RStudio/Terminal (more on this later):
sudo Rscript -e "library(devtools);with_libpaths(new = '/usr/local/lib/R/site-library', install_github('daroczig/binancer'))" -
Rerun the job

-
Create an R script and run with
Rscriptinstead ofR-- eg with the below contentlibrary(binancer) prices <- binance_coins_prices() library(futile.logger) flog.info('The current Bitcoin price is: %s', [symbol == 'BTC', usd]) -
Learn about little R: https://github.com/eddelbuettel/littler
-
Set up e-mail notifications via SNS: https://eu-west-1.console.aws.amazon.com/ses/home?region=eu-west-1#
-
Whitelist and confirm your e-mail address at https://eu-west-1.console.aws.amazon.com/ses/home?region=eu-west-1#verified-senders-email:
-
Take a note on the SMTP settings:
- Server: email-smtp.eu-west-1.amazonaws.com
- Port: 587
- TLS: Yes
-
Create SMTP credentials and note the username and password
-
Configure Jenkins at http://SERVERNAME.ceudata.net:8080/configure
-
Set up the default FROM e-mail address: [email protected]
-
Search for "Extended E-mail Notification" and configure
- SMTP Server
- Click "Advanced"
- Check "Use SMTP Authentication"
- Enter User Name from the above steps from SNS
- Enter Password from the above steps from SNS
- Check "Use SSL"
- SMTP port: 587
-
-
Set up "Post-build Actions" in Jenkins: Editable Email Notification - read the manual and info popups, configure to get an e-mail on job failures and fixes
-
- Configure your first job to alert if Bitcoin price is below $10K or higher than $12K
- Create a Jenkins job running hourly to generate a candlestick chart on the price of BTC and ETH
- Create an alert if BTC or ETH price changed more than 5% in the past 24 hours
-
Install Shiny
sudo apt-get install r-cran-shiny r-cran-rmarkdown -
Refresh what we have
learnedbriefly covered in the DA1 class: https://github.com/daroczig/CEU-R-lab#week-6-100-min-introduction-to-r-markdown-and-shiny -
Create a new "Shiny Web Application" file
-
Pick a name for the App and the "Single File" option
-
Copy/paste the content of our demo app from https://github.com/daroczig/CEU-R-lab/blob/2018/6.R
-
Click on the "Run app" button
-
Disable the popup blocker in the right corner of the navigation bar
-
Retry running the app and enjoy :)
- Create a minimal dashboard showing the ETH prices in the past 24 hours
- Add a dropdown input field to the sidebar to let users change the interval of the plot (eg 1 min, 15 mins, 1 hour etc) -- read the
binance_klinesdocs - Add a dropdown input field to the sidebar to let users pick the symbol (eg
ETHorBTC) - Make the plot interactive eg with http://jkunst.com/highcharter
See the shiny/highcharter subfolder for a possible solution if you get stuck.
-
Install the
highcharterpackage as a system user:sudo apt-get install r-cran-dplyr r-cran-quantmod r-cran-xml r-cran-tidyr r-cran-igraph r-cran-lubridate r-cran-psych r-cran-broom r-cran-yaml r-cran-htmlwidgets sudo R -e "devtools::with_libpaths(new = '/usr/local/lib/R/site-library', install.packages('highcharter', repos='https://cran.rstudio.com/'))" -
Install Shiny Server:
wget https://download3.rstudio.org/ubuntu-12.04/x86_64/shiny-server-1.5.6.875-amd64.deb sudo gdebi shiny-server-1.5.6.875-amd64.deb -
Edit
site_dirinshiny-server.conf:sudo mcedit /etc/shiny-server/shiny-server.conf sudo systemctl restart shiny-server -
Visit Shiny Server on port 3838 from your browser

-
Always keep logs -- set this in the Shiny Server config & restart service:
preserve_logs true; -
Debug logs
ls -la /var/log/shiny-server
- Look at the
forecastpackage and make predictions on future Bitcoin prices -- visualize on a dashboard - Look at the
knitrorpanderpackages and schedule an HTML e-mail report including an image on the price changes -- refresh what we havelearnedbriefly covered in the DA1 class: https://github.com/daroczig/CEU-R-lab#week-6-100-min-introduction-to-r-markdown-and-shiny
Kill your current box and start a new one using the data-infra-in-prod-R-image AMI that already bundles all above steps:


