Using this library, we have to implement JWT (JSON Web Token) authentication in an ASP.NET Core 3.1 & 5 Web API.
Create a Web Project.
- From the File menu, select New > Project.
- Select the ASP.NET Core Web Application template and click Next.
- Name the project Sol_Demo_WebApi and click Create.
- In the Create a new ASP.NET Core Web Application dialog, confirm that .NET Core and ASP.NET Core 3.1 are selected. Select the API template and click Create.
Add following nuget package in Sol_Demo_WebApi project.
PM> Install-Package JwtAuthAsp.netCore -Version 1.0.1
> dotnet add package JwtAuthAsp.netCore --version 1.0.1
Define user model for passing data between repository and controller and can be used to return http response data from controller action methods
using System;
using System.Collections.Generic;
using System.Linq;
using System.Runtime.Serialization;
using System.Threading.Tasks;

namespace Sol_Demo_WebApi.Models
{
    [DataContract]
    public class UsersModel
    {
        [DataMember(EmitDefaultValue = false)]
        public int? Id { get; set; }

        [DataMember(EmitDefaultValue = false)]
        public String FullName { get; set; }

        [DataMember(EmitDefaultValue = false)]
        public String Role { get; set; }

        [DataMember(EmitDefaultValue = false)]
        public String UserName { get; set; }

        [DataMember(EmitDefaultValue = false)]
        public String Password { get; set; }

	[DataMember(EmitDefaultValue = false)]
        public DateTime DateOfBirth { get; set; }

        [DataMember(EmitDefaultValue = false)]
        public String Token { get; set; }
    }
}Define Jwt secret key in appsetting.json file.
{
  "Logging": {
    "LogLevel": {
      "Default": "Information",
      "Microsoft": "Warning",
      "Microsoft.Hosting.Lifetime": "Information"
    }
  },
  "AllowedHosts": "*",
  "Jwt": {
    "SecretKey": "ju5VAN40SrteigiregslWvgbgkszidVUqyHCe8J0HvGOzA6TOaeyFI2drYEzVXDJgMIwcOPw9gtTA6zCR8lVmc5MNiA5zkGbD2giJgoaTgFds3Nxtx6Pr204kTVUul55FDK2ObxtJCJPG6jPO9fgvMxszVAaXWIJj6Fq2gZNauAfZT3rw5TkDChxsRraP83JmlfGLEzJ"
  }
}
Note: do not use above secret key for production code. you can generate your own secret key using any alpha numeric random string tool. Use following web site for generating random string. https://www.random.org/strings/
The app settings class contains properties defined in the appsettings.json file and is used for accessing application settings via objects that are injected into classes using the ASP.NET Core built in dependency injection (DI) system.
using System;
using System.Collections.Generic;
using System.Linq;
using System.Threading.Tasks;

namespace Sol_Demo_WebApi.Models
{
    public class AppSettingsModel
    {
        public String SecretKey { get; set; }
    }
}The user respository contains a method for authenticating user credentials and returning a JWT token.
using AuthJwt.Generates;
using Microsoft.Extensions.Options;
using Sol_Demo_WebApi.Models;
using System;
using System.Collections.Generic;
using System.Linq;
using System.Threading.Tasks;
using System.Security.Claims;

namespace Sol_Demo_WebApi.Repository
{
    public class UserRepository : IUserRepository
    {
        private readonly IGenerateJwtToken generateJwtToken = null;
        private readonly IOptions<AppSettingsModel> options = null; // Get SecretKey from appsetting.json

        public UserRepository(IGenerateJwtToken generateJwtToken, IOptions<AppSettingsModel> options)
        {
            this.generateJwtToken = generateJwtToken;
            this.options = options;
        }

        async Task<dynamic> IUserRepository.LoginAsync(UsersModel usersModel)
        {
            // Demo Purpose
            string tempFullName = "Kishor Naik";
            string tempUserName = "kishor11";
            string tempPassword = "123";
	    DateTime tempDateOfBirth = new DateTime(1986, 08, 11);
            int? tempId = 1;
            String tempRole = "Admin";

            dynamic data = null;

            // Demo Purpose (Validate Login Credentails from database)
            if (usersModel.UserName == tempUserName && usersModel.Password == tempPassword)
            {
                // Demo Purpose (Id,Role & fullName will get from database)
                usersModel.Id = tempId;
                usersModel.Role = tempRole;
                usersModel.FullName = tempFullName;

                // Add Claims for Authorization and Authentication with Jwt Token
                List<Claim> claims = new List<Claim>();
                claims.Add(new Claim(ClaimTypes.Name, Convert.ToString(usersModel.Id))); // Id Base
                claims.Add(new Claim(ClaimTypes.Role, usersModel.Role)); // Role Base
		claims.Add(new Claim(ClaimTypes.DateOfBirth, usersModel.DateOfBirth.ToString())); // Policy Base

                // Generate Token
                usersModel.Token = await generateJwtToken.CreateJwtTokenAsync(options?.Value?.SecretKey, claims.ToArray(), DateTime.Now.AddDays(1));

                usersModel.Password = null;

                data = usersModel;
            }
            else
            {
                data = new
                {
                    Message = "User Name and Password does not match"
                };
            }

            return await Task.FromResult<dynamic>(data);
        }
    }
}
Define Claims for Authication and Authorization.
// Add Claims for Authorization and Authentication with Jwt Token
                List<Claim> claims = new List<Claim>();
                claims.Add(new Claim(ClaimTypes.Name, Convert.ToString(usersModel.Id))); // Id Base
                claims.Add(new Claim(ClaimTypes.Role, usersModel.Role)); // Role Base
		claims.Add(new Claim(ClaimTypes.DateOfBirth, usersModel.DateOfBirth.ToString())); // Policy Base
Generate Jwt Token
await generateJwtToken.CreateJwtTokenAsync(options?.Value?.SecretKey, claims.ToArray(), DateTime.Now.AddDays(1));CreateJwtTokenAsync method have 3 parameters.
- Pass secret key
- Pass collection of claims
- Pass date and time for auth expiration.
Let suppose you might want to require user to be over 21 to access the api. You have a date of birth claim, you can use this info to define an “Over21Only” policy. To do this, you have to create a “MinimumAgeRequirement” and the handler with the logic to validate if the user is meeting the minimum age requirement.
7.1 Create a Requirement, like this.
public class MinimumAgeRequirement : IAuthorizationRequirement
{
	public MinimumAgeRequirement(int age)
	{
	    MinimumAge = age;
	}

	public int MinimumAge { get; set; }
}
7.2 Create a Handler, like this.
public class MinimumAgeHandler : AuthorizationHandler<MinimumAgeRequirement>
{
	protected override Task HandleRequirementAsync(AuthorizationHandlerContext context, MinimumAgeRequirement requirement)
	{
	    if (!context.User.HasClaim(c => c.Type == ClaimTypes.DateOfBirth))
	    {
		return Task.CompletedTask;
	    }

	    var dateOfBirth = Convert.ToDateTime(context.User.FindFirst(c => c.Type == ClaimTypes.DateOfBirth).Value);

	    var userAge = DateTime.Today.Year - dateOfBirth.Year;

	    if (dateOfBirth > DateTime.Today.AddYears(-userAge))
	    {
		userAge--;
	    }

	    if (userAge >= requirement.MinimumAge)
	    {
		context.Succeed(requirement);
	    }
	    return Task.CompletedTask;
	}
}The ASP.NET Core demo controller defines and handles all routes / endpoints for the api that relate to users, this includes authentication. The controller actions are secured with JWT using the [Authorize] & [AllowAnonymous] attribute.
using System;
using System.Collections.Generic;
using System.Linq;
using System.Threading.Tasks;
using Microsoft.AspNetCore.Authorization;
using Microsoft.AspNetCore.Http;
using Microsoft.AspNetCore.Mvc;
using Sol_Demo_WebApi.Models;
using Sol_Demo_WebApi.Repository;

namespace Sol_Demo_WebApi.Controllers
{
    [Produces("application/json")]
    [Route("api/demo")]
    [ApiController]
    public class DemoController : ControllerBase
    {
        private readonly IUserRepository userRepository = null;

        public DemoController(IUserRepository userRepository)
        {
            this.userRepository = userRepository;
        }

        [AllowAnonymous]
        [HttpPost("login")]
        public async Task<IActionResult> LoginAsync([FromBody] UsersModel usersModel)
        {
            if (usersModel == null) return base.BadRequest();

            var data =
                    await
                        userRepository
                        ?.LoginAsync(usersModel);

            return base.Ok((Object)data);
        }

        [Authorize(Roles = "Admin")]
	[Authorize(Policy = "Over21Only")]
        [HttpPost("dowork")]
        public IActionResult DoWork()
        {
            return base.Ok((Object)"Authorize User");
        }
    }
}The startup class configures the request pipeline of the application and how all requests are handled.
Configure AddJwtToken service and read application setting json file.
public void ConfigureServices(IServiceCollection services)
        {
            services
                .AddControllers()
                .AddJsonOptions((leSetUp) =>
                {
                    // Pascal Casing
                    leSetUp.JsonSerializerOptions.PropertyNamingPolicy = null;

                    // Ignore Json Property Null Value from Response
                    leSetUp.JsonSerializerOptions.IgnoreNullValues = true;
                });

            services.Configure<AppSettingsModel>(Configuration.GetSection("Jwt"));
            var getSecretKey = Configuration.GetSection("Jwt").Get<AppSettingsModel>();

            services.AddJwtToken(getSecretKey.SecretKey,(authOption) =>
                {
                    authOption.AddPolicy("Over21Only", (policy) => policy.Requirements.Add(new MinimumAgeRequirement(21))); // Add Policy Base
                }); // Add Jwt Token Service

            services.AddTransient<IUserRepository, UserRepository>();
        }
Note : Add policy it is an optional.
In Configure method add following middleware for http request pipeline. Note : Add UseJwtToken middleware before UseAuthorization method.
 public void Configure(IApplicationBuilder app, IWebHostEnvironment env)
        {
            if (env.IsDevelopment())
            {
                app.UseDeveloperExceptionPage();
            }

            app.UseRouting();

            app.UseJwtToken(); // Use Jwt Token Middleware

            app.UseAuthorization();

            app.UseEndpoints(endpoints =>
            {
                endpoints.MapControllers();
            });
        }
Full Code of Startup.cs file.
using System;
using System.Collections.Generic;
using System.Linq;
using System.Threading.Tasks;
using AuthJwt.Services;
using JwtAuth.Middlewares;
using Microsoft.AspNetCore.Builder;
using Microsoft.AspNetCore.Hosting;
using Microsoft.AspNetCore.Mvc;
using Microsoft.Extensions.Configuration;
using Microsoft.Extensions.DependencyInjection;
using Microsoft.Extensions.Hosting;
using Microsoft.Extensions.Logging;
using Sol_Demo_WebApi.Models;
using Sol_Demo_WebApi.Repository;

namespace Sol_Demo_WebApi
{
    public class Startup
    {
        public Startup(IConfiguration configuration)
        {
            Configuration = configuration;
        }

        public IConfiguration Configuration { get; }

        // This method gets called by the runtime. Use this method to add services to the container.
        public void ConfigureServices(IServiceCollection services)
        {
            services
                .AddControllers()
                .AddJsonOptions((leSetUp) =>
                {
                    // Pascal Casing
                    leSetUp.JsonSerializerOptions.PropertyNamingPolicy = null;

                    // Ignore Json Property Null Value from Response
                    leSetUp.JsonSerializerOptions.IgnoreNullValues = true;
                });

            services.Configure<AppSettingsModel>(Configuration.GetSection("Jwt"));
            var getSecretKey = Configuration.GetSection("Jwt").Get<AppSettingsModel>();

            services.AddJwtToken(getSecretKey.SecretKey,(authOption) =>
                {
                    authOption.AddPolicy("Over21Only", (policy) => policy.Requirements.Add(new MinimumAgeRequirement(21))); // Add Policy Base
                }); // Add Jwt Token Service

            services.AddTransient<IUserRepository, UserRepository>();
        }

        // This method gets called by the runtime. Use this method to configure the HTTP request pipeline.
        public void Configure(IApplicationBuilder app, IWebHostEnvironment env)
        {
            if (env.IsDevelopment())
            {
                app.UseDeveloperExceptionPage();
            }

            app.UseRouting();

            app.UseJwtToken(); // Use Jwt Token Middleware

            app.UseAuthorization();

            app.UseEndpoints(endpoints =>
            {
                endpoints.MapControllers();
            });
        }
    }
}Run the services and test web api endpoint using Postman tool.
Below are instructions on how to use Postman to authenticate a user to get a JWT token from the api, and then make an authenticated request with the JWT token to retrieve a string from the api.
To authenticate a user with the api and get a JWT token follow these steps:
- Open a new request tab by clicking the plus (+) button at the end of the tabs.
- Change the http request method to "POST" with the dropdown selector on the left of the URL input field.
- In the URL field enter the address to the authenticate route of your local API : http://localhost:51236/api/demo/login
- Select the "Body" tab below the URL field, change the body type radio button to "raw", and change the format dropdown selector to "JSON (application/json)".
- Enter a JSON object containing the test username and password in the "Body" textarea
{
	"userName":"kishor11",
	"password":"123"
}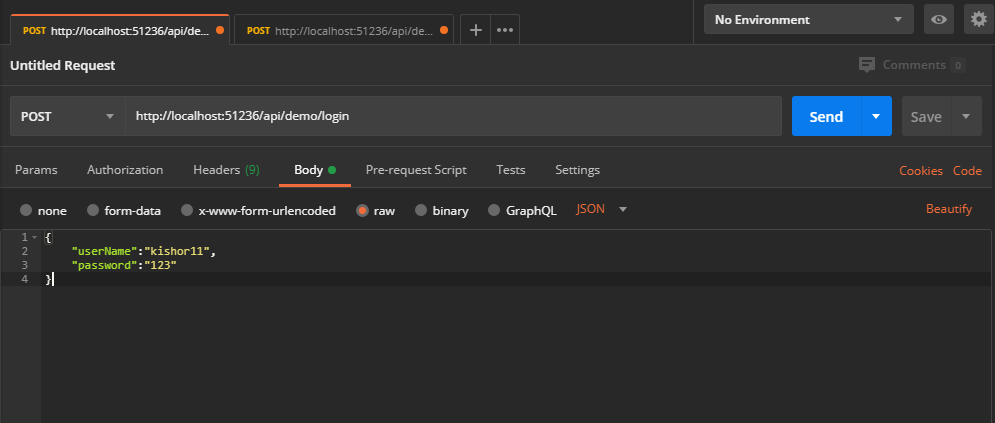
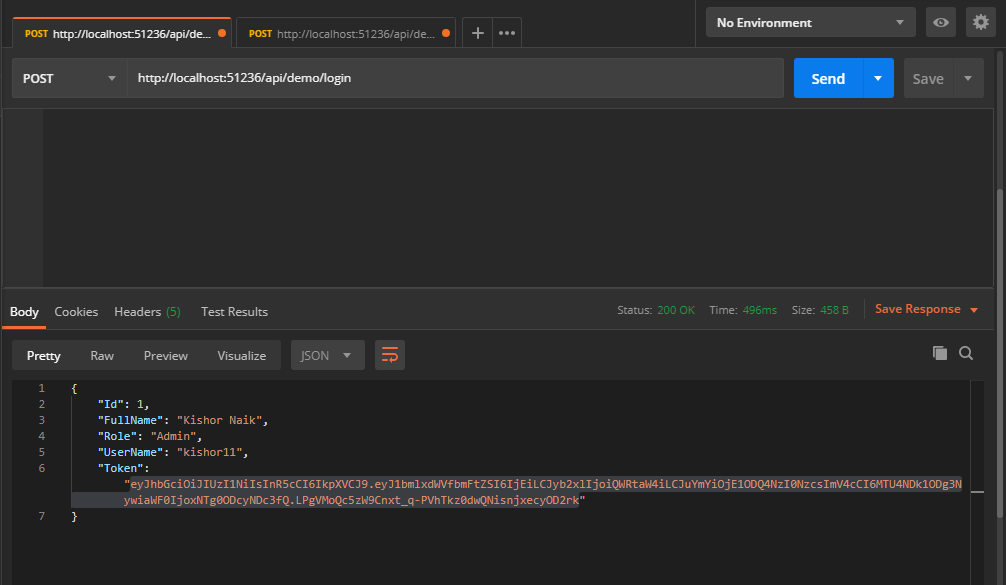
- Click the "Send" button, you should receive a "200 OK" response with the user details including a JWT token in the response body, make a copy of the token value because we'll be using it in the next step to make an authenticated request.
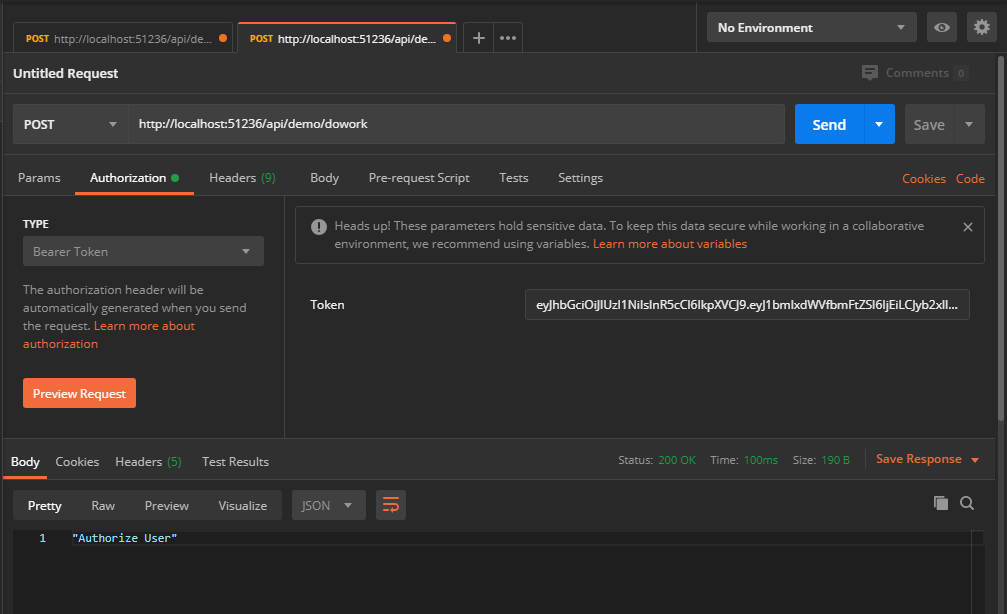
To make an authenticated request using the JWT token from the previous step, follow these steps
- Open a new request tab by clicking the plus (+) button at the end of the tabs.
- Change the http request method to "POST" with the dropdown selector on the left of the URL input field.
- In the URL field enter the address to the users route of your local API: http://localhost:51236/api/demo/dowork
- Select the "Authorization" tab below the URL field, change the type to "Bearer Token" in the type dropdown selector, and paste the JWT token from the previous authenticate step into the "Token" field.
- Click the "Send" button, you should receive a "200 OK" response containing a string.
Finish...
If you want to consume web api in asp.net core project then i will recommend following library. https://github.com/Pathoschild/FluentHttpClient


