H2TC: A Large-Scale Multi-View and Multi-Modal Dataset of Human-Human Throw&Catch of Arbitrary Objects
[Project Page] [Technical Paper] [Dataset] [Sample Cases]
This repository provides tools, tutorials, source codes and supporting documents for the dataset H2TC. For a quick glance at the dataset, we also refer users to the project website and our technical paper. Briefly, it has introduced tools to record, process, and annotate the dataset.
All source codes are available in ./src. It also includes documents and tutotials in in ./docthat explain in detail the data processing, data hierarchy, annotation, and the content of each data file in the dataset.
Simply follow the steps below to run the provided tools from scratch:
- Install the dependencies.
- Fetch the raw data. You have two options to fetch the raw data:
- Process the raw data.
- (Optional) Annotate the processed data with our provided annotator.
To run the tools, some dependencies have to be installed first.
First, the default and well-tested system environment is
- Ubuntu: 20.04
- Python: 3.8.13
- CUDA: 11.6
- Nvidia driver: 510
We have not tested our codes on other systems yet, so it is recommended to configure the same, or at least a similar environment for the best experience.
To run the data processor, install two more applications
- spd-say: text-to-voice converter.
- ffmpeg: video decoder
They can be installed, if not have, using apt:
sudo apt update
// install spd-say
sudo apt install speech-dispatcher
// install ffmpeg
sudo apt install ffmpegThe Python dependencies can be installed automatically via pip:
pip install -r requirements.txtOur recording framework employs three ZED stereo cameras, one Prophesee event camera, a pair of StretchSense MoCap Pro (SMP) Gloves, Optitrack and other streaming sensors. Therefore, their SDK tools need to be installed to record and process the dataset.
You need to install ZED SDK (3.7.6) and Metavision SDK (2.3.0) following the official guidance, so as to use the ZED stereo camera and the Prophesee event camera to record and process the data respectively.
For user's convenience of installing the specific version (3.7.6) of ZED SDK, we fetch the installer from the official repository and save it in ./dev/ZED_SDK_Installer. All you need is to download the SDK installer, run it and select the modules you prefer following the official guides.
Metavision SDK is not packaged in an installer way, so you will have to follow the official guides to install it. Particularly, Metavision SDK provides multiple optional modules. Our tool uses only the functionality from the metavision-essentials, but you are free to install other modules or not.
Now you should be able to launch the event recorder with the following command if your Prophesee event camera is well connected to the computer:
metavision_viewerYou should also be able to test the connection of ZED cameras by running the official samples.
If you do not have a camera or do not intend to record your own dataset, you can simply check if the modules pyzed and metavision_core can be successfully imported by your python program. They will be used only for post processing of the raw data by our dataset.
Our recorder integrates the functionality of recording with multiple devices and organizing the recorded contents in a hierarchical manner. To collect data with our provided recorder, simply follow the steps below:
Step 1: Enable all recording devices.
- The ZED and Prophesee event cameras should be wired to a host Ubuntu (20.04) machine, where the recorder program is supposed to run.
- StretchSense MoCap Pro gloves should be connected to a separate Windows machine with its official client software Hand Engine (HE) running on the same machine.
- The OptiTrack server can be launched either on a separate host, or on any of the two aforementioned clients. You may need to configure the firewall on each machine to enable the User Datagram Protocol (UDP) communication.
Step 2: Update the configuration of OptiTrack NatNet client in ./src/natnet_client/src/example_main.cpp,
and then rebuild it by following our tutorial. Briefly, you need to configure the OptiTrack server IP address (char* ip_address), the recorder IP address (servaddr.sin_addr), and the recorder port (PORT) according to your own network setting.
cd ./src/natnet_client
mkdir build
cd build
cmake ..
make
Step 3: Initialize your lists of human subjects and objects in /register/subjects.csv and /register/objects.csv respectively. Each subject and object should lie in a sperate line. Please refer to the sample lists in our repository for a detailed format.
Step 4: Launch the main recorder with the IP and Port of the local machine and of the HE application
python src/recorder.py --addr IP:PORT --he_addr IP:PORT There are also some other arguments to configure the recorder optionally:
| Arguments | Meanings | Defaults |
|---|---|---|
| addr | IP address and port of the current machine for UDP | 10.41.206.138:3003 |
| he_addr | IP address and port of the Hand Engine machine for UDP | 10.41.206.141:30039 |
| length | Time duration (s) of each recording | 5 |
| nposition | Number of the initial standing locations/cells for subjects | 16 |
| clients | Clients allowed to communicate | ['optitrack'] |
| zed_num | Number of ZED cameras for recording | 3 |
| fps | FPS of ZED recording | 60 |
| resolution | Resolution of ZED | 720p |
| tolerance | Frame drop tolerance | 0.1 |
And then run the NatNet client in another terminal:
./src/natnet_client/build/natnet_client Now you should be able to see a prompt indicating that two machines have successfully communicated with each other, if everything goes well.
Step 5: Follow the interactive instructions prompted in the terminal by the main recorder to perform a recording. The main recorder will automatically communicate with and command Hand Engine and NatNet client to record multiple data modalities in a synchronous manner. Nevertheless, we do recommend you to regularly check Hand Engine and the NatNet client to see if they break.
The data processor synchronizes and converts the raw captured data into the processed data of commonly used formats, and organizes them in a hierarchical manner. Using the tool, users can easily
- Process the raw data into the formats as detailed in the table below, or
- Process the raw data into other preferred formats by modifying the provided tool.
Table 1. Data modalities and their saving formats in H2TC
| Device | Raw | Processed | ||
| Data | File | Data | File | |
| ZED | Left- and right-eye RGB videos | .SVO | RGB images | .PNG |
| Depth maps (unnormalized) | .NPY | |||
| Depth images (normalized) | .PNG | |||
| Event | Binary events in EVT3.0 format | .RAW | Events (x, y, p, t) | .CSV |
| Sensor setting for recording | .BIAS | Event images | .JPG | |
| MoCap Pro | Sensor' reading and hand joint angles | .CSV | Hand joint motion | .CSV |
| Hand calibration parameters | .CAL | |||
| 3D animation visualization | .FBX | |||
| Metadata of the recording | .JSON | |||
| OptiTrack | Local and global transformatiom matrices | .CSV | 6D global motion in the throw&catch frame | .CSV |
We refer users to the data processing for full technical details on how we process the multi-modal and cross-device raw data, and to the data file explanation and our technical paper for a detailed introduction of the data hierarchy and the content of each involved data file.
You can access all raw data from Dropbox . The raw data of each recorded throw&catch activity is packed in a .zip file. First download the raw data to your own folder raw_data_path
raw_data_path
└──011998.zip           // 011998 is the take number
We provide a scripted extrator to unzip the packed raw data and also to organize all raw files in a suitable data hierarchy, as mentioned before. Run the following command below to extract the raw data to your target path target_path:
python src/extract.py --srcpath raw_data_path --tarpath target_path
--srcpath is where you download and save the packed raw files. --tarpath is the target path where you expect to save the extracted raw data files.
Each extracted zip file will be organized in a hierarchical structure under the folder target_path/data. For example, the raw data files of the recording "011998" will be organized as below
target_path
└──data
    └──011998
        ├──hand
        │   ├──P1L.csv / P1R.csv
        │   ├──P1LMeta.json / P1RMeta.json
        │   ├──P1L.cal/P1R.cal
        │   └──P1L.fbx/P1R.fbx
        ├──{zed-id}.svo
        ├──{zed-id}.csv
        ├──event_{timestamp}.raw
        ├──event.bias
        └──optitrack.csv
{zed-id} indicates and includes three involved ZED devices, including 17471, 24483054 and 28280967, which are the fixed third-person (side), the dynamic egocentric and the fixed third-person (back) respectively. {timestamp} is the initial timestamp of the event camera in the UNIX format. A detailed explanation of the data hierarchy and the content of each raw data file is provided in data file explanation.
Once the raw data is extracted and organized appropriately, run the following command
python src/process.py --datapath target_path/data--datapath is where the extracted raw data files are saved. There are also some other arguments that are allowed to configure the processor optionally
| Arguments | Meanings | Defaults |
|---|---|---|
| takes | The id(s) of recording(s) to be processed. Set 'None' to process all recordings in the data directory. This can be given with a single integer for one take, or with a range linked by '-' for a sequence of consecutive recordings, e.g. '10-12' for the recordings {000010, 000011, 000012}. |
None |
| fps_event | FPS for decoding event stream into image frames. | 60 |
| fps_zed | FPS for decoding ZED RGB-D frames. This should be equal to the value used in recording. | 60 |
| duration | The duration of recording in seconds. | 5 |
| tolerance | The tolerance of frame drop in percentage for all devices. | 0.1 |
| depth_img_format | The image format of the exported RGB-D frames for ZED cameras. Either 'png' or 'jpg'. | png |
| xypt | Set True to export event stream in the .xypt format, which is the raw format of events. |
False |
| npy | Set True to export depth stream in the .npy format, which is 3-dimensional numpy arrary holding the unnormalized depth estimation of each frame. |
False |
| depth_accuracy | The float precision for the unnormalized depth maps. The depth maps are not exported by default until the flag 'npy' is set to True. Either 'float32' or 'float64'. |
float32 |
| datapath | The directory of raw data files that needs to specify. | None |
You can change the default settings by adding more arguments into your command. For example, we do not export the depth depth.npy and the event xypt.csvfiles by default (i.e. xypt and npy are set False by default), as they are time/space-consuming. If you need them, simply attach --npy and --xypt to the command:
python src/process.py --datapath target_path/data --npy --xyptOnce the data processing is done, as shown below, the raw data files will be moved into a new directory target_path/data/raw/, and the processed data files will be stored in the directory target_path/data/processed/.
target_path
└──data
    └──011998
        ├──raw              // all raw data as above
        │ └──......
        └──processed        // all processed data
            ├──rgbd1/rgb2/rgb3
            │    ├──left_frame_id.png
            │    ├──depth_frame_id.png
            │    └──depth.npy
            ├──event
            │    └──frame_id.png
            ├──rgb1_ts/rgb2_ts/rgb3_ts.csv
            ├──event_xypt.csv
            ├──event_frame_ts.csv
            ├──left_hand_pose.csv
            ├──right_hand_pose.csv
            ├──sub1_head_motion.csv
            ├──sub1_left_hand_motion.csv
            ├──sub2_head_motion.csv
            ├──object.csv
            └──alignment.json
The data hierarchy and the content of each processed data file are explained in detail in data file explanation and our technical paper.
If you want to customize the processing process, please:
- First follow the Steps 1 and 2 in How to Process to fetch the organized raw data.
- Then in Step 3, customize your own processing process by diving into the full technical details in the data processing. This document explains how we process the multi-modal, cross-device data streams.
If you want to reprocess the processed takes, you will have to manually remove their entir folders first. If you only want to reprocess part(s) of a take, e.g. RGB and depth streams, you just need to remove their corresponding files (folders).
The current mechanism allows for maximally 10 failed attempts to decode (or grab in ZED term) a ZED RGB-D frame. Once the decoding process fails for more 10 times, it will abort and the data processing will continue to the next part, e.g. the next ZED device or the next stream modality. Those frames that have already been decoded will be stored, while the rest frames will be ignored. This issue usually happens to decode the last frame.
To fix this issue, one can simply reprocess the problematic takes via reprocess the processed take as above.
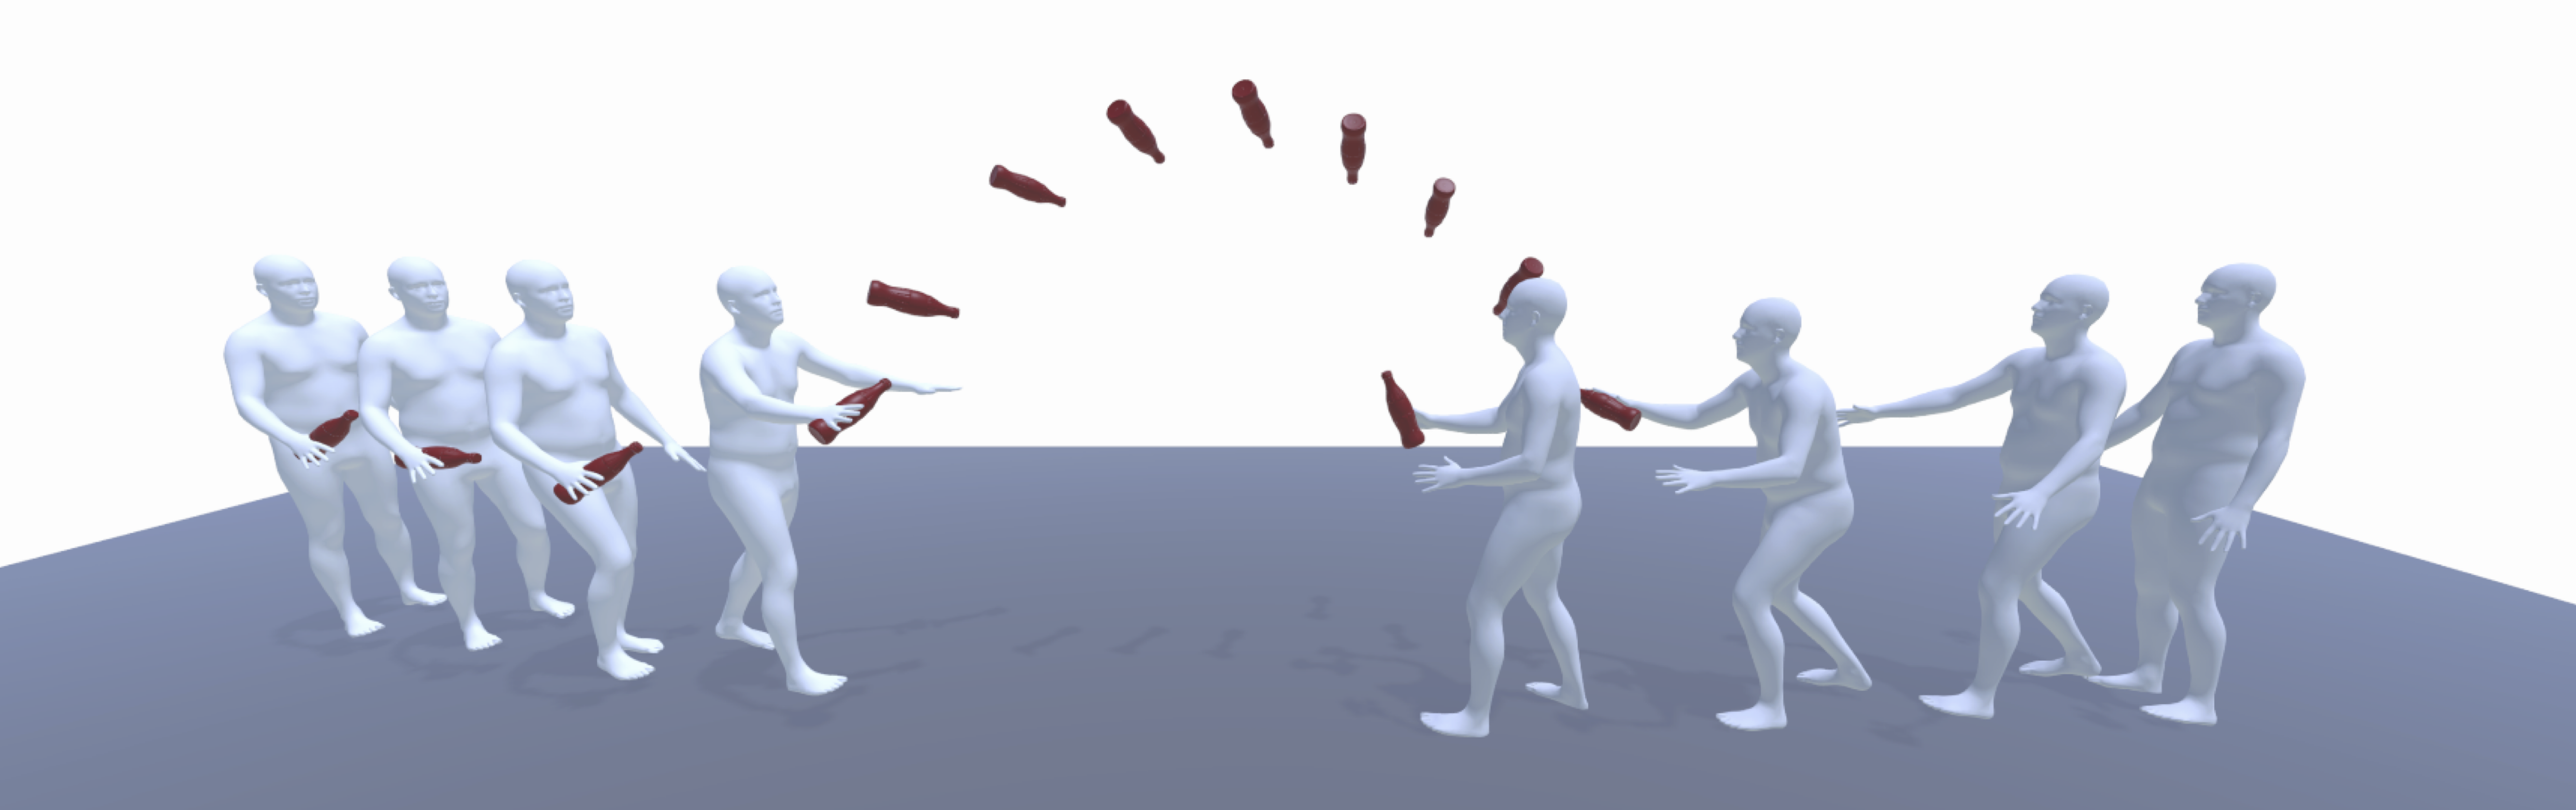
The dataset is provided with a hierarchy of segmentation and annotations, both semantic and dense. Briefly, each recorded throw&catch activity in H2TC is segmented into four phases, including pre-throwing, object flying, catching and post-catching, with three manually annotated moments including throw, catch_touch and catch_stable.

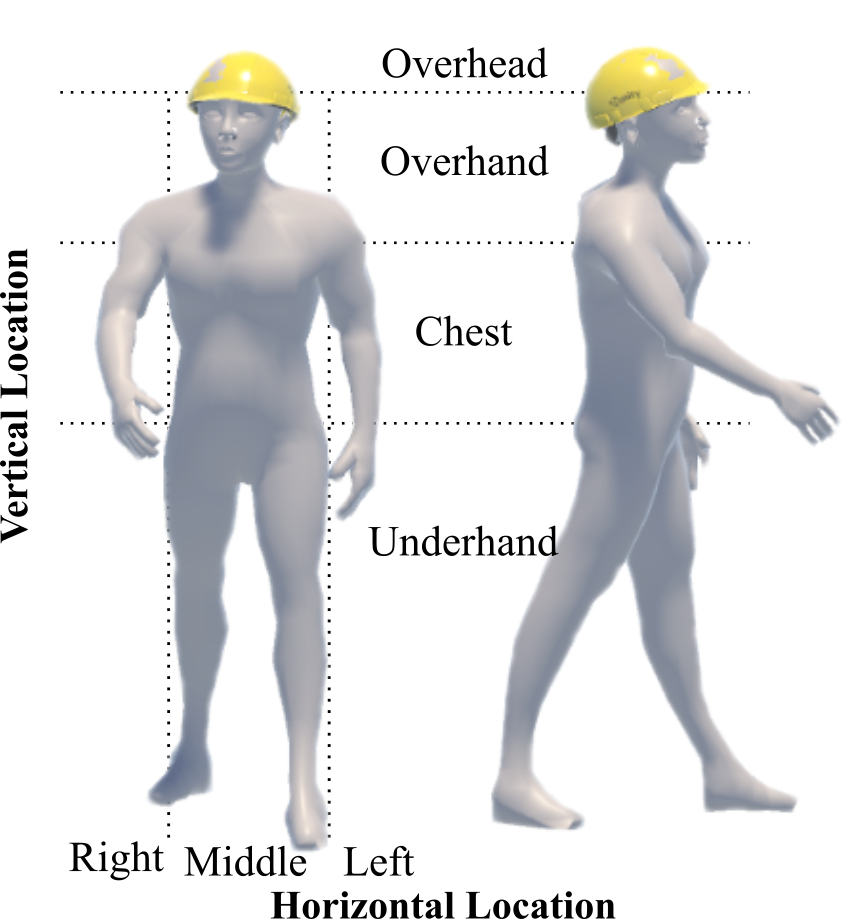
The subjects' behaviors are manually checked and annotated with symbolic labels in terms of grasp mode and hand locations (as shown schematically below). The subjects' exact initial standing locations and the average flying speed of the object are also automatically annotated as quantitative labels.
The complete annotation hierarchy is detailed below:
| Name | Description | Value | Labeling Type |
| Object | The thrown object | 'object\_id' | automatic |
| Throw | The moment when the subject's hand(s) breaks with the thrown object during throwing | UNIX timestamp | manual |
| - Grasp mode | The subject's grasp mode to throw the object at the "throw" moment | {'left', 'right', 'both' } | manual |
| - Throw vertical | The vertical location(s) of the subject's hand(s) to throw the object at the "throw" moment | {'overhead', 'overhand', 'chest', 'underhand' } | manual |
| - Throw horizontal | The horizontal location(s) of the subject's hand(s) to throw the object | {'left', 'middle', 'right' } | manual |
| - Catch vertical | The vertical location(s) of the subject's hand(s) to catch at the "throw" moment | {'overhead', 'overhand', 'chest', 'underhand' } | manual |
| - Catch horizontal | The horizontal location(s) of the subject's hand(s) to catch at the "throw" moment | {'left', 'middle', 'right' } | manual |
| - Throw location | The subject's exact body location to throw at the "throw" moment | (x, z) | automatic |
| - Catch location | The subject's exact body location to catch at the "throw" moment | (x, z) | automatic |
| Catch_touch | The moment when the subject's hand(s) first touches the flying object during catching | UNIX timestamp | manual |
| - Catch location | The subject's exact location to catch the object at the "catch_touch" moment | (x, z) | automatic |
| - Object speed | The object's average speed during free flying | m/s | automatic |
| Catch_stable | The moment when the subject catches the flying object stably during catching | UNIX timestamp | manual |
| - Grasp mode | The subject's grasp mode to catch the object at the "catch_stable" moment | {'left', 'right', 'both' } | manual |
| - Vertical location | The vertical location(s) of the subject's hand(s) to catch the object at the "catch_stable" moment | {'overhead', 'overhand', 'chest', 'underhand' } | manual |
| - Horizontal location | The horizontal location(s) of the subject's hand(s) to catch at the "catch_stable" moment | {'left', 'middle', 'right' } | manual |
| - Catch result | The result on whether the object is stably catched by the subject | {'success', 'fail'} | manual |
In case you want to annotate our dataset and your custom-captured data,
we provide an annotator, with which one can easily annotate catch&throw activities via an interactive interface.
To use the annotator, please follow the steps below:
-
Step 1: Process and store all raw data in the directory
YOUR_PATH/data/take_id/processed. The raw data processing can be achieved as suggested previously in data processing. -
Step 2: Run the following command to launch the annotation tool.
python src/annotate.py --datapath YOUR_PATH/data
There are some other arguments allowed to configure the annotation optionally:
| Arguments | Meanings | Defaults |
|---|---|---|
| takes | The take ids to be annotated. Set None to annotate all takes in the 'data' directory. This can be given with a single integer number for one take or with a range linked by '-' for consecutive takes, e.g. '10-12' for takes [000010, 000011, 000012]. | None |
| review | Set true to review the takes have been already annotated before. By default (False), the annotated takes will not be displayed for annotation again. | False |
| datapath | The directory of processed data. Users need to specify it. | None |
Once running the above command, an interactive prompt interface will appear excluding the orange bars (they are figure annotations).

The interface displays multi-view RGB (left column), depth (middle column), egocentric event (top right sub-window), and hand motion (middle right sub-window) streams. Annotators can check synchronized streams frame by frame via the keyboard (left arrow and right arrow respectively).
The interface also provides an information panel (bottom right sub-window), which allows annotators to annotate the streams with keyboard and display the annotation result in real-time.
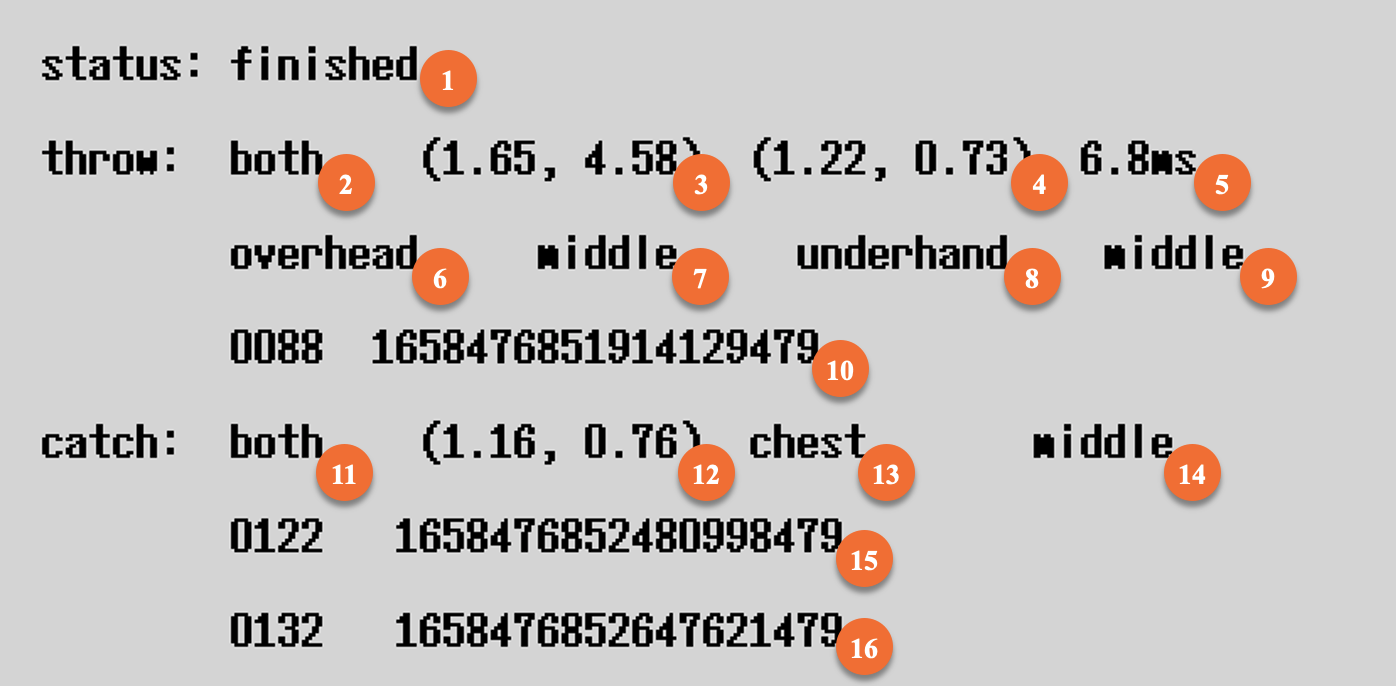
Each entry in the information pannel corresponds to an annotation, as described above,
| Number | Representation | Annotation Name |
|---|---|---|
| 1 | The status of the annotation: finished, unfinished or problematic |
\ |
| 2 | The grasp mode used to throw at the throw moment | Grasp mode |
| 3 | The exact body location of the thrower at the throw moment | Throw location |
| 4 | The exact body location of the catcher at the throw moment | Catch location |
| 5 | The average flying speed of the thrown object | Object speed |
| 6 | The vertical hand location of the thrower at the throw moment | Throw vertical |
| 7 | The horizontal hand location of the thrower at the throw moment | Throw horizontal |
| 8 | The vertical hand location of the catcher at the throw moment | Catch vertical |
| 9 | The horizontal hand location of the catcher at the throw moment | Catch horizontal |
| 10 | The frame number and the timestamp of the moment throw | \ |
| 11 | The grasp mode used to catch at the catch (stable) moment | Grasp mode |
| 12 | The exact body location of the catcher at the catch (touch) moment | Catch location |
| 13 | The vertical hand location of the catcher at the catch (stable) moment | Vertical location |
| 14 | The horizontal hand location of the catcher at the catch (stable) moment | Horizontal location |
| 15 | The frame number and the timestamp of the moment catch (touch) | \ |
| 16 | The frame number and the timestamp of the moment catch (stable) | \ |
Annotators can manually interact with the interface to select semantic labels with the keyboard as defined below, while the dense labels, e.g. the object speed and subject locations, will be automatically annotated by the interface. Any modification to the annotation result will be immediately saved in the corresponding annotation file YOUR_PATH/annotations/take_id.json.
| Key value | Operation |
|---|---|
| "right arrow" | Next frame of the currently annotated recording |
| "left arrow" | Last frame of the currently annotated recording |
| "down arrow" | Next recording to annotate |
| "up arrow" | Last recording that has been annotated |
| "return" | Take the current frame as a moment of throw, catch_touch, and catch_stable in order |
| "del" | Remove the last annotated moment |
| "Q" | Switch and select the value of panel 2 (Grasp mode) among left, right, and both |
| "A" | Switch and select the value of panel 6 (Throw vertica) among overhead, overhand, chest, and underhand |
| "S" | Switch and select the value of panel 7 (Throw horizontal) among left, middle, and right |
| "D" | Switch and select the value of panel 8 (Catch vertical) among overhead, overhand, chest, and underhand |
| "F" | Switch and select the value of panel 9 (Catch horizontal) among left, middle, and right |
| "Z" | Switch and select the value of panel 11 (Grasp mode) among left, right, and both |
| "C" | Switch and select the value of panel 13 (Vertical location) among overhead, overhand, chest, and underhand |
| "V" | Switch and select the value of panel 14 (Horizontal location) among left, middle, and right |
| "space" | Switch and select the value of panel 1 (annotation status) between finished and unfinished |
| "backspace" | Switch and select the value of panel 1 (annotation status) between problematic" and unfinished |
We suggest that users rely mainly on the third-person (side) and egocentric views to annotate.The third-person (back) view can be used as an auxiliary, when significant occlusion happens in the former two views.
The viewing angle of the egocentric camera is higher than the normal height of human eyes,resulting in a top-down viewing angle. This may lead to a biased observation of the vertical hand location. You can use the third-person (back) view to provide additional information.
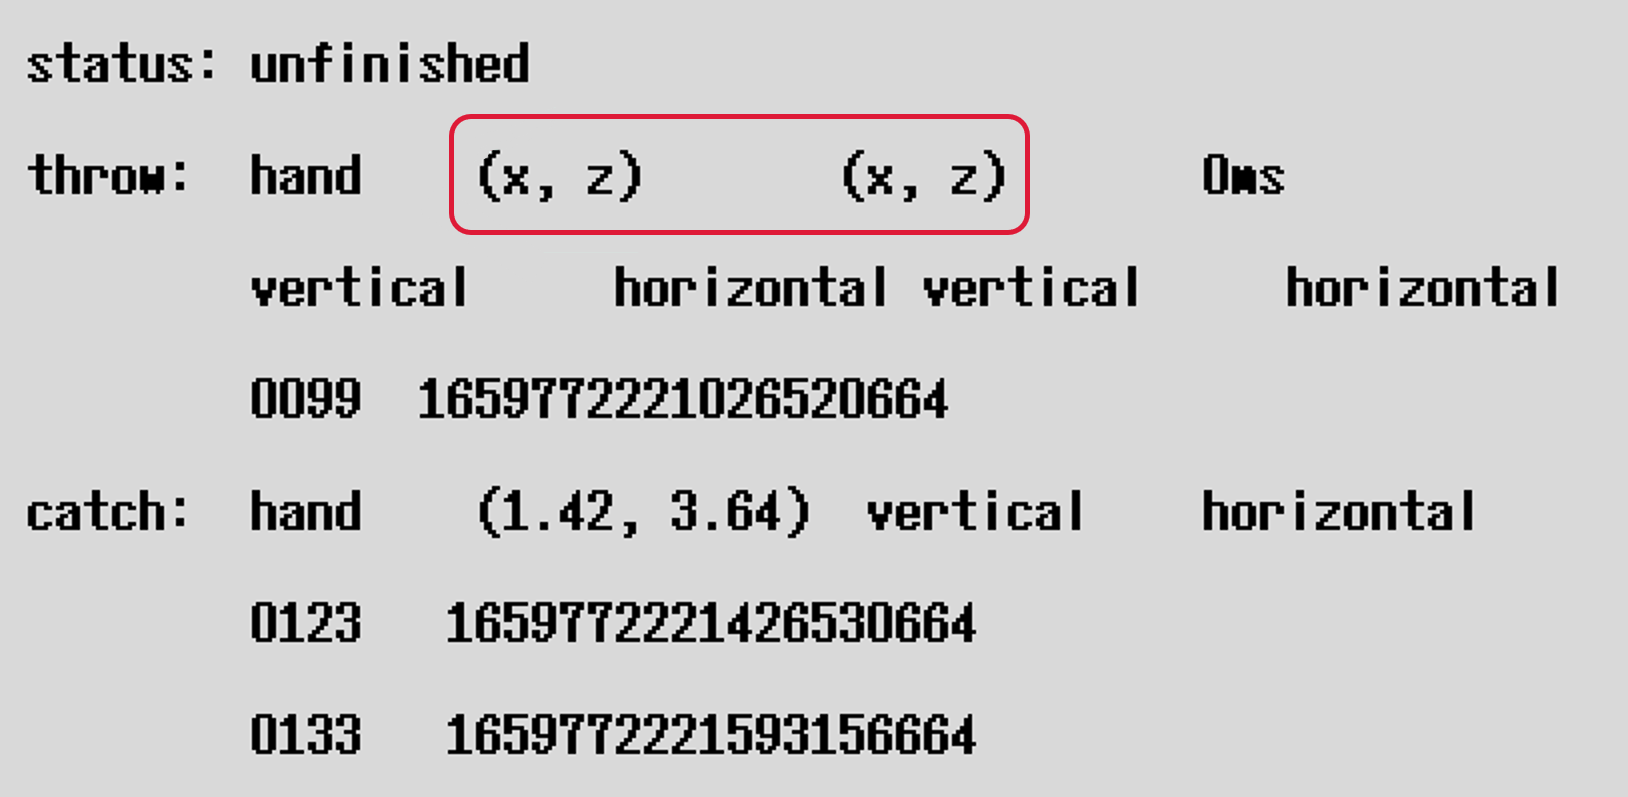
It is possible that some data is missing in your labeled frame. Then the annotation can not be switched to the status of "finished" due to the missing data.
For example, when you label the throw moment and if there is no OptiTrack data, the information panel appears like below. To handle the issue, you should seek closer frames that include complete data and indicate the same event of the moment. If no frame is qualified, the entire take should be annotated as "problematic" and skip to the next take.