

Docker images for Chaste


- Install Docker
docker run -it --init --rm -v chaste_data:/home/chaste chaste/release- GL HF! ;)
ℹ️ To easily share data between the Docker container and the host e.g. the
testoutputdirectory, a bind-mount argument can be added to the command:-v /host/path/to/testoutput:/home/chaste/testoutput. See the instructions on mounting host directories for further details.
Docker is a lightweight virtualisation technology allowing applications with all of their dependencies to be quickly and easily run in a platform-independent manner. This project provides an image containing Chaste (and some additional scripts for convenience) which can be launched with a single command, to provide a portable, homogeneous computational environment (across several operating systems and countless hardware configurations) for the simulation of cancer, heart and soft tissue.
Docker lets you build and run a computational environment from a plaintext Dockerfile. This is analogous to compiling an executable file from source code (equivalent to using docker build to produce an image from a Dockerfile) and then executing it as a running program (akin to using docker run to run a container). The steps of this analogy are illustrated in the figure below from Nüst et al. 2020.
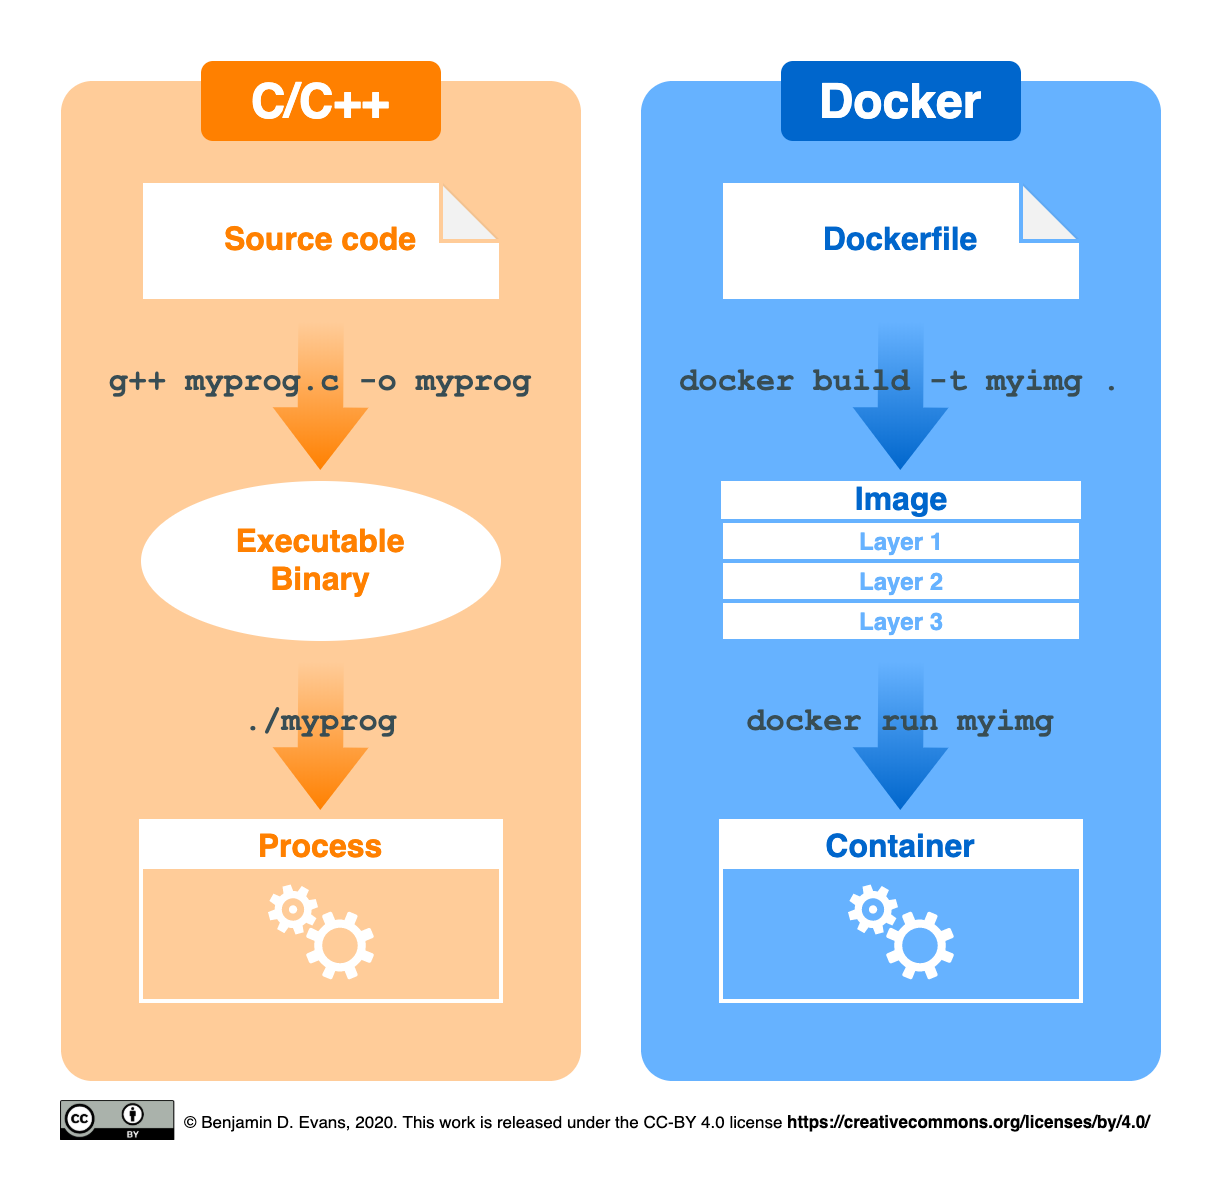
Docker container analogy
More generally, Docker also has an image registry which stores prebuilt images: https://hub.docker.com/. Users may upload images from their own computer (with docker push) and download those from others (e.g. with docker pull) including official dockerised applications (e.g. Python and WordPress) as well as base images (e.g. Ubuntu and Alpine) to build upon for creating your own images. The wider Docker ecosystem is illustrated below.

Docker ecosystem schematic
Some slides from a workshop introducing Docker and how to use this Chaste image can be found here.
Install Docker and configure it to have at least 4GB of RAM and as many cores as you have (more than four cores will need more RAM). On Linux all available RAM and processing cores are shared by default.
If you use macOS you may need to configure the preferences to increase the available RAM and share any additional areas of the hard disk.
For Windows you may be prompted to install Hyper-V, in which case do so. Next configure the preferences to increase RAM and select which local drives should be available to containers (e.g. the C: drive). On Windows, it is also recommended that you install git for tracking changes in your projects and to enable you to build the Docker image directly from GitHub if required. It is recommend to use PowerShell on Windows as a more powerful alternative to the Command Prompt. Optionally, PowerShell can be further enhanced with the modules posh-docker and posh-git which enable tab completion for docker and git commands respectively. Docker command completion can also be configured for macOS.
⚠️ If you don't increase the amount of available RAM from the default 2GB then compilation will fail with strange errors!
If you're a Chaste user and want to get up and running with the latest release fully compiled and ready to go, after installing and configuring Docker simply run:
docker run -it --init --rm -v chaste_data:/home/chaste chaste/release
This should present you with a bash prompt within an isolated Docker container with all the dependencies and pre-compiled code you need to start building your own Chaste projects. If needed, you can also "tag" the image name with chaste/release:tagname to pull a particular release e.g. chaste/release:2019.1 rather than the latest version (see other options here). If you don't already have a project, just use the provided script new_project.sh to create a project template in ~/projects as a starting point. Many tutorials for projects can be found here: https://chaste.cs.ox.ac.uk/trac/wiki/UserTutorials.
Once you have a project ready to build, use the script build_project.sh <TestMyProject> c (replacing <TestMyProject> with the name of your project) and you will find the output in ~/testoutput (the c argument is only necessary when new files are created). If you wish to mount your projects and testoutput directories from the host to make them more easily accessible (recommended), see the instructions and accompanying table on bind-mounting them below.
If you're a Chaste developer and want to build your own image with a particular code branch, make sure you have Docker up and running then read on!
-
Build the Chaste image:
- From the latest commit on Chaste's GitHub
developbranch:docker build -t chaste --build-arg TAG=develop https://github.com/chaste/chaste-docker.git - Alternatively a specific branch or tag may be specified through the argument
--build-arg TAG=<branch/tag>(with the same tag appended onto the docker image name for clarity) e.g.:docker build -t chaste:release_2019.1 --build-arg TAG=release_2019.1 https://github.com/chaste/chaste-docker.git - Finally, if you want a bare container ready for you to clone and compile your own Chaste code, pull a
baseimage withdocker pull chaste/base(tagging with a specific Ubuntu distribution if desired e.g.chaste/base:eoan) Alternatively, build a fresh image by running the following command (omitting the--build-arg TAG=<branch|tag>argument above, or explicitly passing--build-arg TAG=-, which will skip compiling Chaste within the image):(When the container is running you may then editdocker build -t chaste https://github.com/chaste/chaste-docker.gitbuild_chaste.shin thescriptsdirectory to configure the process with your own options before executing it.)
- From the latest commit on Chaste's GitHub
-
Launch the container:
docker run -it --init --rm -v chaste_data:/home/chaste chaste(Or run
docker run -it --init --rm -v chaste_data:/home/chaste chaste:release_2019.1if you tagged your image name as above.) The first time will take a little longer than usual as the volume has to be populated with data. For information on accessing the contents of this volume, see below.
Once the container has successfully launched, you should see a command prompt a bit like this:
chaste@301291afbedf:~$
In here you can build and test your projects without interfering with the rest of your system. You may also find it useful to open another terminal and run docker stats so you can see system resource usage for your running containers. When you are finished with the container, simply type exit to close it. Any changes made in /home/chaste will persist when you relaunch a container, however if the container is deleted, everything else (e.g. installed packages, changes to system files) will be reset to how it was when the image was first used.
Once launched, the container will start in the chaste user's home directory at /home/chaste with the following structure:
.
|-- lib
|-- projects -> /home/chaste/src/projects
|-- scripts
|-- src
`-- testoutput
These folders contain the following types of data:
lib: precompiled Chaste binaries and librariesprojects: a symlink to/home/chaste/src/projectsfor user projectsscripts: convenience scripts for creating, building and testing projectssrc: the Chaste source codetestoutput: the output folder for the project testing framework (set with$CHASTE_TEST_OUTPUT)
Corresponding environment variables are also set as follows:
CHASTE_DIR="/home/chaste"CHASTE_BUILD_DIR="${CHASTE_DIR}/lib"CHASTE_PROJECTS_DIR="${CHASTE_DIR}/src/projects"CHASTE_SOURCE_DIR="${CHASTE_DIR}/src"CHASTE_TEST_OUTPUT="${CHASTE_DIR}/testoutput"
If required, the CHASTE_DIR path can be changed at buildtime with a build arguemnt e.g. --build-arg CHASTE_DIR=/path/to/alternative which will then set the other directories relative to that path.
Any changes made in the home folder (/home/chaste) will persist between restarting containers as it is designated as a VOLUME. Additionally, specific folders may be mounted over any of these subfolders, for example, to gain access to the test outputs for visualising in ParaView or for mounting a different version of the Chaste source code. In general, data should be left in a (named) volume, as file I/O performance will be best that way. However, bind mounting host directories can be convenient e.g. for access to output files and so is explained next.
⚠️ Docker containers are ephemeral by design and no changes will be saved after exiting (except to files in volumes or folders bind mounted from the host). The contents of the container's home directory (including the Chaste source code and binaries) are stored in a DockerVOLUMEand so will persist between container instances. However if you reset Docker, all volumes and their contained data will be lost, so be sure to regularly push your projects to a remote git repository!
Any host directory (specified with an absolute path e.g. /path/to/testoutput) may be mounted in the container e.g. the testoutput directory. Alternatively, navigate to the folder on the host which contains these directories e.g. C:\Users\$USERNAME\chaste (Windows) or ~/chaste (Linux/macOS) and use $(pwd)/testoutput instead as shown below. The image name (final argument) is assumed to be chaste rather than e.g. chaste/develop or chaste/release:2019.1 for simplicity. The exact form of the command depends upon which OS (and shell) you are using:
| Operating System | Command |
|---|---|
| Linux & macOS (*nix) | docker run -it --init --rm -v chaste_data:/home/chaste -v $(pwd)/testoutput:/home/chaste/testoutput chaste |
| Windows (PowerShell [2]) | docker run -it --init --rm -v chaste_data:/home/chaste -v ${PWD}/testoutput:/home/chaste/testoutput chaste |
| Windows (Command Prompt) | docker run -it --init --rm -v chaste_data:/home/chaste -v %cd%/testoutput:/home/chaste/testoutput chaste |
ℹ️ On macOS and Windows (but not Linux), reading and writing files in bind mounts from the host have a greater overhead than for files in Docker volumes. This may slow down simulations where there is a lot of File I/O in those folders (e.g.
testoutput), so bind mounts should be used sparingly in such scenarios. A faster alternative would be to leave the files in a volume and usedocker cpto copy them out at the end of the simulation.
This image is set up to store the Chaste source code (along with compiled libraries and scripts) in a Docker volume as this is the recommended mechanism for data persistence and yields the best File I/O performance across multiple platforms.

Docker mount options
One drawback of this type of mount is that the contents are more difficult to access from the host. While most users will not need direct access to the contents of the volume, it can be convenient for searching and editing the Chaste source files with your favourite code editor. Some possible solutions are provided below.
We recommend using VS Code with the "remote development" plugin which allows the files within a container to be directly accessed and edited as if they were on the host system. Simply start the container with the command given then in VS Code select "Remote-Containers: Attach to Running Container..." then choose the chaste-docker container (which will have a random name unless you launch it by adding --name <name> to the run command). Finally open the folder /home/chaste with the built-in file browser and you will be able to assess the files and directories described above.
Alternative approaches [click to expand]
On a Linux host, the chaste_data volume contents may be directly accessed at /var/lib/docker/volumes/chaste_data/_data. A symlink can me made for easier access in the present working directory:
ln -s /var/lib/docker/volumes/chaste_data/_data chaste_data
The situation is less straightforward for Windows and macOS [1] hosts due to the intermediary Linux virtual machine (Moby based on Alpine Linux) in which images, containers and volumes are stored.
-
For more extensive changes, files may be copied out of the volume, edited on the host, then copied back in with
docker cp. For example use the following commands to copy the whole folder, where the container has been labelledchastewith thedocker runargument--name chaste:docker cp chaste:/home/chaste/src . < Make changes to the source files here > docker cp src/. chaste:/home/chaste/src -
For more sustained Chaste development, you may wish to use another bind mount to overlay the volume's
~/srcfolder with a host directory containing the Chaste source code e.g.-v /path/to/chaste_code:/home/chaste/src. Chaste may then need to be recompiled within the container withbuild_chaste.sh <branch/tag>or if you already have the code in the mounted host folder, cloning can be skipped before recompiling withbuild_chaste.sh .. This will make the same source files easily accessible on both the host and within the Docker container, avoiding the need to copy files back and forth. This may result in slower I/O than when stored in a Docker volume, however this problem may be ameliorated on macOS with thedelegatedoption e.g.--mount type=bind,source="$(pwd)"/chaste_code,destination=/home/chaste/src,consistency=delegated. -
Alternatively, use the utility
docker-sync: http://docker-sync.io/. This works on OSX, Windows, Linux (where it maps on to a native mount) and FreeBSD.
To edit the Chaste code (in ~/src), nano is installed in the image for convenience when small tweaks need to be made, along with git for pushing the changes.
To check Chaste compiled correctly you may wish to run the continuous test pack from the CHASTE_BUILD_DIR directory:
ctest -j$(nproc) -L Continuous
The script test.sh (in /home/chaste/scripts) is provided in the users's path for convenience.
The following test can be run separately to quickly check the build environment and installed dependencies available to chaste:
ctest --verbose -R TestChasteBuildInfo$
For more information on testing see: https://chaste.cs.ox.ac.uk/trac/wiki/ChasteGuides/CmakeBuildGuide.
If you want to use a package which is not installed within the image, you can install it with the command:
sudo apt-get update && sudo apt-get install <PackageName>
Replacing <PackageName> as appropriate. Enter the password: chaste when prompted to do so.
Note that packages installed this way will not persist after the container is deleted (because the relevant files are not stored in /home/chaste). This can be avoided by omitting the --rm flag from the docker run command and using docker start <container_name> to relaunch a previously used container. If there is a package you think would be a particularly useful permanent addition to the Docker image, then email your suggestion to me or submit a pull request.
Firstly, make sure you have given Docker at least 4GB RAM, especially if you compiling Chaste from source.
If you get a message beginning: Unexpected end of /proc/mounts line ..., this can be safely ignored!
If you ran a container before and explicitly gave it a name (e.g. using --name chaste as an argument to docker run) but it now refuses to launch with an error message like below, it's because you need to remove the existing (stopped) container before one can be recreated with the same name.
docker: Error response from daemon: Conflict. The container name "/chaste" is already in use by container "1711bce2674e399b6084c6d452857377f6ed4dd8ee3aa19460de00fac7b86bc7". You have to remove (or rename) that container to be able to reuse that name.
To remove the container, simply run the following command then rerun the docker run ... command to launch the container (N.B. This will not delete the data stored in the chaste_data volume):
docker rm chaste
N.B. You can find out the names of existing containers (and their status) with the command: docker ps -a.
If building the image from scratch, occasionally problems can occur if a dependency fails to download and install correctly. If such an issue occurs, try resetting your Docker environment (i.e. remove all containers, images and their intermediate layers) with the following command:
docker system prune -a
This will give you a clean slate from which to restart the building process described above.
If you have deleted or otherwise corrupted the persistent data in the chaste_data volume, the command can be used with the --volumes flag. docker volume ls and then use the following command to delete a specific volume once you are happy that no important data remains within it:
docker volume rm <volume_name>
For more information on cleaning up Docker, see this tutorial.
ℹ️ Pro tip! To write your own Dockerfiles, see Nüst et al. 2020 for best practices.
For more general troubleshooting, opening a terminal and running docker events then launching the container in another terminal will provide logging information of the events happening behind the scenes.
- [1]: On macOS the Linux virtual machine which hosts the containers can be inspected with the command:
screen ~/Library/Containers/com.docker.docker/Data/com.docker.driver.amd64-linux/tty
- [2]: If you are using PowerShell, you can enable tab completion by installing the PowerShell module
posh-docker. Similarly, for tab completion of git commands in PowerShell, installposh-git.
- Add a layer for automatically building statically linked binaries for small containers or to be copied out and run natively
- Add
.vscodeand.devcontainer(forlaunch.json,devcontainer.json, etc.) to automatically configure VS Code. - Make cmake build options flexible for developers vs. users.
- Modify scripts to parse arguments flexibly
- Add help (-h) option to all scripts.
- Add commands to run.sh to launch a second terminal with
docker stats: - Dockerfile best practices
- Use multi-stage builds for building apps.
- Split into base and release images
- Use tmpfs mounts to store temporary data in RAM for extra speed.
- Add support for singularity #4
- Automate
baseandreleasebuilds on Docker Hub and/or GitHub Actions or GitHub Packages.