This version of Journal will allow you to implement each part of CRUD when working with Core Data.
Please fork and clone this repository. This repository does not have a starter project, so create one inside of the cloned repository folder.
Create a single view application called Journal in Xcode and do not check the Core Data box in the setup. We'll create our own Core Data stack.
- Rename the view controller included with the single view template to
CreateEntryViewController. - Create an
EntriesTableViewControllersubclass ofUITableViewController. - Create a
UITableViewCellsubclass calledEntryTableViewCell. - Create a
CoreDataStackSwift file. - Create an
Entry+ConvenienceSwift file. - Create a new Core Data model file called
Journal.
- Add a
UITableViewControllerscene - Embed each of the above scenes in their own navigation controllers
- Assign the nav controller attached to the table view scene as the initial view
- Create a bar button item in the upper right of the table view scene's nav bar.
- Connect that button to the nav controller for the create scene and use the present modally kind. Change the presentation on the segue to full screen.
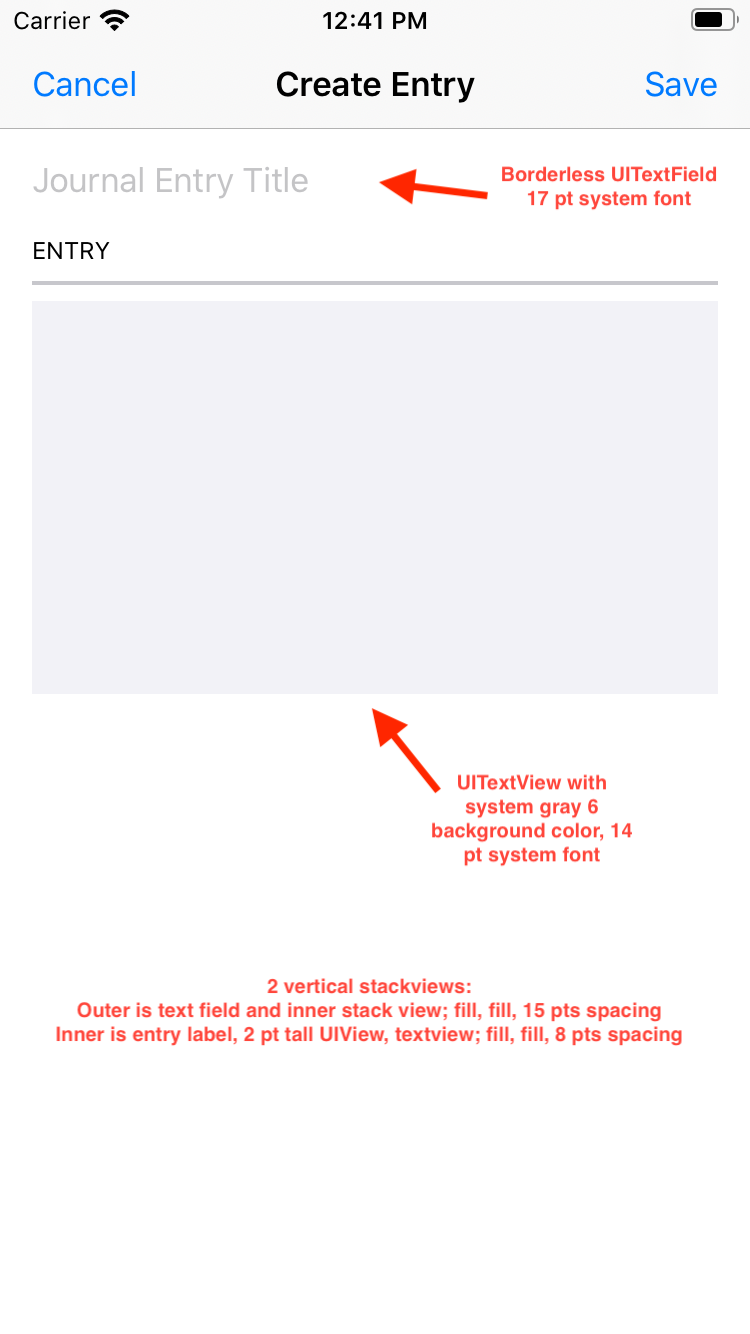
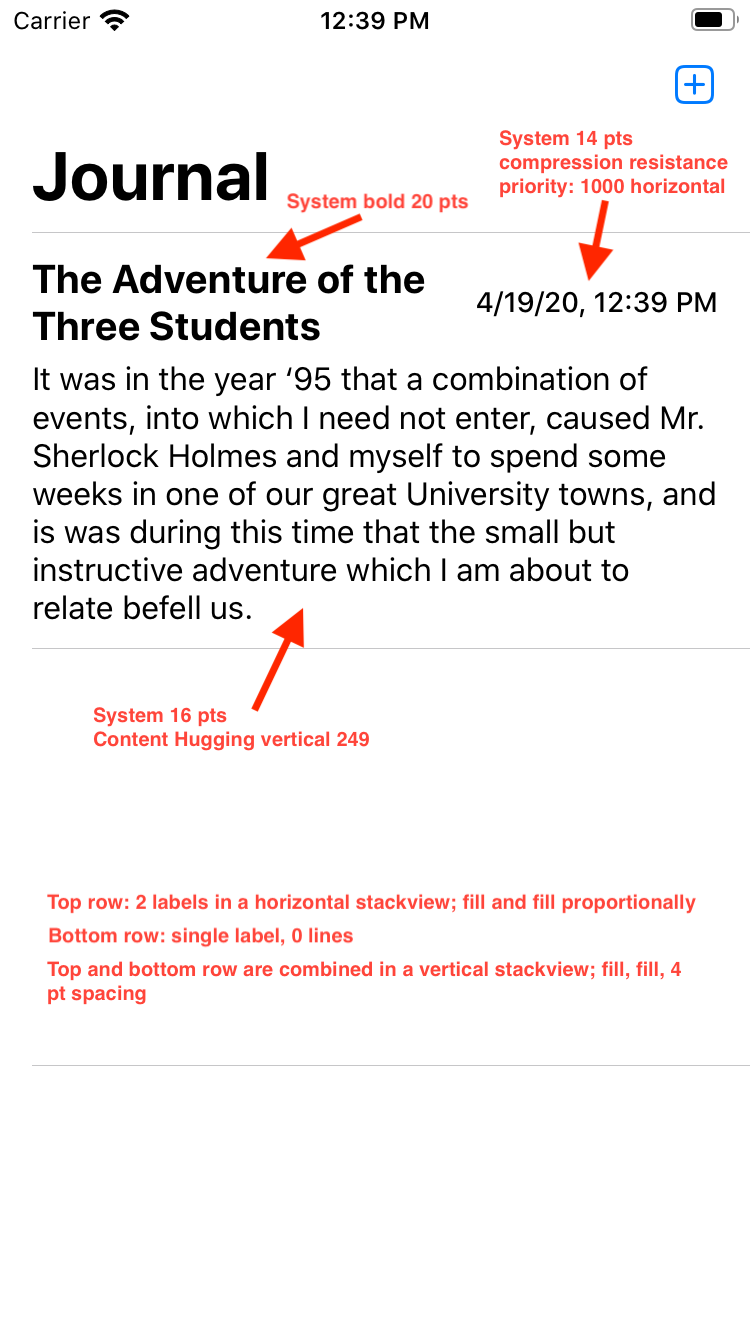
- See the below mockup images for design specs on the create entry view as as well as the table view. Try your best to recreate the design using Auto Layout, stack views, etc. (see today's guided project storyboard for help)
Today's project will continue to add more functionality to the Journal project. You will add syncing between Core Data and a server. In this case, Firebase will be used as the server. Since we have already set up an NSFetchedResultsController to update the table view when the persistent store's managed objects change, you will only need to do work on the model and model controller layers. This is a good example of adding functionality without having to tear up your entire application.
Use the Journal project you made yesterday. Create a new branch called day3. When you finish today's instructions and go to make a pull request, be sure to select the original repository's day3 branch as the base branch, and your own day3 branch as the compare branch.
First, you'll set up the ability to PUT entries to Firebase. Since the Entry entity already has an identifier attribute, there is no need to make a new model version.
Feel free to take the core data stack you used in the guided project and paste it in this file. You may need to change the name of the persistent container to match the name of your data model file.
- Create a new Firebase project for this application. Choose to use the "Realtime Database" and set it to testing mode so no authentication is required.
Something to keep in mind when trying to sync multiple databases like we are in this case is that you need to make sure you don't duplicate data. For example, say you have an entry saved in your persistent store on the device, and on Firebase. If you were to go about fetching the entries from Firebase and decoding them into Entry objects like you've done previously before today, you would end up with a duplicate of the entry in your persistent store. This would occur every single time that you fetch the entry from Firebase.
- Create a new entity and call it
Entry. Keep the codegen as Class Definition. - Add the following attributes to the
Entryentity:- A
titlestring. - A
bodyTextstring. - A
timestampDate. - An
identifierstring.
- A
In the file Entry+Convenience.swift:
- Import
CoreDatain this file. - Add an extension on
Entry. - Create a convenience initializer that takes in values for each of the
Entryentity's attributes, and an instance ofNSManagedObjectContext. Consider giving default values to the timestamp and identifier parameters in this initializer. This initializer should:- Call the
Entryclass' initializer that takes in anNSManagedObjectContext - Set the value of attributes you defined in the data model using the parameters of the initializer.
- Add the
@discardableResultannotation to the beginning of the initializer's method signature so callers don't need to use the object returned.
- Call the
In the EntryTableViewCell class:
- Add an
entry: Entry?variable. - Create an
updateViews()function that takes the values from theentryvariable and places them in the outlets. - Add a
didSetproperty observer to theentryvariable. CallupdateViews()in it.
In the CreateEntryViewController:
- Add outlets for the textfield and the textview. Wire those up to their appropriate views in the storyboard.
- Add IBActions for the cancel and save buttons. Wire those up to their appropriate buttons in the storyboard.
- For cancel, simply dismiss this view's navigation controller.
- For save, collect the data from the user, validate that it isn't empty, create a new
Entrymanaged object, and finally issue a save on Core Data, with the appropriate error handling.
In the EntryTableViewController:
- Create an
entriescomputed property that fetches all entry entities from Core Data and returns them in an array. - Implement the
numberOfRowsmethod using the entries array property. - Implement the
cellForRowAtmethod. Remember to cast the call asEntryTableViewCell, then pass anEntryto the cell'sentryproperty in order for it to call theupdateViews()method to fill in the information for the cell's labels. - Add the
viewWillAppearmethod. It should reload the table view. - Implement the
commit editingStyleUITableViewDataSourcemethod to allow the user to swipe to delete entries. Be sure to delete the entry record from Core Data and remove the appropriate cell from the screen.
 Today you will take the Journal project you made yesterday and add more functionality to it. This will help you practice migrating data in Core Data and
 NSFetchedResultsController.
Use the Journal project you made yesterday. Create a new branch called day2. When you finish today's instructions and go to make a pull request, be sure to select the original repository's day2 branch as the base branch, and your own day2 branch as the compare branch.
- Add a
UISegmentedControlto theCreateEntryViewControllerscene. - Make 3 segments.
- Set each segment's title to a mood. It's recommended to set them to happy, sad, and neutral emoji for the three moods, but you can choose anything you want.
- Make an outlet from the segmented control to the view controller's class file.
Now, you will update your Core Data model to include a property to hold the mood that the user selects on the segmented control.
- Select your Core Data data model file. In the menu, select Editor -> Add Model Version (keep it the same name and click the "Finish" button).
- In the new data model file, add a new attribute called
mood. Set its type to beString. - Give the
mooda default value. The default value is 😐, the neutral emoji. Again, you can choose whichever 3 moods you want. Just make sure to set the default value of this attribute to one of them. This will allow theEntryobjects that have been created beforemoodwas added to have an initial value. - In the File Inspector with the data model file selected, set the current model version to the new model version you just created. (It should be something like
Journal 2) - Now navigate to your "Entry+Convenience.swift" file where you have the
Entryextension and convenience initializer. - Add a
Moodenum that has aStringraw value. Set your cases to whatever three moods you chose. Make the enum conform to theCaseIterableprotocol. - Update the initializer to include and property initialize the new
moodproperty. Have the initializer take aMoodenum value, and then use therawValueto actually set the property in the managed object. - In
CreateEntryViewControllerupdate the code to collect the mood from the segmented control and then pass the appropriateMoodenum value into theEntryinitializer.- NOTE: You'll need to translate the selected segment index into a
Moodenum value. Use theallCasesproperty of the enum to help you out, and look at the guided project for this module to see how you did it there.
- NOTE: You'll need to translate the selected segment index into a
At this point, take the time to test your project. Make sure that:
- Entries that you have saved before adding the
moodproperty have a defaultmoodvalue added to them. - Moods get saved correctly to new entries.
You will now implement an NSFetchedResultsController to manage displaying entries on and handling interactions with the table view.
- In the
EntriesTableViewController, create a lazy stored property calledfetchedResultsController. Its type should beNSFetchedResultsController<Entry>. It should be initialized using a closure. Inside the closure:- Create a fetch request from the
Entryobject. - Create a sort descriptor that will sort the entries based on their
mood. This can be either ascending or descending depending on your preference. - Create a sort descriptor that will sort the entries based on their
timestamp. This can also be either ascending or descending depending on your preference. - Give the sort descriptor to the fetch request's
sortDescriptorsproperty. Note that this property's type is an array of sort descriptors, not a single one. - Create a constant that references your core data stack's
mainContext. - Create a constant and initialize an
NSFetchedResultsControllerusing the fetch request and managed object context. For thesectionNameKeyPath, put "mood" (exactly how you spelled it in the data model file), andnilforcacheName. - Set this view controller class as the delegate of the fetched results controller. NOTE: Xcode will give you an error, but you will fix it in just a second.
- Perform the fetch request using the fetched results controller
- Return the fetched results controller.
- Create a fetch request from the
- Adopt the
NSFetchedResultsControllerDelegateprotocol in an extension to this view controller. - Add the following delegate methods to the table view controller: (feel free to paste this code in if you made a snippet out of it)
controllerWillChangeContent.controllerDidChangeContent.didChange sectionInfo...atSectionIndex.didChange anObject...at indexPath.
Now you will change the UITableViewDataSource methods to look to the fetched results controller for information about how to set up the table view instead of the (no longer existing) entries array in the EntryController.
- Add the
numberOfSections(in tableView: ...)method if you don't have it already. This should use the number of sections in the fetched results controller'ssectionsarray. - In the
numberOfRowsInSection, Again, use thesectionparameter to get the section currently being set up to return thenumberOfObjects. - In the
cellForRowAt, use the fetched results controller'sobject(at: IndexPath)method to get the correct entry corresponding to the cell instead of using theentriesarray. - In the
commit editingStyle, use theobject(at: IndexPath)method again to get the correct entry to be deleted instead of using theentriesarray. - Use the same
object(at: IndexPath)method in theprepare(for segue: ...)method to get the correct entry instead of using theentriesarray.
-
Create an
EntryDetailViewControllerfile that subclassesUIViewController -
Add a view controller scene to your storyboard and link it with a segue between the cell and the view (use show for the kind). This should extend the navigation bar to the new scene.
-
Assign the
EntryDetailViewControllerclass to the new scene in the identity inspector. -
Set the title to
Entry Details. -
Copy and paste the stackview of views from the create scene to this one (you might consider breaking the connections to the outlets and actions before you copy/paste. Sometimes Xcode can get confused about the connections on copied views. Just be sure to reconnect them afterwards).
-
Constrain the stackview in the detail view scene with the following:
- leading, top, and trailing of 20 pts (with margins)
- equal height to the superview (will end up with a proportional height constraint; ensure the multiplier is 0.4)
-
Create outlets in the detail view controller for: the textfield, the text view, and the segmented control
-
Create an optional property to store an
Entryobject, and a variable Bool calledwasEditeddefaulted tofalse -
In
viewDidLoad, set theeditButtonItemto therightBarButtonItemin thenavigationItemproperty.- Also call
updateViews(which you'll create next)
- Also call
-
Create and fill in the
updateViewsmethod. Set the views onscreen to the data from theentrymodel object. Also set the textfield, text view, and segmented control'sisUserInteractionEnabledproperties toisEditing. -
Override the
setEditing(_:animated:)method.- Call the superclass implementation
- Check the
editingproperty, if it's true set thewasEditedproperty to true - Set the 3 outlets'
isUserInteractionEnabledproperties to theeditingvariable - Set the
navigationItem'shidesBackButtonproperty also toediting(this will hide the back button whenever editing is enabled)
-
Override the
viewWillDisappear(_:)method- Call the superclass implementation
- Check if
wasEditedis true. If so, collect entry data from the user interface controls and update theentrymanaged object - Call save on the main context from your
CoreDataStacksingleton ======= The way to prevent this is to create an intermediate data type between the JSON and theEntryclass that will serve as a temporary representation of anEntrywithout being added to a managed object context.
-
Create a new Swift file called "EntryRepresentation". In the file, create a struct called
EntryRepresentation. -
Adopt the
Codableprotocol. -
Add a property in this struct for each attribute in the
Entrymodel. Their names should match exactly or else the JSON from Firebase will not decode into this struct properly. -
In the "Entry+Convenience.swift" file, add a new convenience initializer. This initializer should be failable. It should take in an
EntryRepresentationparameter and anNSManagedObjectContext. This should simply pass the values from the entry representation to the convenience initializer you made earlier in the project. -
In the
Entryextension, create avar entryRepresentation: EntryRepresentationcomputed property. It should simply return anEntryRepresentationobject that is initialized from the values of theEntry.
- Create an
EntryControllerclass for communicating with Firebase and Core Data. - In the
EntryController, add abaseURL: URLconstant that is the URL from the new Firebase database you created for this app. - Create a function called
sendEntryToServerthat takes in an entry and has an escaping completion closure. Give this completion closure a default value of an empty closure. (e.g.{ _ in }). This will allow you to use the completion closure if you want to do something whencompletionis called or just not worry about doing anything after knowing the data task has completed. This method should:- Take the
baseURLand append the identifier of the entry parameter to it. Add the"json"extension to the URL as well. - Create a
URLRequestobject. Set its HTTP method to PUT. - Using
JSONEncoder, encode the entry'sentryRepresentationinto JSON data. Set the URL request'shttpBodyto this data. - Perform a
URLSessionDataTaskwith the request, and handle any errors. Make sure to call completion and resume the data task.
- Take the
- Call this method from the
CreateEntryViewController'ssavemethod and theEntryDetailViewController'sviewWillDisappearmethod. - Create a
deleteEntryFromServermethod. It should take in an entry, and a completion closure that returns an optional error. Again, give the closure a default value of an empty closure. This method should:- Create a URL from the
baseURLand append the entry parameter's identifier to it. Also append the "json" extension to the URL as well. This URL should be formatted the same as the URL you would use to PUT an entry to Firebase. - Create a
URLRequestobject, and set its HTTP method to DELETE. - Perform a
URLSessionDataTaskwith the request and handle any errors. Call completion and don't forget to resume the data task.
- Create a URL from the
- Call the
deleteEntryFromServermethod from theEntriesTableViewController'scommitEditingStylemethod.
Test the app at this point. You should be able to both create and update entries and they will be sent to Firebase as well as to the NSPersistentStore on the device. You should also be able to delete entries from Firebase also.
For today's project, you will update Journal to update its Core Data data from the server in the background. This will allow you to practice more complex Core Data scenarios using multiple managed object contexts, as well as using concurrency with Core Data. You will be modifying an existing codebase to be more performant and correct. To prepare for many of these changes, you'll refactor your code, meaning you'll restructure it so that it's functionality can be updated without compromising its readability and maintainability.
The instructions for this project are intentionally somewhat less detailed that previous instructions this week. This project will require you to think about and understand how to architect your app to use multiple contexts and concurrency correctly. As always, follow the 20-minute rule, but don't be afraid to ask for help as you work.
Use the Journal project you made yesterday. Create a new branch called day4. When you finish today's instructions and go to make a pull request, be sure to select the original repository's day4 branch as the base branch, and your own day4 branch as the compare branch.
=======
Before starting, run your app with the -com.apple.CoreData.ConcurrencyDebug 1 launch argument. Exercise all functions of the app and note whether any Core Data concurrency assertions are triggered. Were any triggered (ie. did the app crash)? If so, why? Today you'll fix these problems while simultaneously improving the overall performance of the app.
Start by refactoring some of your code to be better prepared to switch to using a separate managed object context for syncing operations.
- Change your convenience initalizer for creating an
Entryfrom anEntryRepresentationto accept a context in which to create the newEntry. - Remove the
EntryController'ssaveToPersistentStoremethod and instead create asave(context: NSManagedObjectContext)method in yourCoreDataStack. This should call.performAndWaiton the context that is passed in, then save the same context. Handle any potential errors.
Even though you haven't yet updated your code to use multiple contexts, you can prepare for that by using Core Data's concurrency APIs to ensure that regardless of context, your code is concurrency-safe. Core Data is designed in such a way that you can write concurrency-correct code without having to keep track of and maintain the dispatch queues that each context has yourself.
Remember that any use of managed objects or a managed object context must be done in a perform or performAndWait call for non-main-queue contexts. Even for main-queue contexts, it is safe and valid to use perform or performAndWait.
-
Go through each function that deals with managed objects. Decide whether it should ensure concurrency correctness itself, or whether responsibility for correctness should be left up to its caller.
-
Update each function to do its work using
perform()orperformAndWait()on the main context for now. -
Run your app with the
-com.apple.CoreData.ConcurrencyDebug 1launch argument. Exercise all functions of the app and verify that no Core Data concurrency assertions are triggered (i.e. the app shouldn't crash). -
Create a new function called
update. It should take in anEntrywhose values should be updated, and anEntryRepresentationto take the values from. This should simply set each of theEntry's values to theEntryRepresentation's corresponding values. DO NOT callsaveToPersistentStorein this method. It will be explained why later on. -
Create a method called
updateEntries(with representations: [EntryRepresentation]). This method'srepresentationargument represents the EntryRepresentation objects that are fetched from Firebase. This method should:-
Create a fetch request from
Entryobject. -
Create a dictionary with the identifiers of the
representationsas the keys, and the values as therepresentations. To accomplish making this dictionary you will need to create a separate array of just the entry representations identifiers. You can use thezipmethod to combine two arrays of items together into a dictionary. -
Give the fetch request an
NSPredicate. This predicate should see if theidentifierattribute in theEntryis in identifiers array that you made from the previous step. Refer to the hint below if you need help with the predicate. -
Predicate Hint:
NSPredicate(format: "identifier IN %@", identifiersToFetch) // assuming the array of identifiers you made was called "identifiersToFetch" -
Perform the fetch request on your core data stack's
mainContext. This will return an array ofEntryobjects whose identifier was in the array you passed in to the predicate. Make sure you handle a potential error from thefetchmethod on your managed object context, as it is a throwing method. -
From here, loop through the fetched entries and call your
update(entry: ...method that you made earlier. One you have updated the entry, remove the entry from the dictionary you made a few points earlier. This will make it so you only create entries from the remaining objects in the dictionary. The only ones that would remain after this loop are ones that didn't exist in Core Data already. -
Then make a second loop through your dictionary's
valuesproperty. This should create an entry for each of the values in that dictionary using theEntryinitializer that takes in anEntryRepresentationand anNSManagedObjectContext -
Under both loops, call
saveToPersistentStore()to persist the changes and effectively synchronize the data in the device's persistent store with the data on the server. Since you are using anNSFetchedResultsController, as soon as you save the managed object context, the fetched results controller will observe those changes and automatically update the table view with the updated entries.
-
-
Create a function called
fetchEntriesFromServer. It should have a completion closure that looks like the other closures you've used in this class and its default value should be an empty closure. This method should:- Take the
baseURLand add the "json" extension to it. - Perform a GET
URLSessionDataTaskwith the url you just set up. - In the completion of the data task, check for errors
- Unwrap the data returned in the closure.
- Create a variable of type
[EntryRepresentation]. Set its initial value to an empty array. - Decode the data into
[String: EntryRepresentation].self. Set the value of the array you just made in the previous step to the entry representations in this decoded dictionary. Think about why we are decoding it in this way. Loop through the dictionary to return an array of just the entry representations without the identifier keys. HINT: You can use a for-in loop ormapto do this. - Call your
updateEntriesmethod that you just made in the previous step. - Call completion and pass in
nilfor the error. - Don't forget to resume the data task.
- Take the
-
Write an initializer for the
EntryController. It shouldn't take in any values. Inside of the initializer, call thefetchEntriesFromServermethod. As soon as the app runs and initializes this model controller, it should fetch the entries from Firebase and update the persistent store.
The app should be working at this point. Test it by going to the Firebase Database in a browser and changing some values in the entries saved there. The easiest thing to change is the mood. This will allow you to easily see if the table view will update according to the new changes. It may take a few seconds after the app launches, but you should see the cell(s) move to different sections if you changed the mood of some entries in Firebase.
=======
While the app shouldn't crash anymore, it's still using the main context for operations that could potentially take a long time and block the main queue. In order to fix this:
- Update your
updateEntries(with representations: ...)method so that it creates a new background context, and does all Core Data work on this context. It should update/create tasks from the fetched data on this context. - Save the context only after the update/creation process is complete. Remember that
save()itself must be called on the context's private queue usingperform()orperformAndWait(). (You already made a function to do this earlier that you can call to do this) - In your
CoreDataStack, after creating the container, set itsviewContext'sautomaticallyMergesChangesFromParentproperty to true. This is required for theviewContext(ie. the main context) to be updated with changes saved in a background context. In this case, theviewContext's parent is the persistent store coordinator, not another context. This will ensure that the viewContext gets the changes you made on a background context so the fetched results controller can see those changes and update the table view automatically.
Thoroughly test your app to be sure that all features continue to function correctly. From an end user perspective, the app should behave exactly as it did yesterday. While you're testing the app, be sure the -com.apple.CoreData.ConcurrencyDebug 1 launch argument is set. Verify that no Core Data multithreading assertions are triggered.
If the app behaves correctly and doesn't trigger any assertions, you're done! Submit your pull request. If you have time left, try the suggestions in the Go Further section below.


