The Hasura CLI is a command-line tool you can use to manage your Hasura instances.
We offer two primary methods for working with your Hasura instances: the Hasura Console and the Hasura CLI. While the Console is robust and provides an easy-to-navigate GUI for interacting with your project, the CLI offers a more powerful interface for managing your project.
The CLI is useful for:
- Managing Metadata
- Creating and applying Migrations
- Integrating with your CI/CD pipeline
- Automating tasks
You can use the CLI to initialize a new Hasura Project from the very beginning, or you can use it to manage an existing one.
https://hasura.io/docs/latest/hasura-cli/install-hasura-cli/
We will make use of Hasura CLI to manage the project locally. Start with an empty folder and execute the following commands:
hasura init
This will create a new project structure locally under the given directory (hasura by default). This is how the directory structure looks:
├── config.yaml
├── metadata
│   ├── actions.graphql
│   ├── actions.yaml
│   ├── allow_list.yaml
│   ├── cron_triggers.yaml
│   ├── databases
│   │   └── databases.yaml
│   ├── query_collections.yaml
│   ├── remote_schemas.yaml
│   └── version.yaml
├── migrations
└── seeds
wget https://raw.githubusercontent.com/hasura/graphql-engine/stable/install-manifests/docker-compose/docker-compose.yaml
curl https://raw.githubusercontent.com/hasura/graphql-engine/stable/install-manifests/docker-compose/docker-compose.yaml -o docker-compose.yml
docker-compose up -d
Since you have Hasura running locally via docker-compose, run the following command:
hasura console
This should open up the console on http://localhost:9695, which is the same GUI as the one you see on the server console at http://localhost:8080. The difference is that using the hasura console automatically syncs all of your project metadata and migrations to the generated local yaml files that were generated.
In this workshop, we will build the data model for a realtime todo app. Our todo app will have the following features:
- Users can maintain personal todos
- Users can view public todos
- A list of currently online users using the app
- Send email when a user signs up
Broadly this means that we have two main models in this app: users and todos, each with its own set of properties.
We will go over them in the subsequent steps.
The final model looks like the following:

As we create tables using the console or directly on postgres, Hasura GraphQL engine automatically creates GraphQL schema object types and corresponding query/mutation fields with resolvers.
Once on the console, head to the Data tab and navigate to the Connect Database section
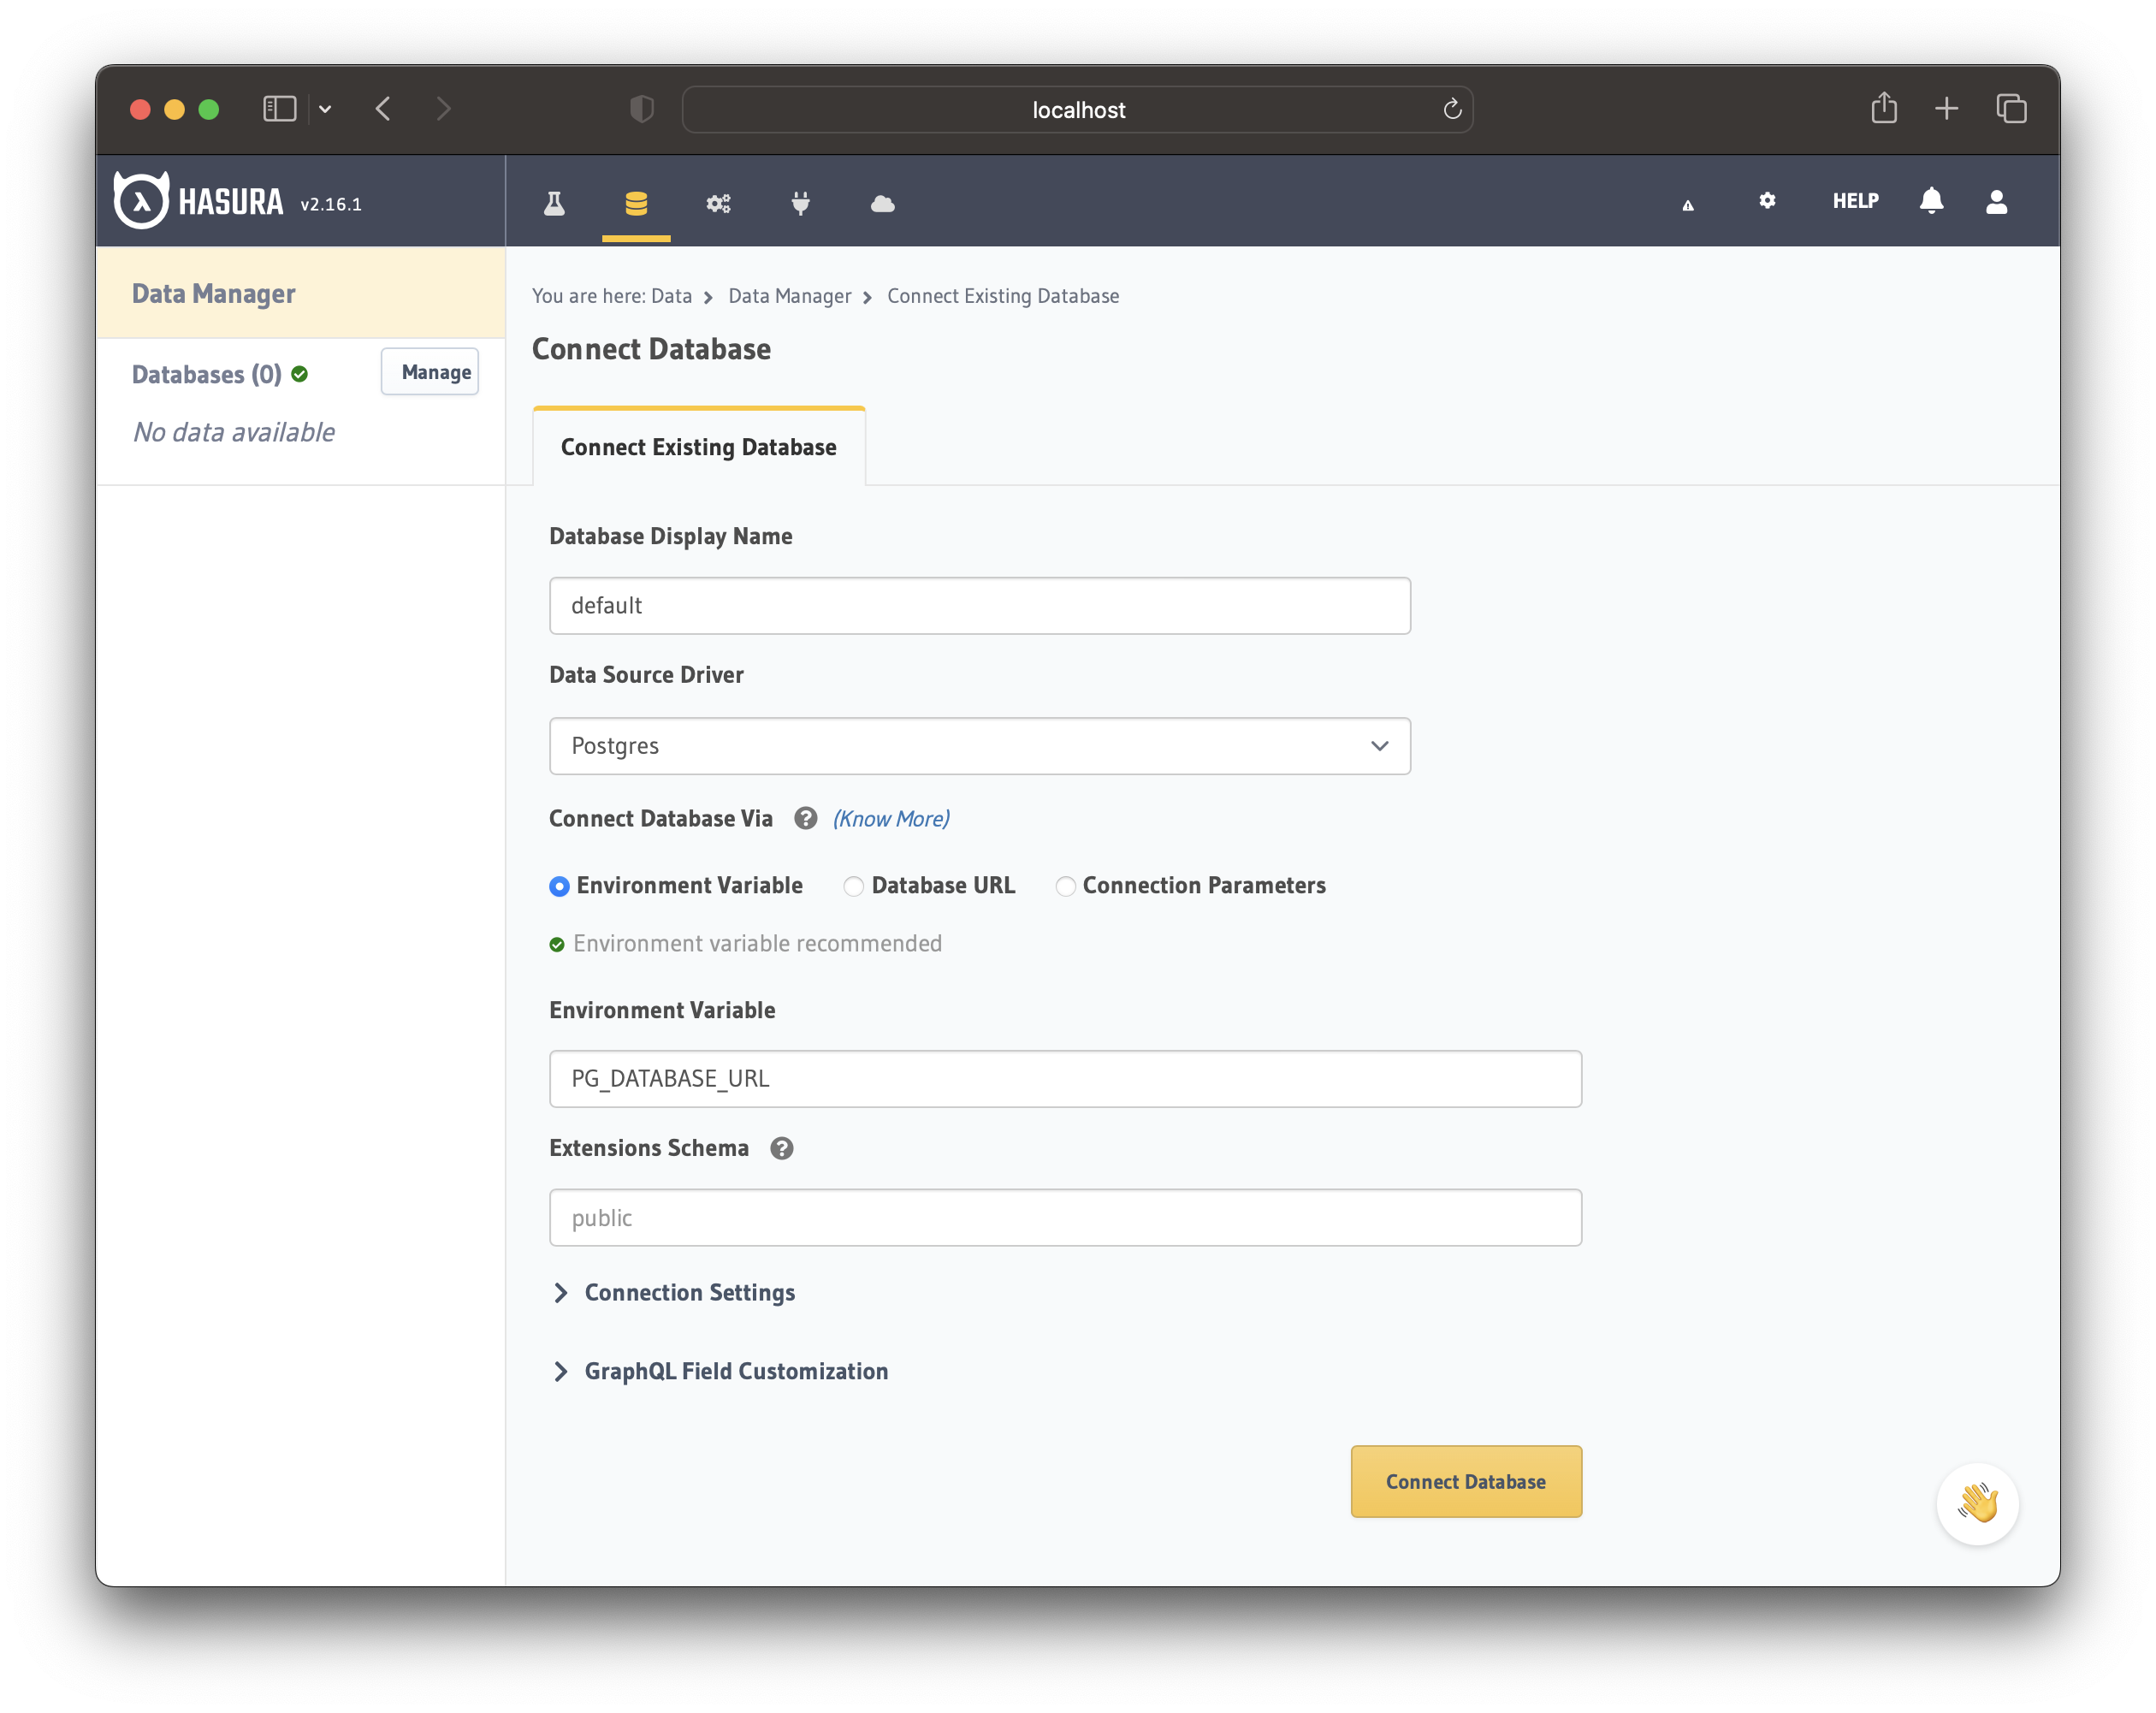
- Enter the database name as default
- Choose the Environment Variable option to connect the database
- Enter the ENV name as PG_DATABASE_URL
Click on Connect Database to finish the database connection. Now you can apply the migrations in the next step.
It should look something like the screen below:

Let's get started by creating the users table.
The users table will have the following columns:
id (type Text and Unique)
name (type Text)
created_at (type Timestamp and default now())
last_seen (type Timestamp and nullable)
The columns are associated with properties of users. The last_seen column is used to store the latest timestamp of when the user was online.
In the Hasura Console, head over to the DATA tab section and click on the database (from the left side navigation) that we connected earlier. The database name would be default and the schema name would be public. Once you land on the public schema, click on Create Table. Enter the values for creating the table as mentioned above. For the table property of Primary Key, use id.
Hasura gives you Instant GraphQL APIs over Postgres, among other databases. Therefore, it can be tested on the table that we just created.
Let's go ahead and start exploring the GraphQL API for users table. We are going to use GraphiQL to explore the API. GraphiQL is the GraphQL integrated development environment (IDE). It's a powerful tool we'll use to interact with the API.
You can access GraphiQL by heading over to Console -> API -> GraphiQL tab.
Let's add a user using a GraphQL Mutation. Copy the following code into the GraphiQL interface.
mutation { insert_users(objects:[{id: "1", name:"Praveen"}]) { affected_rows } }
Click on the Play button on the GraphiQL interface to execute the query.
Now let's go ahead and query the data that we just inserted.
query { users { id name created_at } }
Note that some columns like created_at have default values, even though you did not insert them during the mutation.
Let's run a subscription query over users table to watch for changes to the table.
subscription { users { id name created_at } }
Initially, the subscription query will return the existing results in the response.
Now let's insert new data into the users table and see the changes appearing in the response.
In a new browser tab, Head over to Console -> DATA tab -> default -> public -> users -> Insert Row and insert another row.
And switch to the previous GRAPHIQL tab and see the subscription response returning 2 results.
An active subscription query will keep returning the latest set of results depending on the query.
Now let's move on to creating the other model: todos
The todos table will have the following columns:
id (type Integer (auto-increment))
title (type Text)
is_completed (type Boolean and default false)
is_public (type Boolean and default false)
created_at (type Timestamp and default now())
user_id (type Text)
The columns are associated with properties of todo items.
Remember to set the id column to the primary key.
In the Hasura Console, head over to the DATA tab section and click on Create Table. Enter the values for creating the table as mentioned above.
Similar to the users table, the todos table created in the previous step would have an auto-generated GraphQL API for us to explore.
Let's go ahead and start exploring the GraphQL API for todos table.
Head over to Console -> API -> GraphiQL tab and insert a todo using GraphQL Mutations.
mutation { insert_todos(objects:[{title: "My First Todo", user_id: "1"}]) { affected_rows } }
Now let's go ahead and query the data that we just inserted.
query { todos { id title is_public is_completed user_id } }
Relationships enable you to make nested object queries if the tables/views in your database are connected.
GraphQL schema relationships can be either of
Let's say you want to query todos and more information about the user who created it. This is achievable using nested queries if a relationship exists between the two. This is a one-to-one query and hence called an object relationship.
An example of such a nested query looks like this:
query { todos { id title user { id name } } }
In a single query, you are able to fetch todos and its related user information. This can be very powerful because you can nest to any level.
Let's look at an example query for array relationships.
query { users { id name todos { id title } } }
In this query, you are able to fetch users and for each user, you are fetching the todos (multiple) written by that user. Since a user can have multiple todos, this would be an array relationship.
Relationships can be captured by foreign key constraints. Foreign key constraints ensure that there are no dangling data. Hasura Console automatically suggests relationships based on these constraints.
Though the constraints are optional, it is recommended to enforce these constraints for data consistency.
The above queries won't work yet because we haven't defined the relationships yet. But this gives an idea of how nested queries work.
In the todos table, the value of user_id column must be ideally present in the id column of users table. Otherwise, it would result in inconsistent data.
Postgres allows you to define foreign key constraint to enforce this condition.
Let's define one for the user_id column in todos table.
Head over to Console -> DATA -> todos -> Modify page.
Scroll down to Foreign Keys section at the bottom and click on Add.
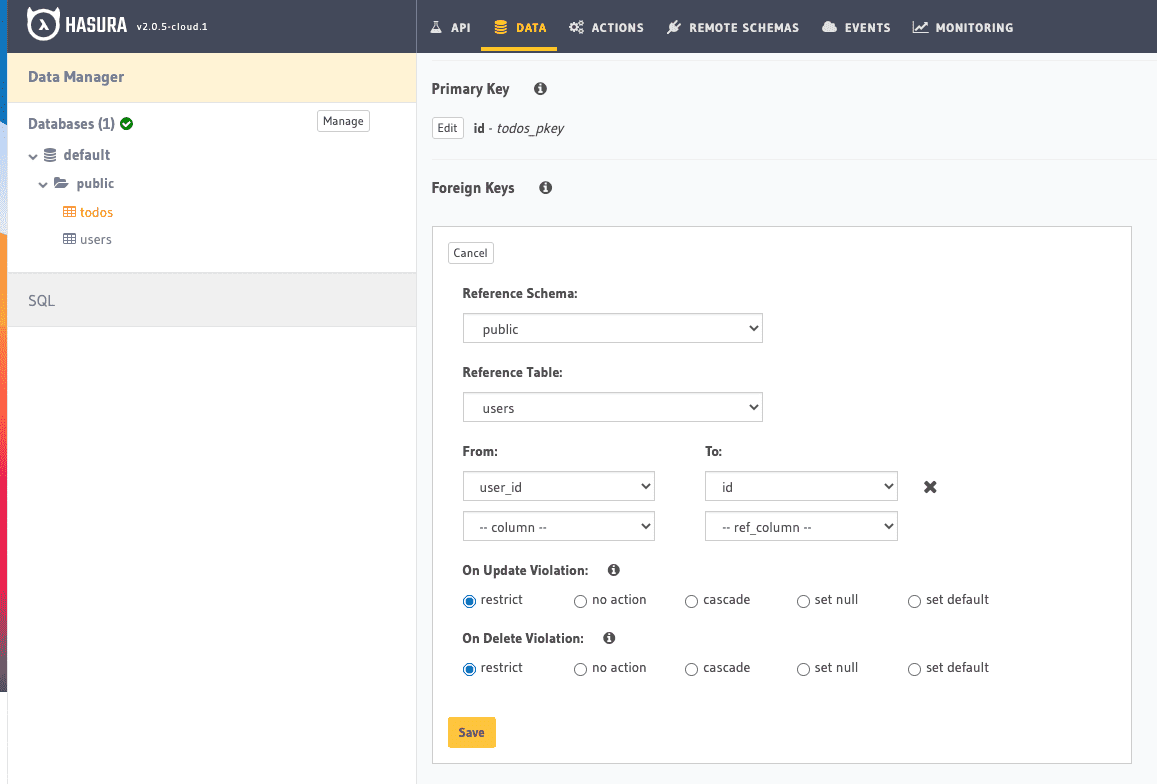
Select the Reference table as users
Choose the From column as user_id and To column as id
We are enforcing that the user_id column of todos table must be one of the values of id in users table.
Click on Save to create the foreign key.
Great! Now you have ensured data consistency.
Now that the foreign key constraint is created, Hasura Console automatically suggests relationships based on that.
Head over to Relationships tab under todos table and you should see a suggested relationship like below:
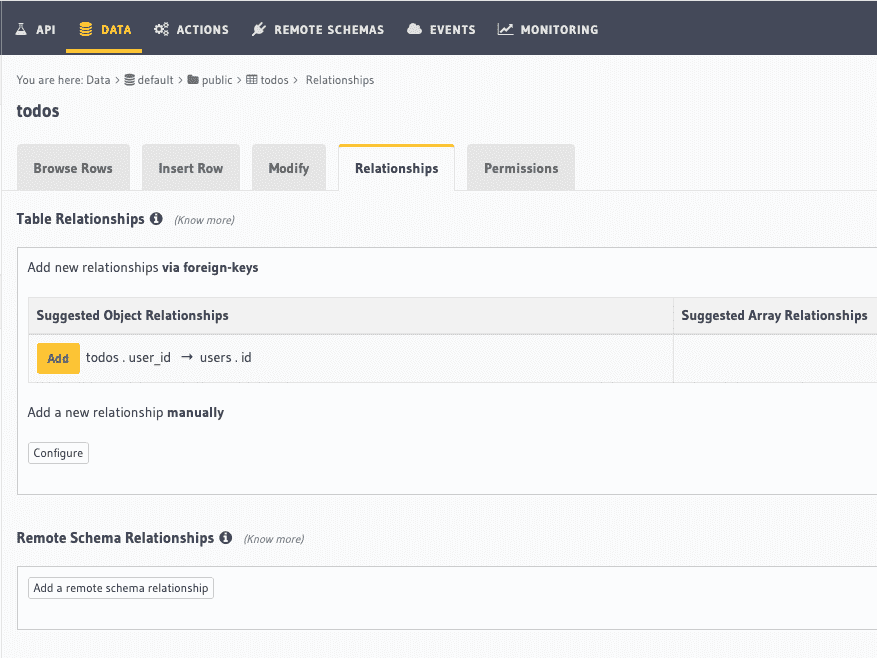
Click on Add in the suggested object relationship.
Enter the relationship name as user (already pre-filled) and click on Save.

A relationship has now been established between todos and users table.
Let's explore the GraphQL APIs for the relationship created.
query { todos { id title user { id name } } }
As you can see, in the same response, you are getting the results for the user's information, exactly like you queried. This is an example of a one-to-one query/object relationship.
One of the realtime features of the todo app is to display the list of online users. We need a way to fetch this information based on the value of last_seen which tells when the user was last online.
So far we were building tables and relationships. Postgres allows you to perform data transformations using:
- Views
- SQL Functions
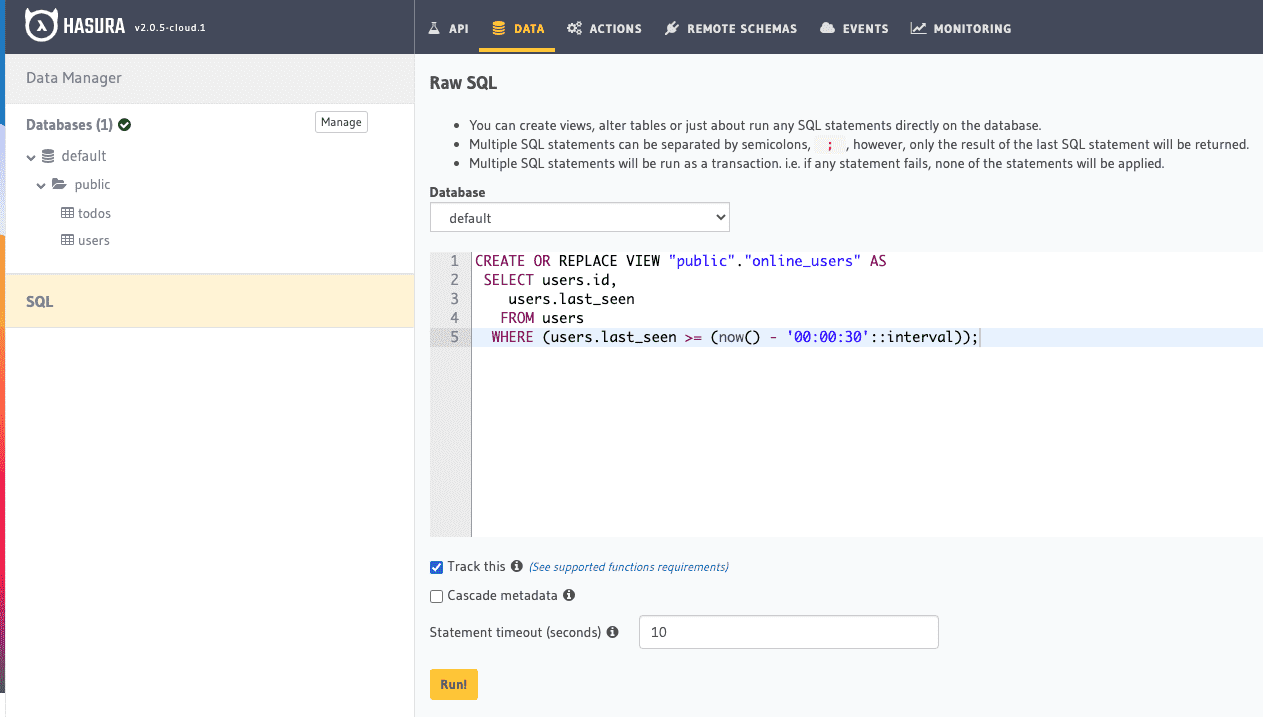
In this example, we are going to make use of Views. This view is required by the app to find the users who have logged in and are online in the last 30 seconds.
The SQL statement for creating this view looks like this:
CREATE OR REPLACE VIEW "public"."online_users" AS SELECT users.id, users.last_seen FROM users WHERE (users.last_seen >= (now() - '00:00:30'::interval));
Let's add this view and track the view with Hasura to be able to query it.
Head to Console -> DATA -> SQL page.
Now let's test by making a subscription query to the online_users view.
subscription { online_users { id last_seen } }
In another tab, update an existing user's last_seen value to see the subscription response getting updated.

Enter the value as now() for the last_seen column and click on Save.
Now switch back to the tab where your subscription query is running to see the updated response.
Now that the view has been created, we need a way to be able to fetch user information based on the id column of the view. Let's create a manual relationship from the view online_users to the table users using the id column of the view.
Head to Console -> Data -> online_users -> Relationships page.
Add a new relationship manually by choosing the relationship type to be Object Relationship. Enter the relationship name as user. Select the configuration for the current column as id and the remote table would be users and the remote column would be id again.
We are mapping the current view's id column to users table's id column to create the relationship.

Let's explore the GraphQL APIs for the relationship created.
query { online_users { id last_seen user { id name } } }
Great! We are completely done with data modeling for the app.
In this part of the tutorial, we are going to define role-based access control rules for each of the models that we created.
Access control rules help in restricting querying on a table based on certain conditions.
In this realtime todo app use-case, we need to restrict all querying only for logged in users. Also, certain columns in tables do not need to be exposed to the user.
The aim of the app is to allow users to manage their own todos only but should be able to view all the public todos.
Setup todos table permissions Head over to the Permissions tab under todos table to add relevant permissions.
We will allow logged-in users creating a new todo entry to only specify the is_public and title columns.
In the enter new role textbox, type in “user”
Click on edit (pencil) icon for “insert” permissions. This would open up a section below, which lets you configure custom checks and allow columns.
In the custom check, choose the following condition
{"user_id":{"_eq":"X-Hasura-User-Id"}}
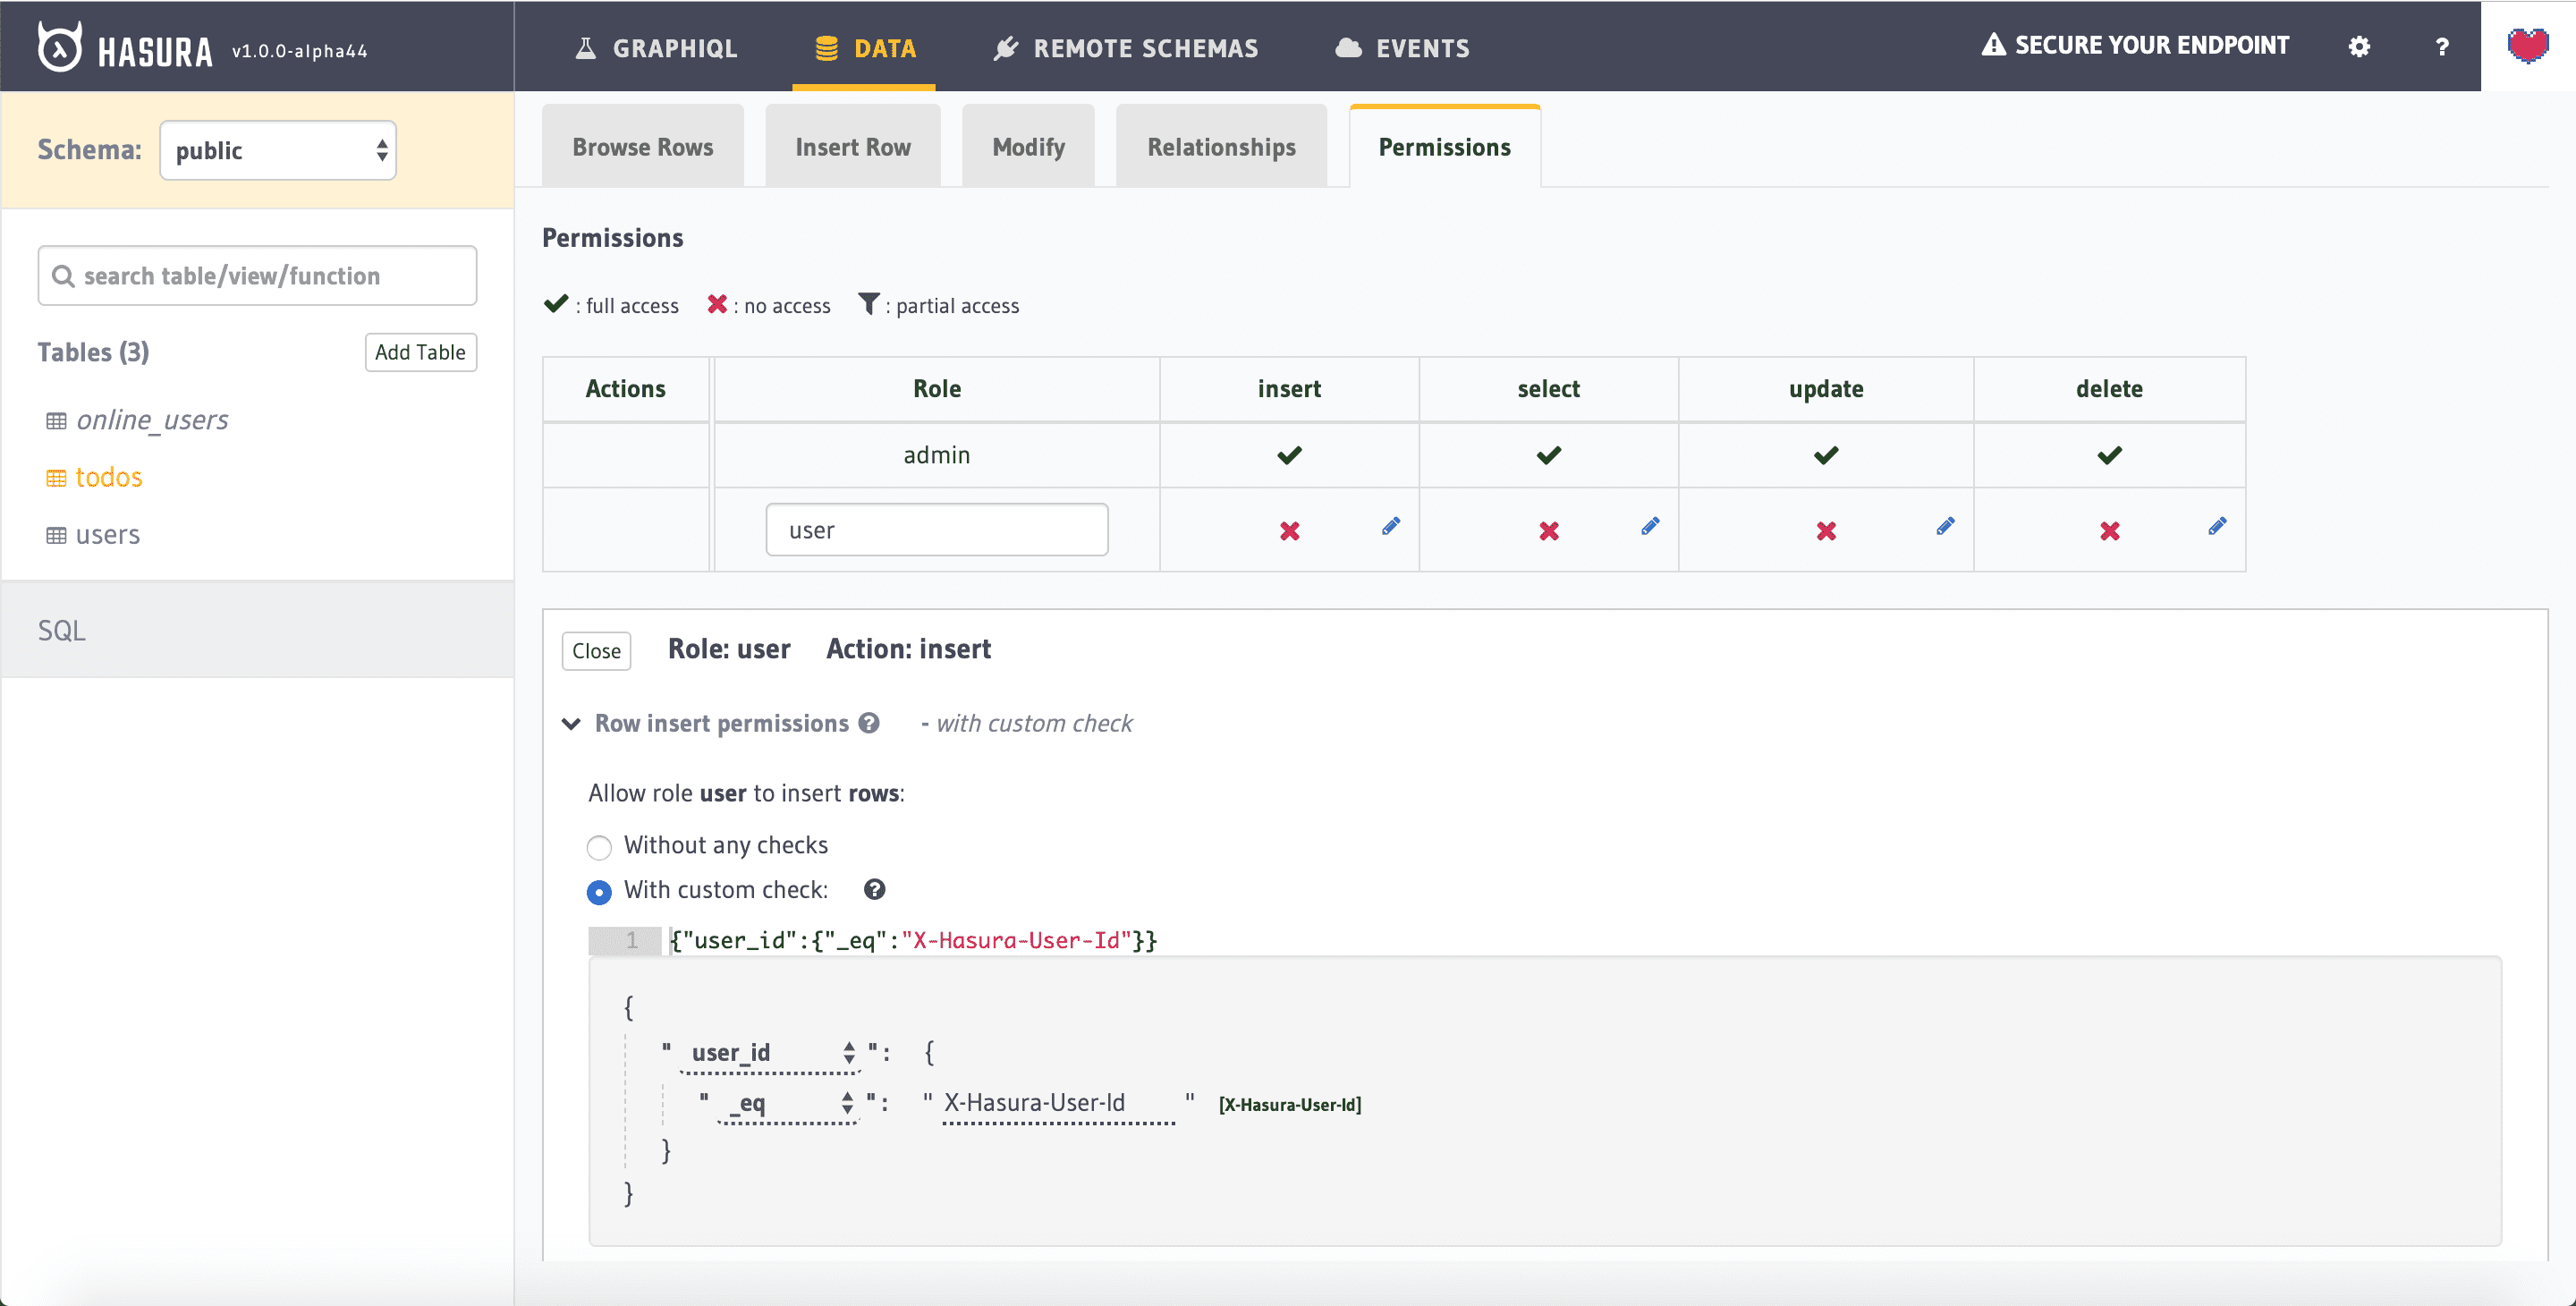
Now under "Column insert permissions", select the title and is_public columns.
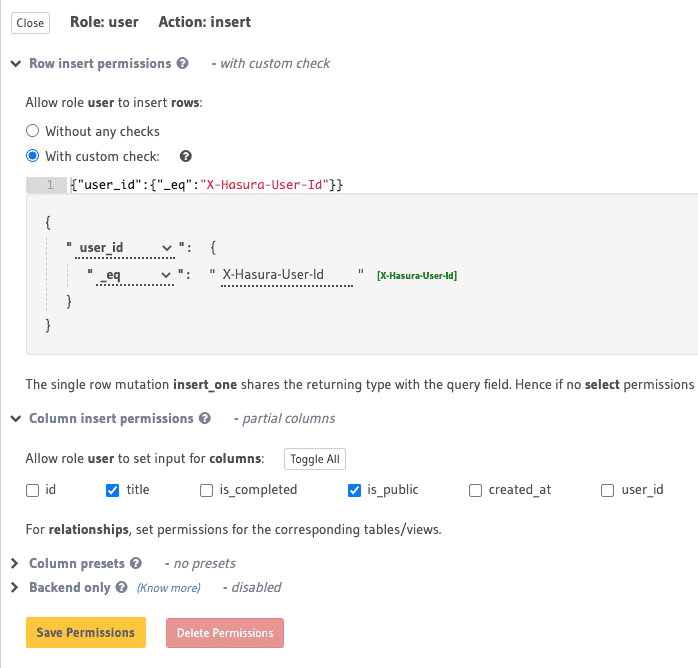
Finally under "Column presets", select user_id from from session variable mapping to X-HASURA-USER-ID.
Note: Session variables are key-value pairs returned from the authentication service for each request. When a user makes a request, the session token maps to a USER-ID. This USER-ID can be used in permission to show that inserts into a table are only allowed if the user_id column has a value equal to that of USER-ID, the session variable.
Click on Save Permissions.
We will allow users to view a todo entry if it is public or if they are logged-in users.
Now click on edit icon for "select" permissions. In the custom check, choose the following condition
{"_or":[{"is_public":{"_eq":true}},{"user_id":{"_eq":"X-Hasura-User-Id"}}]}
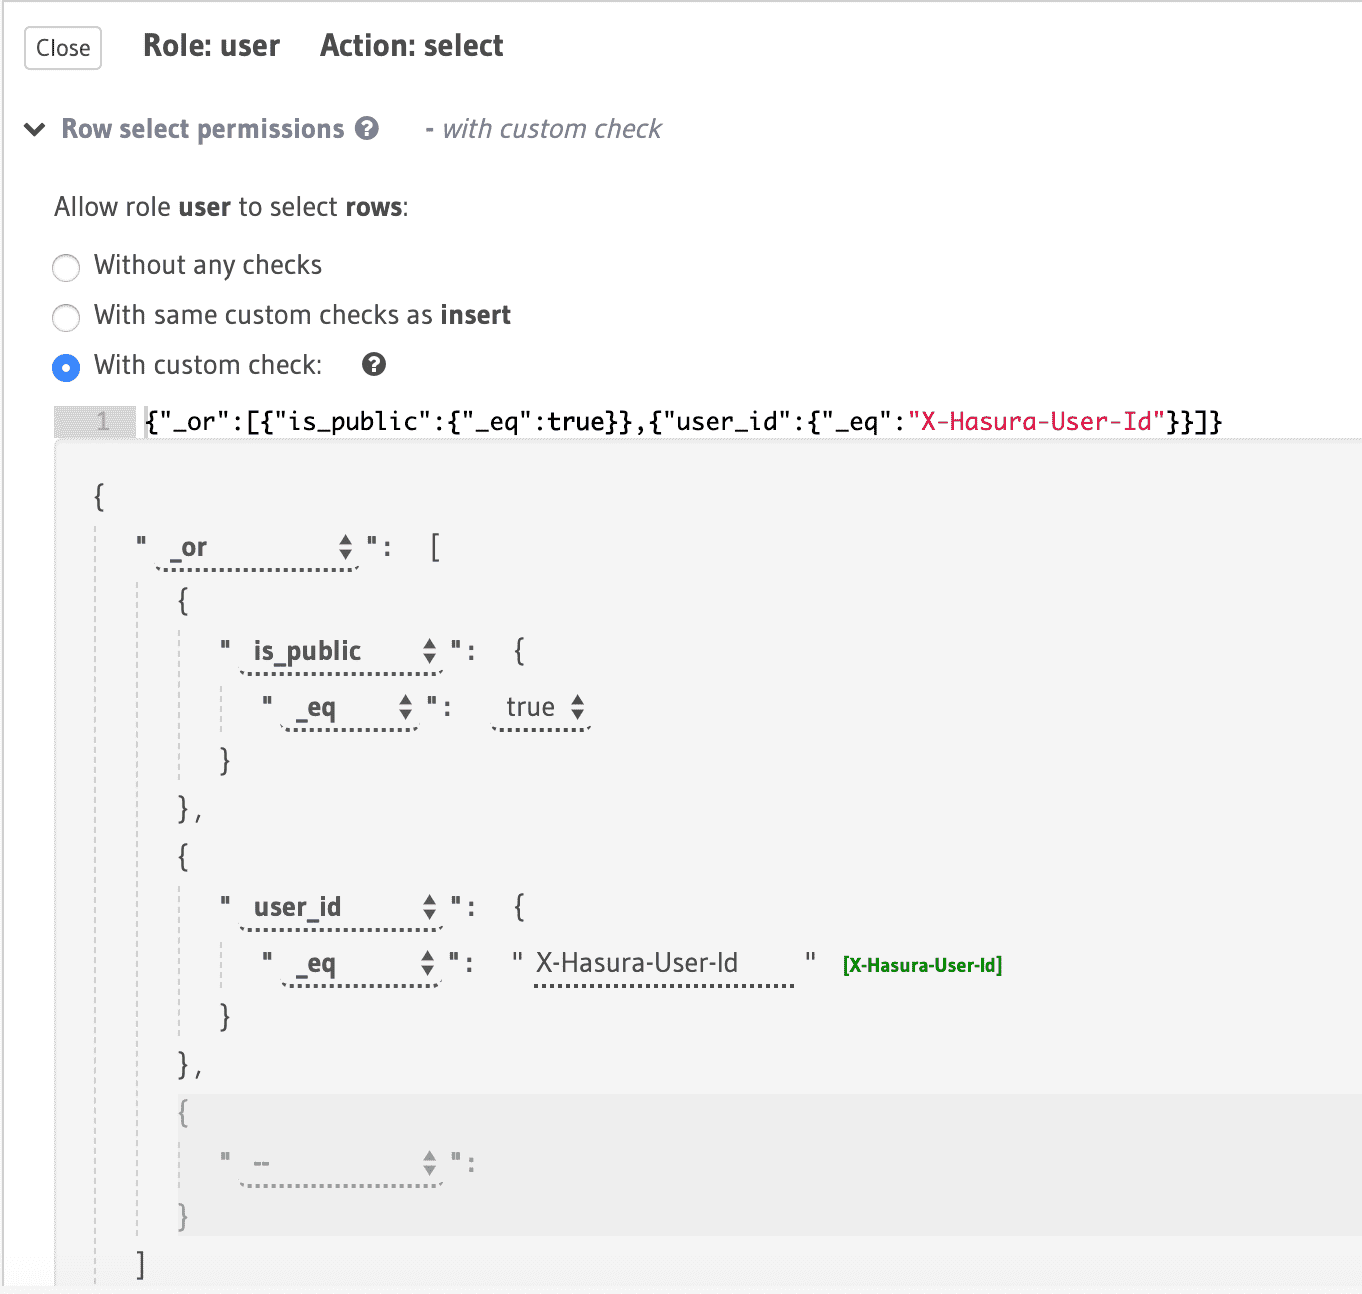
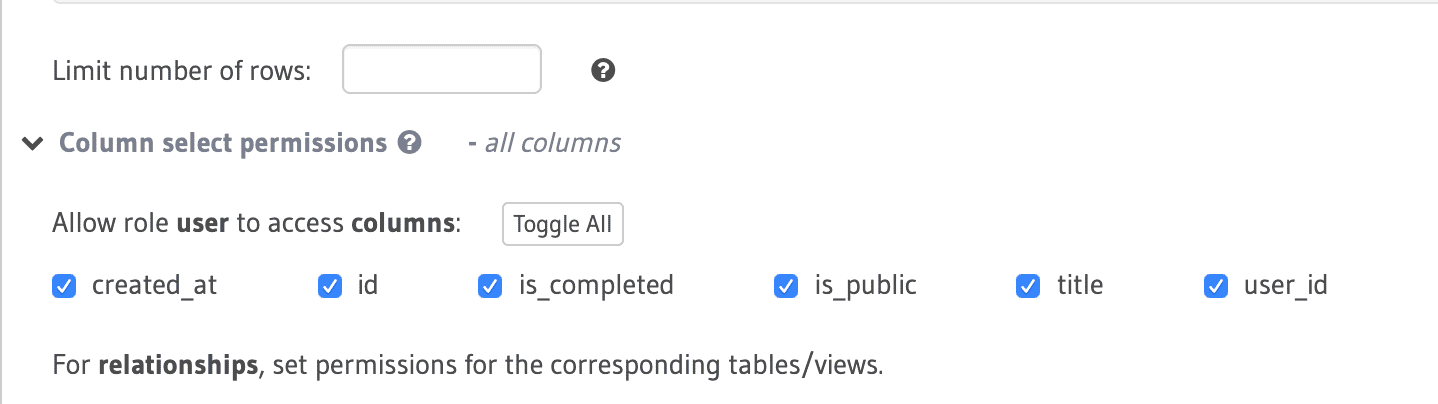
Under "Column select permissions", select all the columns.
Click on Save Permissions
We will only allow the is_completed column to be updated by a user.
Now click on edit icon for "update" permissions. In the pre-update custom check, choose With same custom checks as insert.
And under "Column update permissions", select the is_completed column.
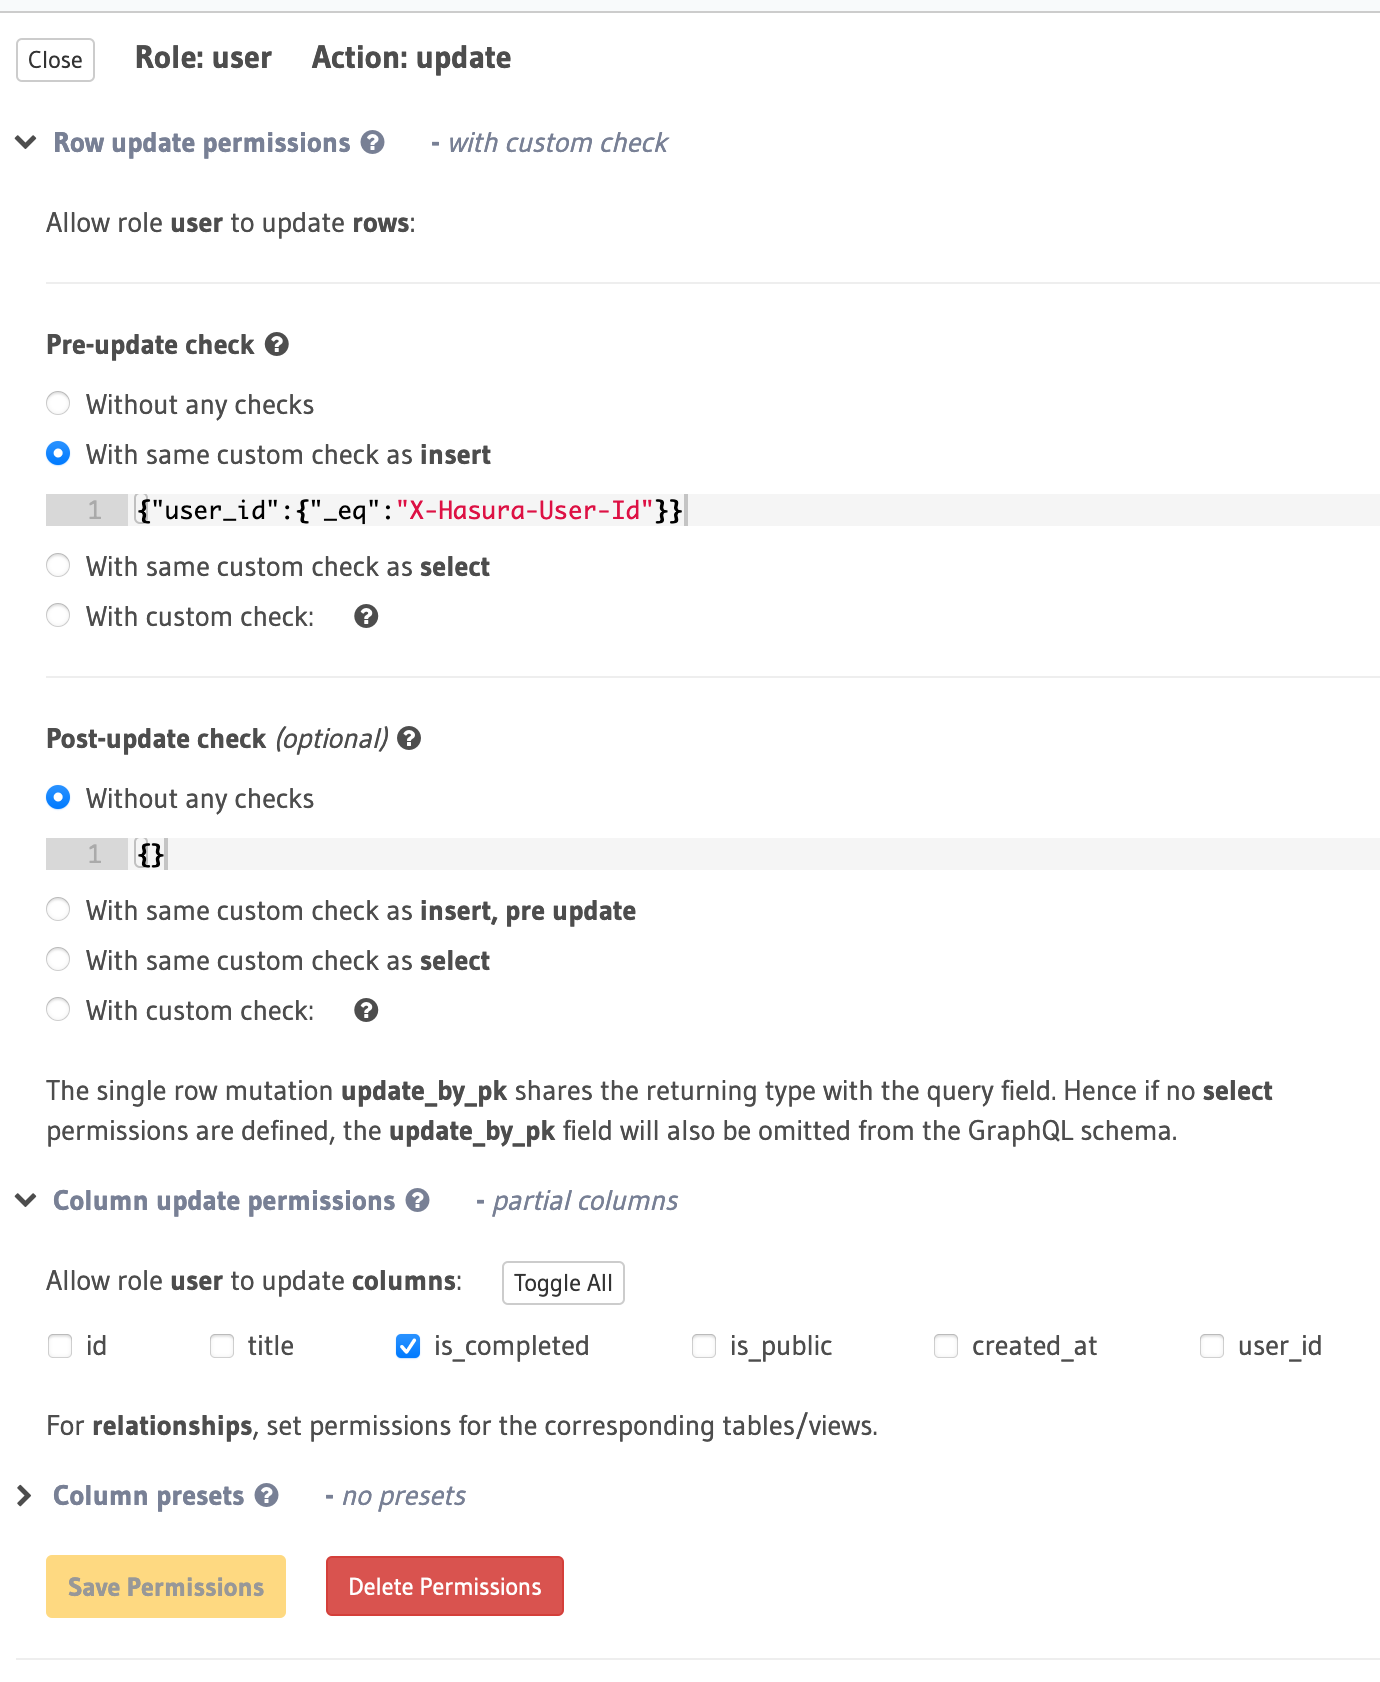
Click on Save Permissions once done.
Only logged-in users are allowed to delete a todo entry.
Finally for delete permission, under custom check, choose With same custom checks as insert, pre update.

Click on Save Permissions and you are done with access control for todos table.
We also need to allow select and update operations into users table. On the left sidebar, click on the users table to navigate to the users table page and switch to the Permissions tab.
Click on the Edit icon (pencil icon) to modify the select permission for role user. This would open up a section below which lets you configure its permissions.
Here the users should be able to access every other user's id and name data.
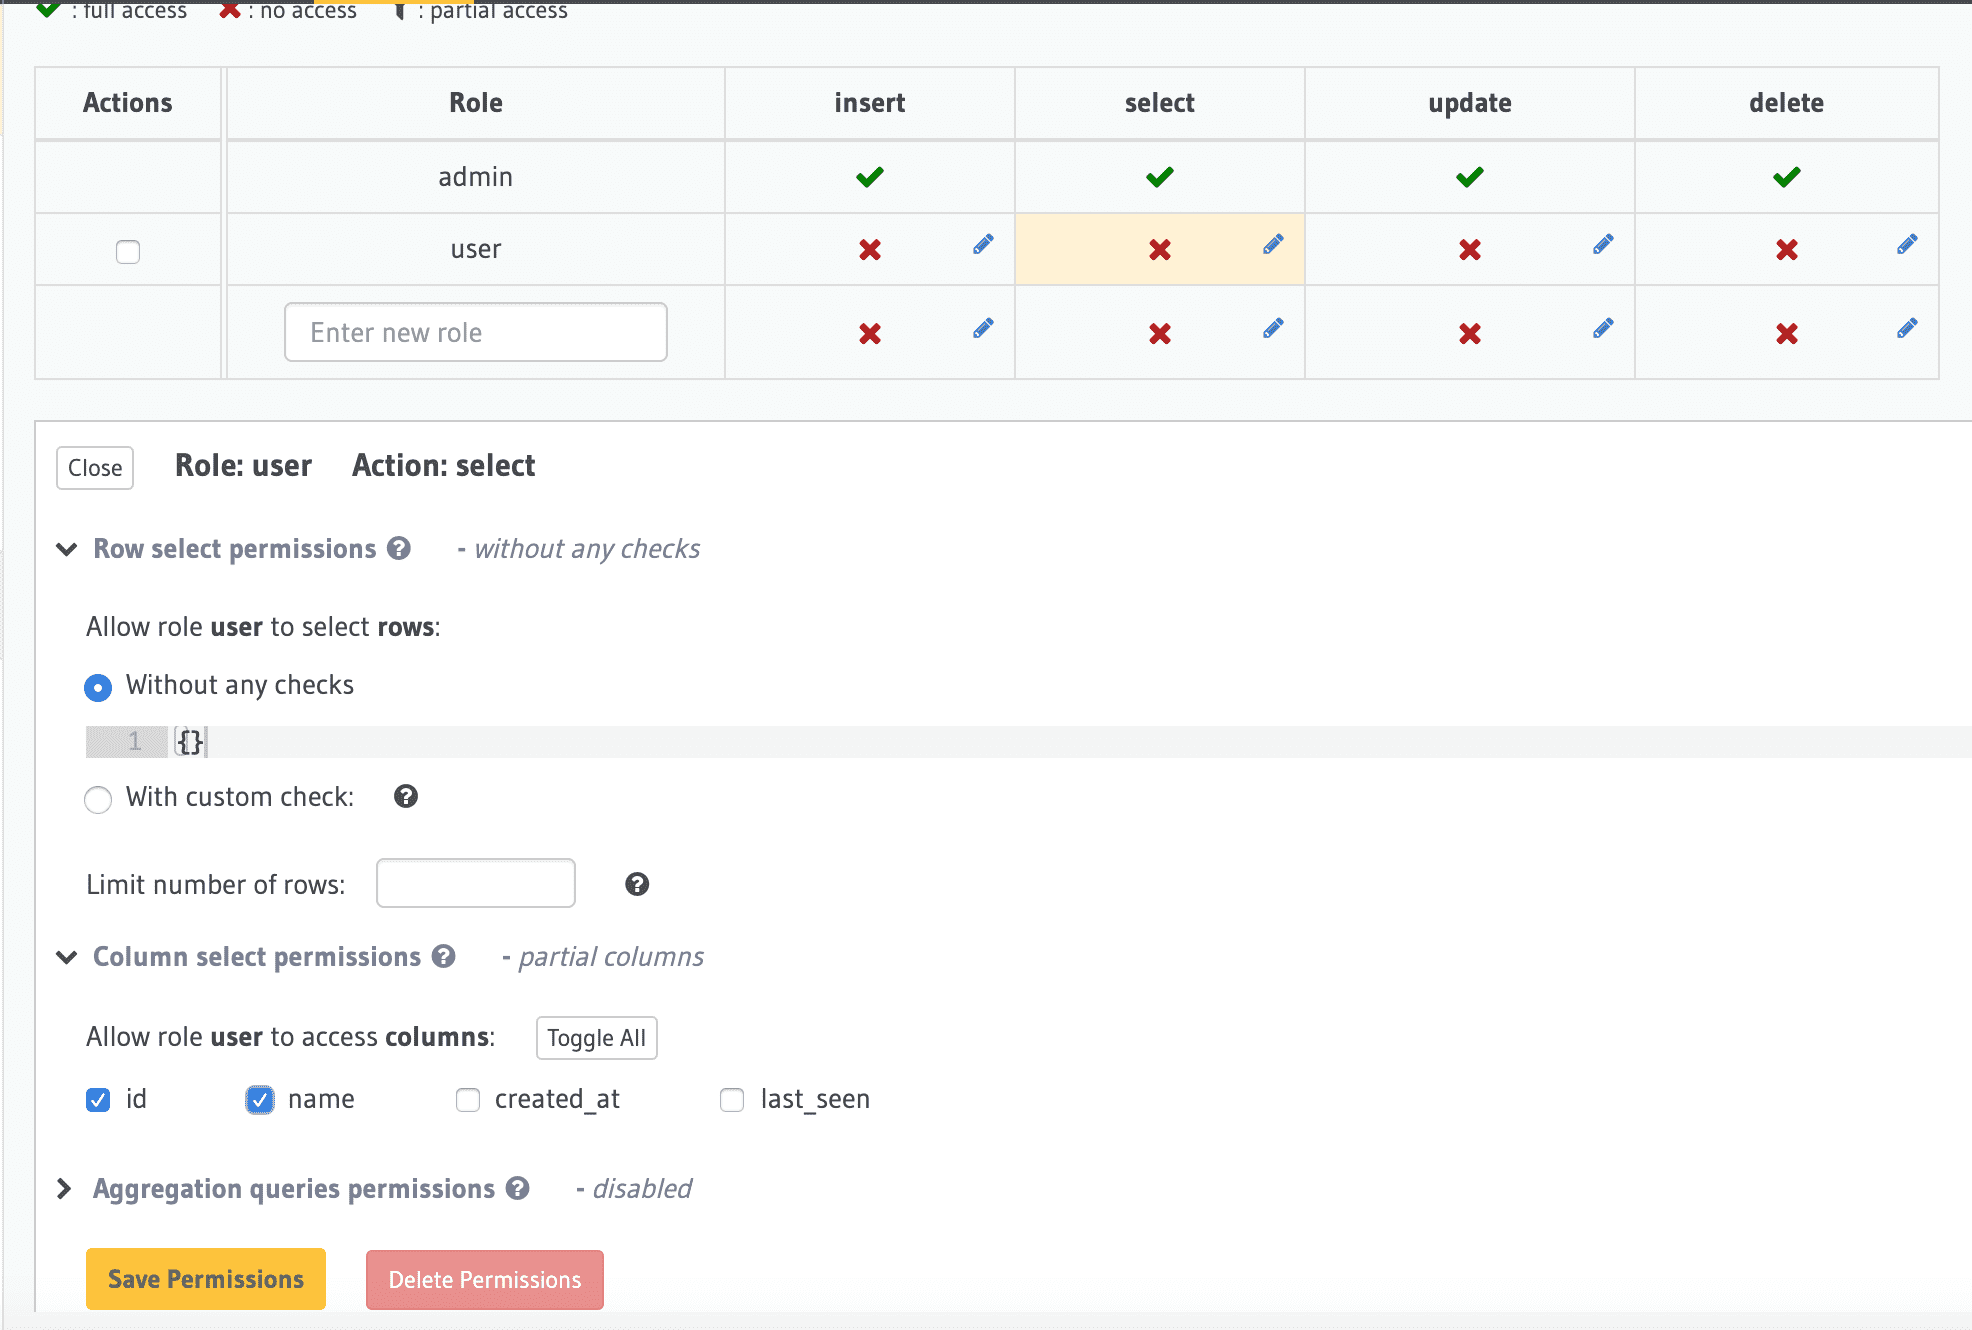
Click on Save Permissions
The user who is logged in should be able to modify only their own record. So let’s set that permission now.
Now click on edit icon for "update" permissions. In the pre-update custom check, choose With custom check with following condition.
{"id":{"_eq":"X-Hasura-User-Id"}}
Under column update permissions, select last_seen column, as this will be updated from the frontend app.
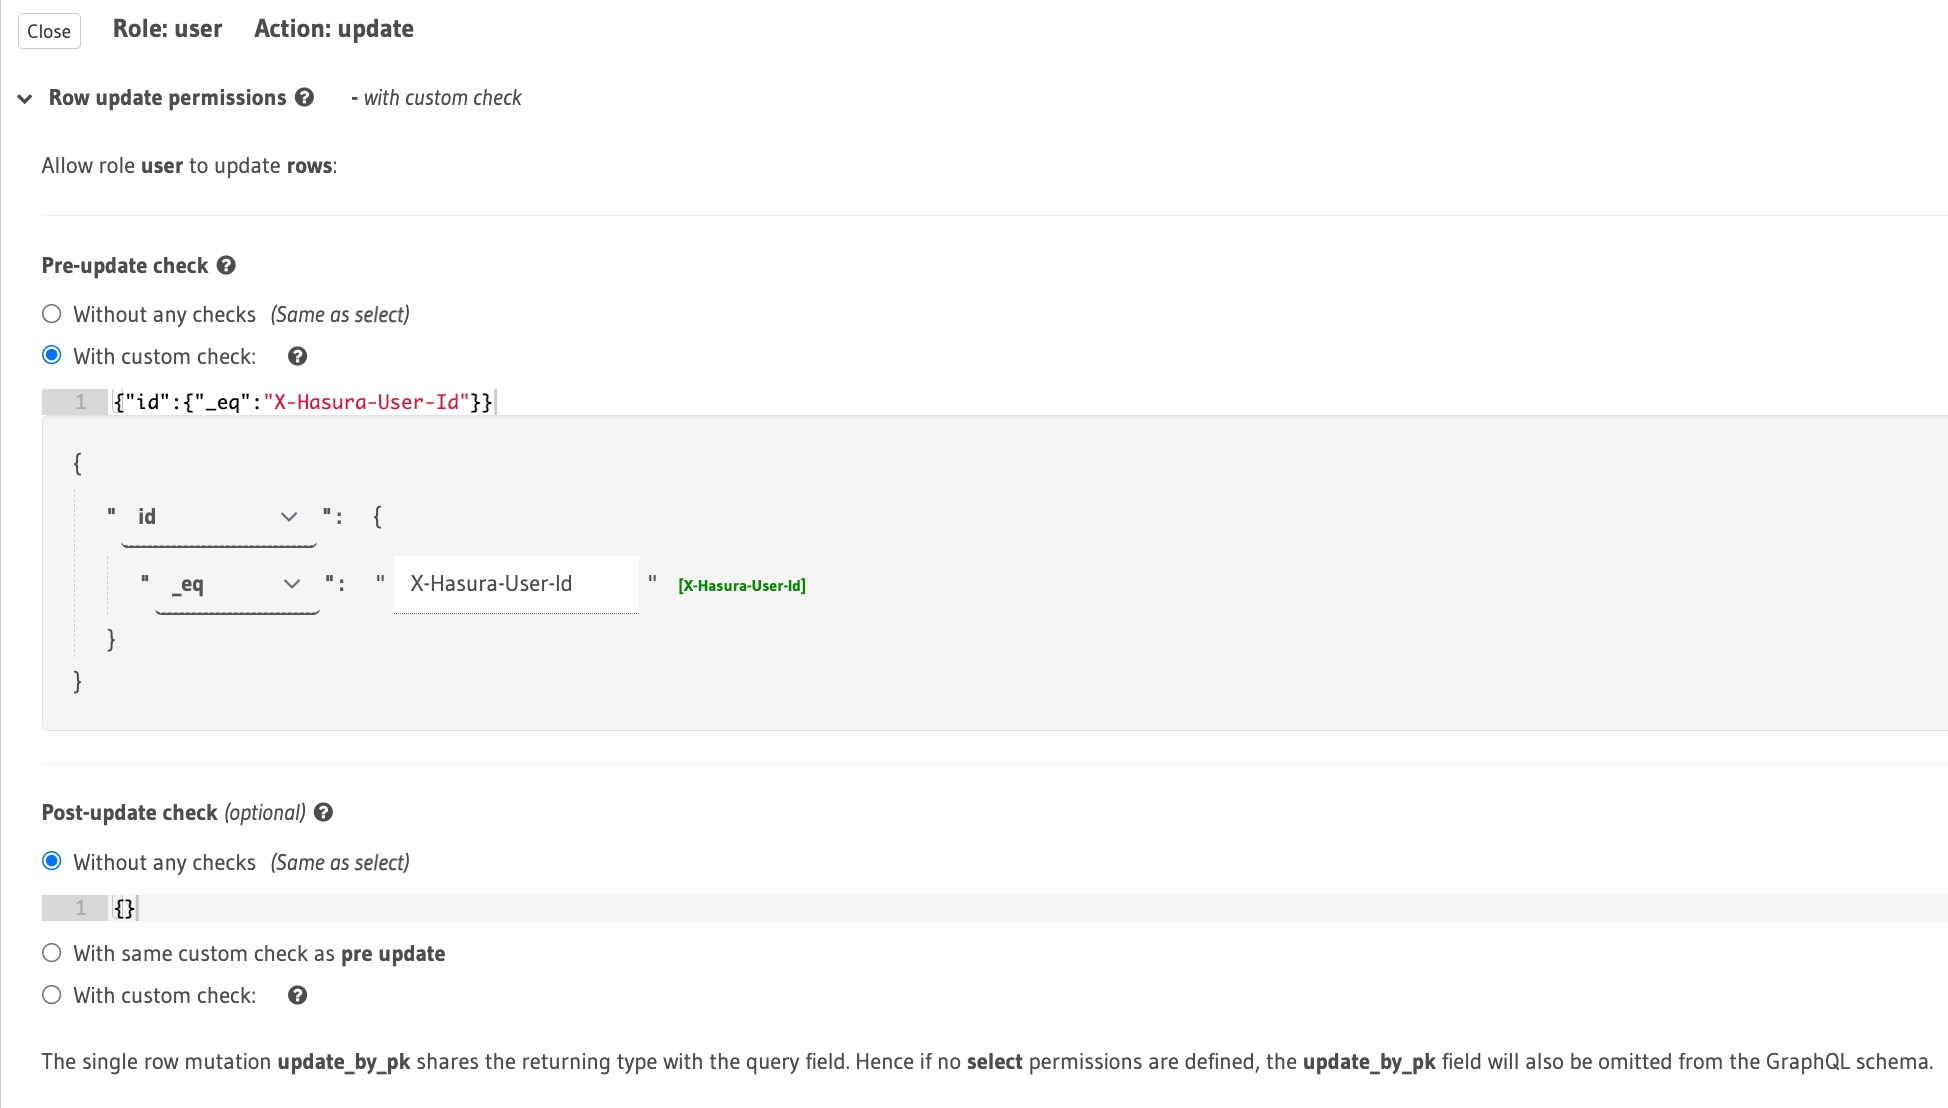
Click on Save Permissions and you are done with access control rules for users table.
Head over to the Permissions tab under online_users view to add relevant permissions.
Here in this view, we only want the user to be able to select data and not do any mutations. Hence we don't define any permission for insert, update or delete.
For Row select permission, choose Without any checks and under "Column select permission", choose both the columns id and last_seen.

Click on Save Permissions. You have completed all access control rules required for the realtime todo app.
Let's go ahead and start testing the permissions through the GraphQL API for todos table.
Now let's go ahead and query the data by adding two request headers:
- x-hasura-role: user
- x-hasura-user-id: 1
query { todos { id title is_public is_completed user_id } }
You should get a response looking something like this:

Note that the response received is filtered for the user id 1. If you change the value for x-hasura-user-id to 2, the data would be returned only for the user id 2. This confirms the permissions that we configured in the previous steps.
You can test the permission configuration similarly for the users table as well.
