![]()


A python package implementing a novel text classifier with visualization tools for Explainable AI
The SS3 text classifier is a novel supervised machine learning model for text classification. SS3 was originally introduced in Section 3 of the paper "A text classification framework for simple and effective early depression detection over social media streams" (preprint available here).
Some virtues of SS3:
- It has the ability to visually explain its rationale.
- Introduces a domain-independent classification model that does not require feature engineering.
- Naturally supports incremental (online) learning and incremental classification.
- Well suited for classification over text streams.
- Its 3 hyperparameters are easy-to-understand and intuitive for humans (it is not an "obscure" model).
Note: this package also incorporates different variations of the SS3 classifier, such as the one introduced in "t-SS3: a text classifier with dynamic n-grams for early risk detection over text streams " (recently submitted to Pattern Recognition Letters, preprint available here) which allows SS3 to recognize important word n-grams "on the fly".
What is PySS3?
PySS3 is a Python package that allows you to work with SS3 in a very straightforward, interactive and visual way. In addition to the implementation of the SS3 classifier, PySS3 comes with a set of tools to help you developing your machine learning models in a clearer and faster way. These tools let you analyze, monitor and understand your models by allowing you to see what they have actually learned and why. To achieve this, PySS3 provides you with 3 main components: the SS3 class, the Live_Test class and the PySS3 Command Line tool, as pointed out below.
The SS3 class
which implements the classifier using a clear API (very similar to that of sklearn's models):
    from pyss3 import SS3
    clf = SS3()
    ...
    clf.fit(x_train, y_train)
    y_pred = clf.predict(x_test)
The Live_Test class
which allows you to interactively test your model and visually see the reasons behind classification decisions, with just one line of code:
    from pyss3.server import Live_Test
    from pyss3 import SS3

    clf = SS3(name="my_model")
    ...
    clf.fit(x_train, y_train)
    Live_Test.run(clf, x_test, y_test) # <- this one! cool uh? :)
As shown in the image below, this will open up, locally, an interactive tool in your browser which you can use to (live) test your models with the documents given in x_test (or typing in your own!). This will allow you to visualize and understand what your model is actually learning.
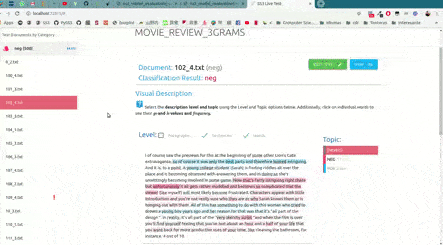
For example, we have uploaded two of these live tests online for you to try out: "Movie Review (Sentiment Analysis)" and "Topic Categorization", both were obtained following the tutorials.
And last but not least, the PySS3 Command Line tool
This is probably the most useful component of PySS3. When you install the package (for instance by using pip install pyss3) a new command pyss3 is automatically added to your environment's command line. This command allows you to access to the PySS3 Command Line, an interactive command-line query tool. This tool will let you interact with your SS3 models through special commands while assisting you during the whole machine learning pipeline (model selection, training, testing, etc.). Probably one of its most important features is the ability to automatically (and permanently) record the history of every evaluation result of any type (tests, k-fold cross-validations, grid searches, etc.) that you've performed. This will allow you (with a single command) to interactively visualize and analyze your classifier performance in terms of its different hyper-parameters values (and select the best model according to your needs). For instance, let's perform a grid search with a 4-fold cross-validation on the three hyperparameters, smoothness(s), significance(l), and sanction(p) as follows:
your@user:/your/project/path$ pyss3
(pyss3) >>> load my_model
(pyss3) >>> grid_search path/to/dataset 4-fold -s r(.2,.8,6) -l r(.1,2,6) -p r(.5,2,6)
In this illustrative example, s will take 6 different values between 0.2 and 0.8, l between 0.1 and 2, and p between 0.5 and 2. After the grid search finishes, we can use the following command to open up an interactive 3D plot in the browser:
(pyss3) >>> plot evaluations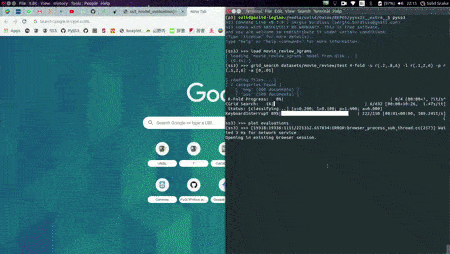
Each point represents an experiment/evaluation performed using that particular combination of values (s, l, and p). Also, these points are painted proportional to how good the performance was using that configuration of the model. Researchers can interactively change the evaluation metrics to be used (accuracy, precision, recall, f1, etc.) and plots will update "on the fly". Additionally, when the cursor is moved over a data point, useful information is shown (including a "compact" representation of the confusion matrix obtained in that experiment). Finally, it is worth mentioning that, before showing the 3D plots, PySS3 creates a single and portable HTML file in your project folder containing the interactive plots. This allows researchers to store, send or upload the plots to another place using this single HTML file (or even provide a link to this file in their own papers, which would be nicer for readers, plus it would increase experimentation transparency). For example, we have uploaded two of these files for you to see: "Movie Review (Sentiment Analysis)" and "Topic Categorization", both evaluation plots were also obtained following the tutorials.
The PySS3 Workflow
PySS3 provides two main types of workflow: classic and "command-line". Both workflows are briefly described below.
Classic
As usual, importing the needed classes and functions from the package, the user writes a python script to train and test the classifiers. In this workflow, user can use the PySS3 Command Line tool to perform model selection (though hyperparameter optimization).
Command-Line
The whole process is done using only the PySS3 Command Line tool. This workflow provides a faster way to perform experimentations since the user doesn't have to write any python script. Plus, this Command Line tool allows the user to actively interact "on the fly" with the models being developed.
Note: tutorials are presented in two versions, one for each workflow type, so that the reader can choose the workflow that best suit her/his needs.
Want to give PySS3 a try?
Just go to the Getting Started page :D
Installation
Simply use:
pip install pyss3Or, if you already have installed an old version, update it with:
pip install --upgrade pyss3

