
Have a look at the demo video to get an idea of what this video wall package is capable of:
You can use any number of screens to create a video wall of arbitrarily placed screens. Screens can be of any size and you can rotate and place your screens in any way you want. If you're using Pi4 devices, you can connect two screens to each Pi4. Otherwise with older Pis you'll need one Pi per screen.
Content on your video wall can be images or videos. Due to how videos are rendered, the resolution of them should not exceed 720p. Higher resolutions might result in slowed down playback. HEVC videos are and will not be supported at all.
Experimental streaming supported is also available, but results might vary. You'll probably get the best result if you use a multicast stream and all devices connected using Ethernet.
After you imported this package into your account you'll first have to create a setup based on it. A setup allows you to create a video wall from a collection of screens. If you want to create multiple video walls, just create multiple setups. In the setup you'll first have to click on the Assigned devices tab and add all the screens you want to use. Then click back to the Configuration tab.
Click on the node labeled Playlist Configuration on the left side of the configuration screen.
You can add images and video assets to your playlist. If you make changes to the playlist and click on Save, your devices will have to resync for a short moment.
Let's configure the assigned screens. On the left side, click the node labeled Screen Configuration.
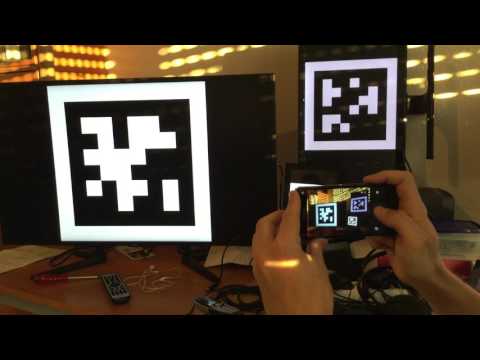
You should see the screens you have assigned. In case you didn't while setting up the playlist, click on Save now. This will instruct all assigned devices to show a configuration tag. Each screen should now show something like this:

The next step is to take a picture of all your screens from the position of your future viewers.
If you have a webcam available, you might skip to the next section below!
When configuring the video wall for the first time, it's usually best to stand directly in front of all your screens and take a picture. Make sure all tags are visible.
Then click on Upload/Capture Mapping Picture and select the picture you just created. Certain browsers, especially on mobile devices, also allow you to directly take a picture instead of selecting an existing picture.
After you've selected or taken a picture it might take a moment to automatically detect all the tags in the picture. If everything was successful, all screens items in the configuration interface should turn green. Just click on Save again and you're ready to show content on your video wall.
If your snapshot didn't detect all tags or some tags are covered, you can create more mapping pictures to configure your wall. Be sure to capture any additional snapshot from the same position you took the initial snapshot. Otherwise your video wall will look weird. Additional snapshots allows you to create setups that include partially occluded screens: First create a snapshot with all the screens in the "bottom layer". Then, while keeping the camera in the same position, add more screens on top and create more snapshots to complete your setup.
If your browser supports webcam access you can instead use the Webcam Mapping mode. Just click on the Start Webcam Mapping button. Your browser might ask for permission to access the webcam. Allow this access (Due to how the info-beamer configuration interface works, the live video stream never leaves your browser: All computation is done on your machine and is never shared with info-beamer.com or any other site), then point the webcam to your video wall screens. You will see a preview window showing all detected screens as they are added to your video wall. If you want to see the current configuration on your screens, just save the setup. Once you've mapped all screens, you might click on Stop Webcam Mapping.
If you're not satisfied with your configuration, just click on Reset mapping. This will remove the previous mapping configuration and allows you to create a new one. Make sure you click on Save so all screens show the configuration tags again.
You can have screens in any orientation. They can be rotated in almost any direction as long as the tag is still detectable by the configuration system. Be aware that a wierd arrangement might only look good from the position you took the mapping picture.
If you want to create a video wall that works from any angle, be sure that all screen surfaces are planar.
Make sure you get as close to your screens as possible as the video/image you show on your screens will be scaled according to the mapping picture you took. The further you're away from the screen, the less of the content you'll see on them later.
I'd suggest you just play around with them a bit to get a feeling of how the mapping system works.
This package as experimental support for live streaming. Just enter a stream url and your device will play that stream instead of the configured playlist.
Since there is no communication across devices running a video wall setup, synchronization is tricky. Right now streaming really only works if you configure a RTP multicast stream. You can use the "Multicast Video Streamer" to generate such a stream from a connected camera module. Learn more about the package: https://info-beamer.com/pkg/7314
This package will not work offline as it requires a correct system time across all devices using the package. Usually that system time is provided online by querying NTP servers. Without a correct time, the video wall will be desynced.
This version now supports dual display configurations on the Pi4. The configuration interface has been reworked and setting up your video wall should be easier now.
Now compatible with the Pi4. In addition the way the "Camera Capture" feature is implemented has been updated and should work with recent browser versions again.
The package now allows incremental mapping. This allows you to configure partically occluded screens by taking multiple configuration pictures from the same location.
Added experimental streaming support
Added webcam support to the configuration interface.
This is the first public release. While it works, there might be problems. If you find anything, please open an issue on github.


