huenchao / libuv-study-v1.x Goto Github PK
View Code? Open in Web Editor NEWlibuv源码阅读的注释版本
License: Other
libuv源码阅读的注释版本
License: Other


void uv_close(uv_handle_t* handle, uv_close_cb close_cb) {
  assert(!uv__is_closing(handle));

  handle->flags |= UV_HANDLE_CLOSING;
  handle->close_cb = close_cb;

  switch (handle->type) {
  case UV_NAMED_PIPE:
    uv__pipe_close((uv_pipe_t*)handle);
    break;

  case UV_TTY:
    uv__stream_close((uv_stream_t*)handle);
    break;

  case UV_TCP:
    uv__tcp_close((uv_tcp_t*)handle);
    break;

  case UV_UDP:
    uv__udp_close((uv_udp_t*)handle);
    break;

  case UV_PREPARE:
    uv__prepare_close((uv_prepare_t*)handle);
    break;

  case UV_CHECK:
    uv__check_close((uv_check_t*)handle);
    break;

  case UV_IDLE:
    uv__idle_close((uv_idle_t*)handle);
    break;

  case UV_ASYNC:
    uv__async_close((uv_async_t*)handle);
    break;

  case UV_TIMER:
    uv__timer_close((uv_timer_t*)handle);
    break;

  case UV_PROCESS:
    uv__process_close((uv_process_t*)handle);
    break;

  case UV_FS_EVENT:
    uv__fs_event_close((uv_fs_event_t*)handle);
    break;

  case UV_POLL:
    uv__poll_close((uv_poll_t*)handle);
    break;

  case UV_FS_POLL:
    uv__fs_poll_close((uv_fs_poll_t*)handle);
    /* Poll handles use file system requests, and one of them may still be
     * running. The poll code will call uv__make_close_pending() for us. */
    return;

  case UV_SIGNAL:
    uv__signal_close((uv_signal_t*) handle);
    /* Signal handles may not be closed immediately. The signal code will
     * itself close uv__make_close_pending whenever appropriate. */
    return;

  default:
    assert(0);
  }

  uv__make_close_pending(handle);
}
一方面是关闭handle,另一方面,是挂一个cb在这个handle上,这个handle被挂到了closing_handles上,在uv_run的最后一个阶段会被执行。

其实event是由uv_run驱动的,并且是在UV_RUN_ONCE的模式下执行
UV_RUN_ONCE就是你文中描述的
poll 阶段: 获取新的I/O事件, 适当的条件下node将阻塞在这里;
中的“适当条件”,它会阻塞在kqueue的kevent()函数中(这里以mac为例,linux下这一块由epoll_wait()函数处理,windows下则是IOCP)
这里描述UV_RUN_ONCE为适当条件,是因为uv_run还有两种模式,对于UV_RUN_NOWAIT的模式,io_poll不会阻塞,会立即触发超时结束当前的event_loop,进入下一次循环(v4.4.2版本中仅用在进程退出前的最后检查)
实际上,你描述的timer,在一次event loop中可能在两个地方执行:
最开始以及close callbacks结束之后
为什么这么说呢,就算不看源代码,我们也可以思考这样的一个场景:
当你设置了一个超时timer,那么第一次进入uv_run_timer时,超时时间未到;此时进入kevent()阻塞等待
如果此处不提供超时机制,那就会永远阻塞在kevent()的I/O等待中;所以我们在
当前的event loop循环中的某一次时,如果存在timer且为达到设定时间,则会把最近的一个timer剩余超时时间作为参数传入io_poll()中,这样kevent()等待时,如果没有任何I/O事件触发,也会由timerout触发跳出等待的操作,结束本次时间循环
所以呢,在UV_RUN_ONCE的模式下,每次循环结束前,即你说的close callback执行结束后,会再执行一次对timer的超时判断
具体涉及到的代码如下:
//deps/uv/src/unix/core.c
int uv_run(uv_loop_t *loop, uv_run_mode mode) {
	int timeout;
	int r;
	int ran_pending;
	//uv__loop_alive返回的是event loop中是否还有待处理的handle或者request
	//以及closing_handles是否为NULL,如果均没有,则返回0
	r = uv__loop_alive(loop);
	//更新当前event loop的时间戳,单位是ms
	if (!r)
    	uv__update_time(loop);
	while (r != 0 && loop->stop_flag == 0) {
    	//使用Linux下的高精度Timer hrtime更新loop->time,即event loop的时间戳
    	uv__update_time(loop);
    	//执行判断当前loop->time下有无到期的Timer,显然在同一个loop里面timer拥有最高的优先级
    	uv__run_timers(loop);
    	//判断当前的pending_queue是否有事件待处理,并且一次将&loop->pending_queue中的uv__io_t对应的cb全部拿出来执行
    	ran_pending = uv__run_pending(loop);
    	//实现在loop-watcher.c文件中,一次将&loop->idle_handles中的idle_cd全部执行完毕(如果存在的话)
    	uv__run_idle(loop);
    	//实现在loop-watcher.c文件中,一次将&loop->prepare_handles中的prepare_cb全部执行完毕(如果存在的话)
    	uv__run_prepare(loop);

    	timeout = 0;
    	//如果是UV_RUN_ONCE的模式,并且pending_queue队列为空,或者采用UV_RUN_DEFAULT(在一个loop中处理所有事件),则将timeout参数置为
    	//最近的一个定时器的超时时间,防止在uv_io_poll中阻塞住无法进入超时的timer中
    	if ((mode == UV_RUN_ONCE && !ran_pending) || mode == UV_RUN_DEFAULT)
        	timeout = uv_backend_timeout(loop);
    	//进入I/O处理的函数(重点分析的部分),此处挂载timeout是为了防止在uv_io_poll中陷入阻塞无法执行timers;并且对于mode为
    	//UV_RUN_NOWAIT类型的uv_run执行,timeout为0可以保证其立即跳出uv__io_poll,达到了非阻塞调用的效果
    	uv__io_poll(loop, timeout);
    	//实现在loop-watcher.c文件中,一次将&loop->check_handles中的check_cb全部执行完毕(如果存在的话)
    	uv__run_check(loop);
    	//执行结束时的资源释放,loop->closing_handles指针指向NULL
    	uv__run_closing_handles(loop);

    	if (mode == UV_RUN_ONCE) {
        	//如果是UV_RUN_ONCE模式,继续更新当前event loop的时间戳
        	uv__update_time(loop);
        	//执行timers,判断是否有已经到期的timer
        	uv__run_timers(loop);
    	}
    	r = uv__loop_alive(loop);
    	//在UV_RUN_ONCE和UV_RUN_NOWAIT模式中,跳出当前的循环
    	if (mode == UV_RUN_ONCE || mode == UV_RUN_NOWAIT)
        	break;
		}

	//标记当前的stop_flag为0,表示当前的loop执行完毕
	if (loop->stop_flag != 0)
    	loop->stop_flag = 0;
	//返回r的值
	return r;
}
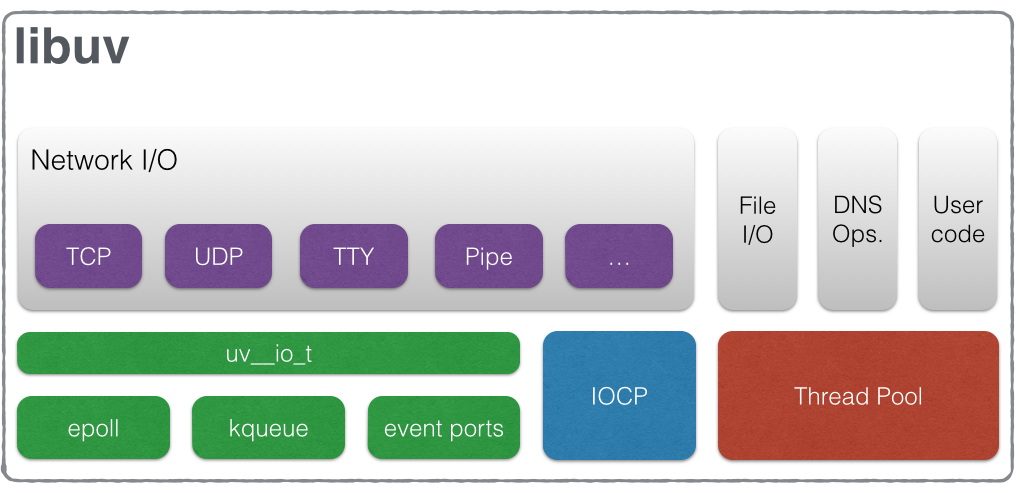
看这个图,I/O可是libuv的重中之重,这篇issue,就是讲解里面的细节。
参考文章:
https://blog.butonly.com/posts/node.js/libuv/5-libuv-io-watcher/
https://www.alexhwoods.com/blog/event-loop-polling
static uv_loop_t default_loop_struct;
static uv_loop_t* default_loop_ptr;

uv_loop_t* uv_default_loop(void) {
  if (default_loop_ptr != NULL)
    return default_loop_ptr;

  if (uv_loop_init(&default_loop_struct))
    return NULL;

  default_loop_ptr = &default_loop_struct;
  return default_loop_ptr;
}
上面的代码可以看出来,就是一个单例的静态初始化,真正初始化的事情是uv_loop_init做的。
#include "uv.h"
#include "task.h"

static uv_prepare_t prepare_handle;
static uv_timer_t timer_handle;
static int prepare_called = 0;
static int timer_called = 0;
static int num_ticks = 10;


static void prepare_cb(uv_prepare_t* handle) {
  ASSERT(handle == &prepare_handle);
  prepare_called++;
  if (prepare_called == num_ticks)
    uv_prepare_stop(handle);
}


static void timer_cb(uv_timer_t* handle) {
  ASSERT(handle == &timer_handle);
  timer_called++;
  if (timer_called == 1)
    uv_stop(uv_default_loop());
  else if (timer_called == num_ticks)
    uv_timer_stop(handle);
}


TEST_IMPL(loop_stop) {
  int r;
  uv_prepare_init(uv_default_loop(), &prepare_handle);
  uv_prepare_start(&prepare_handle, prepare_cb);
  uv_timer_init(uv_default_loop(), &timer_handle);
  uv_timer_start(&timer_handle, timer_cb, 100, 100);

  r = uv_run(uv_default_loop(), UV_RUN_DEFAULT);
  ASSERT(r != 0);
  ASSERT(timer_called == 1);

  r = uv_run(uv_default_loop(), UV_RUN_NOWAIT);
  ASSERT(r != 0);
  ASSERT(prepare_called > 1);

  r = uv_run(uv_default_loop(), UV_RUN_DEFAULT);
  ASSERT(r == 0);
  ASSERT(timer_called == 10);
  ASSERT(prepare_called == 10);

  return 0;
}
struct uv_loop_s {
  /* User data - use this for whatever. */
  void* data;
  /* Loop reference counting. */
  unsigned int active_handles;            //每次我们start一个handle的时候,就会+1,到时候会讲到。
  void* handle_queue[2];                     //理解一下queue.h,里面存的是每个具体类型的hander,利用双向循环列表的数据结构,加快访问和操作。
  union {
    void* unused[2];
    unsigned int count;
  } active_reqs;
  /* Internal flag to signal loop stop. */
  unsigned int stop_flag;                    //影响 uv_run这个函数里的循环。
  UV_LOOP_PRIVATE_FIELDS
};
#define QUEUE_SPLIT(h, q, n)                                                  \
  do {                                                                        \
    QUEUE_PREV(n) = QUEUE_PREV(h);                                            \
    QUEUE_PREV_NEXT(n) = (n);                                                 \
    QUEUE_NEXT(n) = (q);                                                      \
    QUEUE_PREV(h) = QUEUE_PREV(q);                                            \
    QUEUE_PREV_NEXT(h) = (h);                                                 \
    QUEUE_PREV(q) = (n);                                                      \
  }                                                                           \
  while (0)
#define QUEUE_SPLIT(h, q, n) 这个宏定义函数就是为了把h删了,把n加到原来到h队列里,其中q是属于h之前的队列。

#define QUEUE_MOVE(h, n)                                                      \
  do {                                                                        \
    if (QUEUE_EMPTY(h))                                                       \
      QUEUE_INIT(n);                                                          \
    else {                                                                    \
      QUEUE* q = QUEUE_HEAD(h);                                               \
      QUEUE_SPLIT(h, q, n);                                                   \
    }                                                                         \
  }                                                                           \
  while (0)
#define QUEUE_MOVE(h, n) 根据#define QUEUE_SPLIT(h, q, n),我们知道它是把h删了,把n节点插入h原来的队列中,其中q是h的next指向的位置。
#define go(h, n)                                                              \
  do {                                                                        \
    QUEUE_PREV_NEXT(h) = QUEUE_NEXT(n);                                       \
    QUEUE_NEXT_PREV(n) = QUEUE_PREV(h);                                       \
    QUEUE_PREV(h) = QUEUE_PREV(n);                                            \
    QUEUE_PREV_NEXT(h) = (h);                                                 \
  }                                                                           \
  while (0)
把n变成了新的h

参考文献:
http://masutangu.com/2016/10/13/libuv-source-code/ 讲清楚了QUEUE_SPLIT和 QUEUE_ADD/go
https://www.jianshu.com/p/6373de1e117d
A declarative, efficient, and flexible JavaScript library for building user interfaces.
🖖 Vue.js is a progressive, incrementally-adoptable JavaScript framework for building UI on the web.
TypeScript is a superset of JavaScript that compiles to clean JavaScript output.
An Open Source Machine Learning Framework for Everyone
The Web framework for perfectionists with deadlines.
A PHP framework for web artisans
Bring data to life with SVG, Canvas and HTML. 📊📈🎉
JavaScript (JS) is a lightweight interpreted programming language with first-class functions.
Some thing interesting about web. New door for the world.
A server is a program made to process requests and deliver data to clients.
Machine learning is a way of modeling and interpreting data that allows a piece of software to respond intelligently.
Some thing interesting about visualization, use data art
Some thing interesting about game, make everyone happy.
We are working to build community through open source technology. NB: members must have two-factor auth.
Open source projects and samples from Microsoft.
Google ❤️ Open Source for everyone.
Alibaba Open Source for everyone
Data-Driven Documents codes.
China tencent open source team.