mruby/c for Wio はSeeed社が開発した以下の基板上で mruby/c を動作させるためのライブラリです。
mruby/cでコードを書いたLED制御サンプル(クリックで再生)。
- mruby-2.0.1
- mrubyc-2.1
- Arduino IDEを起動し、
スケッチ->ライブラリをインクルード->ライブラリを管理をクリックし、ライブラリマネージャを起動します。 Wio 3GWio LTE M1/NB1の場合は、Wio cell libで検索し、Wio cell lib for Arduinoの最新版をインストールします。Wio LTEの場合は、Wio LTEで検索し、Wio LTE for Arduinoの最新版をインストールします。
以下の3つのライブラリをインストールします。いずれもArduinoIDEからインストール可能ですが、IDEから入れるとコンパイルエラーが発生するためgithubからmasterブランチをcloneしてください.
- SeeedJP/pubsubclientのREADMEに従い、
Arduino Client for MQTTをインストールします。 - https://github.com/SeeedJP/pubsubclient.git
SeeedJP/pubsubclientをインストールします.
$ cd ~/Documents/Arduino/libraries/
# git clone https://github.com/SeeedJP/pubsubclient.git
Seeed-Studio/Grove_SHT31_Temp_Humi_Sensorをインストールします.
$ cd ~/Documents/Arduino/libraries/
# git clone https://github.com/Seeed-Studio/Grove_SHT31_Temp_Humi_Sensor.git
Seeed-Studio/Seeed_SHT35をインストールします.
$ cd ~/Documents/Arduino/libraries/
# git clone https://github.com/Seeed-Studio/Seeed_SHT35.git
Seeed-Studio/Grove_BMP280をインストールします.
$ cd ~/Documents/Arduino/libraries/
# git clone [email protected]:Seeed-Studio/Grove_BMP280.git
Seeed-Studio/Seeed_BME680をインストールします.
$ cd ~/Documents/Arduino/libraries/
# git clone [email protected]:Seeed-Studio/Seeed_BME680.git
本リポジトリをcloneします.
$ git clone https://github.com/hiroeorz/mrubyc_for_Wio_cell_lib.git
リポジトリごとArduinoのライブラリディレクトリに保存します。
$ cp -r mrubyc_for_Wio_cell_lib ~/Documents/Arduino/libraries/
あとは、スケッチの中で本ライブラリをインクルードします
スケッチ->ライブラリのインクルード->mruby/c for Wio cell libを選択。
基本クラス
Groveセンサー
examples ディレクトリ以下にサンプルを置いています。
各サンプルのディレクトリに移動し
$ make
とすると、rubyのソースからCのソースを吐き出します。
あとはArduino上でビルドし、 Wio3G , Wio LTE , Wio LTE M1/NB1 にアップロードして実行してください。
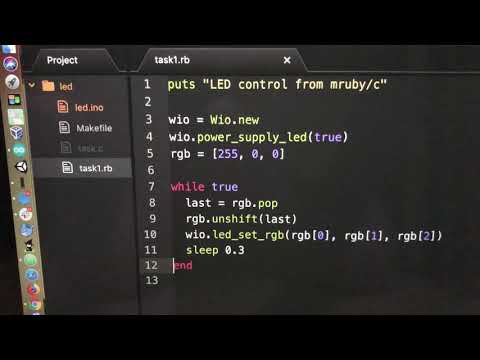
例として、Wio3Gに実装されているLEDを赤・緑・青で繰り返し光らせるためのRubyソースコードは以下のようになります。
wio = Wio.new
wio.power_supply_led(true)
rgb = [255, 0, 0]

while true
  last = rgb.pop
  rgb.unshift(last)
  wio.led_set_rgb(rgb[0], rgb[1], rgb[2])
  sleep 0.3
end- 初期状態で Wio <-> PC 間の通信スピードは
115200bpsです。putsなどの出力を見る場合はシリアルモニタの速度を115200bpsに設定してください。 - 通信速度を変更する場合は
Wioクラスのインスタンスを生成する際に引数で通信速度を渡してください・- 例:
wio = Wio.new(9600)
- 例:
また、簡易なJSONパーサ、ジェネレータも持っています。
  {:di => [1, 2, 3], :ai => [20, 30, 40], :alert => 0, :flag => false}.to_json
  #=> "{\"di\":[1,2,3],\"ai\":[20,30,40],\"alert\":0,\"flag\":false}"

  JSON.parse('{"name": "hiroe", "age": 43, "weight": 70.2, "lover": null}')
  #=> {"name" => "hiroe", "age" => 43, "weight" => 70.2, "lover" => nil}
MQTTプロトコルを通じてSORACOM Beamに接続するmrubycコードは以下のように使います。
wio = Wio.new
wio.power_supply_cellular(true)
wio.turn_on_or_reset
sleep 1

wio.activate("soracom.io", "sora", "sora")
send_data = {:di => [1, 2, 3], :ai => [20, 30, 40], :alert => 0, :flag => false}

MQTTClient.open("beam.soracom.io", 1883, "") do |mqtt|
  mqtt.subscribe("test")
  mqtt.publish("test", send_data.to_json)

  while true
    data = mqtt.get_subscribed_data

    if data
      puts "recived! #{data["test"]}"
    end

    mqtt.wait_loop(1)
  end
end
ここで、このディレクトリ内で make を実行すると task.c が生成されます。
この task.c を読み込んで実行するArduinoスケッチは以下のようになります。
#include <libmrubyc.h>
#include "task.c"

extern const uint8_t code[];

#define MEMSIZE (1024*30)
static uint8_t mempool[MEMSIZE];

void setup() {
  delay(1000);

  mrbc_init(mempool, MEMSIZE);
  mrbc_define_wio_methods();

  if (NULL == mrbc_create_task(code, 0)) {
    SerialUSB.println("!!! mrbc_create_task error");
    return;
  }

  SerialUSB.println("--- running mruby/c ---");
}

void loop() {
  mrbc_run();
}
コンパイル・基板にアップロードして実行するとLEDが三色順番に発光します。
本ライブラリを実装するにあたり、kishimaさんの以下の電子書籍やレポジトリ等を参考にさせていただいています。
- 本ライブラリはWio_cell_lib_for_ArduinoおよびWio LTE for Arduinoに依存します。
- 本ライブラリはmruby/c 2.0のソースコードを含んでいます。
- 作者は手元にWio3GとWioLTEしか持っていないため、Wio LTE N1/NB1での動作確認は行なっておりません。
mruby/c for Wio cell lib はBSD License(aka 3-clause license)のもとで配布いたします。


