geniusfunny / geniusfunny.github.io Goto Github PK
View Code? Open in Web Editor NEW个人技术博客
个人技术博客


Node是单线程模型,当需要执行多个独立且耗时任务的时候,只能通过child_process来分发任务,提高处理速度;不像Java这种多线程语言,可以通过线程来解决并行问题,Node只能创建进程来进行处理;但是进程相对于线程来说,开销太大。一旦进程数较多时,CPU和内存消耗严重(影响我干其他的事情),所以做了一个简易版的进程池,用来解决并行任务的处理。
主控进程+工作进程群
ProcessPool是我们管理进程的地方,我们通过传递配置参数(任务脚本、脚本需要的参数、最大并行进程数)生成一个ProcessPool实例,然后通过这个实例来管控进程池。
ProcessItem是我们进程池里的进程对象,ProcessItem对象除了process的信息,我们还增加了唯一标识和状态(忙碌、任务失败、任务完成、进程不可用)。
一批任务开始时,我们会一次性fork到最大并行进程数,然后开始监控是否有工作进程完成任务,如果有工作进程完成了任务,那我们就可以复用这个工作进程,让其执行新任务;如果任务执行失败,我们会将任务归还给进程池,等待下一次分发。
由于主控进程即要负责IPC又要不断监听批任务完成的情况,目前我采用的方式是setInterval切割,让IPC和监控能交替进行(ps:应该有更好的方法
const fs = require('fs')
const ProcessItem = require('./ProcessItem')
/**
 * 进程池类
 * @param maxParallelProcess,最大并行工作进程数
 * @param timeToClose,任务最长耗时时间
 * @param taskParams,所有任务脚本需要的参数
 * @param dependency,任务脚本所需依赖
 * @param taskName, 工作脚本名称
 * @param script 脚本内容
 * @param workDir 工作目录
 * Todo: 读写同一文件时出现任务丢失,待修复bug
 */
function ProcessPool({
    maxParallelProcess = 50,
    timeToClose = 60 * 1000,
    taskParams = [],
    dependency = '',
    workDir ='',
    taskName = Date.now(),
    script = '',}) {
  if (typeof script !== 'function' && script.name === 'task') {
    throw new Error('script must be a async function that named task')
  }
  if (typeof maxParallelProcess !== 'number' || maxParallelProcess < 1) {
    throw new Error('maxParallelProcess must be a integer and > 0')
  }
  if (typeof timeToClose !== 'number' || timeToClose < 1) {
    throw new Error('timeToClose must be a integer and > 0')
  }
  if (typeof dependency !== 'string') {
    throw new Error('dependency must be a string')
  }
  if (typeof workDir !== 'string') {
    throw new Error('dependency must be a path')
  }
  this.timeToClose = timeToClose
  this.processList = new Map() // 使用Map存储进程对象
  this.currentProcessNum = 0 // 当前活动进程数
  this.dependency = dependency // 任务脚本依赖
  this.workDir = workDir // 主控函数工作目录
  this.taskName = taskName // 任务脚本名称
  this.task = `${this.workDir}/${this.taskName}.js`// 任务脚本路径
  this.taskParamsTodo = taskParams // 待完成的任务参数数组,包含了n个小任务所需参数,所以是一个二维数组
  this.taskParamsDone = [] // 已完成的任务参数数组
  this.maxParallelProcess = maxParallelProcess // 最大进程并行数
  this.script = script
  try {
    this.writeScript()
  } catch (e) {
    throw new Error('创建工作脚本失败' + e)
  }
}
/**
 * 将内容写进脚本
 */
ProcessPool.prototype.writeScript = function() {
  /**
   * Todo:生产工作进程脚本
   * 1. 在工作目录下新建脚本
   * 2. 注入依赖
   * 3. 引入task模版
   * 4. 倒入任务脚本内容
   */
  if (this.fileIsExist()) {
    fs.writeFileSync(this.task, '')
  }
  try {
    fs.appendFileSync(this.task, `${this.dependency}\n`, (err) => {
      if (err) throw new Error('依赖写入失败')
    })
  } catch (e) {
    throw new Error('依赖写入失败')
  }
  try {
    fs.copyFileSync(`${__dirname}/task.js`, this.task)
  } catch (e) {
    throw new Error('复制task模版失败')
  }
  try {
    fs.appendFileSync(this.task, this.script.toString(), err => {
      if (err) throw new Error('任务脚本写入失败')
    })
  } catch (e) {
    throw new Error('任务脚本写入失败')
  }
}
/**
 * 复用空闲进程
 * @param key,可复用进程的pid
 */
ProcessPool.prototype.reuseProcess = function(key) {
  const workProcess = this.processList.get(key)
  if (this.taskParamsTodo.length) {
    const taskParam = this.taskParamsTodo.shift()
    workProcess.state = 1 // 设置为忙碌
    workProcess.process.send(taskParam)
  }
}
/**
 * 监测当前是否有正在处理任务的进程
 * @returns {number}
 */
ProcessPool.prototype.hasWorkProcessRunning = function() {
  if (!this.processList.size) return 1 // 进程池刚启动,尚无进程
  for (const p of this.processList.values()) {
    if (p.state === 1) return 2 // 有忙碌的进程
  }
  return -1
}
ProcessPool.prototype.listenProcessFinish = function(workProcess, params) {
  workProcess.process.on('message', message => {
    if (message === 'finish') {
      this.taskParamsDone.push(params)
      workProcess.finishTask()
    } else if (message === 'failed') {
      this.taskParamsTodo.unshift(params)
      workProcess.unFinishTask()
    }
  })
}
ProcessPool.prototype.addProcess = function() {
  if (this.currentProcessNum <= this.maxParallelProcess) {
    let workParam = this.taskParamsTodo.shift()
    const newProcess = new ProcessItem({task: this.task, workParam})
    this.processList.set(newProcess.id, newProcess)
    this.currentProcessNum++
    this.listenProcessFinish(newProcess, workParam)
  }
}
/**
 * 从进程池中移除[进程id]
 * @param id
 */
ProcessPool.prototype.removeProcess = function(id) {
  if (this.processList.has(id)) {
    const processToTerminate = this.processList.get(id)
    processToTerminate.terminate()
    this.currentProcessNum--
  }
}
/**
 * 关闭所有进程并清空进程池
 */
ProcessPool.prototype.closeProcessPool = function() {
  const processItems = this.processList.values()
  for (const processItem of processItems) {
    processItem.terminate()
  }
  // 清空进程池
  this.processList = null
  process.kill(process.pid)
}
/**
 * 检查任务脚本是否已经存在
 */
ProcessPool.prototype.fileIsExist = function() {
  fs.access(this.task, fs.constants.F_OK, err => {
    return !err
  })
}
/**
 * 进程池启动,处理任务
 * Todo:一方面要实时监控任务状态,另一方面要处理工作进程传递过来的message,由于单线程模型,二者只有一个能运行,目前采用定时器切换工作上下文,应该有更好的方法。
 *
 */
ProcessPool.prototype.run = function() {
  setInterval(() => {
    let flag = this.hasWorkProcessRunning() // 判断是否有工作进程正在执行或是否是第一次处理任务
    const taskTodoNum = this.taskParamsTodo.length

    if (flag === 1 && taskTodoNum) {
      // 初始阶段,fork min{任务数,最大进程数} 的进程
      while (this.currentProcessNum <= this.maxParallelProcess && this.currentProcessNum <= taskTodoNum) {
        this.addProcess()
      }
    } else if (flag > 0 && !taskTodoNum) {
      // 如果有工作进程正在执行且没有新的任务要执行,那么等待工作进程结束任务
    } else if (flag > 0 && taskTodoNum) {
      // 如果有工作进程正在执行且有新的任务要执行,如果有空闲进程,那么重用空闲进程执行新任务
      const processList = this.processList.values()
      for (const p of processList) {
        if (p.state !== 1 || p.state !== 4) {
          this.reuseProcess(p.id)
        }
      }
    } else if (flag < 0 && taskTodoNum) {
      // 如果没有工作进程正在执行且有新的任务要执行,如果有空闲进程,那么重用空闲进程执行新任务,如果没有则新启动进程进行执行任务
      const processList = this.processList.values()
      for (const p of processList) {
        if (p.state !== 1 || p.state !== 4) {
          this.reuseProcess(p.id)
        }
      }
    } else if (flag < 0 && !taskTodoNum) {
      // 如果没有工作进程正在执行且没有新的任务要执行,关闭进程池,任务完成
      this.closeProcessPool()
    }
  }, 0)
}
module.exports = ProcessPoolconst ChildProcess = require('child_process')
/**
* 工作进程类
*/
function ProcessItem({ task = './task.js', workParam = [] }) {
/**
* state 状态码
* 1: 忙碌
* 2: 完成任务
* 3: 未完成任务
* 4: 不可用
*/
if (!Array.isArray(workParam)) {
throw new Error('workParam must be a array')
}
if (typeof task !== 'string') {
throw new Error('workParam must be a string')
}
this.process = this.createProcess(task, workParam)
this.state = 1
this.id = this.process.pid
}
ProcessItem.prototype.finishTask = function() {
if (this.state === 1) {
this.state = 2
}
}
ProcessItem.prototype.unFinishTask = function() {
this.state = 3
}
ProcessItem.prototype.terminate = function() {
try {
this.process.kill()
this.state = 4
} catch (e) {
throw new Error(`关闭进程${this.id}失败`)
}
}
ProcessItem.prototype.createProcess = function (task, workParam) {
let childProcess = ChildProcess.fork(task, workParam)
if (childProcess) {
return childProcess
} else {
throw new Error('create process failed')
}
}
module.exports = ProcessItem/**
* 当进程被子进程创建后,立刻执行工作任务
*/
async function firstTask() {
const workParam = process.argv.slice(2)
await task(workParam)
}
/**
* 完成任务,提示进程池已完成,工作进程空闲
*/
async function finishTask() {
await process.send('finish')
}
/**
* 任务失败,提示进程池未完成,归还任务
*/
async function unFinishTask() {
await process.send('failed')
}
/**
* 监听进程池后续指派的任务
*/
process.on('message', async workParam => {
await task(workParam)
try {
await finishTask()
} catch (e) {
await unFinishTask()
}
})
/**
* 进程被创建时立即执行进程池指派的任务
* @returns {Promise<void>}
*/
async function main() {
try {
await firstTask()
await finishTask()
} catch (e) {
await unFinishTask()
}
}
main()
/**
* @name 工作进程负责的任务
* @param workParam // 执行任务所需的参数数组
* 动态添加任务脚本到此文件尾部
*/npm install node-process-pool// 进程池使用示例
const ProcessPool = require('../src/ProcessPool')
const taskParams = []
for (let i = 0; i < 100; i++) {
taskParams[i] = [i]
}
// 创建进程池实例
const processPool = new ProcessPool({
maxParallelProcess: 50, // 支持最大进程并行数
timeToClose: 60 * 1000, // 单个任务被执行最大时长
dependency: `const path = require('path')`, // 任务脚本依赖
workDir: __dirname, // 当前目录
taskName: 'test', // 任务脚本名称
script: async function task(workParam) {
console.log(workParam)
}, // 任务脚本内容
taskParams // 需要执行的任务参数列表,二维数组
})
// 利用进程池进行处理大规模任务
processPool.run()
// 测试任务1:写时间戳到文本中
// 进程池:5000个任务,耗时2.7s,每个任务耗时0.54ms
// 单线程:5000个任务,耗时0.456s,每个任务耗时0.0934ms
// 测试任务2:写时间戳到文本中,但每个任务需要至少耗时20ms(while空循环)
// 进程池:5000个任务,耗时15.089s,每个任务耗时3.02ms
// 单线程:5000个任务,耗时100.260s,每个任务耗时20.052ms
// 显然,当处理独立且耗时任务时,使用进程池更加合适。例如爬取信息,直接会将对方服务器503,2333333~2009年,Node.js诞生
2010年,Express和Socket.io诞生
2011年,Node.js正式商用(LinkedIn、Uber)、Npm诞生
2012年,Node.js趋于成熟,商用框架Hapi诞生
2013年,Node.js在Web框架领域百花齐放,Koa诞生;蚂蚁金服内部推出Chair框架(Egg.js前身)
2016年,Egg.js开源
官方对Express的描述:Fast, unopinionated, minimalist web framework for Node.js
我们可以从中看出,Express主要有2个特点:
const express = require('express')
const app = express() // 实际执行 createcreateApplication
const port = 3000

app.use(function(req, res, next) {
  // ...
  next()
})
app.use('/test', function(req, res, next) {
  // ...
  next()
})


app.get('/', (req, res) => {
  res.send('Hello World!')
})

app.listen(port, () => {
  console.log(`Example app listening at http://localhost:${port}`)
})
Demo非常简单,主要步骤如下:
1.引入express模块
2.调用express(),创建一个应用实例
3.通过app.use绑定两个中间件
4.通过app.get为根目录注册一个Get路由
5.通过app.listen将服务运行在3000端口,并监听请求
Express源码合计约3500行。
- lib/
    - middleware/
        - init.js
        - query.js
    - router/
        - index.js
        - layer.js
        - route.js
    - application.js
    - express.js
    - request.js
    - response.js
    - utils.js
    - view.js
- index.js
下面主要从程序运行角度,将express的源码分为两个阶段:初始化流程与请求处理
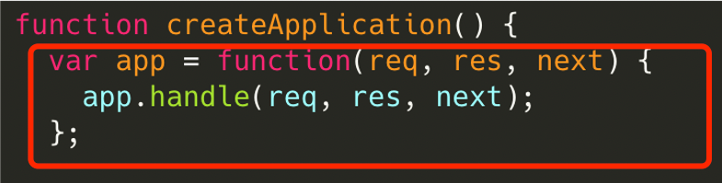
function createApplication() {
  var app = function(req, res, next) {
    app.handle(req, res, next);
  };

  mixin(app, EventEmitter.prototype, false); // 赋予eventEmitter能力
  mixin(app, proto, false); // 挂载基本方法,例如get/post/listen/init/use/handle等

  // expose the prototype that will get set on requests
  app.request = Object.create(req, {
    app: { configurable: true, enumerable: true, writable: true, value: app }
  })

  // expose the prototype that will get set on responses
  app.response = Object.create(res, {
    app: { configurable: true, enumerable: true, writable: true, value: app }
  })

  app.init(); // 初始化
  return app;
}
Demo中调用的express()即执行的createApplication函数;
在createApplication函数执行过程中,app这个函数被挂载了许多方法和属性。
然后调用app.init()方法进行初始化。
最后返回app函数。(为什么返回的是函数而不是Object?)
app.use = function (fn) {
  // 通过offset来处理函数重载,忽略细节
  var fns = flatten(slice.call(arguments, offset));
  this.lazyrouter() // 初始化router,讲路由的时候再说
  fns.forEach(fn => {
    // 实际上app.use调用的router的中间件绑定
    this.router.use(path, function mounted_app(req, res, next) {
    	fn.handle(req, res, function(err) {
      setPrototypeOf(req, orig.request)
      setPrototypeOf(res, orig.response)
      next(err);
    })
  })
  fn.emit('mount', this);
  })
}
绑定中间件:
// 单例模式
app.lazyrouter = function lazyrouter() {
  if (!this._router) {
    // 初始化一个router实例,全局唯一
    this._router = new Router({
      caseSensitive: this.enabled('case sensitive routing'),
      strict: this.enabled('strict routing')
    });
		// router挂载基本中间件
    this._router.use(query(this.get('query parser fn')));
    this._router.use(middleware.init(this));
  }
};
通过单例模式初始化了一个Router实例,然后挂载基本中间件。
Router对象内部结构:
function Router(options) {
  var opts = options || {};

  function router(req, res, next) {
    router.handle(req, res, next);
  }

  // mixin Router class functions
  setPrototypeOf(router, proto)

  router.params = {};
  router._params = [];
  router.caseSensitive = opts.caseSensitive;
  router.mergeParams = opts.mergeParams;
  router.strict = opts.strict;
  router.stack = [];

  return router;
};
Router构造函数:
与createApplication类似,返回的也是函数而非object
内部维护了stack数组
app.use内部实际执行的router.use
// router.use(fn1, fn2); // 所有路径和方法(除options)都会执行
// router.use('/test', fn3); // 针对/test才会执行

// 伪代码
router.use = function(callbacks) {
  //
  for(let i = 0; i < callbacks.length; i++) {
    const layer = new Layer(path, {
      // 配置
    }, callbacks[i]);
    layer.route = undefined;
    this.stack.push(layer); // 将所有中间件维护在一起
  }
}
1.与app.use类似,通过对参数的判断进行函数重载
2.对每个中间件包装成Layer对象,Layer对象的route属性设置为undefined;
3.将layer对象维护在router的stack数组中
这里的layer对象内部机构如下:
function layer(path, options, fn) {
  // 省略部分代码
   this.handle = fn;
   this.path = undefined;
}
Layer构造函数: 接受3个参数,第一个是路径,默认为undefined;最后一个是处理函数
app[method] = function(path){
  if (method === 'get' && arguments.length === 1) {
    // app.get(setting)
      return this.set(path);
   }
    this.lazyrouter();
    var route = this._router.route(path); // 初始化route
    route[method].apply(route, slice.call(arguments, 1)); // 绑定处理函数
    return this;
}
初始化route:
1.创建指定path的route对象
2.创建指定path的layer对象,并且该layer绑定的函数为route.dispatch
3.并将layer推入router的stack数组
app.use绑定中间件时创建layer时,将layer.route设置为undefined,注册路由时却将layer.route设置为route。
由此可知,Router的layer有2种类型,一种非路由中间件(未指定route),一种则为路由中间件(指定route)。
router.route = function route(path) {
  let route = new Route(path);
  let layer = new Layer(path, {
    // 配置
  }, route.dispatch.bind(route)) // layer上绑定route的dispatch方法【后续会说作用】
  layer.route = route; // layer只与此route相关
  this.stack.push(layer); // 将一个route下的所有路由函数放一起
  return route;
}
Route对象内部结构:
function Route(path) {
  // 忽略部分代码
  this.path = path;
  this.stack = []; // route也有stack,用来存储处理函数,即对应 http路由的 处理函数
  // route handlers for various http methods
  this.methods = {};
}Route为指定方法绑定处理函数:
methods.forEach(function(method){
  Route.prototype[method] = function(){
    var handles = flatten(slice.call(arguments));

    for (var i = 0; i < handles.length; i++) {
      var handle = handles[i];

      if (typeof handle !== 'function') {
        var type = toString.call(handle);
        var msg = 'Route.' + method + '() requires a callback function but got a ' + type
        throw new Error(msg);
      }

      var layer = Layer('/', {}, handle);
      layer.method = method;

      this.methods[method] = true;
      this.stack.push(layer);
    }

    return this;
  };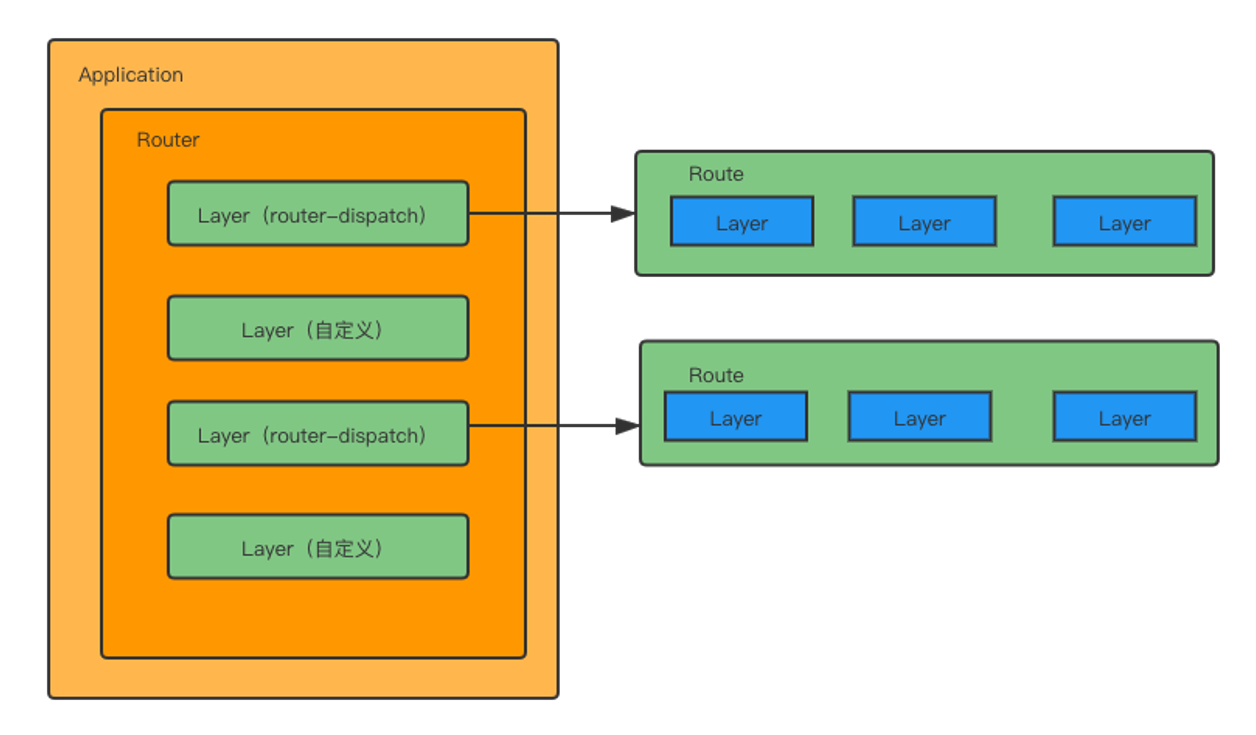
});经过初始化阶段后,各个模块关系图如下:
Express将创建server和监听端口合并成一个app.listen函数
app.listen = function listen() {
  var server = http.createServer(this);
  return server.listen.apply(server, arguments);
};
并且,创建server时 将app函数本身作为requestListener,那么每次端口监听到请求时就会执行app函数;
这样就进入express的第二个阶段,请求处理阶段
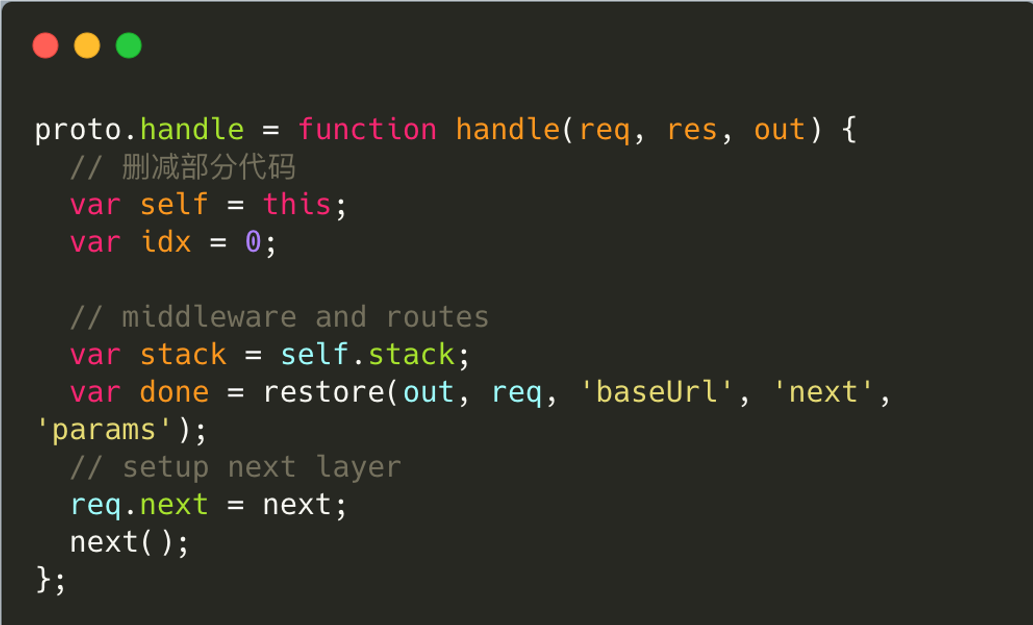
app.handle内部实际调用的router.handle
app.handle = function handle(req, res, callback) {
var router = this._router;
// final handler
var done = callback || finalhandler(req, res, {
env: this.get('env'),
onerror: logerror.bind(this)
});
// no routes
if (!router) {
debug('no routes defined on app');
done();
return;
}
router.handle(req, res, done);
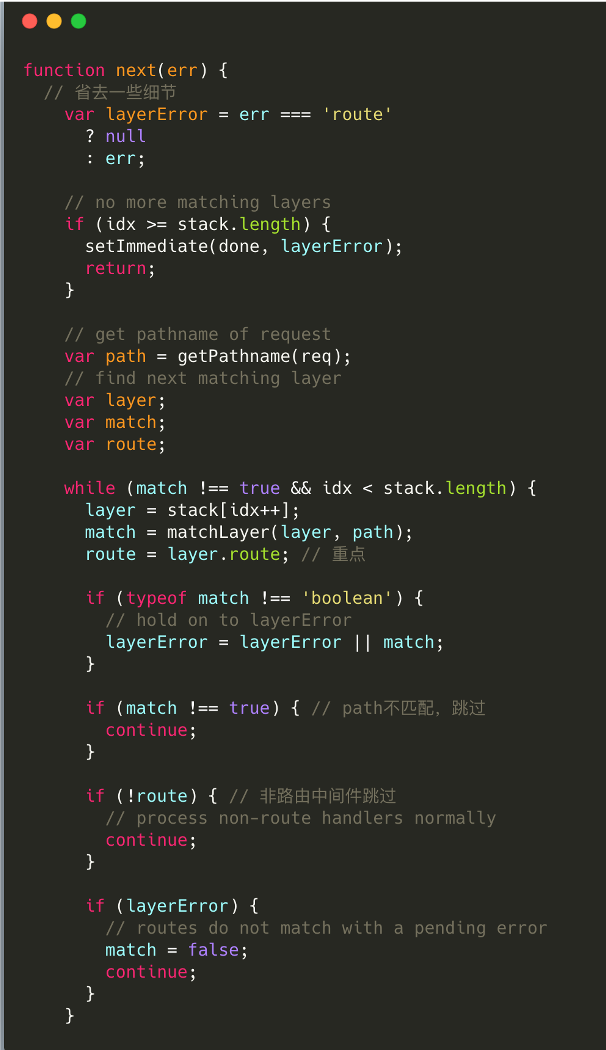
};router.handle主要做两件事情:1. 根据传进来的参数req,做一些处理,如获取ur;2.遍历layer,这个是通过next函数来实现。
next函数:按索引遍历Router.stack,找到匹配路径的中间件,然后执行layer.handle_request(req, res, next)
handle_request函数其实就是执行创建layer对象时传递的第三个参数(handle)。
路由中间件的layer绑定的handle为route.dispatch
非路由中间件的layer绑定的handle为自定义函数
layer.prototype.handle_request = function(req, res, next) {
  var fn = this.handle;
  if (fn.length > 3) return next(); // 如果参数不对,跳过本处理函数
  try {
    fn(req, res, next); // 执行处理函数
  } catch(err) {
    next(err);
  }
}
再来看route.dispatch: dispatch的功能就是,遍历route的stack数组,若layer的method和本次req的method匹配就执行。
// dispatch req, res into this route
Route.prototype.dispatch = function(req, res, next) {
  if (stack.length === 0) return;
  // ...不必要细节
  function next(err) {
    var layer = stack[idx++];
    // method就是http方法
    if (layer.method && layer.method !== method) { // 方法不匹配,跳过本处理函数
      return next(err);
    }
    layer.handle_request(req, res, next); // 执行处理函数
  }
  next()
}请求处理流程如图:
作为Node.js平台第一个Web应用框架,也是多数JavaScripter接触的第一个服务端框架,Express已经完成了它的历史使命。
// source: 需要筛选的原资源
// itemName: 要筛选的属性名
// itemValue: 指定的属性值
const filtrateItem = (source, itemName, itemValue) => {
return source.filter((item) => {
return item[itemName] === itemValue
})
}
// source: 需要筛选的原资源
// 关键字: {name: value}
const filtrate = (source, keyWord) => {
const keyWordName = Object.keys(keyWord)
const keyWordValue = Object.values(keyWord)
keyWordName.map((item, index) => {
source = filtrateItem(source, item, keyWordValue[index])
})
return source
}
当我们谈到浏览器缓存的时候,总是会提到强缓存/协商缓存,但是事实上,浏览器(Chrome)的缓存不止于此。浏览器(以Chrome为例)的缓存分为四种:**Service Worker Cache、Memory Cache、Disk Cache、Push Cache。**而我们所说的强缓存/协商缓存,只是Disk Cache(也叫HTTP Cache)。
接下来,按优先级递减的顺序一一简单介绍这四种类型的Cache。
Service Worker Cache不同于Memory Cache和Disk Cache,它是由我们自己来管控,并且这个缓存是永久性的,必须我们手动删除或者浏览器清空cache storage。
如果 Service Worker 没能命中缓存,一般情况会使用 fetch() 方法继续获取资源。这时候,浏览器就去 memory cache 或者 disk cache 进行下一次找缓存的工作了。
Memory Cache,存储在内存中。几乎所有的资源都会自动放在内存中,但是由于内存大小有限制,所以只能存放一定数量的数据,并且浏览器一旦关闭Tab,存储在内存中的数据就会丢失。
preloader:边解析js/css,边获取js/css
preload:显式指定的预加载资源,也会被放入 memory cache 中。
cache:no store,只有这样设置才会让资源不被短期缓存,其余的方式都会存在短期缓存效果(毕竟资源还在内存里嘛)
也就是HTTP Cache,这个可以简单介绍。
强缓存:
协商缓存:
HTTP/2 中的 Server Push 技术使得服务端收到页面请求后,能够将页面所需资源(CSS、JS)通过 PUSH_PROMISE 帧推送给浏览器,从而减少延迟;如果要推送的资源浏览器本地已经有了缓存,会导致流量的浪费。
HTTP/2的服务端推送,推送的资源直接进入客户端缓存
前端路由分为两种实现方式:
location.hash,然后监听hashchange事件来进行对应操作。pushState、replaceStateAPI,然后监听popstate事件来进行对应操作。二者的优劣:
第一种方法兼容性更好,但是实现比较复杂,并且url比较丑陋(例如:http://www.test.com/#/xxx)。
第二种方法是浏览器提供的能力,所以实现比较简单,url与正常相同(例如:http://www.test.com/xxx),但是可能存在兼容性问题。
其实还有第三种,MemoryHistory,用于non-DOM环境下,例如React Native。
_routes用来存储路由对应的回调函数,当hash变化时调用refresh函数(从_routes总找到对应的回调函数然后执行);通过back函数进行回退,所以我们需要引入布尔值判定当前操作是否为回退。
class HashRouter {
    constructor() {
        this._routes = new Map()
        this._history = []
        this._currentUrl = ''
        this._backIndex = this._routes.length - 1
        this._currentIndex = this._routes.length - 1
        this._isBack = false
        this._bindEvent()
    }
    _bindEvent = () => {
        window.addEventListener('laod', this.refresh, false)	// 加载后就触发更新
        window.addEventListener('hashchange', this.refresh, false)	//监听hash的变化,然后调用更新函数
    }
    route(path, cb = function() {}) {
        this._routes.set(path, cb)
    }
    refresh = () => {
        this._currentUrl = location.hash.slice(1) || '/' //读取url中'#'后面的内容
        this._history.push(this._currentUrl)
        this._currentIndex++
        if (!this._isBack) {
            this._backIndex = this._currentIndex
        }
        let cb = this._routes.get(this._currentUrl)
        if (typeof cb === 'function') cb()	//	执行路由对应的回调函数
        this._isBack = false
    }
    back = () => {
        this._isBack = true
        if (this._backIndex <= 0) {
            this._backIndex = 0
        } else {
            this._backIndex -= 1
        }
        location.hash = `#{this._history[this._backIndex]}`
    }
}依赖于HTML5提供的History对象,Router的实现简便很多;使用go来进行前往指定路由,用back回退。
class BroswerRouter {
    constructor() {
        this._routes = new Map()
        this._bindEvent()
    }
    _bindEvent = () => {
        window.addEventListener('popstate', e => {
            let path = e.state && e.state.path
            let cb = this._routes.get(path)
            if (typeof cb = 'function') cb()
        })
    }
    init(path) {
        history.replaceState({path: path}, '', path)
        let cb = this._routes.get(path)
        if (typeof cb = 'function') cb()
    }
    route(path, cb = function() {}) {
        this._routes.set(path, cb)
    }
    go = (path) => {
        history.pushState({path: path}, '', path)
        let cb = this._routes.get(path)
        if (typeof cb === 'function') cb()
    }
    back = () => {
        history.back()
    }
}👆👆👆只是简单的前度路由的模拟,但是涉及到React或者Vue的时候,我们需要另外处理渲染逻辑,所以会牵扯到生命周期和组件通信。
下面简单分析概述一下React-Router v4
React-Router分为4个package,分别为:react-router、react-router-dom、react-router-native、react-router-config。
react-router:负责通用的路由逻辑,被其他package所依赖,无需特别引入。
react-router-dom: 负责浏览器的路由管理。
react-router-native:负责react-native的路由管理。
react-router-config: 用于配置特别的react-router,比如SSR环境下。
下面介绍一下react-router中只要的模块👇👇👇
BroswerRouter在内部创建一个全局对象history,然后通过props传递给Router组件,Router组件再将这个history属性作为context传递给子组件。
//	创建context,用于全局传递信息
const createNamedContext = name => {
  const context = React.createContext();
  context.Provider.displayName = `${name}.Provider`;
  context.Consumer.displayName = `${name}.Consumer`;
  return context;
}
const RouterContext = createNamedContext('Router')

class Router extends Component {
  static computeRootMatch(pathname) {
    return { path: "/", url: "/", params: {}, isExact: pathname === "/" };
  }
  constructor(props) {
    super(props);
    this.state = {
      location: props.history.location
    };

    // This is a bit of a hack. We have to start listening for location
    // changes here in the constructor in case there are any <Redirect>s
    // on the initial render. If there are, they will replace/push when
    // they mount and since cDM fires in children before parents, we may
    // get a new location before the <Router> is mounted.
    this._isMounted = false;
    this._pendingLocation = null;
    if (!props.staticContext) {
        //	!!!在这里进行监听,每次路由变化都会触发顶层Router的回调事件,然后Router进行setState,再向下传递context,最下面的Route根据context内容判断是否进行渲染!!!
      this.unlisten = props.history.listen(location => {
        if (this._isMounted) {
          this.setState({ location });
        } else {
          this._pendingLocation = location;
        }
      });
    }
  }

  componentDidMount() {
    this._isMounted = true;

    if (this._pendingLocation) {
      this.setState({ location: this._pendingLocation });
    }
  }
  componentWillUnmount() {
    if (this.unlisten) this.unlisten();
  }
  render() {
    return (
      <RouterContext.Provider
        children={this.props.children || null}
        value={{
          history: this.props.history,
          location: this.state.location,
          match: Router.computeRootMatch(this.state.location.pathname),
          staticContext: this.props.staticContext
        }}
      />
    );
  }
}
class BrowserRouter extends React.Component {
  history = createHistory(this.props);
  render() {
    return <Router history={this.history} children={this.props.children} />;
  }
}Router是借助context向Route传递内容的,Router作为Provider、Route作为Comsumer,所以Route必须包含在Router内部。
同时,Route借助context将history、location、match作为三个独立的属性传递给要渲染的组件。
class Route extends Component {
  render() {
    return (
      <RouterContext.Consumer>
        {context => {

          const location = this.props.location || context.location
          const match = this.props.computedMatch
            ? this.props.computedMatch // <Switch> already computed the match for us
            : this.props.path
              ? matchPath(location.pathname, this.props)
              : context.match

          const props = { ...context, location, match }	//	传递给要渲染的组件

          let { children, component, render } = this.props

          // Preact uses an empty array as children by
          // default, so use null if that's the case.
          if (Array.isArray(children) && children.length === 0) {
            children = null;
          }
          if (typeof children === "function") {
            children = children(props);

            if (children === undefined) {
              children = null;
            }
          }

          return (
              //	提供了多种渲染的方式,children(子元素)、component(props)、render(props)
            <RouterContext.Provider value={props}>
              {children && !isEmptyChildren(children)
                ? children
                : props.match
                  ? component
                    ? React.createElement(component, props)	//	这里是通过React.creareElement创建组件的,所以React Diff认为每次都不一样,更新的时候会先卸载之前的组件再重新安装新的组件。
                    : render
                      ? render(props)
                      : null
                  : null}
            </RouterContext.Provider>
          );
        }}
      </RouterContext.Consumer>
    );
  }
}Switch的作用是,当Switch中的第一个Route匹配后就不会渲染其他的Route,类似swich这个语法。源码如下:
class Switch extends Component {
  render() {
    return (
      <RouterContext.Consumer>
        {context => {

          const location = this.props.location || context.location;

          let element, match;

          // We use React.Children.forEach instead of React.Children.toArray().find()
          // here because toArray adds keys to all child elements and we do not want
          // to trigger an unmount/remount for two <Route>s that render the same
          // component at different URLs.
          React.Children.forEach(this.props.children, child => {
         //	按children的顺序依次遍历子元素,成功就标记这个子元素和对应的location和comutedMatch,最后调用React.cloneElement渲染,否则返回null
            if (match == null && React.isValidElement(child)) {
              element = child;

              const path = child.props.path || child.props.from;
			//	Switch通过matchPath来判断是否匹配成功
              match = path
                ? matchPath(location.pathname, { ...child.props, path })
                : context.match;
            }
          });

          return match
            ? React.cloneElement(element, { location, computedMatch: match })
            : null;
        }}
      </RouterContext.Consumer>
    );
  }
}前面多次提到使用matchPath来判断是否匹配成功,那么到底是如何进行匹配的呢?下面是matchPath的源码
//	缓存,不必每次都生成一个正则表达式用于判断
const cache = {};
const cacheLimit = 10000;
let cacheCount = 0;

function compilePath(path, options) {
  const cacheKey = `${options.end}${options.strict}${options.sensitive}`;
  const pathCache = cache[cacheKey] || (cache[cacheKey] = {});

  if (pathCache[path]) return pathCache[path];

  const keys = [];
  const regexp = pathToRegexp(path, keys, options);
  const result = { regexp, keys };

  if (cacheCount < cacheLimit) {
    pathCache[path] = result;
    cacheCount++;
  }

  return result;
}

/**
 * Public API for matching a URL pathname to a path.
 */
function matchPath(pathname, options = {}) {
  if (typeof options === "string") options = { path: options };

  const { path, exact = false, strict = false, sensitive = false } = options;

  const paths = [].concat(path);

  return paths.reduce((matched, path) => {
    if (matched) return matched;
    const { regexp, keys } = compilePath(path, {
      end: exact,
      strict,
      sensitive
    });
    const match = regexp.exec(pathname);

    if (!match) return null;

    const [url, ...values] = match;
    const isExact = pathname === url;

    if (exact && !isExact) return null;

    return {
      path, // the path used to match
      url: path === "/" && url === "" ? "/" : url, // the matched portion of the URL
      isExact, // whether or not we matched exactly
      params: keys.reduce((memo, key, index) => {
        memo[key.name] = values[index];
        return memo;
      }, {})
    };
  }, null);
}Link是react-router-dom中的,而不是通用模块里的元素;Link是一个用a标签包裹、用来实现跳转的元素。
class Link extends React.Component {
  handleClick(event, history) {
    if (this.props.onClick) this.props.onClick(event);

    if (
      !event.defaultPrevented && // onClick prevented default
      event.button === 0 && // ignore everything but left clicks
      (!this.props.target || this.props.target === "_self") && // let browser handle "target=_blank" etc.
      !isModifiedEvent(event) // ignore clicks with modifier keys
    ) {
      event.preventDefault();

      const method = this.props.replace ? history.replace : history.push;

      method(this.props.to);
    }
  }

  render() {
    const { innerRef, replace, to, ...rest } = this.props; // eslint-disable-line no-unused-vars

    return (
      <RouterContext.Consumer>
        {context => {

          const location =
            typeof to === "string"
              ? createLocation(to, null, null, context.location)
              : to;
          const href = location ? context.history.createHref(location) : "";

          return (
            <a
              {...rest}
              onClick={event => this.handleClick(event, context.history)}
              href={href}
              ref={innerRef}
            />
          );
        }}
      </RouterContext.Consumer>
    );
  }
}
H5的history对象中通过pushState、replaceState只会改变路由而不会发生跳转,但是之前提的Router中的listen可以监听到路由的变化然后更新props和context,让下层的Route重新匹配,完成需要渲染部分的更新。如何监听的呢?这部分在history库中的createTransitionManager中(React-Router依赖于history)。
下面就是源码,观察者模式的一个应用
function createTransitionManager() {
  let prompt = null;

  function setPrompt(nextPrompt) {
    prompt = nextPrompt;
    return () => {
      if (prompt === nextPrompt) prompt = null;
    };
  }

  function confirmTransitionTo(
    location,
    action,
    getUserConfirmation,
    callback
  ) {
    // TODO: If another transition starts while we're still confirming
    // the previous one, we may end up in a weird state. Figure out the
    // best way to handle this.
    if (prompt != null) {
      const result =
        typeof prompt === 'function' ? prompt(location, action) : prompt;

      if (typeof result === 'string') {
        if (typeof getUserConfirmation === 'function') {
          getUserConfirmation(result, callback);
        } else {

          callback(true);
        }
      } else {
        // Return false from a transition hook to cancel the transition.
        callback(result !== false);
      }
    } else {
      callback(true);
    }
  }

  let listeners = [];

  function appendListener(fn) {
    let isActive = true;

    function listener(...args) {
      if (isActive) fn(...args);
    }

    listeners.push(listener);

    return () => {
      isActive = false;
      listeners = listeners.filter(item => item !== listener);
    };
  }

  function notifyListeners(...args) {
    listeners.forEach(listener => listener(...args));
  }

  return {
    setPrompt,
    confirmTransitionTo,
    appendListener,
    notifyListeners
  };
}光从名字上看就知道,这是一个HOC,这个高阶组件的作用就是让我们在非Route中的组件也能获取到路由信息。
function withRouter(Component) {
  const C = props => {
    const { wrappedComponentRef, ...remainingProps } = props;

    return (
      <Route
        children={routeComponentProps => (
          <Component
            {...remainingProps}
            {...routeComponentProps}
            ref={wrappedComponentRef}
          />
        )}
      />
    );
  };

  C.displayName = `withRouter(${Component.displayName || Component.name})`;
  C.WrappedComponent = Component;
  return hoistStatics(C, Component);
}现在我们来大致梳理一下,前端路由的过程。
所以说整个前端路由的思路(以React-Router为例)就是:
那么,前端路由跟后端路由有什么区别呢?
后端路由,数据渲染是由服务器解决,例如利用express构建的服务端应用,render('xxx.pug'),服务器渲染好页面后返回给浏览器端,浏览器显示。表现形式就是,跳转页面会白屏,加载~
前端路由,数据渲染是由浏览器端解决,例如上述的例子,但是路由变化和渲染变化是分隔开的,所以我们需要通过hashchange or popstate将路由变化和渲染变化连接起来。表现形式则是,跳转页面不会白屏~
那是不是前端路由就可以完全取代后端路由了呢?不是的,前端路由也存在不足,SEO就是一个big problem。
那是不是前端路由和后端路由就是相互隔绝的呢?不是的,二者之间又衍生出许多新的hack手段,例如预渲染(服务端线构建出一部分静态HTML,用于直出浏览器,然后剩余使用前端渲染来实现)、SSR。
既然谈到了预渲染和SSR;那就先占个坑位,学习一下SSR和预渲染~
A declarative, efficient, and flexible JavaScript library for building user interfaces.
🖖 Vue.js is a progressive, incrementally-adoptable JavaScript framework for building UI on the web.
TypeScript is a superset of JavaScript that compiles to clean JavaScript output.
An Open Source Machine Learning Framework for Everyone
The Web framework for perfectionists with deadlines.
A PHP framework for web artisans
Bring data to life with SVG, Canvas and HTML. 📊📈🎉
JavaScript (JS) is a lightweight interpreted programming language with first-class functions.
Some thing interesting about web. New door for the world.
A server is a program made to process requests and deliver data to clients.
Machine learning is a way of modeling and interpreting data that allows a piece of software to respond intelligently.
Some thing interesting about visualization, use data art
Some thing interesting about game, make everyone happy.
We are working to build community through open source technology. NB: members must have two-factor auth.
Open source projects and samples from Microsoft.
Google ❤️ Open Source for everyone.
Alibaba Open Source for everyone
Data-Driven Documents codes.
China tencent open source team.