![]()
- Beelance
- Downloads
- How to build
- How to install
- How to use
- Developer guide
- Related projects, guides and articles
- Sponsors and partners
Beelance comes from the French word "Balance" which means "weight scale".
Beelance is an autonomous and remotely connected weight scale for beehives 🐝. It can monitor the weight of beehives and send the data to a remote server. The communication can be done through LTE-M / NB-IoT / LTE / 4G. LTE-M and NB-IOT are special communication frequencies for IoT devices which allows cellular coverage at more remote locations.
Features:
- Powered by Solar Panel
- Powered by battery (optional), recharged by solar panel (type 18650, LFP or Li-ion)
- Remote communication with CAT-M (LTE-M), NB-IOT, LTE, 4G
- Web interface with ESP-DASH
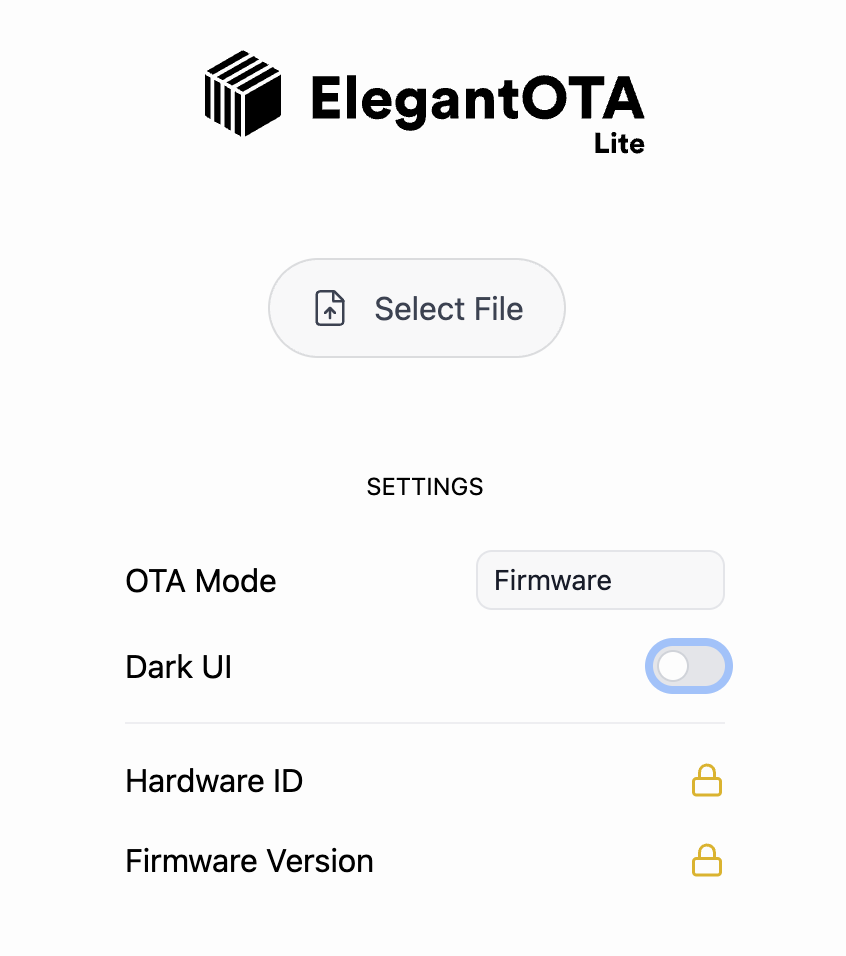
- OTA Web updates with ElegantOTA
- Configuration backup and restore
- Work in AP Mode and WiFi mode
- Sleep mode to save battery
- Night mode to avoid sending data at night
- GPS location of beehives
- Battery voltage and level monitoring
- DS18B20 Temperature sensor
- Supported boards:
Firmware downloads are available in the Releases page of the project.
Firmware files are named as follow:
Beelance-<VERSION>-<BOARD>.bin: the firmware used to update through web interfaceBeelance-<VERSION>-<BOARD>.factory.bin: the firmware used to flash for the first time
Where:
VERSION: version, ormainfor the latest development buildBOARD: the board name
You need to choose if you go with:
- A IoT / M2M SIM card (with
LILYGO® T-SIM7080G S3 with GPS)- Cheaper if you have several beehives
- Better coverage: LTE-M and NB-IoT are special optimized bandwidth for IoT devices
- Requires to get SIM card from the right IoT / M2M provider
- A normal 4G SIM card from a traditional mobile operator (with
LILYGO® T-A7670G R2 with GPS)- Easier to setup (i.e. in France a cheap Free Mobile SIM card could work)
- Won't scale with many beehives, and can be more expensive
Here is a matrix of tested LTE-M / NB-IOT provider for France and boards:
| Provider | T-SIM7080G-S3 | T-A7670G R2 |
|---|---|---|
| Things Mobile | ✅ | ✅ |
| Onomondo | ✅ | ✅ |
| Free Mobile | ❌ | Should work |
Onomondo is the recommended communication provider.
It has been tested extensively during development and works very well with the T-SIM7080G S3 board.
Onomondo also has accessible pricing, very good technical support, and provides connectors, a way to optimize the traffic in order to reduce cost even more.
This is the way to go if you have several beehives.
Beelance supports Onomondo connectors, which is a way to considerably reduce costly data traffic and decouple the device from the website collecting the data.
Things Mobile has been tested during development and works well with the T-SIM7080G S3 board.
Things Mobile should should cost around 1-2 euros per month per SIM card (beehive), but the solution is not scalable: it's not possible to order a batch of SIM cards, and each SIM card costs 5 euros to ship, 1.5 euros to activate, and the minimal balance to add on the platform is 30 euros.
Also, the platform is a mere web interface where we can manage SIM card. There is no connector API like Onomondo, and no details and logs about the connections and traffic.
This solution is good if you have a few connected beehives.
Free Mobile provides cheap SIM cards at 2 euros (or free for people having a Freebox), with 200MB of data per month, which should be enough for a beehive.
Since it works on traditional frequencies (700 MHz band 28), it should work with the T-A7670G R2 board.
Hardware
- Pick one board:
- LTE-M / NB-IOT: LILYGO® T-SIM7080G S3 (AliExpress) - 42 euros
- LTE / 4G: LILYGO® T-A7670G R2 with GPS (AliExpress) - 47 euros
- Temperature Sensor: DS18B20 Cable + DS18B20 Adapter - 3 euros - SAMIORE Store
- Solar Panels - 33 euros for 2 items
- Weight scale
- 4x Load Sensors - 11 euros for 4 items - SAMIORE Store
- HX711 - 3 euros - SAMIORE Store
- Alternative: Set of 4x Load Sensors + HX711 - 6 euros - SAMIORE Store
- Dupont Cable Kit - 4 euros - SAMIORE Store
- Box:
- Waterprood Electric Box about 150mm x 100mm x 60mm - 8 euros
- If using a battery, take a UL94V-0 box (fire retardant)
- Optional:
- Waterproof USB-C Sockets - 9 euros for 5 items - Facilitate charging and powering the device without opening the box
- Battery (18650): Li-ion Battery 18650 3.7V 3200-3600mAh - 15 euros for 2 items
- Charger: Li-ion 18650 battery Charger - 16 euros
- USB-C 90 degree extension - 10 euros - If you make the mistake like I did to put the board too close to the interior side of the box, and then you do not have enough clearance to connect a USB-C charging cable
WARNINGS:
-
Make sure to verify what you receive. The seller SAMIORE Store is quite reliable: I often buy electronic stuff at this store. I already received broken items or unfinished items from some other sellers.
-
Verify the Solar Panel Voc: it should be within 4.4-6V.
- Connect the GPS antenna and LTE antenna to the module
- Connect de DS18B20 adapter (data to GPIO pin 21, VCC to 3.3V DC1, GND to GND on board)

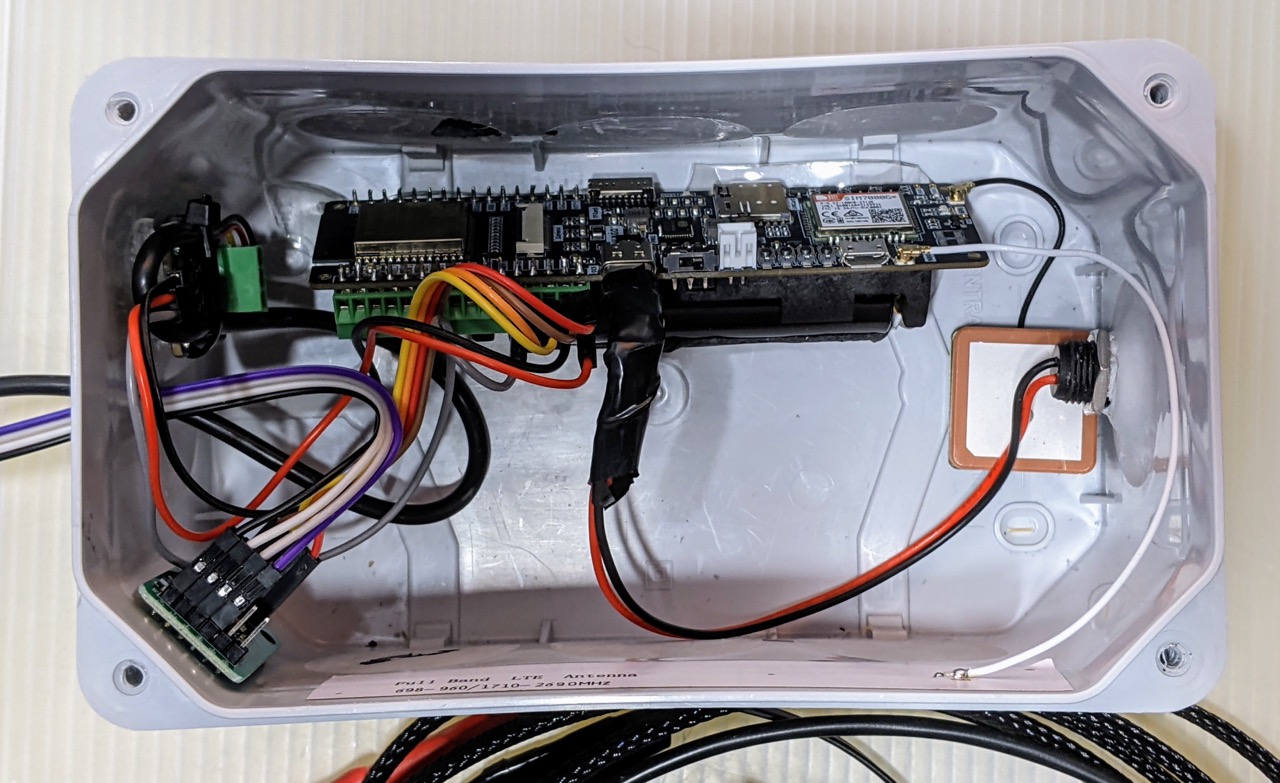
- Install the battery in the board (optional)
- Connect the solar panel to USB-C port
WARNING:
Leaving a device in nature with a battery is a potential hazard, especially with Li-ion batteries which are not supposed to be used above 60 degrees. Please inform yourself with the associated risks with Li-ion or LFP batteries. If you are not sure about the safety of the device, do not leave it unattended or without any monitoring, or do not install any battery. In any case, use an appropriate box which is fire retardant (UL94V-0) and waterproof.
First time, flash the entire firmware which includes the partition table and all partitions. Pick the right firmware for the right board.
- Erase the flash
esptool.py --port /dev/ttyUSB0 \
erase_flash- Flash the firmware
esptool.py --port /dev/ttyUSB0 \
  --chip esp32 \
  --before default_reset \
  --after hard_reset \
  write_flash \
  --flash_mode dout \
  --flash_freq 40m \
  --flash_size detect \
  0x0 Beelance-VERSION-CHIP.factory.bin
On Windows, you can use the official ESP32 Flash Download Tool. Pay attention to set the flash address to 0.
Install the SIM card and power the board.
-
Connect to the WiFi access point
Beelance-XXXXXXand open a web browser tohttp://192.168.4.1. -
Go to the configuration page (
http://192.168.4.1/config)
-
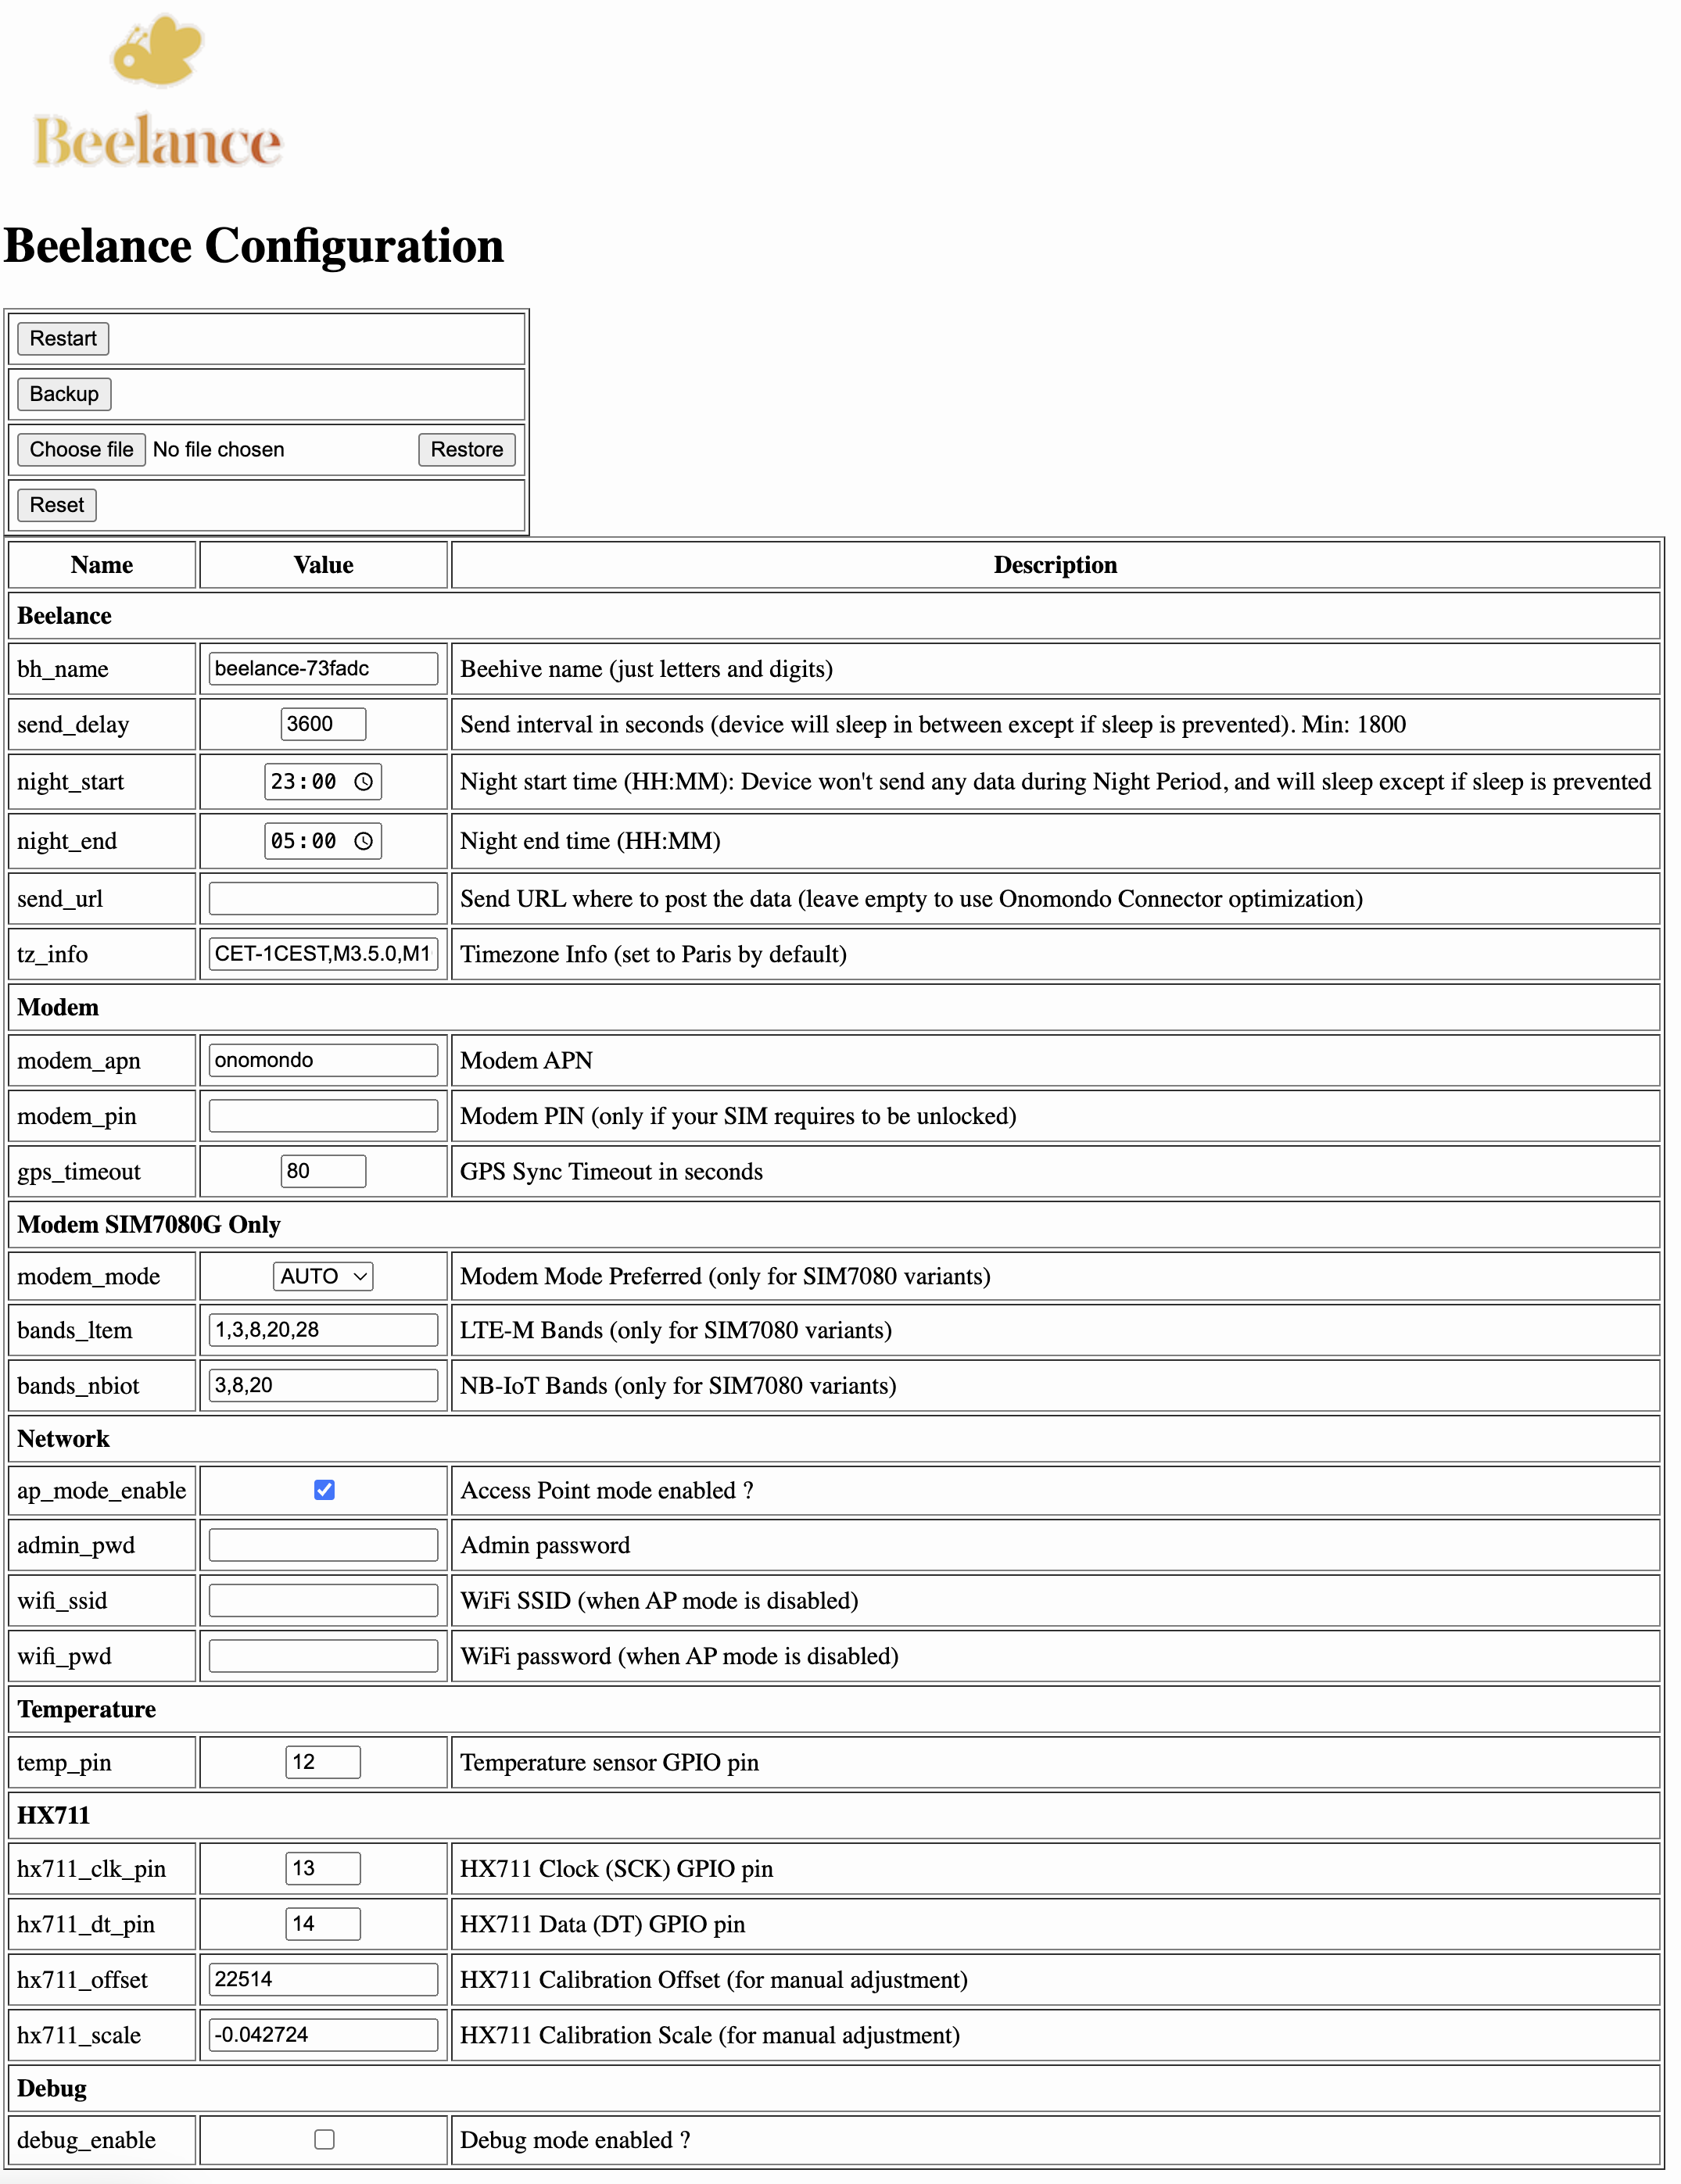
Set:
admin_pwd: The password to access the web interfacebh_name: The name for your beehivemodem_apn: The APN of your connectivity provider (TMfor Things Mobile,onomondofor Onomondo)send_delay: The time to sleep between each data send (in seconds). Default to 1 hour (3600 seconds)send_url: ONLY IF YOU DO NOT USE Onomondo: The URL to send the data to (must be a HTTP or HTTPS POST endpoint that will receive a Json payload)night_start: Format:HH:MM. Defines the start of the night, when no data is sentnight_end: Format:HH:MM. Defines the end of the night, when data is sent periodicallysys_tmp_pin: THe sensor temperature GPIO that you used (21 by default, but you can change it)
-
Restart the device. It should:
- Connect to the cellular network
- Show the time and GPS location (if you are outside)
If you are not using Onomondo or want to setup your own website to receive the data, here here a sample of Json that the device will send to the configured URL:
{
  "altitude": 7.400000095, // altitude == 0 if GPS fix failed
  "battery_charging": false, // true or false
  "battery_level": 90.79998016, // 0 if charging or not running on battery
  "battery_voltage": 4.107999802, // 0 if charging or not running on battery
  "beehive": "ruche_02",
  "boot": 852, // device boot count: useful to know if the device reboots often because of a bug
  "build": "3714812", // exact firmware build hash
  "device": "C01B0C", // ESP32 device ID
  "firmware": "Beelance-main-lilygo_t_a7670g-debug.bin", // firmware name that was installed
  "iccid": "89457300000014000000",
  "imei": "867284062000000",
  "latitude": 44.1234, // latitude == 0 if GPS fix failed
  "longitude": -2.1234, // longitude == 0 if GPS fix failed
  "modem": "A7670G-LLSE",
  "operator": "20801", // Name or code of current operator
  "temperature": 25.5, // temperature in Celsius, 0 if not activated
  "timestamp": "2024-03-26T14:49:50Z", // UTC timestamp
  "uptime": 119, // device uptime in seconds, useful to know if the device reboots often because of a bug
  "version": "v1.2.3", // firmware version
  "weight": 30 // weight in kg of the beehive. Not that the weight is not accurate because what is important is to track the evolution over time
}
Important information about the Modem
Connecting the first time with a new SIM card can take a very long time: first 30 seconds, the app tries oto automatically register the SIM with an operator. Cellular communication goes through several steps:
- Modem startup: can take up to 20 seconds
- Network registration: can take up to 30 seconds
- Network search: if step 2 fails can take up to 1 minute
- Network registration for each search result until one succeeds (can take up to 30 seconds per operator tried)
- GPS search: can take up to 1 minute, but this timeout can be configured in the configuration page (
gps_timeout)
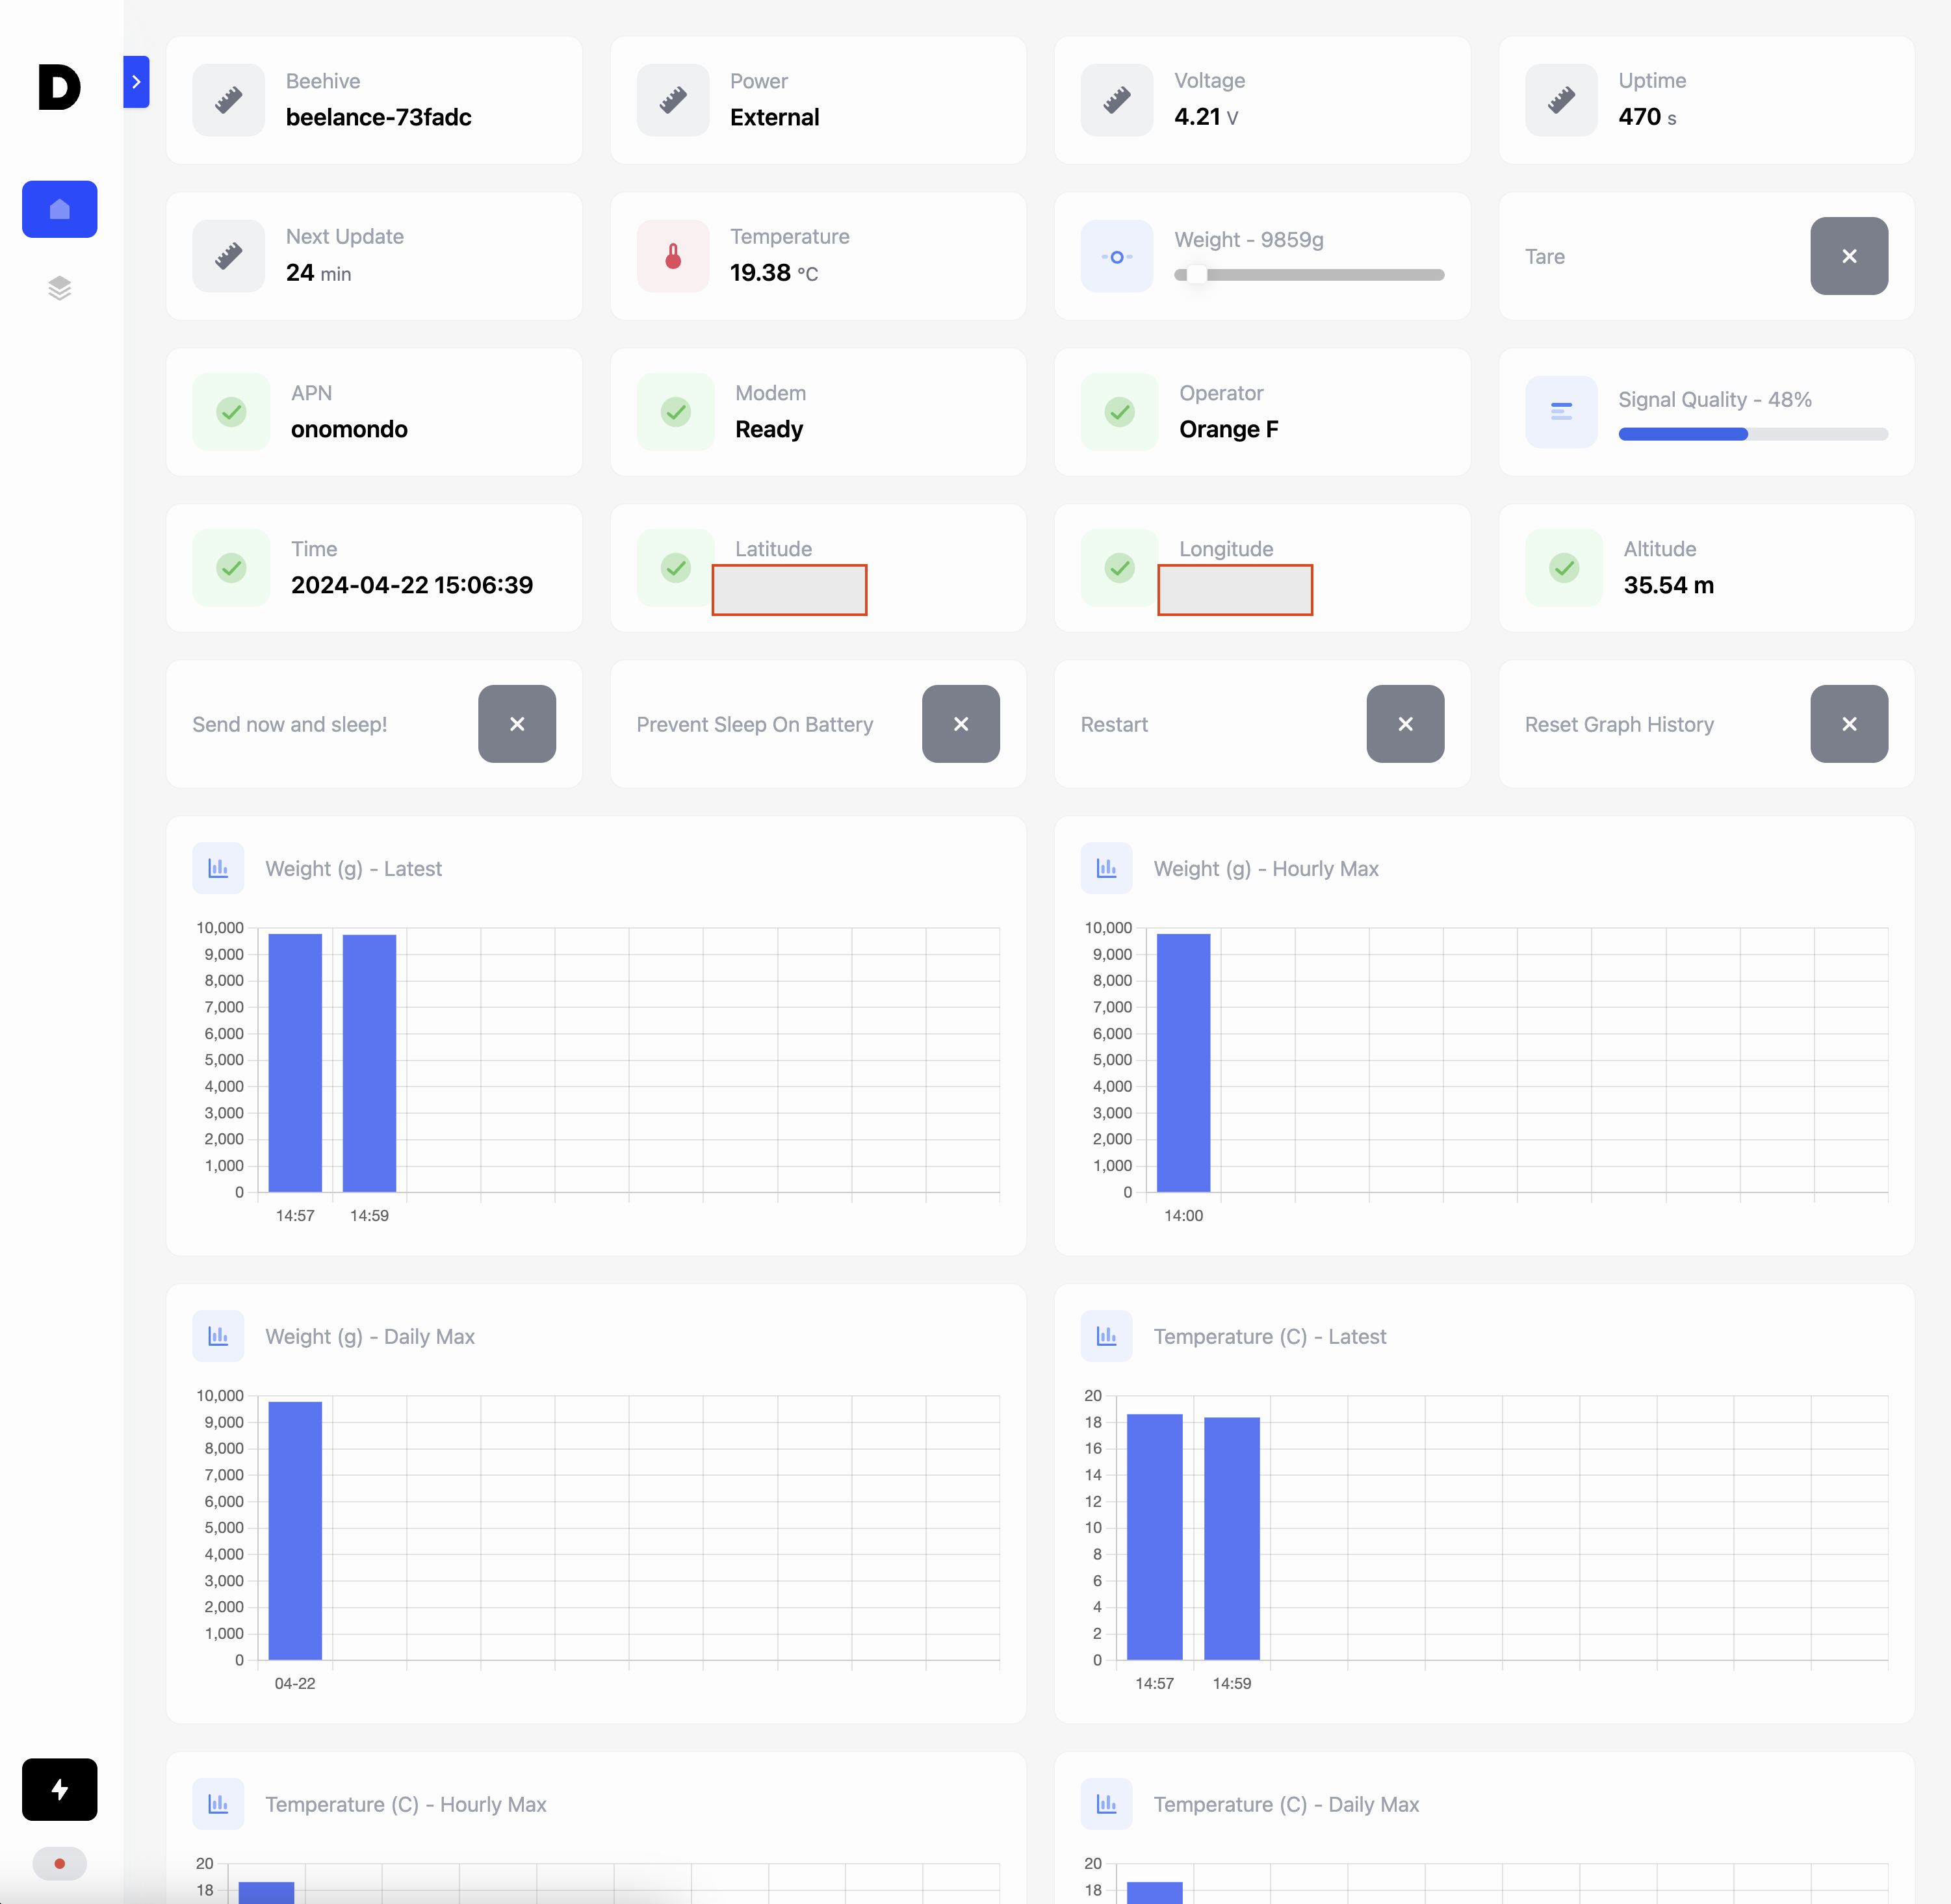
The Dashboard is located at http://192.168.4.1/.
For there you can see the device status and access some basic buttons.
Send now and sleep!: will send the data now and go to sleep for the configured amount of time (send_delay) if sleep is not preventedScan Operators: Trigger a new operator scan and new GPS searchPrevent Sleep: Keeps the device active and prevents it from going to sleepDebug Logging: activate debug logging, which you can see in the console athttp://192.168.4.1/consoleRestart: Restart the device
The statistics menu shows some metrics regarding the device itself.
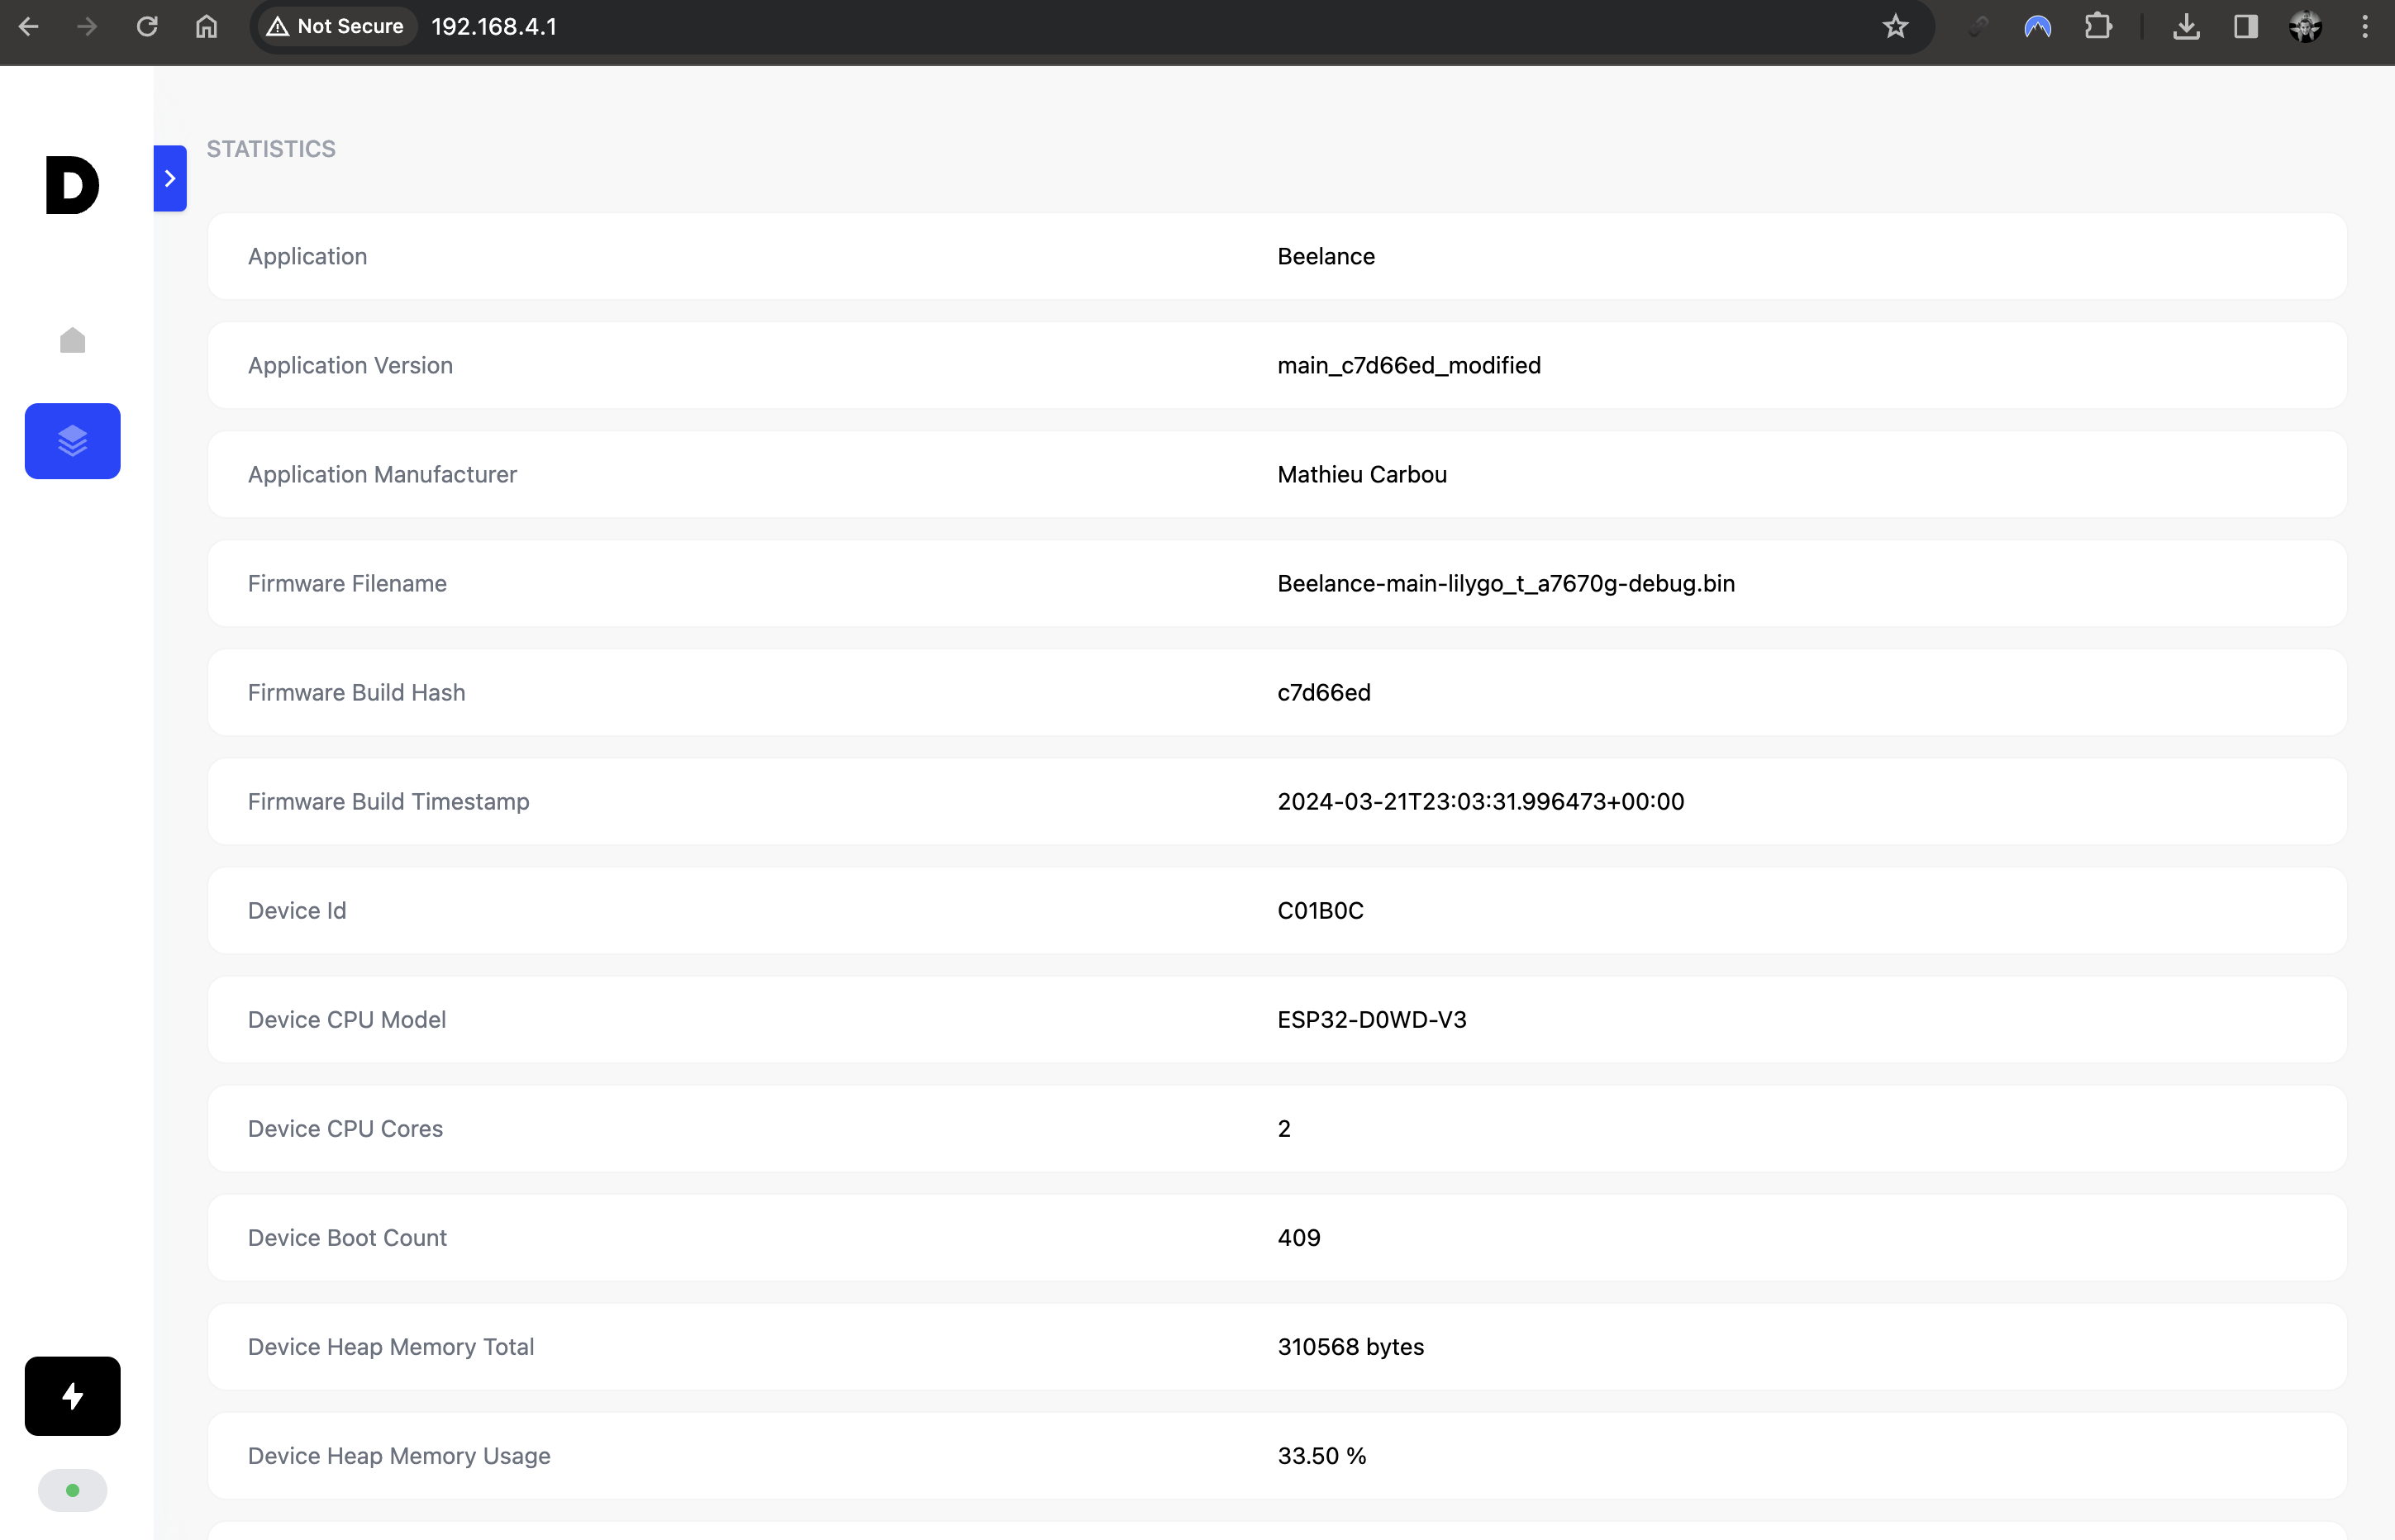
Other pages are available:
http://192.168.4.1/update: OTA Web Update pagehttp://192.168.4.1/config: Configuration page (with backup and restore)http://192.168.4.1/console: Web Console to see logshttp://192.168.4.1/api/: API endpoints with more technical information about system, sensors and connectivityhttp://192.168.4.1/api/apphttp://192.168.4.1/api/beelancehttp://192.168.4.1/api/confighttp://192.168.4.1/api/networkhttp://192.168.4.1/api/system
It is always recommended to update the firmware to the latest version.
Download the latest version on your mobile phone or computer, then connect to each device on their WiFi access point.
Then go to http://192.168.4.1/update and upload the firmware.
The device will automatically reboot after the upload.
If you need to backup, restore or reset the configuration to factory settings, go to http://192.168.4.1/config and click on the corresponding button.
The same page can be used to change your configuration and some more advanced settings.
Select Debug Logging in the Dashboard (http://192.168.4.1/).
This will activate debug logging and show the logs in the console at http://192.168.4.1/console.
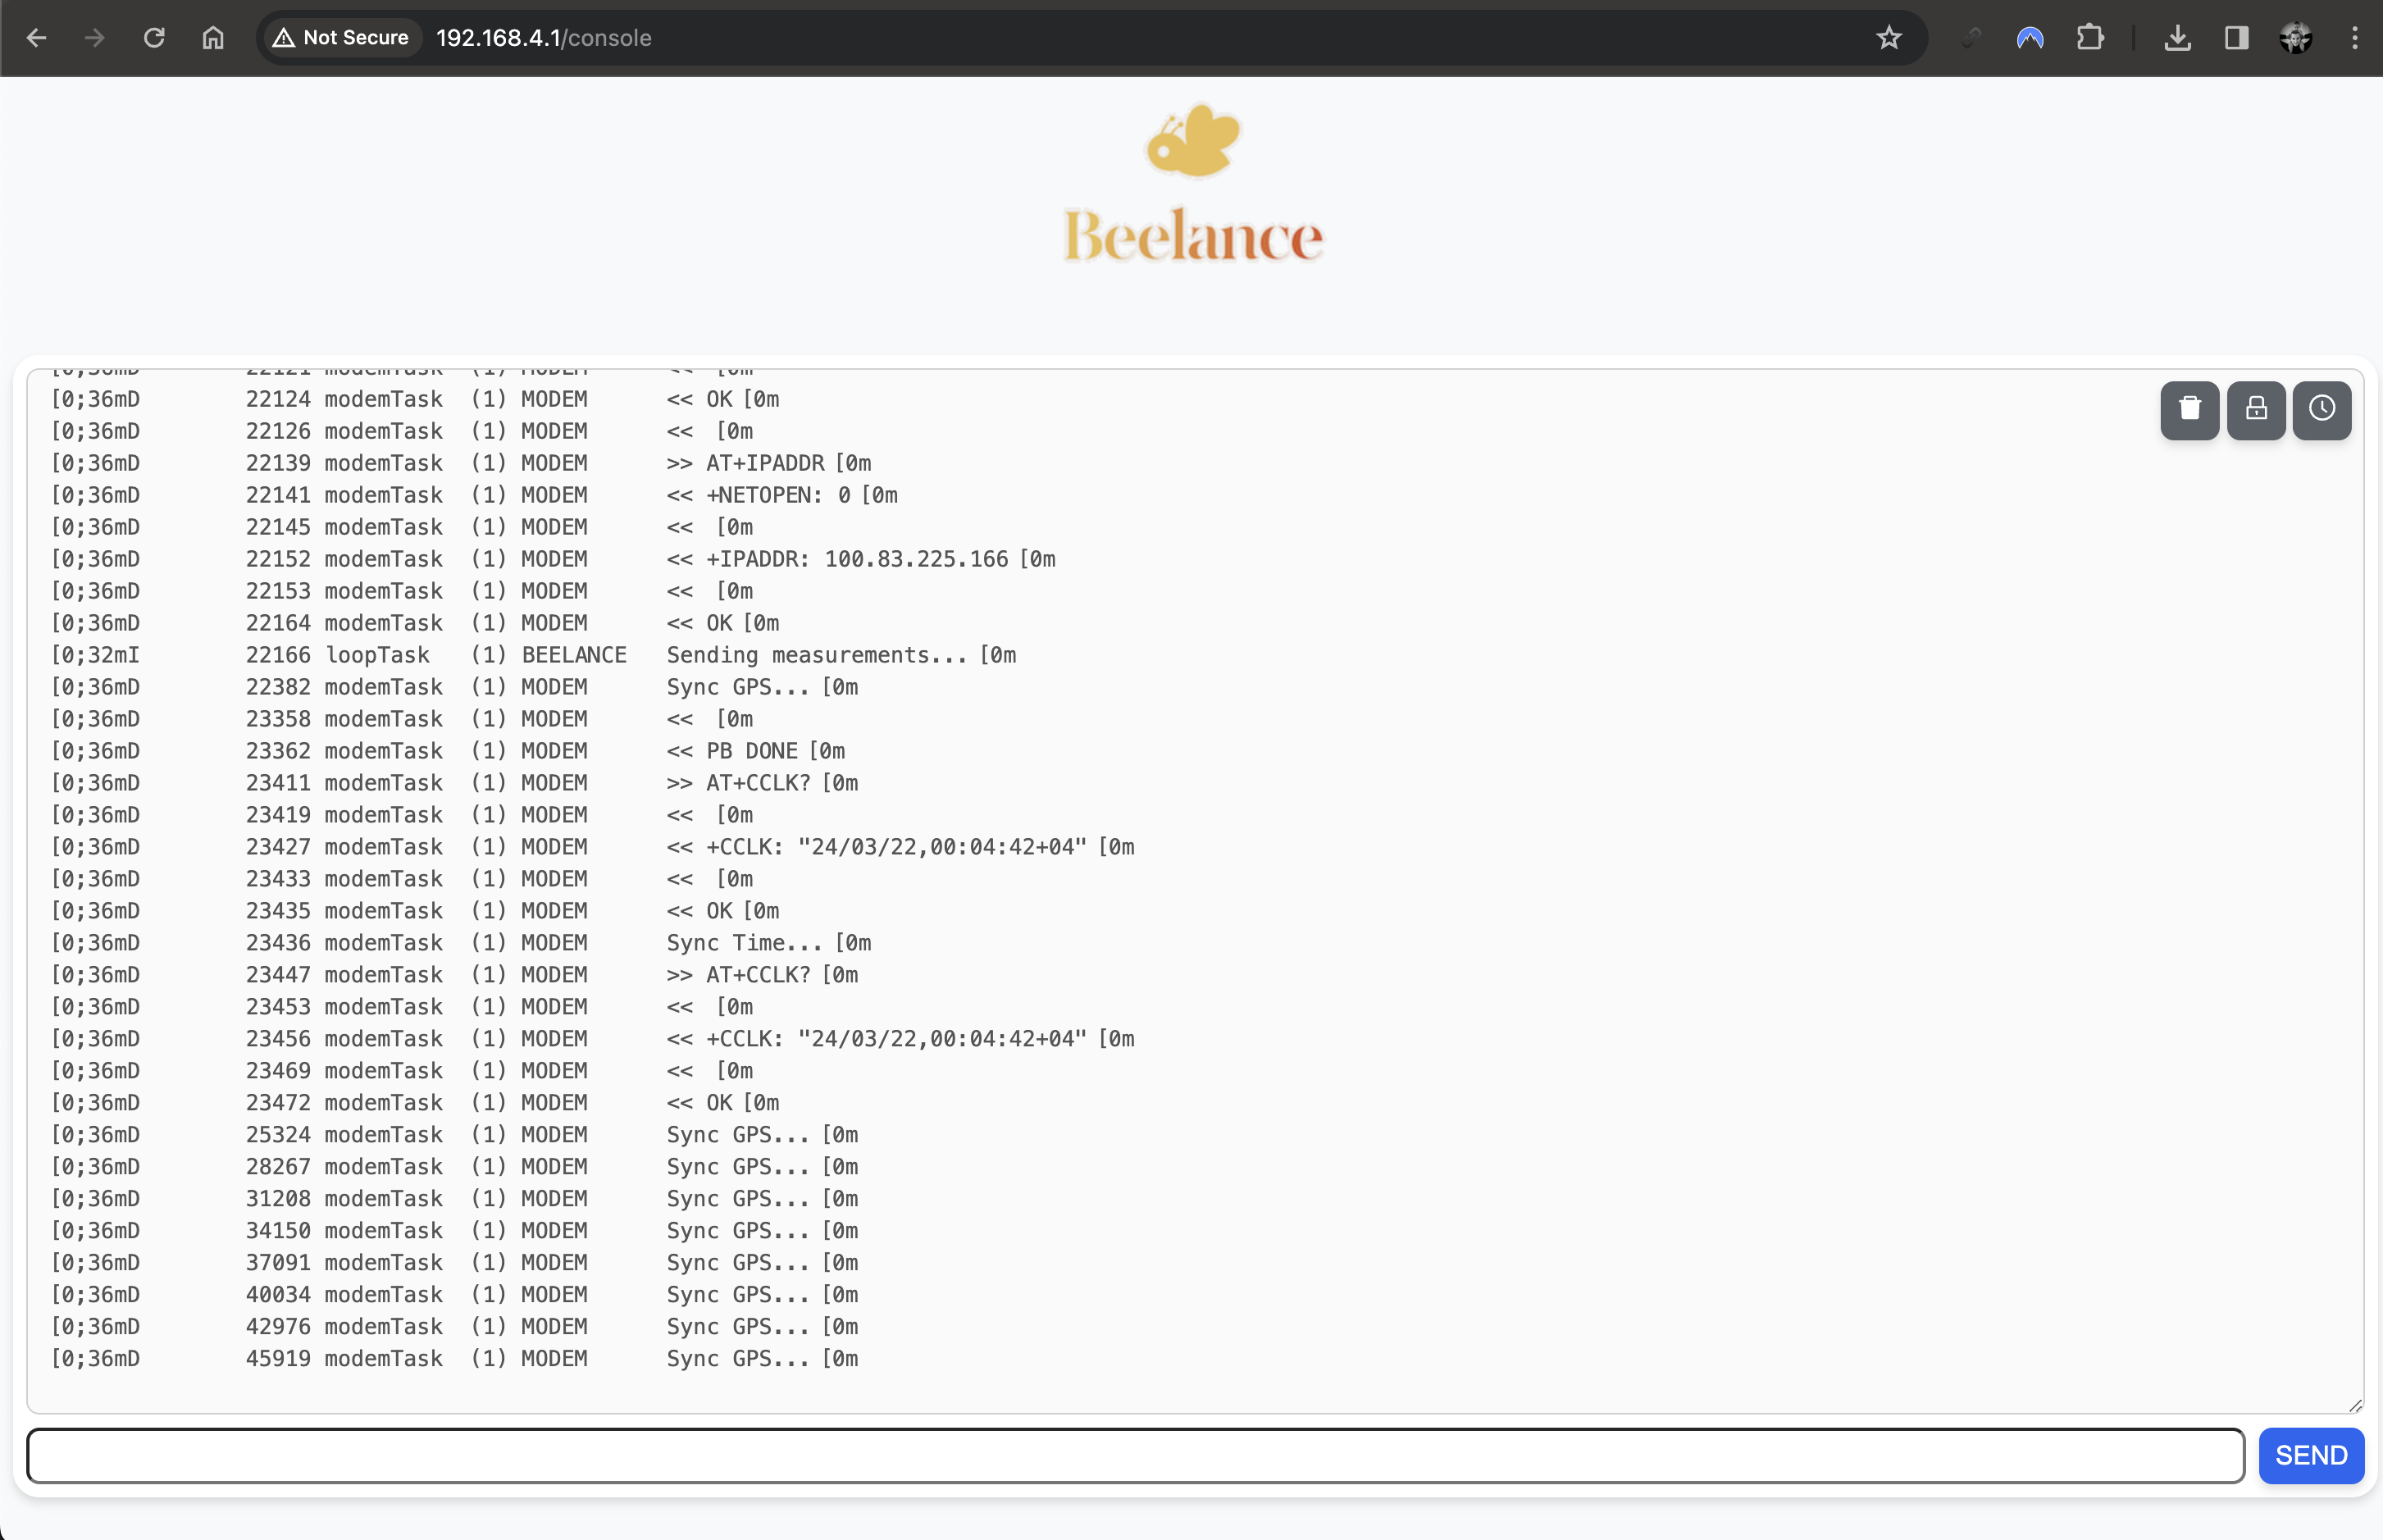
WARNING: the console allows you to interact with the Modem internals (called AT commands).
DO NOT SEND ANY DATA UNLESS YOU KNOW WHAT YOU ARE DOING.
To do a factory reset, proceed with the Firmware flash (first time) step.
Recommended IDE: Visual Studio Code with the PlatformIO extension.
.github: CI/CD workflowsdata: Build components added to the firmwareinclude: Firmware include codelib: Firmware librariespio: pio scriptssrc: Firmware source codeplatformio.ini: PlatformIO configuration
pio run -t build
pio run -t upload
pio run -t monitor- The Internet of Bees: Adding Sensors to Monitor Hive Health
- Balance Pour Surveiller Le Poids Des Ruches Pour Moins De 150€
- Beehive project issue
- Balance de ruche à 30€ : épisode 1 - Fabrication du capteur
- Balance de ruche à 30€ : épisode 2 - L'électronique
- Balance de ruche à 30€ : épisode 3 - L'étalonnage
- Balance de ruche à 30€ : épisode 4 - Le programme
- Balance connectée
- Arduino Bathroom Scale With 50 Kg Load Cells and HX711 Amplifier
- Powering Arduino Uno with Solar Cell
- Power ESP32/ESP8266 with Solar Panels (includes battery level monitoring)
- Load Cell Amplifier HX711 Breakout Hookup Guide