On the top right corner of this page, click the Fork button.
Clone down the forked repo (from your GitHub). Since you don't want to name your project "flashcards-starter", you can use an optional argument when you run git clone (you replace the [...] with the terminal command arguments):
git clone [remote-address] [what you want to name the repo]Once you have cloned the repo, change into the directory and install the library dependencies. Run:
npm installTo verify that it is setup correctly, run npm test in your terminal. You should have 5 pending tests in your Card test file that show up.
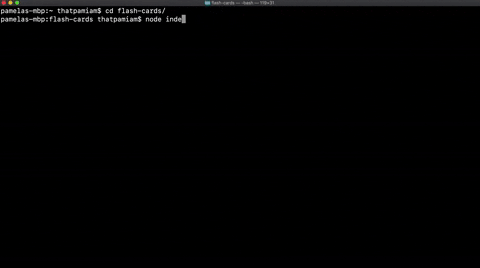
Running node index.js from the root of your project should result in the following message being displayed in your terminal:
Your project is running...Note that you will not need to you run your server until you are instantiating your Game class in Iteration 3. Prior to that, you should be using TDD to drive your code. You should check the functionality of your application by running your tests via npm test.
Create all of your feature code files in the src directory.
We will be using the module.exports and require syntax to share code across files.
Once you are working through Iteration 3, you will want to start your server to test your functionality. In the terminal, run:
node index.jsWhen the game is functioning appropriately, you will be prompted for each question, have the opportunity to select an answer, and will be given feedback. You will be able to play through the entire deck of cards:
Similar to feature code, your test code needs to be put in a specific place for it to run successfully.
Put all of your test files in the test directory. As a convention, all test filenames should end with -test.js. For instance: Round-test.js.
Run your test suite using the command:
npm testThe test results will output to the terminal.
![dependabot[bot] avatar](https://avatars.githubusercontent.com/in/29110?v=4 "dependabot[bot]")


