About v24 Stable
This flow version works best with heishamon firmware 3.1 (or higher).
In fw3.1+ there are new additional topics available of which two are used in the flow. I have been using fw3.1 for a month now without any issues.
Note: There is a manual override available for the two new topics. But This flow will work with fw2.0, fw3.0 as well after these two topics have been set.
Here is a list of up-to-date firmware's for heishamon. https://github.com/Egyras/HeishaMon/tree/master/binaries
There are also some breaking changes with external sensors. They need to be reconnected to the right [WP Input] tab AND configured in the dashboard (SYSTEM > SENSORS).
- Introduction
- Changes compared to v23 stable
- What can this Node Red flow do for you
- Installation
- The Dashboard
- FAQ
- Release changelog
- Acknowledgments
- Donations
Heishamon hardware is created by Egyras. AWESOME job!
https://www.tindie.com/stores/thehognl/
It is able to communicate directly with a range of Panasonic heat pumps.
- The heishamon board can receive information from the Panasonic heat pump and forwards it to a MQTT-broker.
- The heishamon board can receive commands from the MQTT-broker and sends it to the Panasonic heat pump.
There are multiple options to connect to the heishamon and control your heat pump. As long as it is able to read and send MQTT information.
- 1: MQTT > Home Assistant
- 2: MQTT > OpenHab
- 3: MQTT > Domoticz
- 4: MQTT > Node Red
- 5: MQTT > ... any other automation platform
All of the above options are ways to interact with the heat pump. (And all are good if your happy with it)
I have chosen Node Red (=NR). I already use a lot of NR functionality/automations combined with HomeAssistant. In many cases NR is the controller and HomeAssistant (=HA) is just the graphical front. This CAN be different if you want, as HA is also able to send/receive MQTT messages.
(Just to emphasize; because of the awesome design choice of the heishamon board, it presents everything in the MQTT standard, and that’s why it is able to interact with ANY software that can handle it.)
BUT...again, I choose the NR option because if I update or restart HA, the controller and automation's just continue.
I have chosen option 4 in the list above. In this GIT-page you can read about the NR functions and dashboard I built to control the Panasonic.
Back to top
- Breaking change: New flow-tab "WP Input". All external sensors and triggers are now managed from this tab.
- Breaking change: External sensors used with functions are now handled partly though the dashboard. (DASHBOARD > SYSTEM > SENSORS)
- A lot of stability issues and bugs have been resolved. Thanks to all issue reporters and the Dutch www.tweakers.net users
- First boot of new installations has been improved a lot.
- The flow works correct using "Compensation Curve" or "Direct" mode.
- The flow works correct using zone control "Water Temperature", "Thermostat (External)", "Thermostat (Internal)" or "Room sensor".
- Resource improvement; CPU usage has been decreased by ~30%.
As always, enjoy your heat pump!
/Ed ter bak
Back to top
Only using the default room controller does not let you see historical data easily. This controller is not extremely user friendly as well. This Node Red dashboard offers a lot of ease for that with charts and bar-charts.
Additionally, I have built in a lot of extra functions to do specific tasks or automation's. More about that below...
Back to top

What do I need to make use of this flow?
- The heishamon module working with your heat pump.
- A functional MQTT broker. (Mosquitto/HiveMQ/EMQX/etc.)
- A functional Node Red instance.
1. Obviously, you need the heishamon pcb module connected to your heat pump and have it functional. Without this module, you can stop reading. 😄 See this site to get one: https://www.tindie.com/stores/thehognl/
2. You can use any broker that is 24/7 available. You can install it on any system, as long as heishamon and the broker can communicate with each other and the Node Red can communicate with the broker.
3. You can install node red on a lot of devices. It can be directly on Linux or a device like Raspberry Pi. You can also run it in a container (self hosted) or within Home Assistant (add-on). For all options see: https://nodered.org/
All of these options are good, as long as the Node Red application can communicate with the broker and the Node Red instance has persistent storage enabled.
The Node Red flow is stand-alone so: You do not require a database. You do not require HomeAssistant. If you have HomeAssistant also connected to heishamon >> Disable all related automation's!! 2 captains on 1 ship does not go well....

A - Persistent data folder.
B - Adjust settings.js.
C - TimeZone setup
D - Required Node Red libraries/pallets
But first; Why?
I found that after reboot of node red, the logic did not have all variables populated yet. This caused the system not to start automatically where it left off before reboot.
To be honest, this does not present a major problem to me, but it will reduce the overall WAF significantly when I don’t notice something like this in time. So, I had to look for a solution to make the programmed setpoints, and all other variables, stick. This is how I achieved that. (Maybe there are better options, feel free to help me on this 😊 )
Please also note that this flow writes to disk every 5 minutes. Storage on sd-card is not advised because of possible high wear levels.
Make sure Node Red is installed with persistent local volume available.
If you have Node Red running directly inside Linux (not using docker) or on a RPI, this is already okay and you don't need to create a data folder.
If you have Node Red running in a docker container, make sure you install with this parameter:
-v FOLDER:/data
Here you can choose the name "FOLDER" yourself which will be the local storage folder of NR.
If you are node red withing Home Assistant, which is a HA controlled container, follow these instructions:
https://github.com/edterbak/NodeRed_Heishamon_control/tree/main/HomeAssistant
You need to change some settings in settings.js
Why? If you reboot node red, you will notice some of the variables are not populated yet. Setpoints we have programmed earlier are gone. To make them persistent after reboots, you have to enable the local storage option. Below I have set the flush interval (write to disk) to 300s.
In a (proxmox) docker install, you can find this settings.js file in:
/var/lib/docker/volumes/FOLDER/_data
where 'FOLDER' is your own folder name chosen in part A.
On a Raspberry Pi, you can find this settings.js file here:
/home/pi/.node-red/settings.js".
Search for contextStorage: Put in the text as below:
contextStorage: {
	default: "memoryOnly",
	memoryOnly: { module: 'memory' },
	file: { module: 'localfilesystem', config: {flushInterval: '300'}, }
},
Reboot Node Red for the changes to load.
ATTENTION:
After you have done this, and you seem to have it operational, be sure to test if all settings stick after a reboot of Node Red. Things that should stick are: Virtual SP (Ta), Function toggles on the main page, Setpoints in WAR function/graph. Setpoints for RTC function/graph, Heat Pump power toggle on/off
If this is not the case for you, you either need to correct this in settings (like given above), or choose not to use this NR flow, or even accept manual action needed after power loss situations.
If you use a linux version, make sure you set your correct timezone. You can do this by running this command from CLI root and go through the setup process.
dpkg-reconfigure tzdata
You can check if it was successful by executing this command
timedatectl
If you are running Node Red from within HomeAssistant, follow the instructions from HomeAssistant on how to do that.
To make use of the dashboard functionality, you need to install the dashboard library.
https://flows.nodered.org/node/node-red-dashboard
The scheduler makes use of the moment lib.
https://flows.nodered.org/node/node-red-contrib-moment
node-red-contrib-noop is used as well
https://flows.nodered.org/node/node-red-contrib-noop
node-red-contrib-dashboard-bar-chart-data (from v13+)
https://flows.nodered.org/node/node-red-contrib-dashboard-bar-chart-data
node-red-node-smooth (from 20+)
https://flows.nodered.org/node/node-red-node-smooth
- In NR, click on the hamburger icon (three horizontal stripes) in the top right corner
- Select Import
- Copy/past the content of the .JSON file from this GIT. (or select a file to upload and select the flow.json file offered here)
- Click on Import
Once imported, you need to adjust the settings of the MQTT server.
- Add the correct information of your broker
- Use QOS: 0 or 1 (maximum for heishamon).
- Use MQTT v3.1.1 (maximum for heishamon).
Click on the hamburger icon and then configuration nodes. Find the MQTT broker part, double click it and change to your settings.


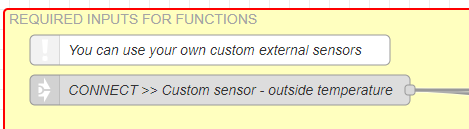
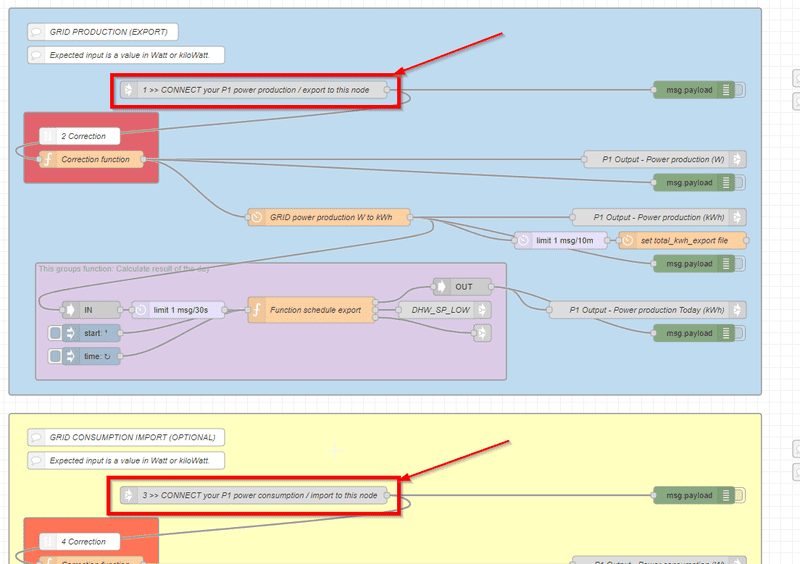
Important >> After import and correcting the MQTT settings, and you might want to connect custom external sensors.
By default the native Panasonic sensors will be used. But you can connect your custom sensor. For this go to the flow page to the tab [WP Input], the section indicated below in purple section.
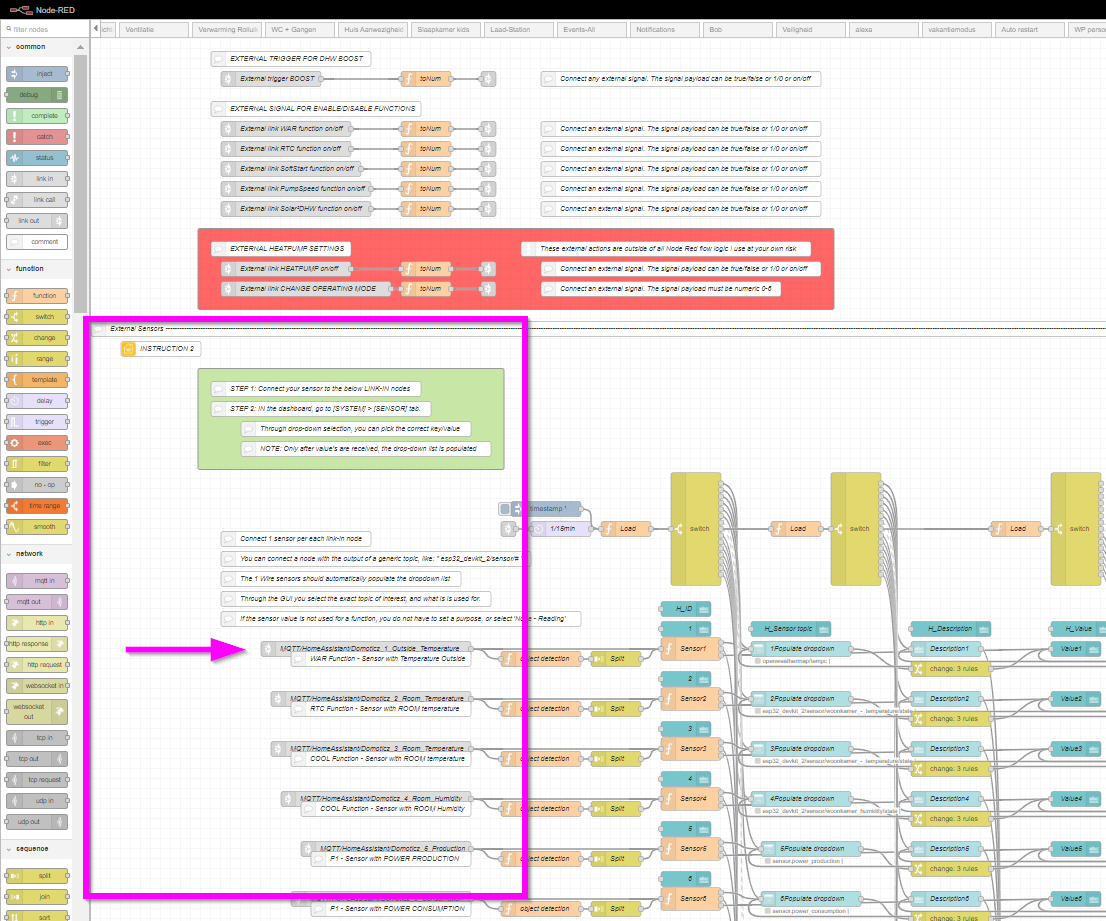
You can also connect external signals to the flow in this tab.
** Note 1: The Panasonic Room Thermostat is not very accurate which might cause bad temperature control.
** Note 2: The Outside temperature sensor on the Panasonic might be subject to heating up due to direct sunlight. This can also have a negative impact on the functions. Personally I use OpenWeatherMap source for outside temperature, but anything is possible.
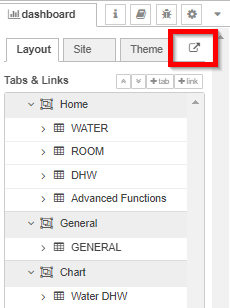
You can find the link to the dashboard like this:


First: Create a backup of current version. Select all tabs by holding CTRL. Then in the right menu select Export > Download.

RightMouseClick on the GIF and select open in a new tab to see it full screen.
Back to top
I found it is easiest to:
1, remove the tabs, WP MQTT, WP Dash, WP Control, WP Solar, WP Scheduler completely
2, remove all ui_base, ui_group and ui_tab references from the flows.
*Keep the MQTT (x.x.x.x) and Home Assistant references.
3, import new version
4, correct setup, eg. MQTT server.
5, re-connect your personalization’s.
*Not nessesary if you used a WP_Personal tab (see FAQ.md).
If there are better ideas about this, please inform me.

RightMouseClick on the GIF and select open in a new tab to see it full screen.
Back to top

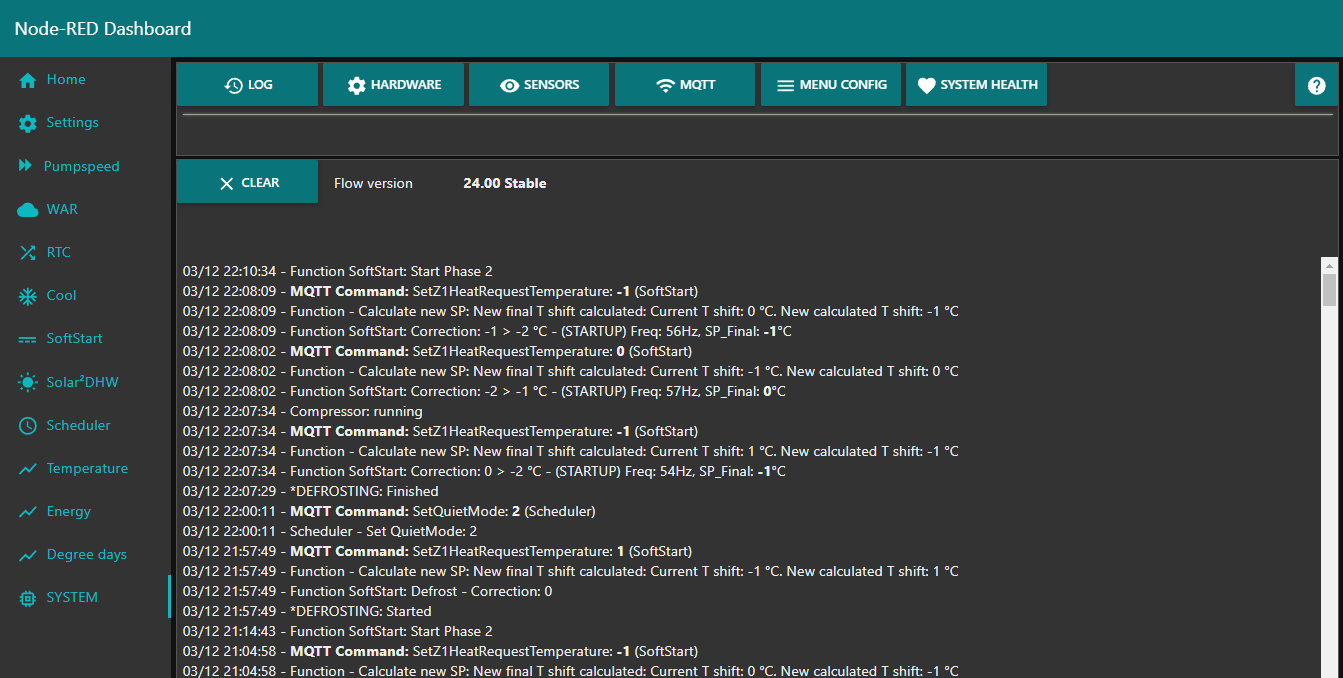
This is the home page of the dashboard.

Visible is a short overview of the current status of the heat pump.
You can enable / disable, see the status and the result of each custom function.
In the column "HEAT" there are a number of custom functions. These functions build on top of each other and you should read them from top to bottom.
- Starting point is "Shift curve" or "Water temp." value. The [setpoint] for Compensation curve or Direct mode.
- When the WAR function is enabled, it replaces the [setpoint] from 1.
- When the RTC function is enabled, it corrects the [setpoint] from 2.
- When the SoftStart function is enabled, it corrects the [setpoint] from 3.
- When the Nightreduction function is enabled, it corrects the [setpoint] from 4. (Note: night reduction will be deprecated soon!)
More details and screenshots of each of the dashboard tabs are present in the collapsed section below.
Back to top

Here are some basic controls of the heat pump. (Not all, because the flow is designed for 1 zone config. )

This function allows you to set dynamic pump speeds, depending on the current operation.
Set a different maximum water flow during DHW operation.
Set a different maximum water flow during HEAT operation.
You can set a default (low) maximum water flow. This is active when both operations are inactive (with active compressor).
Note: Do not set the maximum flow too low. It causes irratic behavior and a LOT of stop/starts.
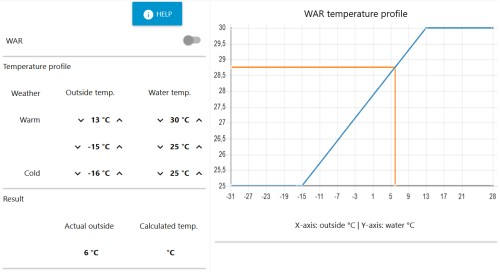
weather dependent temperature control.
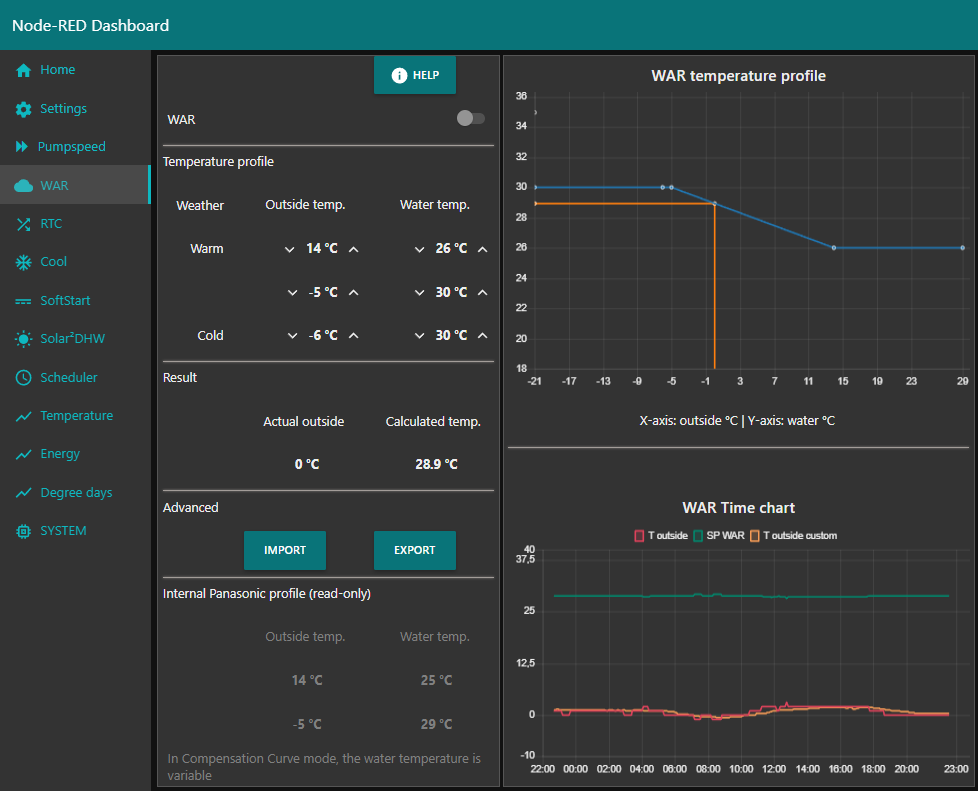
! This function is only available when the heat pump is set to "Direct" mode. When the heat pump is set to "Compensation Curve" mode, the WAR function is automatically greyed out and disabled.
Question: Why have you created the same custom function while Panasonic provided the same function as "Compensation Curve"?
Answer: The native Panasonic implementation is limited to the in-built thermocouple or connected external temperature sensor. Both are affected by direct sunlight and show incorrect values then. The custom function is able to use any sensor which is able to produce values into Node Red. Personally I use "OpenWeatherMap" as a source. But any local sensor can be used.
You can import / export settings to the panasonic heat pump.

This function adjusts the setpoint of the water depending on the room temperature.
When the temperature in a room gets too high, it will add "-1" to the current setpoint of the water temperature or shift.
You can set the room target temperature, the temperature limits and you can set the correction to be performed.
Additionally it is possibility to use automation's. To have the pump shut down when above a trigger temperature and turn back ON again below a revert temperature.

Default behavior of the heat pump is when it starts up the compressor will go to high Hz for a period. Only when the returning water temperature approaches the setpoint, it ramps down the Hz and get more economic.
If the SoftStart function is enabled and the compressor starts, the water setpoint will be lowered. This should cause the compressor to ramp the compressor down quicker, within minutes. When ramp down of the compressor frequency has occurred, the HEAT setpoint restrictions will gradually be lifted.
There's an add-on to the SoftStart called SoftStart-Quietmode
This is an extra (add-on) function to reduce the compressor frequency at startup even more.
Some heat pump models will start a run and always go up to 45 Hz in de first minute(s) regardless of the target temperature.
This Quietmode (when switched on) will put the heat pump in the Quietmode (level 3) at rest and waits till the run starts.
When the compressor turns on, the Quietmode will remain active for an amount of time and after this time switches back to the previous Quietmode (if set).
You can specify this fallback time in the Setup - Quietmode time (default 5 min).
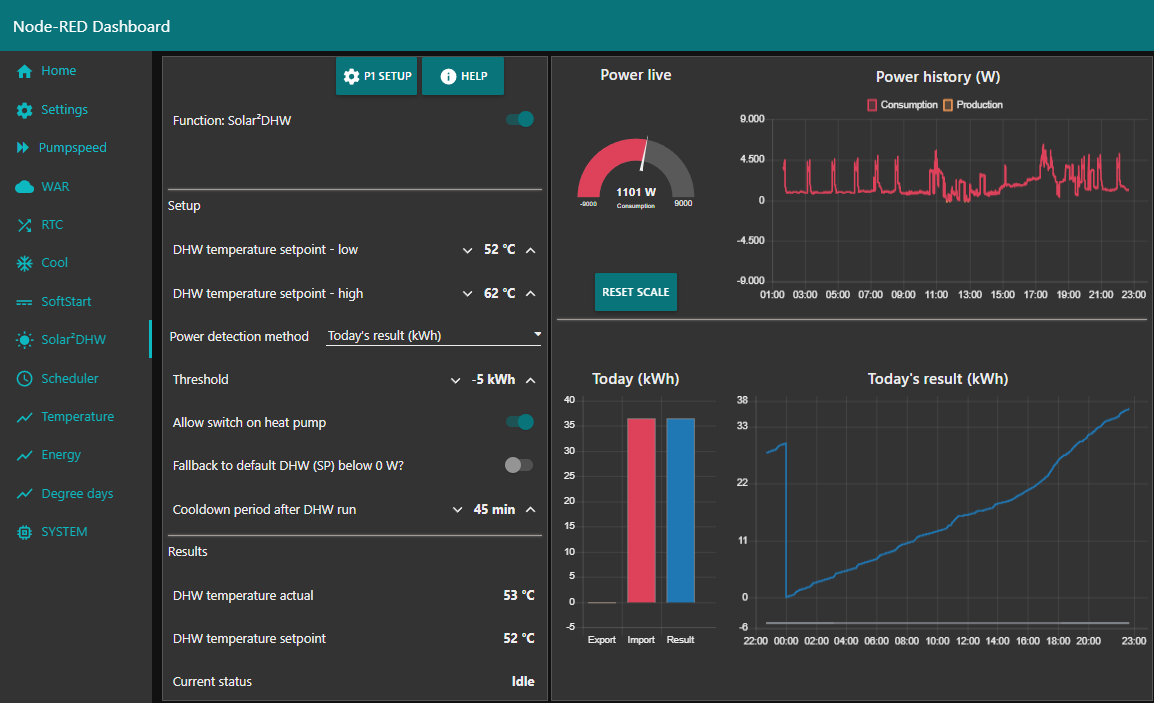
The aim of this function is to increase efficiency (and save cost) by utilizing solar energy as much as possible. When there is solar energy in abundance, you can tell the heat pump to use that energy to heat up your DHW water tank. To determine if there is enough solar energy, you need any form of power measurement. This can be a P1 power meter, or a meter directly behind your panels.

You can enable/disable a schedule, multiselect a day of the week, specify the time (hour + minute) and give the schedule a name.
I have added an option to create 10x schedules for the following actions:
- Toggle heat pump power on / off
- Set water setpoint (heat shift / heat direct)
- Set room setpoint (RTC function)
- Start Force DHW runs
- Start Sterilization runs
- Set Quiet modes
- Set operating modes
- Toggle a custom function on / off
On each line of the scheduler, you can indicate if the heat pump should be powered on for the task or not.
A recent addition to the scheduler is the possibility to add conditions for each of the scheduled tasks.
Note: Make sure the native panasonic scheduler (in the controller) is disabled to prevent unexpected behavior of the flow.
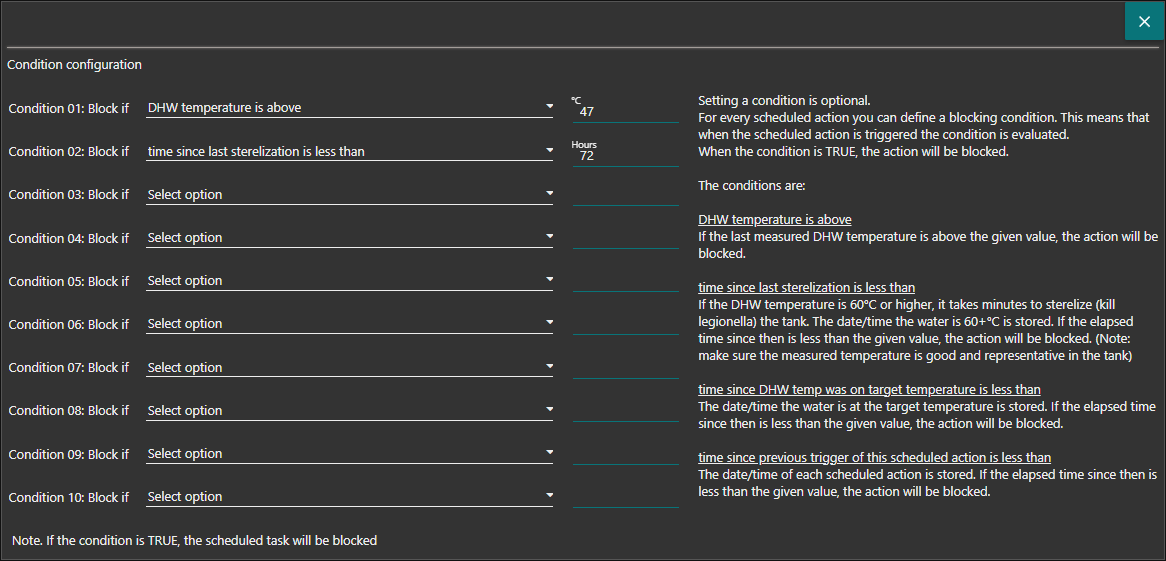
Each line in the condition section is a blocking condition. If the condition is met, the scheduled task will be blocked.


In this tab you have multiple sub-sections.
- LOG: See 1000 lines back of all logged events.
- HARDWARE: Basic readings of the hardware configuration.
- SENSOR: Select the external or 1wire sensors for custom functions.
- MQTT: Enable / disable general MQTT block. Basic reading of MQTT messages.
- MENU CONFIG: Enable / disable parts of the dashboard menu.
- SYSTEM HEALTH: Extended logging and system information.

Q - Can I forward the information coming mqtt messages from the heat pump towards my InfluxDB database?
Q - I use the Node Red Addon in Home Assistant, how to go to the Node Red Gui for editing?
In my case this wasn't working, perhaps due to the use of the DuckDNS addon.
Use something like 'https://your.duckdns.org:1880/endpoint/ui/' instead.
Q - Can I use both WAR and RTC at the same time?
Q - If I switch off the heatpomp via the Remote Controller will it disable the automation from the Node Red flow also?
Keep in mind however that if the Node Red flow decides it time to adjust some settings it will act accordingly and overwrite settings.
Q - I know the function SOFTSTART is experimental, but can you explain what this function does?
This late throttling behavior can be quiet energy consuming, it can cause the heat pump to generate too much heat at the start and turn off again.
This SOFTSTART function, when enabled, looks at the moment when the compressor is on, and lower the setpoint to just above the temperature of the returning water. This will in theory cause the heat pump to start throttling down a lot quicker.
This function can be useful directly after defrost cycles when the pump starts again, or when the temperature difference between outside/inside is getting smaller.
Q - How do I add my Entities from Home Assistant like living room temperature?
In the square "REQUIRED INPUTS FOR FUNCTIONS" you will have to add a node (left pane under Home Assistant) named "Events: state".
You can drag and drop this in the square mentioned first.
It will replace the "TOP33 - panasonic_heat_pump/main/Room_Thermostat_Temp"-node eventually, which you should disable if not using.
Select the newly created node, then double click to open up the properties window;
Give is a name of your choosing like 'LivingRoom_temperature'
In the Entity box you can try to find your sensor entity (assuming you have already setup the MQTT settings earlier).
Make sure that in the 'Output properties' you have a MSG.PAYLOAD = EVENT STATE
Check the box 'output on connect' and make sure at the bottom this node is enabled.
Finally press DONE to close the properties dialog and connect your node to the function node 'set.T_woonkamer_BT'

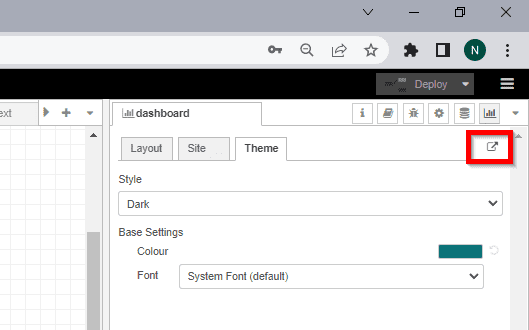
Q - How to use a dark theme in the dashboard?
Now press the Theme-tab and pick your style.
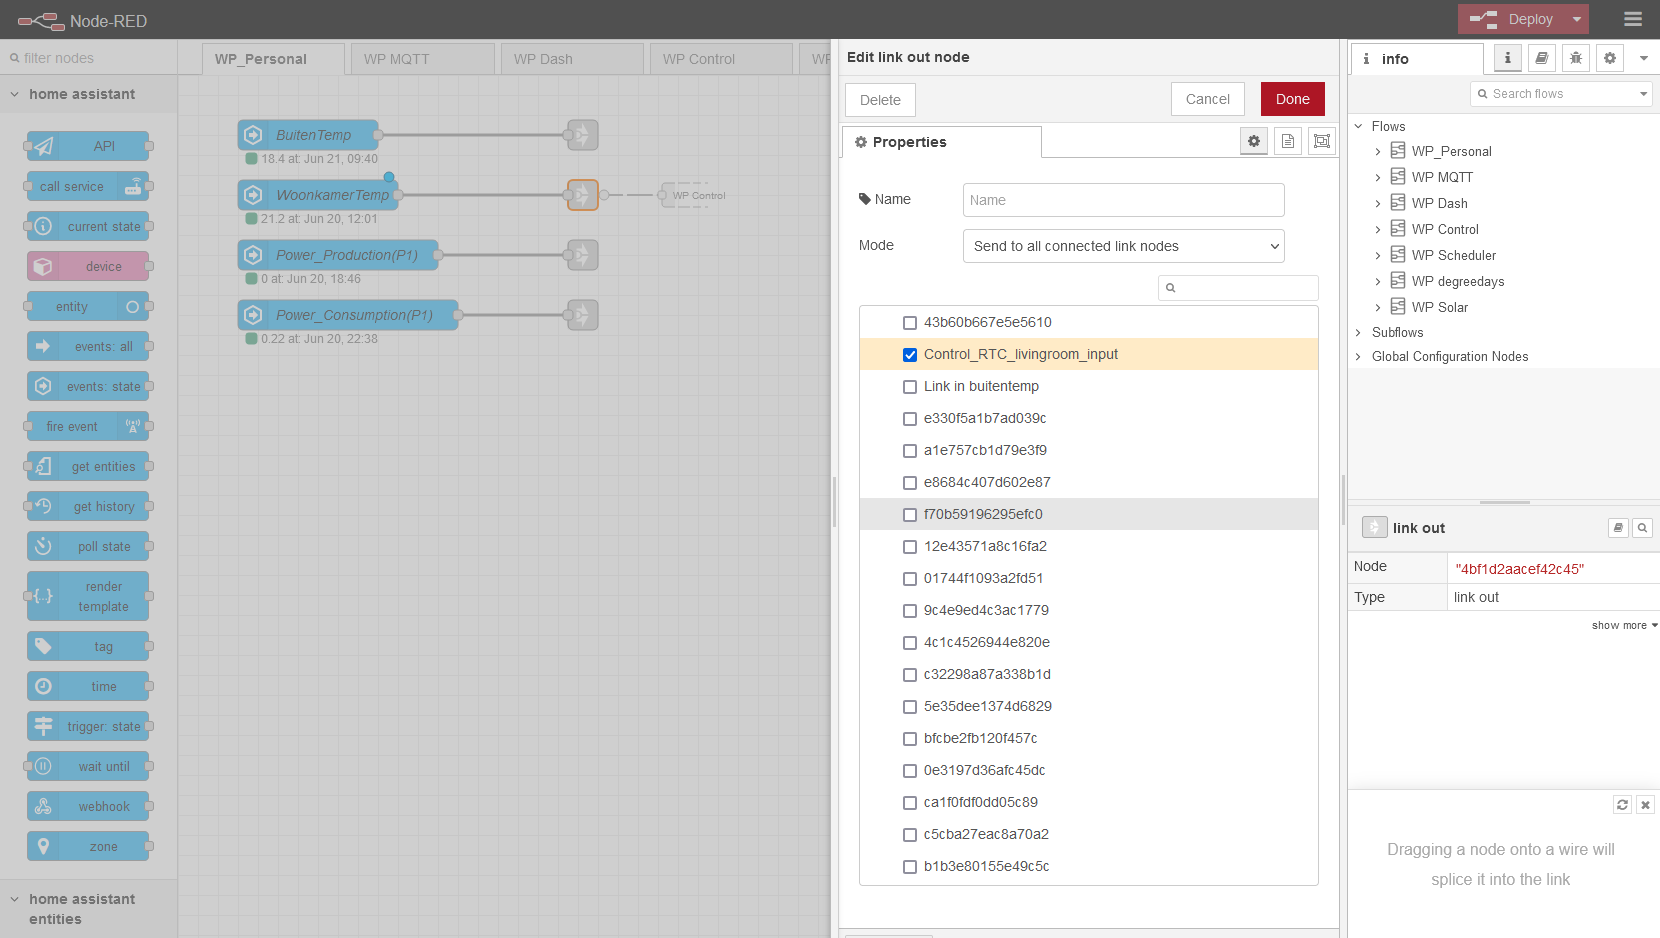
Q - How to update flow to latest version and keep my inputs, MQTT and Home Assistant settings?
Give those inputs.sensors each an own [Link Out] node
Connect those [Link Out] nodes to the already existing [Link In] nodes by double clicking the [Link Out] node and select the corresponding one from the list.
Some images to explain this:

Follow the update procedure from the Readme as described here: https://github.com/edterbak/NodeRed_Heishamon_control#how-to-update-to-a-newer-version

[2023-06-06] v23.01 Stable. Changes:
- [FIX] Export error. A missing connection in WP Manager tab. For some reason this connection did not want to be exported, no matter what. Remove + new wire solved it. (= NR Bug)
[2023-06-12] v23.02 Stable. Changes:
- [FIX] Cool mode in Home Dashboard. Kept showing incorrect HEAT setpoint. Now it is correct.
- [FIX] Cool menu area. You now see [setpoint lower limit] more clearly
- [FIX] SoftStart function + cool mode kept showing heat setpoint in the graph. This has now been fixed.
[2023-07-09] v23.03 Stable. Changes:
- [FIX] Cool function. Complete rewrite of the cool function. I expect no more NaN for sending cool setpoints.
- [Enhancement] Added manual lower limit for the cool function.
- [Enhancement] Setpoint changes from cool function will not be sent when heat pump is off, or cool is not in operating mode.
- [Enhancement] Updated HELP in cool section.
[2023-07-20] v23.04 Stable. Changes:
- [New feature] Add conditions to the scheduler. This is a nice addition to the existing scheduler.
[2023-07-22] v23.05 Stable. Changes:
- [New feature] Add to scheduler the option to set the DHW setpoint temperature. (#120)
[2023-08-21] v23.06 Stable. Changes:
- [New feature] Scheduler - Conditions now allow multiselect.
- [FIX] Scheduler - after reboot the conditions were not shown in dashboard #126
- [FIX] COOL function - [error] [function:COOL function] is resolved #127
[2023-08-21] v23.07 Stable. Changes:
- [FIX] Scheduler - Due to grouping the scheduler did not function anymore. This should now be improved a lot. #128
- [FIX] Home dashboard did not show correct temperature behind 'Water temp'. Related to #123.
- [FIX] Detection on persistent storage should now work properly.
[2023-09-01] v23.08 Stable. Changes:
- [FIX] Scheduler - There seems to be a NodeRed bug in the JUNCTION functionality during export/import. I have now removed it from the scheduler tab. I will start replacing the junction nodes with other nodes due to this crazy issue. For now, it seems that all is working. Sorry for the possible hassle this might have caused. :( #128 Update 2023-09-02: v23.08 is stable again. Confirmed.
[2023-09-01] v23.09 Stable. Changes:

[06-12-2023] v24.01 Stable.
- [FIX] SCHEDULER - In some situations the task "Change Operating mode" did not get executed. This is now fixed.
- [FIX] Corrected [SYSTEM] > [about] text. It was still showing changelo of v23.xx
[06-12-2023] v24.02 Stable.
- [Enhancement] SoftStart function. It was doing a generic round vs round-UP to calculate the corrected setpoint. This resulted in frequent compressor stops. Now this has been significantly been improved.
- [Enhancement] Boost DHW now function. It did not revert operating mode, and did not revert the DHW setpoint. Now it does both.
- [FIX] Increased the compatibility with new K/L Panasonic heat pump series. 6 new topics added to the flow to read.
- [NEW] Add connection check with the broker. You will find this under [SYSTEM] > [MQTT]
Pressing [TEST] will send a message to the broker. The flow also listens to this topic. If the message is NOT received withing 10 seconds, an error line will be added to the [SYSTEM] > [LOG] section


[14-01-2024] v24.03 Stable. Happy new year everyone!
- [New] Added SMOOTH function to the input signals TOP14 (Outside_Temp) and TOP33 (Room_Thermostat_Temp). Average is taken over 4 measurements. On top of THAT result, there is now a rate limiter of 1 measurement per 5 minutes. For this purpose more than enough.
- [New] Added new input signal for start-DHW. This version is without 'forceful mode'
- [FIX] The efficiency graph now shows COP (HEAT) over a longer period.
- [FIX] The new heatpump series K and L should now be supported. There was an error in the topic.
- [FIX] The WAR function showed incorrect temperatures (20c). This is now fixed.

- Egyras: The original creator of Heishamon. https://github.com/Egyras
- Egyras: For the MQTT topic list - https://github.com/Egyras/HeishaMon/blob/master/MQTT-Topics.md
- CurlyMo: The original calculation for automagical 'Stooklijn' correction - https://gathering.tweakers.net/forum/list_messages/2039982#Automagische_stooklijncorrectie
- AUijtdehaag: The COP calculation - https://github.com/Dylantje/WP-Heishamon-sripts/blob/master/WP%20LUA%20COP%20berekening
- lampy25. For unselfishly giving supportive feedback and good idea's. Thanks!
- timovd for his contributions. ! Thanks.
- E1cid from Node Red forum, for the help with the bar-chart.
- Javaboon for his assistance in the Solar functionality.
- Maarten69 for his feature requests and helping with testing. MEGAAA THANKS :).
- Maarten69 (yes, again) for contributing to this project and helping with a FAQ !!!!! :).
- Aikon for contributing to this project and helping with layout/textual improvements.
- Maarten69 for contributing to this project. New additions can be expected from him on this project. Mega sweet!!
- MikeyMan for contributing with testing and discussing a lot about this. Good testing is very valuable!
By multiple users of the flow, I have been asked to put up a donation on the site. I was never that fond of that idea, because it is just my hobby and I like doing it. In addition, I do not want to change the expectation of users, the open character of the communication here (moving from one enthusiast>enthusiast to a supplier>client relationship).
This is just a hobby, and I do not expect I can quit my daytime job anytime soon.. Ghhehehe.. And of course it will stay like this.
But the constant raising eyebrows of my social circle why I don't have such a button (because so many people do it), and the curiosity about how many users actually want to make a donation have won me over to try such a button. Let's see.
But most important. In no way you are obliged to make any donation!! The flow remains completely free, free to use as you want, as always at your own risk.
My request to you:
When you choose to use/try this (Feel free to do so), PLEASE give feedback on any issues you encounter. You can use the [Issues] section to report to me.
When making an issue, please give as much info as you think is required to solve this. Steps to reproduce. Maybe a screenshot etc. Reporting this will help me help you :)
Thank you in advance.