It has been a dark time for Notifier, but there is still hope. A new era has arrived. The previous Notifier major version was controlled by Dart jQuery and Vanilla JavaScript. In an attempt to rescue Notifier, a few of dotkom's people went together and created a React App. This app was fused with Notifier, giving it strength and power one could not even imagine was possible in 2014...
More information can be found in the infoscreen folder.
3 steps:
- Equipment: Get a screen, Raspberry PI (with NOOBS or Raspian), HDMI cable, keyboard and mouse.
- Internet: Connect Raspberry PI to a WiFi or ethernet cable.
- Run
bash <(curl -Ls http://gg.gg/notiwall-cli) install {infoscreen-id} {secret}in a terminal (Ctrl+Alt+T) and follow the instructions.
The Notiwall API keeps track of infoscreens and sensor data. This is what you can get from the API:
The part in brackets: {...}, is encoded in base64 (such that secrets does not mess with the url).
/api/v1=> List all infoscreen names./api/v1/{infoscreen_name:secret}=> Get infoscreen info.- This includes IP and sensor data if any of them are present.
/api/v1/{infoscreen_name:secret}/ip=> Get IP only (if it exists)./api/v1/{infoscreen_name}/sensors=> Get sensor data (if it exists)./api/v1/{infoscreen_name}/screenshot.png=> Get last screenshot of infoscreen (if it exists).
Example:

The part in brackets: {...}, is encoded in base64 (such that secrets does not mess with the url).
/api/v1/sensors/{infoscreen_name:secret}=> Update a sensor (this also triggers websockets to all clients listening for this sensor)./api/v1/ip/{infoscreen_name:secret}=> Update IP of infoscreen./api/v1/screenshot/{infoscreen_name:secret}=> Upload and update screenshot to infoscreen.
WebSockets (socket.io)
We currently use socket.io in both client and server. It is probably easiest if you use that too if you want to listen for sensor data (like the office door or coffee machine). This is how it can be used:
import io from 'socket.io-client';

// Url format: wss://notiwall.online.ntnu.no/{machine}/{sensor_name}
socket = io('wss://notiwall.online.ntnu.no/online-door/office-door');
socket.on('status', sensor => {
  console.log(`Sensor ${sensor.name} is updated to: ${sensor.value}`);
});yarn # Install dependencies
yarn start # Start development
# Setup own CORS server allowing requests from anywhere
yarn cors-server
First the app starts a fetch schedule described by ./src/defaults/apis.js. A fetch sequence can look like this (more details in ./src/defaults/apis.js):
  ...
  github: {
    interval: 60, // Fetch every 60th second
    print: true, // (Optional) Print results into the browser console
    url: `https://api.github.com/users/{{users.*}}/repos`, // Create multiple URLs from users. Currently 'dotkom' is the only user
    users: {
      dotkom: 'dotkom',
    },
  },
  ...
The code above will generate a URL that can be accessed using github.users.dotkom. The fetch call is not called unless a component asks for github.users.dotkom. More on how components can use this in the next section.
Complete example
  ...
  linjeforening: {
    interval: 1000, // Fetch every 1000th second
    delay: 10, // Start fetch after 10 seconds
    url: 'https://events.com/api/v1/events?start=[[now.datetime]]', // Any URL, can use datestamps from current time

    // Random objects can be used for permutations in requests/urls. See the body below or the url from previous example
    somedata: {
      business: '210',
      social: '121',
      open: '111',
    }

    // Tranform API data using STJS (read more about transforms in the examples below)
    transform: {
      events: {
        '{{#each results}}': {
          startDate: '{{event_start}}',
          endDate: '{{event_end}}',
          title: '{{title}}',
          image: 'https://events.com[[{{link}}#HTML:#eventImage > img@src]]', // [[What to scrape:selector@attribute]]
        },
      },
    }
    scrape: ['events.*.image'], // Tell app to scrape images from the transform above
    cache: true, // You probably want to cache the images (src attribute values) above

    method: 'POST', // All request methods are allowed
    request: { body: '{"type":"{{somedata.*}}"' }, // Modify the request with headers and stuff. Can use permuations on body
    body: { type: '{{somedata.*}}' }, // Same as above, just simpler if only body is needed
    cors: true, // Some sites does not allow CORS, but enabling this will allow everything

    print: true, // You probably want to output requests when debugging
    printTransform: true, // Output after transform of data is also useful
  },
The full example can be used through linjeforening.somedata.business, linjeforening.somedata.social and linjeforening.somedata.open.
Plain REST example
  ...
  githubDotKom: {
    interval: 60,
    url: `https://api.github.com/users/dotkom`,
  },
  ...
Available through: githubDotkom
Transform the API output before it is passed to components
We use STJS to transform the input from the API data. This is for example useful when using multiple event APIs and you want a spesific structure on the data passed to the components.
You can read about STJS transforms here: https://selecttransform.github.io/site/transform.html
  ...
  githubDotKom: {
    interval: 60,
    url: `https://api.github.com/users/dotkom`,
+   transform: {
+     image: '{{avatar_url}}',
+     description: '{{bio}}',
+     url: '{{html_url}}',
+   }
  },
  ...
Output:
{
  image: 'https://avatars0.githubusercontent.com/u/693951?v=4',
  description: 'Drifts- og utviklingskomiteen i Online, linjeforeningen for Informatikk ved NTNU.',
  url: 'https://github.com/dotkom',
}
Dealing with RSS feeds
When dealing with other formats than JSON, you can specify this by appending these to the URL:
{URL}#GET (JSON => JSON){URL}#POST[#body] (JSON => JSON){URL}#RSS (XML => JSON){URL}#HTML[:query-selector[(at)attribute]] (HTML => JSON){URL}#HTML2JSON[:query-selector[(at)attribute]] (HTML => JSON){URL}#HTML2HTML[:query-selector[(at)attribute]] (HTML => outerHTML){URL}#HTML2TEXT[:query-selector[(at)attribute]] (HTML => innerText){URL}#TEXT (Plain text => Plain text)- More info on this in
./src/defaults/apis.js.
  ...
  redditArticles: {
    interval: 86400,
    url: `https://www.reddit.com/.rss#RSS`, // <-- Appended #RSS
    transform: {
      articles: {
        '{{#each feed.entry}}': {
          title: '{{title[0]}}',
          date: '{{updated[0]}}',
          link: '{{link[0].$.href}}',
          author: '{{author[0].name}}',
          image: 'https://www.redditstatic.com/new-icon.png',
        },
      },
    },
  },
  ...
Output:
{
  articles: [
    {
      title: 'Witcher III (My last comic)',
      date: '1970-01-01T23:41:07+00:00',
      link: 'https://www.reddit.com/r/gaming/comments/ajdml1/witcher_iii_my_last_comic/',
      author: '/u/SrGrafo',
      image: 'https://www.redditstatic.com/new-icon.png',
    },
    ...
  ]
}
Dealing with RSS feeds (And scraping images from each feed element)
  ...
  vgArticles: {
    interval: 86400,
    url: `https://www.vg.no/rss/feed/?categories=1068&limit=10#RSS`,
+   cache: true,
+   scrape: ['articles.*.author'],
    transform: {
      articles: {
        '{{#each rss.channel[0].item}}': {
          title: '{{title[0]}}',
          date: '{{pubDate[0]}}',
          link: '{{link[0]}}',
+         author: '[[{{link[0]}}#HTML:article > div > ul > li]]',
          image: '{{image[0]}}',
        },
      },
    },
  },
  ...
Output:
{
  articles: [
    {
      title: 'Tittel på artikkel',
      date: 'Thu, 01 Jan 1970 23:01:00 +0100',
      link: 'http://www.vg.no/nyheter/innenriks/...',
      author: 'Ola Normann',
      image: 'https://imbo.vgc.no/users/vgno/images/451f60dc338...',
    },
    ...
  ]
}
Scrape HTML content from any website
A lot of websites does not have a JSON API and it is therefore handy to be able to fetch spesific data from an element in a HTML document.
The syntax for retrieving HTML is like this:
{URL}#HTML[:query-selector[(at)attribute]] (HTML => HTML)
  ...
  komplett: {
    interval: 60,
+    url: `https://www.komplett.no/product/823822/tv-lyd-bilde/hodetelefoner/hodetelefoner/bose-qc-25-hodetelefon-apple#HTML:.product-main-info-stockstatus > div > div > span`,
+    cors: true,
  },
  ...
Output:
{
  state: '20+ stk. på lager.',
}
To use the data from the API's you need a component to pass the data into. Components for each affiliation (linjeforening) is described in ./src/defaults/affiliations.js. Each affiliation can have a set of components:
  ...
  dotkom: { // Select affiliation in `./src/defaults/settings.js`
    name: 'DotKom',
    components: [

      // Shorthand existing template
+     'Clock',

      // Extended existing template
+     {
+       template: 'GitHub',
+       apis: {
+         repos: 'github.users.dotkom',
+       },
+     },

      // Shorthand self made template (with pipe transformation and loop)
+     '<h1>{{affiliation|upper|back  er kult}}!{{#each [1,3,3,7]}}{{this}}{{#end}}</h1>',
      // Output: <h1>DOTKOM er kult!1337</h1>

      // Extended self made template
+     {
+       template: '<h1>Time: {{seconds|time HH:mm:ss}}</h1>',
+       apis: {
+         seconds: 'seconds', // Listen to changes in seconds
+       },
+     },
      // Output: <h1>Time: 16:42:00</h1>

    ],
  },
  ...
Components can have two different formats:
This option is most preferred as you can choose between a large variety of templates written in React. This exposes the true power of the web with animations and data handling.
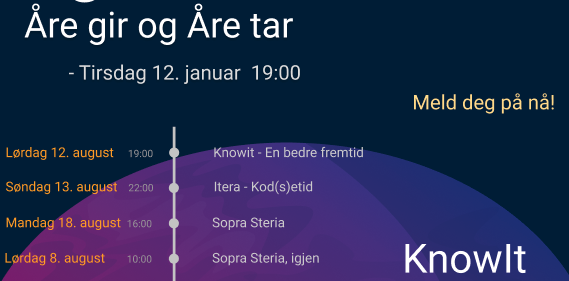
Example of `Events` template usage
[
...
{
template: 'Events',
apis: {
events: '{{affiliation}}Events:events', // {{affiliation}} is injected from settings
},
},
...
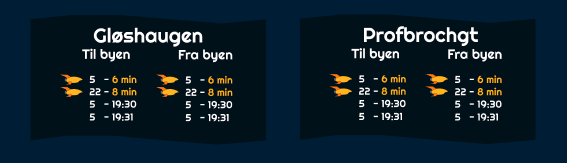
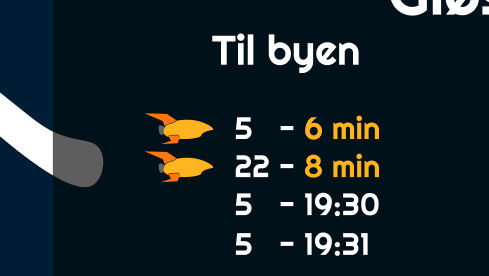
]Example of `Bus` template usage
[
  ...
  {
    template: 'Bus',
    name: '{{bus:glos}}', // The bus name displayed on the screen. If none have been chosen, then bus name will be set to 'glos' as default
    count: '{{busCount}}', // Control amount of departures from settings
    apis: {
      fromCity: 'tarbus.stops.{{bus:glos}}.fromCity:departures',
      toCity: 'tarbus.stops.{{bus:glos}}.toCity:departures',
    },
  },
  ...
]You can also create your own components with data from any API.
Example
[
  ...
  {
    template: '<h1>Klokke: {{variable|time HH:mm:ss}}</h1>', // Using pipe syntax to format the time from milliseconds to HH:mm:ss
    apis: {
      variable: 'time', // Makes it possible to listen for time changes
    },
  },
  ...
]
Shorthand (Will not update regularly as it does not listen to a time API):
[
  ...
  '<h1>Klokke: {{clock|time HH:mm}}</h1>',
  ...
]
Example with template loops
[
  ...
  {
    template: `<h1>Bus table for {{bus:glos|translate}}</h1>
{{#each departures}}
<div>{{number}} - {{name}} ({{registeredTime|time HH:mm}})</div>
{{#end}}`,
    apis: {
      departures: 'tarbus.stops.{{bus:glos}}.fromCity:departures',
    },
  },
  ...
]
Most times you want to specify a layout. This can either be fixed using plain CSS or the inbuilt app grid systemᵗᵐ. Here is an example from both:
The Notifier Grid Systemᵗᵐ (preferred)
  ...
  dotkom: {
    name: 'DotKom',
+   layouts: {
+     0: ['Clock', 'GitHub'], // From 0 to 511px
+     512: ['Clock GitHub'], // From 512px and out
+   },
    components: [
      'Clock',
      {
        template: 'GitHub',
        ...
      },
    ],
  },
  ...
Equivalent example with affiliation CSS
  ...
  dotkom: {
    name: 'DotKom',
+   layouts: {}, // Deactivate layout generator
+   css: `
+   .Components {
+     grid-template: "Clock" "GitHub" / 1fr;
+   }
+   @media (min-width: 512px) {
+     .Components {
+       grid-template: "Clock GitHub" / 1fr 1fr;
+     }
+   }`,
    components: [
      'Clock',
      {
        template: 'GitHub',
        ...
      },
    ],
  },
  ...
If no layouts are specified, the layout will be autogenerated based on the component order and screen width.

You can achieve everything with plain CSS, but The Notifier Grid Systemᵗᵐ is probably good enough for most layouts.
The Notifier Grid Systemᵗᵐ advanced
  ...
  dotkom: {
    name: 'DotKom',
    layouts: {

      0: [
        'Clock',
+       'Clock-2', // Identified through the dash (-)
+       'ThirdClock', // Identified through "id" property
+       'GitHub \ 1' // Make GitHub component use 1fr of the space (aka. rest of the screen, if any)
      ],

      512: [

        // Justify colums using "/" at the start of a layout
+       '/ 1fr 400px', // 1 fraction for first column and 400px for second column

        'Clock Clock-2',
+       'ThirdClock GitHub / 1fr', // Using 1fr, auto or minmax(...) is allowed
+       'GitHub / 2', // Use 2fr
      ],

      // You can also just use plain CSS Grid template syntax
+     1024: `
+       "Clock Clock-2 ThirdClock"
+       "GitHub GitHub GitHub" 2fr
+       / 1fr 1fr 1fr
+     `,

      2048: [
+       // Use "|" to fill area between two columns with 1fr
+       '/ 400px 400px | 400px',

        // Adding a value to the filled area is also possible: '/ 400px 400px |100px 400px'

        'Clock Clock-2 ThirdClock', // Adds a "." (space) with size of 1fr between Clock-2 and ThirdClock
        'GitHub GitHub GitHub', // Stretch GitHub over 1fr, not adding a blank space

        // Actually generated: 'Clock Clock-2 . ThirdClock'
        //                     'GitHub GitHub GitHub GitHub'
        //                     '/ 400px 400px 1fr 400px'
      ]

    },
    components: [
      'Clock',
+     'Clock-2', // Use dash (-) to use multiple components of the same type
      {
        template: 'Clock',
+       id: 'ThirdClock', // Use "id" to set layout name
      },
      {
        template: 'GitHub',
        ...
      },
    ],
  },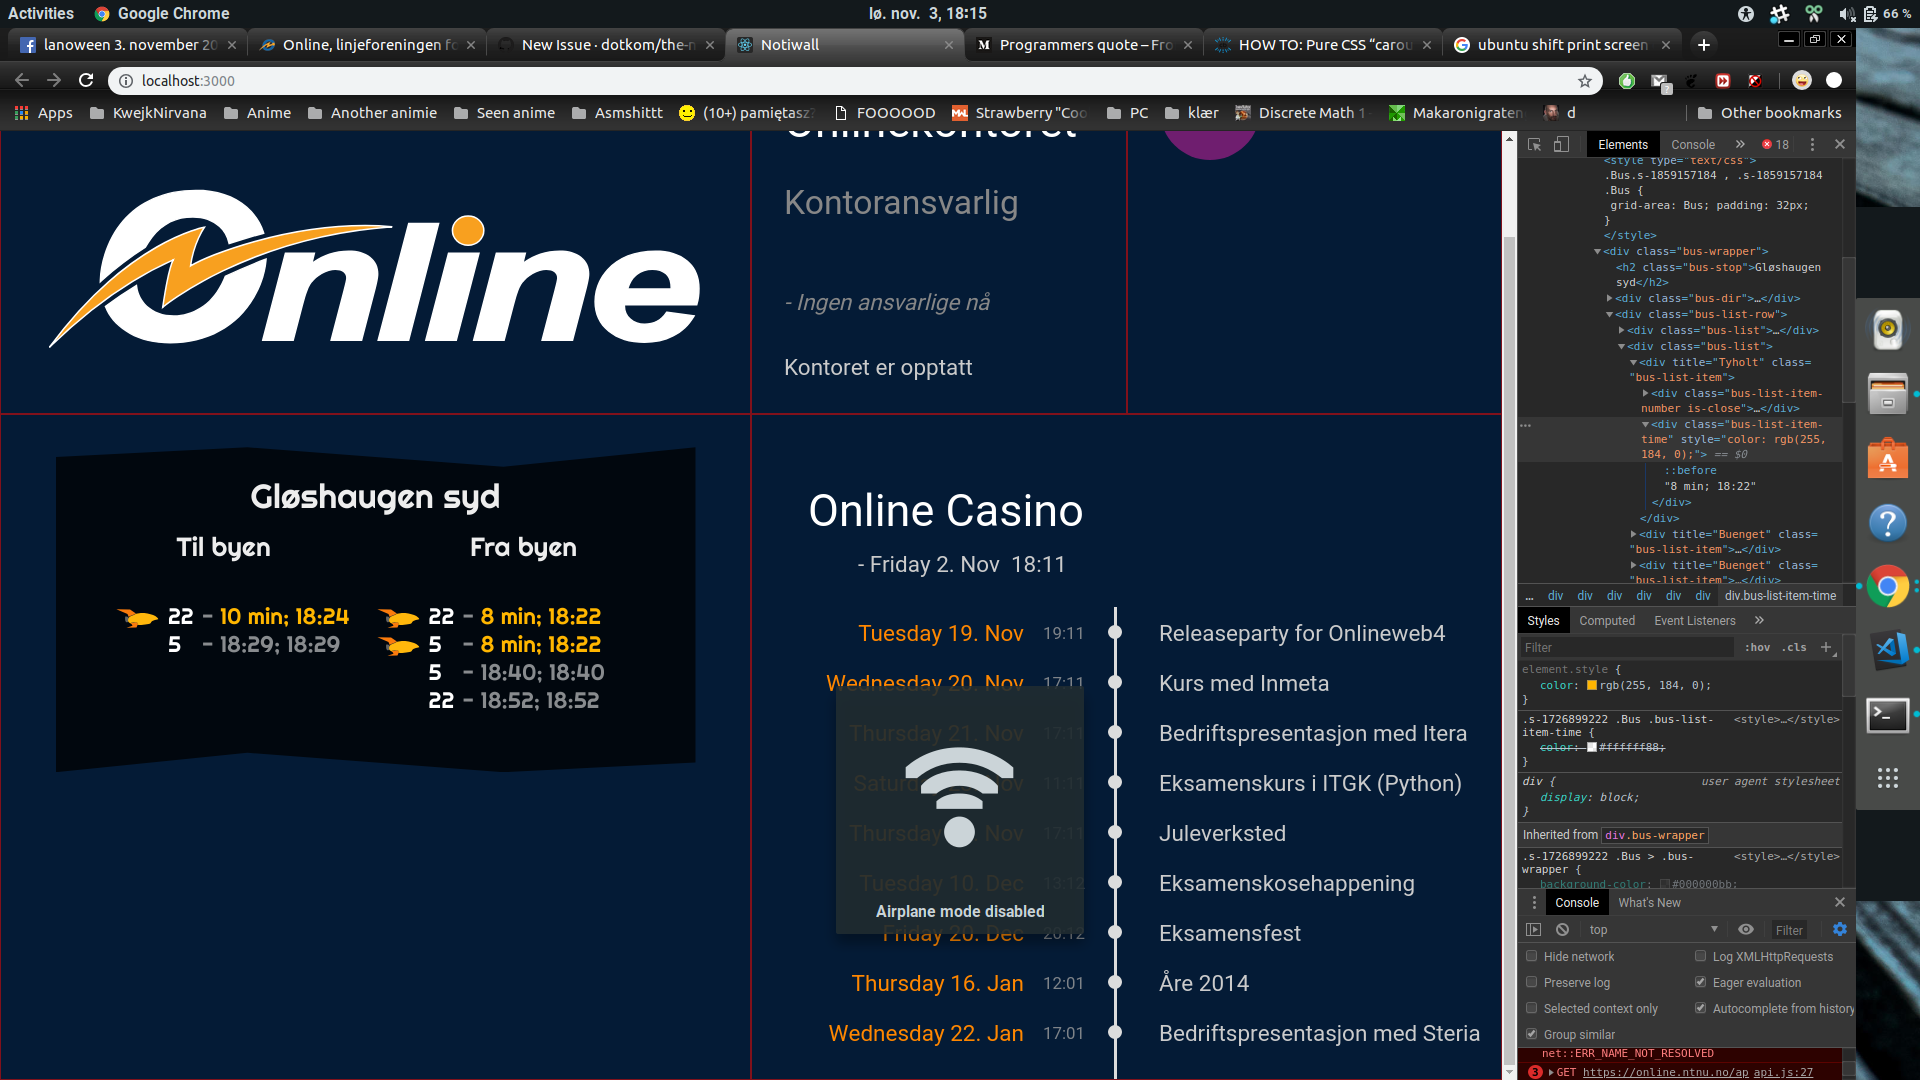
...Example of the Online affiliation using four different layouts at specified widths:

Example of the Online affiliation
  ...
  online: {
    name: 'Online',
+    layouts: {
+      0: ['Logo', 'Clock', 'Office', 'Bus', 'Bus2', 'Events'],
+      720: [
+        '/ 200px . . 200px',
+        'Logo Logo Logo',
+        'Office Office Clock Clock',
+        '. . . .',
+        'Bus Bus Bus2 Bus2',
+        '. . . .',
+        'Events Events Events .',
+      ],
+      1400: [
+        'Logo Logo Office Clock',
+        '. . . .',
+        '. . Events Events / 1',
+        'Bus Bus Events Events',
+        'Bus2 Bus2 Events Events',
+        '. . Events Events / 1',
+        '. . . .',
+      ],
+      2000: [
+        'Logo Logo Office Clock',
+        '. . .',
+        'Bus Bus2 Events Events',
+        '. . .',
+      ],
+    },
    components: [...],
  },
  ...

![dependabot[bot] avatar](https://avatars.githubusercontent.com/in/29110?v=4 "dependabot[bot]")