
[https://github.com/djvov/esp8266-blynk-bot/blob/master/real/vk_sYRZaswefbQ.jpg?raw=true]


In Arduino IDE setup you need to put "http://arduino.esp8266.com/stable/package_esp8266com_index.json" at the line "Extend links to board manager". Then go to the Board Manager and install ESP8266 community. In the board menu choose your chip, my is Generic 8266. Then your need to put esp8266 and FTDI programmator together as shown below.

Open Arduino OTA sketch from examples and write it.
Because in this robot I took all PINs to some tasks, we need to write firmware Over The Air. And first step is load OTA firmware to esp8266.
I'll buy native esp8266 chip and white development board.

In the Fritzing schema I didn't find white pcb, so I put what I found, some black. But, as white pcb, It's has some width as breadboard width. So we need to extend it by wire to another row. From 1 row to 9 row, from 2 row to 10 row, etc.

The yellow lines just to show hot to each pin goes to its row after pcb.

[https://github.com/djvov/esp8266-blynk-bot/blob/master/schema/robot_bb.jpg?raw=true]
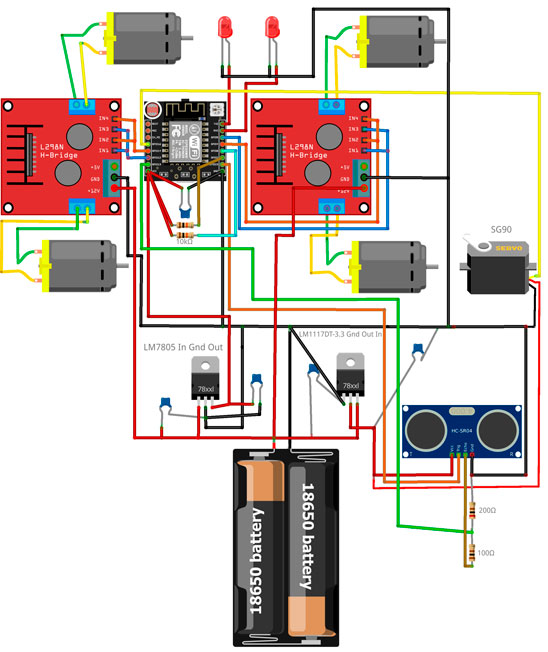
First of all, two 18650 with serial connection to get 8.4v. With BMS plate to prevent overdischarge, and charge it with balance. From battery block we need to build TWO special power lines: 3.3v for ESP8266, 5v for servo and HC–SR04 sonar. And raw 8.4v power for motor drivers. 3.3v we get from LM1117DT-3.3, 5v we get from LM7805. In both case two ceramic 104 capacitor for IN and OUT to ground. IMPORTANT! It is necessary to connect ALL GROUNDS

I use MX1508 dual motors driver, analog of L298N. 1.5A per channel, 2.5A peak. With no heat sink. Becarefurl with VCC + and -.

I use two MX1508 dual motors drivers, becase I have four wheels. One MX1508 drives two motors from same side. So we need to put IN1 and IN3 together, also IN2 and IN4, for same direction of two motors. This schema can use only two pins of ESP8266 instead of four pins.
Here is table of signal for direction, standby and brakes. Standby different from brake. Standby ends of power to motor, and motor stops by itself, it tooks some time. Brake stops motor immediately.

White board for ESP8266 already has pull-up 10k resistors for CH_PD and RESET, and pull-down 10k resistor for GPIO15. If you use native ESP8622 chip you must use put this resistor manually. Also, we has to pull-up GPIO2 and GPIO0 with 10k resistors. And I put ceramic 104 capacitor between VCC and GND of ESP8266.
//motors
// left
const int in1 = 12;
const int in2 = 14;
// right
const int in3 = 5;
const int in4 = 4;
HC–SR04 sonar use 5v power and 5v TTL logic. But it know about 3.3v TTL for TRIG pin (HC–SR04 input). BUT ECHO pin (HC–SR04 output) needs to be connect to ESP8266 through voltage divider

// HC–SR04 sonar
const int trigPin = 15;
const int echoPin = 13; // through voltage divider!
LED uses TX and RX pins. THATS WHY FIRST OF ALL WE FLSAH OTA sketch.
// LED
const int led = 1;
const int led1 = 3;
Servo SG90 use 5v power and 5v TTL logic. But it know about 3.3v TTL for SG90 input.
//servo
Servo servo1;
const int servoPin = 16;

V0  slider, 0-180, decimals 0, send on release Off. Servo. Just for fun.
    In time the robot walks - servo is worked automatic.
V1-V4 push type buttons, Forward, Revers, Right, Left.
V5  switch type button. LEDs.
V6  slider, 300-600, decimals 0, send on release On. Speed.
V7  switch type button. Automatic walk.
V8  terminal
For use Blynk App you must need ESP8266WiFi and BlynkSimpleEsp8266 libraries. ESP8266mDNS and WiFiUdp and ArduinoOTA for Over The Air upload. Servo for servo ;-)
#include <ESP8266mDNS.h>
#include <WiFiUdp.h>
#include <ESP8266WiFi.h>
#include <BlynkSimpleEsp8266.h>
#include <ArduinoOTA.h>
#include <Servo.h>You should get Auth Token in the Blynk App. Get it from Blynk app. And login and password to your router.
// You should get Auth Token in the Blynk App.
char auth[] = "";

// Your WiFi credentials.
char ssid[] = "";
char pass[] = "";
Default speed. Slowest 300. If speed < 300, motor has not enough power to move. Fastest is 1023. But I set tup fastest is 600 because if speed > 600, robot could not stop before it crashes the wall ).
// скорость 1023 max
int spd = 300;
// скорость автопрогулки
int autoSpd = 300;
timerStrob is for timer that runs stroboscope effect with leds.
timerStena is for timer that checks distance to the obstacle in manual mode, it moves the servo to which the sonar is attached.
timerAuto is for timer that runs auto walk, it moves the servo to which the sonar is attached.
BlynkTimer timer;
int timerStrob;
int timerStena;
int timerAuto;
Movement flags to know where the robot is going.
// флаги движения
int V1_forv = 0;
int V2_back = 0;
int V3_right = 0;
int V4_left = 0;
Global variable autO that indicates if auto walk running. Last letter is capital because auto is reserved word. You may name it autoWalk.
// авто прогулка
int autO = 0;
Servo angles. In order for the sonar to look forward, the servo must be rotated 90 degrees. Similarly, sonar to right 50 degrees, sonar to left 140 degrees.
// Углы поворота Серовпривода
int angleF = 90;
int angleR = 50;
int angleL = 140;
Distances in centimeters. distAttention - Speed higher. distCaution - Speed lower. distSTOP - STOP.
// дистанции остановки
int distSTOP = 30; // дистанция СТОП!
int distCaution = 50; // дистанция ОСТОРОЖНО! скорость 300
int distAttention = 70; // дистанция ВНИМАНИЕ! скорость 400
Terminal widget in blynk app attached to Virtual pin 8. For some debug information.
WidgetTerminal terminal(V8);Delay time to stabilize servo.
int delay_time = 150; // время задержки для стабилизации сервоприводаIn this section you must initizlize pin mode, attach servo, move it forward (90 degrees), stop motors, turn off the leds.
 // моторы
  pinMode(in1, OUTPUT);
  pinMode(in2, OUTPUT);
  pinMode(in3, OUTPUT);
  pinMode(in4, OUTPUT);
  stp(0);
  // фара leds
  pinMode(led, OUTPUT);
  pinMode(led1, OUTPUT);
  digitalWrite(led, LOW);
  digitalWrite(led1, LOW);
  //датчик расстояния sonar
  pinMode(trigPin, OUTPUT);
  pinMode(echoPin, INPUT);
  // servo
  servo1.attach(servoPin);
  servo1.write(90);
Timer setup. BlynkTimer is similar as SimpleTimer. First of all needs to declare timer object in global. BlynkTimer timer;
Timer objects can manage several timers. Each of them must be also declared. int timerStrob;.
Then we must determine the correspondence between variable and function.
int setInterval(unsigned long d, timer_callback f);
First parametr d is delay in milliseconds, second parameter f is name of callback function that runs every d milliseconds.
timerStrob = timer.setInterval(200, strobo);And disable that timer, because we don't need to all timer functions run at startup.
timer.disable(timerStrob);We do the same for all timers.
  // увидел ли стену в ручном режиме
  timerStena = timer.setInterval(13L, checkrasst);
  timer.disable(timerStena);

  // автопрогулка
  timerAuto = timer.setInterval(1L, go_auto);
  timer.disable(timerAuto);
Then we start OTA and Blynk
// по воздуху
  ArduinoOTA.begin();
  Blynk.begin(auth, ssid, pass);
Theb we initilize terminal widget.
clear function clear ther terminal. print and println functions as Serial.print, writes text and return or not return caret.
After we finished all text, we need to terminal sends data to blynk app by the flush function.
Lets write some 'hello' text and current IP after robot connects to router.
  terminal.clear();
  terminal.println(String("Speed ") + String(spd));
  terminal.println(String("Servo 90"));
  terminal.print(String("Local IP"));
  terminal.println(WiFi.localIP());
terminal.flush();When you use Blynk your loop section must contains only Blynk.run(). ArduinoOTA.handle(); if you uses OTA, and timer.run(); if you uses timer functions. Thats all! All loops, cycles, events, actions, etc. in separate functions.
void loop()
{
  ArduinoOTA.handle();
  Blynk.run();
  timer.run();
}Just blink two leds one by one.
void strobo() {
  digitalWrite(led, HIGH);
  digitalWrite(led1, LOW);
  delay(100);
  digitalWrite(led, LOW);
  digitalWrite(led1, HIGH);
}Checks distance to the obstacle in manual mode. Servo looks forward (90 degrees). When The robot stop near the 'wall' he shakes his head like a man, means "NO"
void checkrasst() { // проверка расстояния в ручном режиме поездки и остановка если мало
  int cm = distanceMeasuringSonar (angleF);
  if (cm<distSTOP) {
    stp(0);
    servo1.write(70);
    delay(500);
    servo1.write(110);
    delay(500);
    servo1.write(90);
  }
}Measuring distance to the obstacle at the some angle. angle parameter in degrees. In settings we declare some variables for some angles. Turn the servo, wait for stabilization. Then use sonar. If result of the pulseIn function is 0 this means error of measurement, and we need to restart sonar by send low to echoPin, before this turn echoPin in OUTPUT mode, and back in INPUT mode after sonar reset. And I decided return 400cm in this case (limit of measurement). If everything is ok, divide result of the pulseIn function by 58, we get distance in cm.
// *************** Функция определения Расстояния СОНАР ******************
int distanceMeasuringSonar (int angle)// функция — измерение расстояния при определенном угле поворота сервопривода
{
  int distanceSonar = 0;
  servo1.write(angle); // поворот сервопривода 1
  delay (delay_time); // подождать стабилизацию сервопривода
  digitalWrite (trigPin, LOW); // подать напряжение на сонар LOW в течении 2¦Мs
  delayMicroseconds (2);
  digitalWrite (trigPin, HIGH); // подать напряжение HIGH на сонар в течении 10¦Мs
  delayMicroseconds (10);
  digitalWrite (trigPin, LOW); // подать напряжение LOW на сонар
  int distance = pulseIn(echoPin, HIGH, 30000); // считываем данные с Сонара
  if (distance == 0)// если расстояние "0" — ошибка измерения (вне предела/завис)
  { // делаем перезагрузку сонара подачей 0 на вывод ECHO Сонара
    pinMode(echoPin, OUTPUT);
    digitalWrite(echoPin, 0);
    pinMode(echoPin, INPUT);
    // в случае ошибки измерения выводим расстояние "400 см" — расстояние вне предела измерения датчика
    distanceSonar = 400;
  } else {
    distanceSonar = distance / 58; // переводим "время" в сантиметры
  }
  terminal.print(String("DISTANCE "));
  terminal.println(distanceSonar);
  terminal.flush();
  return (distanceSonar); // возвращаем расстояние
}All movement (forward, backward, left, right) functions excluding STOP has two parameters, delay (uses in auto walk mode), and speed.
If auto walk mode is activated, speed takes from function parameter, in manual mode speed takes from global variables spd, that regulates from blynk app by slider widget. And we enable timerStena in forward function when manual mode is activated. And I write in terminal what's going on.
void stp(int f) { // стоп
  digitalWrite(in1, LOW);
  digitalWrite(in2, LOW);
  digitalWrite(in3, LOW);
  digitalWrite(in4, LOW);
  terminal.println(String("stop"));
  terminal.flush();
  timer.disable(timerStena);
  delay(f);
}

void go_forv(int a, int sa) {
  int spd1 = 0;
  if (autO==1) spd1=sa;
  else spd1=spd;
  if (autO==0) {
    timer.enable(timerStena);
  }
  analogWrite(in1, spd1);
  digitalWrite(in2, LOW);
  analogWrite(in3, spd1);
  digitalWrite(in4, LOW);
  terminal.println(String("go_forv"));
  terminal.flush();
  if (autO==1) {
    delay (a);
  }
}

void go_back(int g, int sg) {
  int spd1 = 0;
  if (autO==1) spd1=sg;
  else spd1=spd;
  digitalWrite(in1, LOW);
  analogWrite(in2, spd1);
  digitalWrite(in3, LOW);
  analogWrite(in4, spd1);
  terminal.println(String("go_back"));
  terminal.flush();
  if (autO==1) {
    delay (g);
  }
}

void go_left(int e, int se) {
  int spd1 = 0;
  if (autO==1) spd1=se;
  else spd1=spd;
  digitalWrite(in1, LOW);
  analogWrite(in2, spd1);
  analogWrite(in3, spd1);
  digitalWrite(in4, LOW);
  terminal.println(String("go_left"));
  terminal.flush();
  if (autO==1) {
    delay (e);
  }
}

void go_right(int d, int sd) {
  int spd1 = 0;
  if (autO==1) spd1=sd;
  else spd1=spd;
  analogWrite(in1, spd1);
  digitalWrite(in2, LOW);
  digitalWrite(in3, LOW);
  analogWrite(in4, spd1);
  terminal.println(String("go_right"));
  terminal.flush();
  if (autO==1) {
    delay (d);
  }
}