During this project, we'll be building a web application that allows for categorizing information in radar charts. We'll build out two main components to make our web application work. The component that allows for making new charts and the component that displays a list of the created charts and allows us to navigate between charts. The component for adding datasets to charts will already be built out for us. However, we will create the reducer code that the component will use. The radar chart will also already be setup for us. We'll just need to pass the correct data to its component. To keep track of data and pass it to the correct components we'll make heavy use of Redux and React Redux.
The following diagram can serve as a useful reference point on how data is flowing in the application if you ever get a little lost.
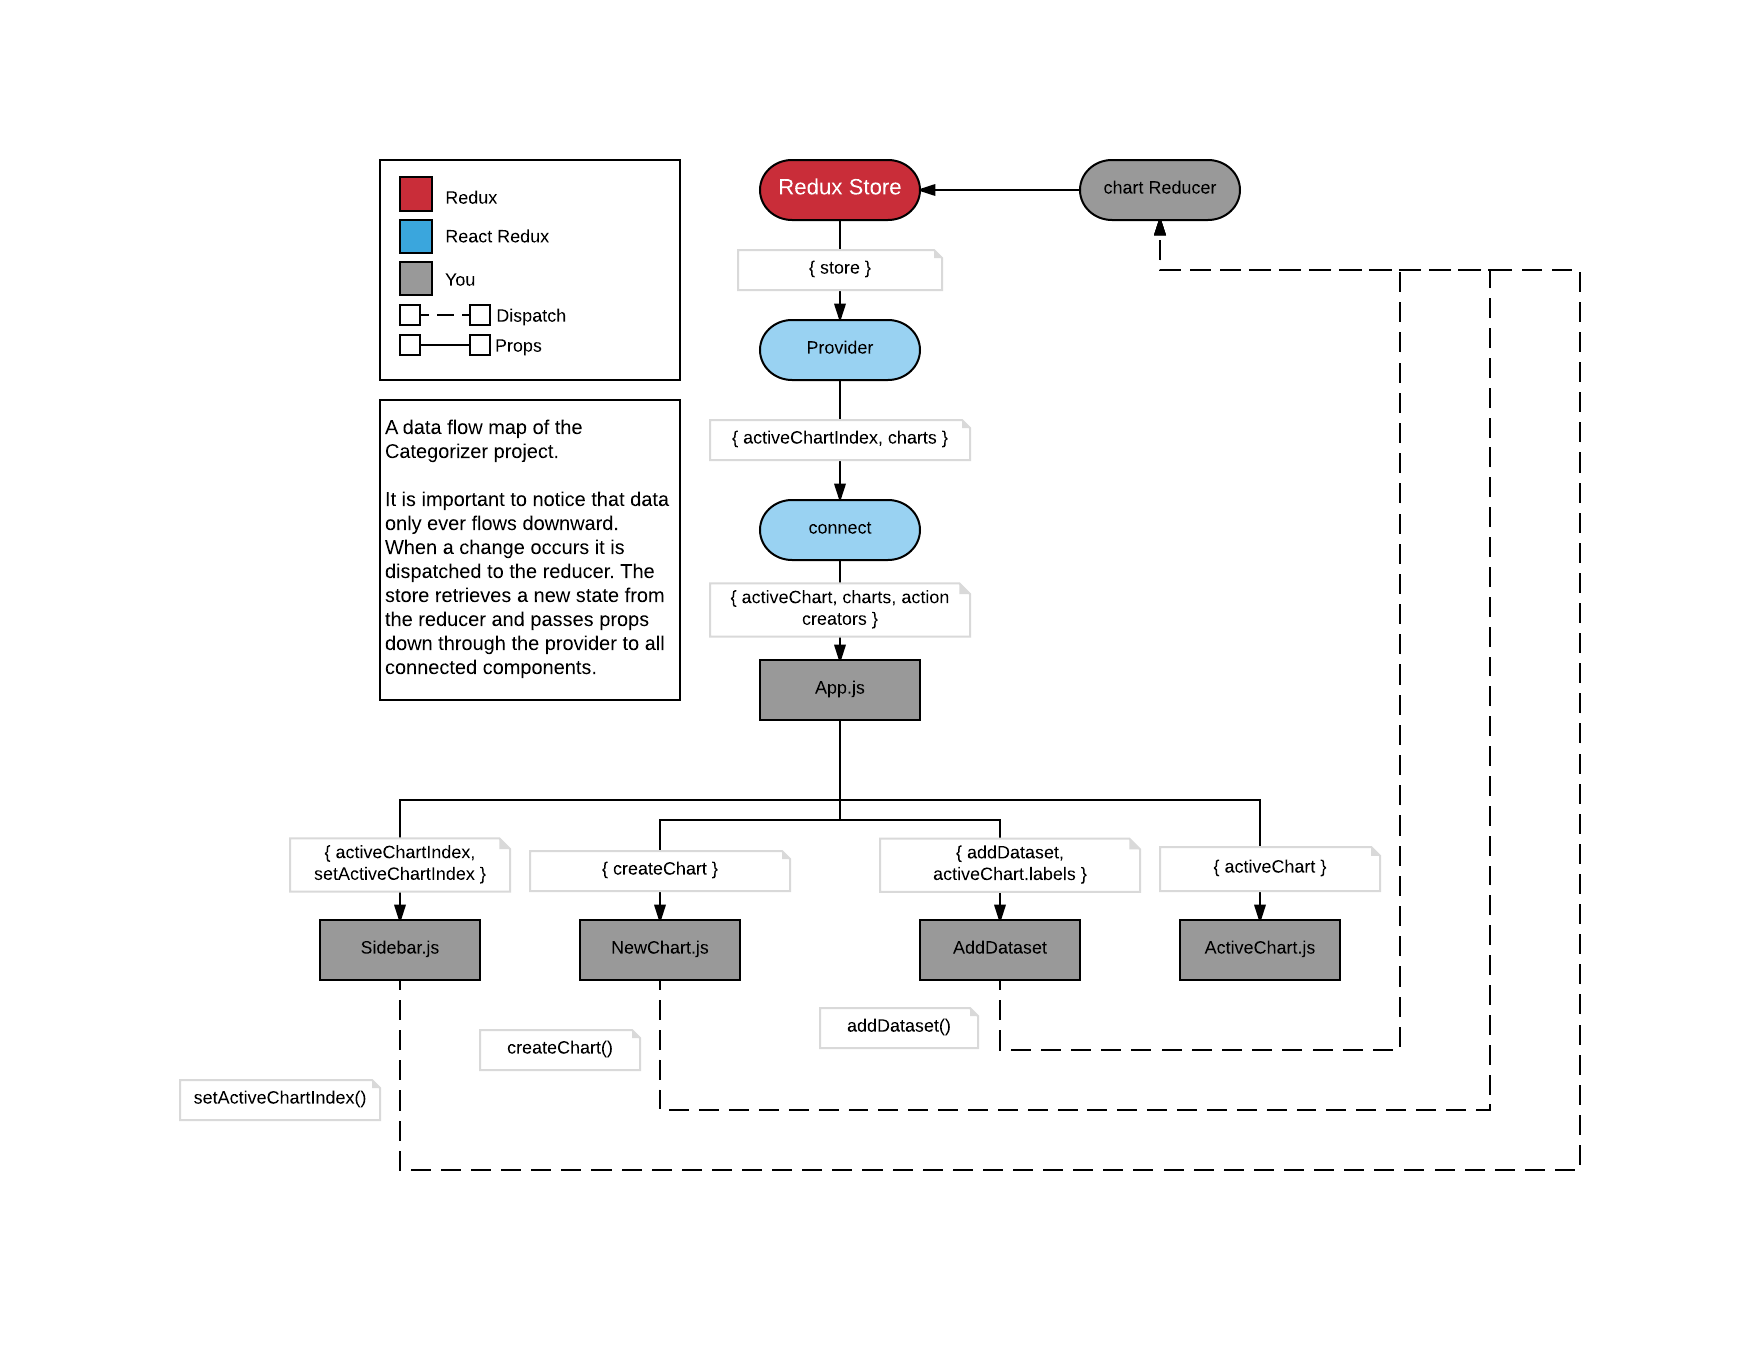
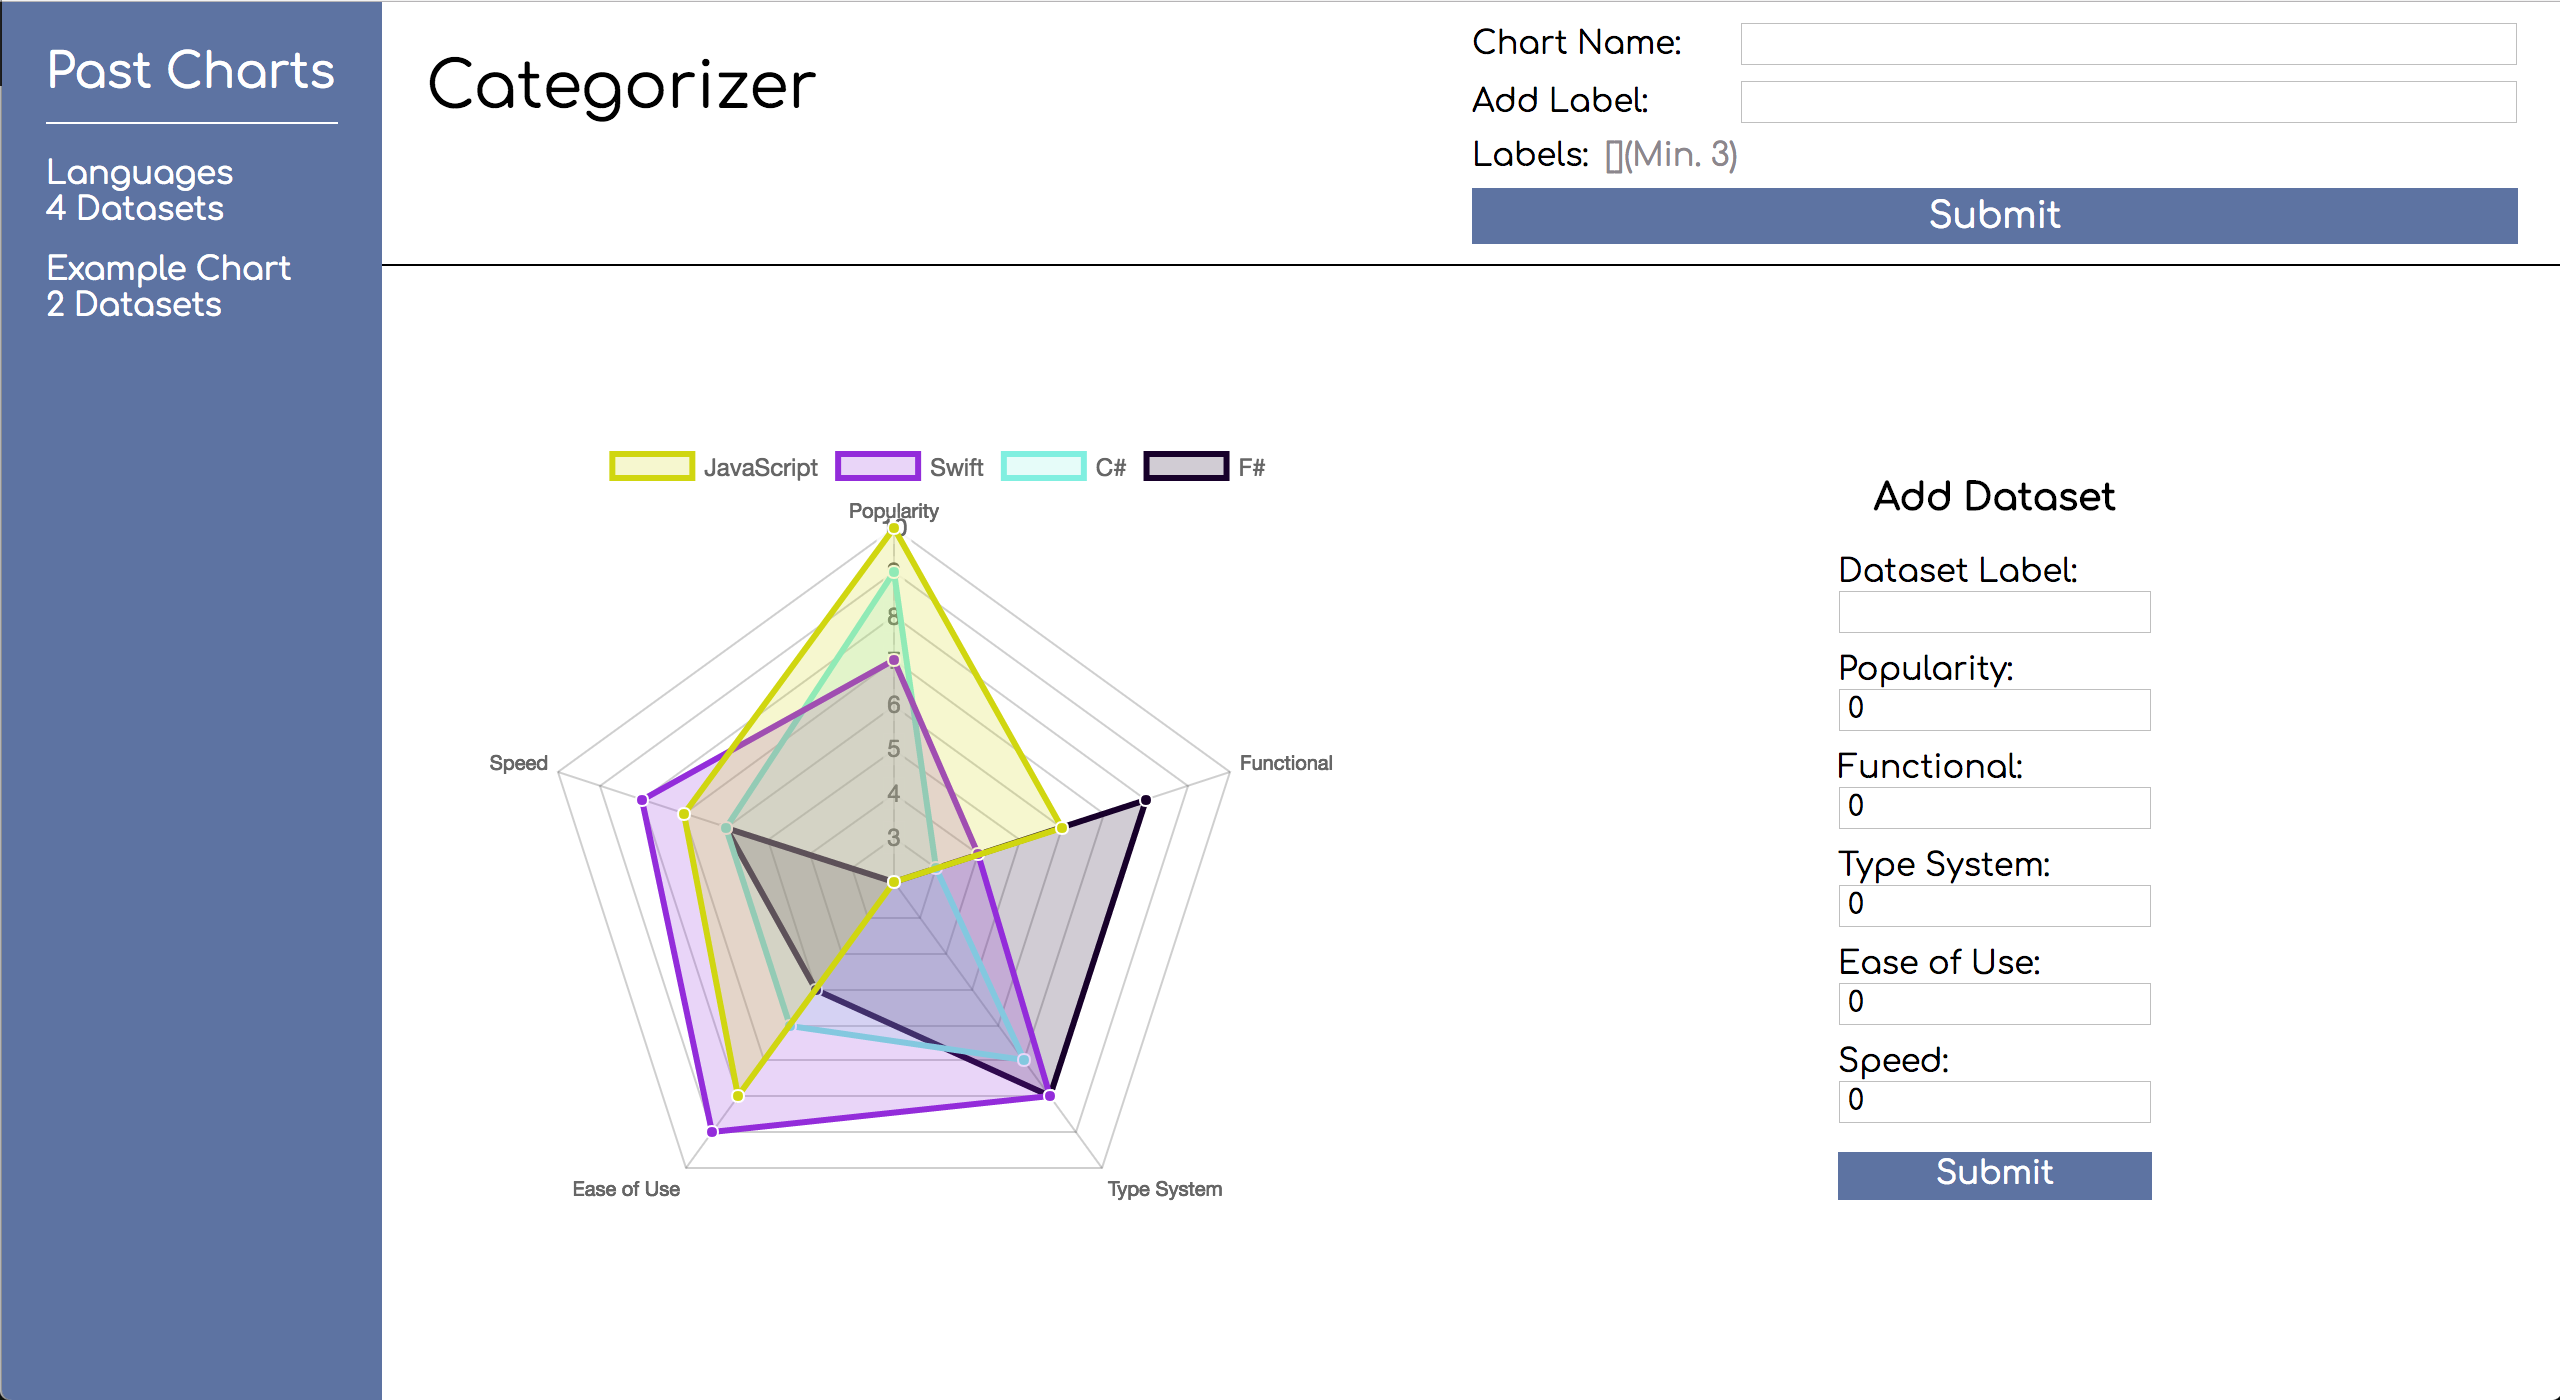
A live example can be found here
Forkandclonethis repository.cdinto the project directory.- Run
npm installto download the included dependencies. - In one terminal window/tab run
npm testto start the test suite. - In another terminal window/tab run
npm startto spin up the development server.
In this step, we'll download the necessary packages to use Redux and create a reducer for our charts.
- Install Redux and React Redux using npm.
- Create a
chart.jsfile insrc/ducks/. - Create an initial state object at the top of
chart.jscalledinitialStatewith the following properties:activeChartIndex- The index of the active chart. This should default to value of0.charts- The array of charts. Each chart will be an object. This array should default to having one chart.-
Default Chart Code{ labels: [ "Red", "Blue", "Yellow", "Green", "Purple", "Orange" ], name: "Example Chart", datasets: [ { label: "My First dataset", data: [65, 59, 90, 81, 56, 55, 40] }, { label: "My Second dataset", data: [28, 48, 40, 19, 96, 27, 100] } ] }
-
- Create a reducer function underneath the
initialStatecalledchart:- This function should be exported by default.
- This function should have two parameters:
state- The current state of the application. This should default toinitialState.action- An object containing information about what has occurred and any data necessary to perform a state change.
- This function should use a
switchstatement on theaction.type:- Add a default case that returns
state.
- Add a default case that returns
Detailed Instructions
Let's begin by installing the following dependencies we'll need in order to use Redux with our react application. Open up a third terminal window/tab and make sure you are still in the root directory of the project and then run npm install redux react-redux.
While the install is happening, open the ducks folder ( src/ducks ) and create a file called chart.js. This is where we'll create our reducer, action types, action creators, and the initial state for our reducer.
Now let's open src/ducks/chart.js and start by creating an initialState variable. initialState should be an object with two properties: activeChartIndex and charts.
activeChartIndex- This is where we will store the index of the chart that the user has chosen to display.charts- This will be an array of objects containing the data necessary to create the charts.
Let's set the value of activeChartIndex to 0 so it will display the first chart and let's default charts to an array. We'll also add a default chart to the charts array.
The charts array will contain an array of chart objects that will keep track of the following information:
labels(array of strings): The labels that will appear at the corners of the chart.name(string): The name of the chart.datasets(array of objects): Data required for rendering values on to the chart
Our default chart will be the following object:
Default Chart Object
{
  labels: [ "Red", "Blue", "Yellow", "Green", "Purple", "Orange" ],
  name: "Example Chart",
  datasets: [
    {
      label: "My First dataset",
      data: [65, 59, 90, 81, 56, 55, 40]
    },
    {
      label: "My Second dataset",
      data: [28, 48, 40, 19, 96, 27, 100]
    }
  ]
}A dataset object in the datasets array will have two properties: label and data. The label is a string value for the name of the dataset and the data array contains the integer values for the labels of the chart. Let's take a look at the first dataset object:
{
label: "My first dataset",
data: [65, 59, 90, 81, 56, 55, 40]
} Since the default chart has the labels: "Red", "Blue", "Yellow", "Green", "Purple", "Orange". The value for "Red" is 65, the value for "Blue" is 59, and so on till the the value for "Orange" is 40. This relationship is made through the index of the arrays.
Your chart.js should now look like:
const initialState = {
activeChartIndex: 0,
charts: [
{
  labels: [ "Red", "Blue", "Yellow", "Green", "Purple", "Orange" ],
  name: "Example Chart",
  datasets: [
    {
      label: "My First dataset",
      data: [65, 59, 90, 81, 56, 55, 40]
    },
    {
      label: "My Second dataset",
      data: [28, 48, 40, 19, 96, 27, 100]
    }
  ]
}
]
};Let's move on to the next part of this step and create our reducer under the initialState variable. Create and export by default a function named chart which takes two parameters: state and action.
state- This will be an object representation of our application's current state.- It should default to
initialState.
- It should default to
action- An object containing information about what has occurred and any data necessary to perform a state change.
export default function chart( state = initialState, action ) {
}In ES2015 we can set default parameters by using an = sign in the function's head. state = initialState means that whenever chart gets called and state is not defined, it will use the value of initialState instead.
Now that our reducer function is created let's add a switch statement to the chart function that checks action.type. Later it will check for specific types but for now just give it a default case that returns state.
export default function chart( state = initialState, action ) {
switch(action.type) {
default:
return state;
}
} src/ducks/chart.js
const initialState = {
  activeChartIndex: 0,
  charts: [
    {
      labels: [ "Red", "Blue", "Yellow", "Green", "Purple", "Orange" ],
      name: "Example Chart",
      datasets: [
        {
          label: "My First dataset",
          data: [65, 59, 90, 81, 56, 55, 40]
        },
        {
          label: "My Second dataset",
          data: [28, 48, 40, 19, 96, 27, 100]
        }
      ]
    }
  ]
};
export default function chart( state = initialState, action ) {
  switch(action.type) {
    default:
      return state;
  }
}In this step, we'll create a store that will use the reducer we made in the previous step.
- Create a
store.jsfile insrc/. - Create a Redux store inside of the
store.jsfile you just created:- Import
createStorefrom'redux'. - Import
chartfrom the reducer we made in the previous step (./ducks/chart.js). - Call the
createStorefunction withchartas the first parameter.- This function call should be exported by default.
- Import
Detailed Instructions
Let's begin by creating a new file in src named store.js. Inside of src/store.js we'll want to import createStore from redux and chart from src/chart.js. Then we can use createStore by invoking it and passing in our chart reducer. We'll also want to export this by default.
import { createStore } from 'redux';
import chart from './ducks/chart';

export default createStore(chart);
Basically, Redux is creating the store and calling our reducer chart with undefined and a dummy action as arguments. This will then cause our reducer to return the initialState variable and give our store an initial state.
src/store.js
import { createStore } from "redux";
import chart from "./ducks/chart";

export default createStore( chart );In this step, we'll connect Redux to our application in index.js.
- Open
src/index.js. - Import
Providerfromreact-reduxafter theimportforReactDOM - Import
storefromsrc/store.jsafter theimportfor./index.css. - In
ReactDOM.render():- Wrap the
<App />component in aProvidercomponent. - Add a
storeprop to theProvidercomponent that equalsstore.
- Wrap the
Detailed Instructions
Let's being by opening src/index.js and importing Provider from react-redux and store from src/store.js.
import { Provider } from 'react-redux';
import store from './store.js';
Now that we have our store and Provider component, let's wrap the App component with the Provider component. We'll also need to add a store prop to Provider. The store prop should equal the store we imported earlier. This will give our application access to the Redux store.
ReactDOM.render(
  <Provider store={ store }>
    <App />
  </Provider>,
  document.getElementById( 'root' )
);src/index.js
import React from "react";
import ReactDOM from "react-dom";
import { Provider } from "react-redux";

import "./index.css";

import store from "./store";

import App from "./components/App";

ReactDOM.render(
  <Provider store={ store }>
    <App />
  </Provider>,
  document.getElementById( 'root' )
);In this step, we will connect the App component definition to Redux.
- Open
src/components/App.js. - Import
connectfromreact-reduxabove theimportfor./App.css. - Create a
mapStateToPropsfunction above theexportstatement ofApp.- This function should use object destructuring on the first parameter:
- The first parameter will always be a state object which will always have two properties.
activeChartIndexandcharts.
- The first parameter will always be a state object which will always have two properties.
- This function should return an object with the following properties:
activeChart- Should equal the actual object of the active chart.charts- Should equal the entire array of charts.
- This function should use object destructuring on the first parameter:
- Modify the original
exportofAppto export it's decorated version:- Invoke
connectand pass inmapStateToPropsas the first parameter. - Invoke the function it returns with
Appas the first parameter.
- Invoke
Detailed Instructions
Let's being by opening src/components/App.js. At the top of the file, just above the import for ./App.css, let's import connect from react-redux. We'll use this later to connect our App component. Now let's create a mapStateToProps function above our export statement for App. This function should destructure the first parameter. The first parameter will always be a state object that will always have the following two properties: activeChartIndex and charts. Therefore we can destructure it by doing { activeChartIndex, charts }.
function mapStateToProps( { activeChartIndex, charts } ) {

}
Object Destructuring
Using ES2015 we can destructure the object that gets passed into mapStateToProps by using { activeChartIndex, charts }. This takes the object that would get passed in as the first parameter and turns its props into variables we can reference in the function. This is the same thing as doing:
// state = { activeChartIndex: 0, charts: [] }
function mapStateToProps( state ) {
  return {
    activeChart: state.charts[ state.activeChartIndex ],
    charts: state.charts
  }
}
This function will be used to tell Redux which pieces of state our App component is interested in and also format state before reaching App. Let's have our mapStateToProps return an object with a activeChart and charts property.
activeChart- This should equal the actual object of the chart, we can do this by using ouractiveChartIndexwith ourchartsarray.charts- This should equal the array of charts.
function mapStateToProps( { activeChartIndex, charts } ) {
  return {
    activeChart: charts[ activeChartIndex ],
    charts: charts
  };
}
To finish connecting the App component definition, we need to create a decorator by invoking connect and passing in mapStateToProps. This will return a function we need to then invoke and pass in our App component. Finally, we'll then want to modify our export statement to equal the decoratedComponent instead of App.
Decorators can be created one of two ways:
function mapStateToProps( state ) {
  return state;
}
const decorator = connect( mapStateToProps );
const decoratedComponent = decorator( App );
export default decoratedComponent;
function mapStateToProps( state ) {
return state;
}
export default connect( mapStateToProps )( App );Either way accomplishes the same thing, but in the solutions to come I'll be using the shorter version.
src/components/App.js
import React, { Component } from "react";
import {connect} from "react-redux";

import "./App.css";

import NewChart from "./NewChart/NewChart";
import Sidebar from "./Sidebar/Sidebar";
import AddDataset from "./AddDataset/AddDataset";

class App extends Component {
  render() {
    return (
      <div className="app">
        <Sidebar />
        <main className="app__main">
          <header className="app__header">
            <h1 className="app__title">Categorizer</h1>

            <div className="app__new-chart">
              <NewChart />
            </div>
          </header>
        </main>
      </div>
    );
  }
}

function mapStateToProps( { activeChartIndex, charts } ) {
  return {
    activeChart: charts[ activeChartIndex ],
    charts
  };
}

export default connect(mapStateToProps)(App);In this step, we are going to dive deeper into the flow of data to remove any layers of abstraction that might have appeared. If you feel confident in the flow of data up to this point, feel free to skip this step.
Visualization
So far we've create a reducer and a store and then hooked it up to our App. But what exactly is the order of events in these files we've created? The first event in this chain is in our index.js. When we import store it goes into store.js and then store.js imports chart.js which causes our initialState variable to be created. After that store.js then invokes createStore(chart) which calls our reducer in chart.js. It calls our reducer with undefined for the state parameter and an object with a type property equal to "@@redux/INIT" for the action parameter.
Since state was equal to undefined our default parameter sets state equal to our initialState variable in chart.js. Then our switch statement fires for action.type and returns state because of the default case.
We then go back to index.js which then imports App.js. This causes the export default for App to fire which calls our mapStateToProps function above the export. mapStateToProps is called with our initial state as an object:
{
  activeChartIndex: 0,
  charts: [
    {
      labels: [ "Red", "Blue", "Yellow", "Green", "Purple", "Orange" ],
      name: "Example Chart",
      datasets: [
        {
          label: "My First dataset",
          data: [65, 59, 90, 81, 56, 55, 40]
        },
        {
          label: "My Second dataset",
          data: [28, 48, 40, 19, 96, 27, 100]
        }
      ]
    }
  ]
}
mapStateToProps then modifies this object and returns a new object. This new object then becomes the props for the App component. Be aware that there are other events happening in between these events, mostly by Redux, but at a high-level this is the chain of events for the files we created.
In the following giphy take note of which file the debugger is currently in:

In this step, we will be creating our first action type and action creator for creating new charts. We'll then update our reducer to handle our first action by returning a brand new state object.
- Open
src/ducks/chart.js. - Create a
CREATE_CHARTaction type at the top of the file, that equals "CREATE_CHART". - Create a
createChartaction creator underneath thechartreducer:- This function should take two parameters:
labels- An array of labels that the chart will have.name- A string that equals the name of the chart.
- This function should return an object with two properties:
chart- An object containing the necessary chart data.- Hint:
{ lables: [], name: string, datasets: [] } - Since we do not get any
datasetsfrom this action, default it to an empty array.
- Hint:
type- A string that equals the action type, in this caseCREATE_CHART.
- Export this action creator function.
- This function should take two parameters:
- Modify the
chartreducer to handle adding a new chart:- Add a
caseto theswitchstatement, above the default case, forCREATE_CHART. - Create and return a new state object with the following properties:
activeChartIndex- Should equal 0 because we add newchartsto the beginning of thechartsarray.charts- Should equal an array with the new chart in front and all the old charts after it.- Remember to not mutate old state
- Add a
Detailed Instructions
Let's begin by opening src/ducks/chart.js. At the top of the file create a variable called CREATE_CHART and set it equal to "CREATE_CHART". This variable will be our action type. You can think of action types as descriptions of what happened. The action types get used by our reducer to determine how to change state.
const CREATE_CHART = "CREATE_CHART";Now let's create our action creator underneath the chart reducer. Create and export a function named createChart with two parameters:
labels- An array of labels that the chart will havename- A string that equals the name of the chart
This function should return an object with two properties:
chart- An object containing the necessary chart datatype- The action type, in this caseCREATE_CHART
We can determine what the necessary chart data is by looking at our initialState object and the first object in the charts array. ( labels: [], name: string, datasets: [] )
export function createChart(labels, name) {
  return {
    chart: { labels, name, datasets: [] },
    type: CREATE_CHART
  }
}
Shorthand Notation
In ES2015 you can use shorthand notations for assigning properties on an object. The above solution is the same thing as doing:
return {
  chart: { labels: labels, name: name, datasets: [] },
  type: CREATE_CHART
}
With the action creator ready to go, we now need to update the reducer function itself to handle the action. Add a new case to the switch statement, above the default case, that checks for CREATE_CHART. This case should return a new state object where our new chart is at the beginning of the charts array and has all of the previous state's charts after it. activeChartIndex should still be set to 0 since our new chart gets added to the beginning of the charts array.
Remember not to mutate state! You should be returning a brand new object based on the values from the previous state object.
export default function chart( state = initialState, action ) {
  switch(action.type) {
    case CREATE_CHART:
      return {
        activeChartIndex: 0,
        charts: [ action.chart, ...state.charts ]
      };
    default:
      return state;
  }
}
We'll see this action work live in our application at the end of the next step.
src/ducks/chart.js
const CREATE_CHART = "CREATE_CHART";

const initialState = {
  activeChartIndex: 0,
  charts: [
    {
      labels: [ "Red", "Blue", "Yellow", "Green", "Purple", "Orange" ],
      name: "Example Chart",
      datasets: [
        {
          label: "My First dataset",
          data: [65, 59, 90, 81, 56, 55, 40]
        },
        {
          label: "My Second dataset",
          data: [28, 48, 40, 19, 96, 27, 100]
        }
      ]
    }
  ]
};

export default function chart( state = initialState, action ) {
  switch(action.type) {
    case CREATE_CHART:
      return {
        activeChartIndex: 0,
        charts: [ action.chart, ...state.charts ]
      };
    default:
      return state;
  }
}

export function createChart(labels, name) {
  return {
    chart: { labels, name, datasets: [] },
    type: CREATE_CHART
  };
}In this step, we'll import the createChart action creator into the App component, connect our action creator, and then pass it down as a prop into our NewChart component.
- Open
src/components/App.js. - Import
createChartfromsrc/ducks/chart.jsafter the import for./App.css. - Connect the
createChartaction creator:- Where we export our decorated
Appcomponent add anobjectaftermapStateToPropsas a second parameter. - Inside this new
objectaddcreateChart.
- Where we export our decorated
- Deconstruct
propsat the top of therendermethod.- Hint:
mapStateToPropscan tell you what propsAppwill have. - Hint: Action creators are also added to props since we created a second parameter for
connect.
- Hint:
- Locate where we
renderNewChartin therendermethod ofApp:- Add a
proptoNewChartcalledcreateChartand set it equal tocreateChartfromApp's props.
- Add a
Detailed Instructions
Let's begin by opening src/components/App.js. At the top of the file, just after the import of ./App.cs, import the createChart action creator from our chart reducer.
import { createChart } from '../ducks/chart';Now that App.js has access to our action creator, we need a way for our App component to dispatch this action to our reducer. We can do this by adding an object after mapStateToProps where we export our decorated component.
export default connect(mapStateToProps, { createChart })(App);Basically, this is allowing us to directly call this.props.createChart inside of our App component. Without doing it this way, you would have to use the dispatch function with the action creator as a parameter. Redux automatically adds the dispatch function to props. It would look like: this.props.dispatch(this.props.createChart).
Also another thing to note is that once we create this object of action creators, dispatch is no longer automatically added to props. Any future action creators will have to be added to this object as well in order to be used in the App component.
The magic behind connect wrapping action creators
It may feel a little like magic, but the wrapping of action creators in dispatch is fairly simple! The actual source code will be different, but this is accomplishing the same thing.
// Take in an object of action creators, i.e { createChart }
function wrapActionCreator( actionCreatorsObject ) {
  // A new object that will hold the wrapped action creators
  const wrappedActionCreators = {};
  // Iterate over each action creator in the object
  for ( let actionCreator in actionCreatorsObject ) {
    // Creating a new function to capture arguments to the action creator
    // such as "labels" and "name"
    wrappedActionCreators[ actionCreator ] = ( ...args ) => {
      // Create the action, passing in the captured arguments
      const action = actionCreatorsObject[ actionCreator ]( ...args );
      // Dispatch the action to Redux
      dispatch( action );
    }
  }
  return wrappedActionCreators;
}
Now that our action creator is ready to be used, let's pass it down as a prop to our NewChart component. Before we pass down our prop, let's add createChart to our deconstruction of props at the top of the render method. This will allow us to avoid having to use this.props.propNameHere every time we want to refer to a prop.
render() {
  const {
      activeChart,
      charts,
      createChart
  } = this.props;
}
Now we can pass down our createChart prop where we render NewChart.
<NewChart createChart={ createChart } />This prop will then be used later by the NewChart component to dispatch an action for creating a new chart to our chart reducer.
src/components/App.js
import React, { Component } from "react";
import { connect } from "react-redux";

import "./App.css";

import { createChart } from '../ducks/chart';

import NewChart from "./NewChart/NewChart";
import Sidebar from "./Sidebar/Sidebar";
import AddDataset from "./AddDataset/AddDataset";

class App extends Component {
  render() {
    const {
      activeChart,
      charts,
      createChart
    } = this.props;

    return (
      <div className="app">
        <Sidebar />
        <main className="app__main">
          <header className="app__header">
            <h1 className="app__title">Categorizer</h1>

            <div className="app__new-chart">
              <NewChart createChart={ createChart } />
            </div>
          </header>
        </main>
      </div>
    );
  }
}

function mapStateToProps( { activeChartIndex, charts } ) {
  return {
    activeChart: charts[ activeChartIndex ],
    charts: charts
  };
}

export default connect(mapStateToProps, { createChart })(App);In this step, we will start making our NewChart component functional by creating a constructor method, state, and a handleChange method to handle user input.
- Open
src/components/NewChart/NewChart.js. - Create a
constructormethod, just above therendermethod, that takespropsas a parameter:- This method should call super with
propsas a parameter. - This method should create a state object with the following properties:
labels- A list of the labels submitted so far. It should default to an empty array.name- The text from the name input. It should default to an empty string.newLabel- The text from the new label input. It should default to an empty string.
- This method should call super with
- Create a
handleChangemethod, just below theconstructormethod, for handling user input. It should take two parameters:field- The name of the field that is changing.event- The change event object holding the new value.
- Bind
thisto thehandleChangemethod at the bottom of theconstructormethod:- Create two different variants of
handleChange, one forhandleNameChangeand one forhandleInputChange. Both should be equal tothis.handleChange.bind(this, "")with the string being the property on state to update.- this.handleNameChange = this.handleChange.bind(this, "name");
- this.handleLabelChange = this.handleChange.bind(this, "newLabel");
- Create two different variants of
- Deconstruct state at the top of the
rendermethod. - Locate the input with the className of
"new-chart__name new-chart__input":- Create an
onChangeprop that callsthis.handleNameChange. - Create a
valueprop equal toname.
- Create an
- Locate the input with the className of
"new-chart__category new-chart__input":- Create an
onChangeprop that callsthis.handleLabelChange. - Create a
valueprop equal tonewLabel.
- Create an
Detailed Instructions
Let's begin by opening src/components/NewChart/NewChart.js. Just above the render method, add a constructor method that takes props as its first parameter. Then call super with props as a parameter inside the constructor method. After calling super, create a state object with three properties:
labels- A list of the labels submitted so far. It should default to an empty array.name- The text from the name input. It should default to an empty string.newLabel- The text from the new label input. It should default to an empty string.
constructor( props ) {
  super( props );

  this.state = {
    labels: [],
    name: '',
    newLabel: ''
  };
}
Now that our initial state is ready to go for our NewChart component, let's create a handleChange method. handleChange will have two parameters:
field- The name of the field that is changing, in this case that will be"name"or"newLabel".event- The DOM event triggering the change and carrying the new value.
All this method needs to do is update the specified field on state with the specified value.
handleChange(field, event) {
  this.setState({ [ field ]: event.target.value });
}
Now that our handleChange method is created, let's bind this and the field we want to change to it at the bottom of the constructor method. We'll want to make two different variants of handleChange. One for updating name and one for updating label. Let's call them handleNameChange and handleLabelChange.
constructor( props ) {
  super( props );

  this.state = {
    labels: [],
    name: '',
    newLabel: ''
  };

  this.handleNameChange = this.handleChange.bind( this, "name" );
  this.handleLabelChange = this.handleLabelChange.bind( this, "newLabel" );
}
Now let's destructure labels, name, and newLabel from this.state at the top of the render method so we can refer to them witout having to use this.state.
render() {
  const {
    labels,
    name,
    newLabel
  } = this.state;
}
We're now ready to hook up our handleChange method to the input fields for chart name and chart label.
Locate the input element with the className of "new-chart__name new-chart__input". Let's add an onChange prop to it that equals this.handleNameChange. Since we bound this and the field we want to update in the constructor we are good to go. Next let's add a value prop on the input element equal to name. Since we deconstructed state we didn't have to use this.state.name.
<input
  className="new-chart__name new-chart__input"
  type="text"
  onChange={ this.handleNameChange }
  value={ name }
/>
Now let's repeat the same exact steps for the input element with the className of "new-chart__category new-chart__input". However, change the onChange prop to equal this.handleLabelChange and change the value prop to equal newLabel.
<input
  className="new-chart__category new-chart__input"
  required
  type="text"
  onChange={ this.handleLabelChange }
  value={ newLabel }
/> src/components/NewChart/NewChart.js
import React, { Component, PropTypes } from "react";

import "./NewChart.css";

export default class NewChart extends Component {
  static propTypes = { createChart: PropTypes.func.isRequired };

  constructor( props ) {
    super( props );

    this.state = {
      labels: [],
      name: '',
      newLabel: ''
    };

    this.handleNameChange = this.handleChange.bind( this, "name" );
    this.handleLabelChange = this.handleChange.bind( this, "newLabel" );
  }

  handleChange(field, event) {
    this.setState({ [field]: event.target.value });
  }

  render() {
    const {
      labels,
      name,
      newLabel
    } = this.state;
    return (
      <div className="new-chart">
        <div className="new-chart__form-group">
          <label className="new-chart__label">Chart Name:</label>
          <input
            className="new-chart__name new-chart__input"
            type="text"
            onChange={ this.handleNameChange }
            value={ name }
          />
        </div>
        <form className="new-chart__form-group">
          <label className="new-chart__label">Add Label:</label>
          <input
            className="new-chart__category new-chart__input"
            required
            type="text"
            onChange={ this.handleLabelChange }
            value={ newLabel }
          />
        </form>

        <div className="new-chart__labels-wrapper">
          <label className="new-chart__label">Labels:</label>
          <span className="new-chart__labels">[] (Min. 3)</span>
        </div>

        <button className="new-chart__submit">
          Submit
        </button>
      </div>
    );
  }
}In this step, we will continue to make our NewChart component functional by handling adding new labels.
- Open
src/components/NewChart/NewChart.js. - Create a new class method called
addLabel, just below thehandleChangemethod, that takes aneventobject as the first parameter.- This method should call
event.preventDefault();so the browser doesn't refresh. - Then the method should use
setStateto update the following properties on state:labels- Should equal the previous list of labels from state with the new label added to the end.newLabel- Should then be reset back to its default value of''.
- This method should call
- Bind
thistoaddLabelat the bottom of theconstructormethod. - Add an
onSubmitprop to theformelement with theclassNameof"new-chart__form-group".- It should call
this.addLabel.
- It should call
- Change the span with the
classNameof"new-chart__labels"to display the current labels from state inside [ ].- For example, if I had the labels
greenandred:- "[ green, red ] (Min. 3)"
- For example, if I had the labels
Detailed Instructions
Let's begin by opening src/components/NewChart/NewChart.js. After the handleChange method, let's create a new method called addLabel. addLabel will take a single event parameter. This method should call event.preventDefault(), to prevent a browser refresh, and then use this.setState() to update two properties on state. It should update this.state.labels to equal a new array of all the previous labels with the new label at the end. It should also set newLabel back to it's default value afterwards.
addLabel(event) {
  event.preventDefault();
  this.setState({
    labels: [ ...this.state.labels, this.state.newLabel ],
    newLabel: ''
  });
}
Now that our method is built out, let's bind this to addLabel at the bottom of the constructor method.
this.addLabel = this.addLabel.bind( this );Then we can assign an onSubmit prop to the form element with the className of "new-chart__form-group". This will allow us to press the enter key when typing in the input field to execute our addLabel method.
<form className="new-chart__form-group" onSubmit={ this.addLabel }>Now we'll need to update the span element with the className of "new-chart__labels" to show our labels. Inside the [ ] we can use { } to call on labels. Let's use the array prototype join to join our labels by a comma and a space.
<span className="new-chart__labels">[ { labels.join(', ') } ] (Min. 3)</span> src/components/NewChart/NewChart.js
import React, { Component, PropTypes } from "react";

import "./NewChart.css";

export default class NewChart extends Component {
  static propTypes = { createChart: PropTypes.func.isRequired };

  constructor( props ) {
    super( props );

    this.state = {
      labels: [],
      name: '',
      newLabel: ''
    };

    this.handleNameChange = this.handleChange.bind( this, "name" );
    this.handleLabelChange = this.handleChange.bind( this, "newLabel" );
    this.addLabel = this.addLabel.bind( this );
  }

  handleChange(field, event) {
    this.setState({ [field]: event.target.value });
  }

  addLabel(event) {
    event.preventDefault();
    this.setState({
      labels: [ ...this.state.labels, this.state.newLabel ],
      newLabel: ''
    });
  }

  render() {
    const {
      labels,
      name,
      newLabel
    } = this.state;
    return (
      <div className="new-chart">
        <div className="new-chart__form-group">
          <label className="new-chart__label">Chart Name:</label>
          <input
            className="new-chart__name new-chart__input"
            type="text"
            onChange={ this.handleNameChange }
            value={ name }
          />
        </div>
        <form className="new-chart__form-group" onSubmit={ this.addLabel }>
          <label className="new-chart__label">Add Label:</label>
          <input
            className="new-chart__category new-chart__input"
            required
            type="text"
            onChange={ this.handleLabelChange }
            value={ newLabel }
          />
        </form>

        <div className="new-chart__labels-wrapper">
          <label className="new-chart__label">Labels:</label>
          <span className="new-chart__labels">[ { labels.join(', ') } ] (Min. 3)</span>
        </div>

        <button className="new-chart__submit">
          Submit
        </button>
      </div>
    );
  }
}
You should now be able to go into your app and try putting in labels by typing in the label input field and pressing enter. You should see the text underneath update every time you press enter.
In this step, we will finish the functionality for our NewChart component by sending data to our reducer through the prop createChart.
- Open
src/components/NewChart/NewChart.js. - Create a new class method called
submitChartjust below theaddLabelmethod.- This method should exit by calling
returnifthis.state.nameis falsy or there aren't at least 3 labels. - Otherwise this method should call
this.props.createChartwith two arguments:- The first argument should be the
labelsarray fromstate. - The second argument should be the
namestring fromstate.
- The first argument should be the
- Then the method should use
this.setStateto set allstatevalues back to their default values.
- This method should exit by calling
- Bind
thistosubmitChartat the bottom of theconstructormethod. - Add an
onClickprop that callssubmitCharton the element with theclassNameof"new-chart__submit".
Detailed Instructions
Let's begin by opening src/components/NewChart/NewChart.js and creating our last class method called submitChart just below the addLabel method. This method won't need any parameters. The first thing the method should do is check to see if this.state.name is not falsy and that this.state.labels has 3 or more labels. If either of these conditions aren't met our method should call return to exit the method early.
submitChart() {
  if ( !this.state.name || this.state.labels.length < 3 ) {
    return;
  }
}
If both conditions are met then we should then call this.props.createChart with our labels and name from state.
submitChart() {
  if ( !this.state.name || this.state.labels.length < 3 ) {
    return;
  }

  this.props.createChart(this.state.labels, this.state.name);
}
Finally our method should reset all state values back to their default values using setState.
submitChart() {
  if ( !this.state.name || this.state.labels.length < 3 ) {
    return;
  }

  this.props.createChart(this.state.labels, this.state.name);
  this.setState({
    labels: [],
    name: '',
    newLabel: ''
  });
}
Now that our method is built, let's bind this to it at the bottom of the constructor method.
this.submitChart = this.submitChart.bind( this );Now all that's left is to hook up our method to our Submit button using an onClick prop. Locate the button element with the className of "new-chart__submit" and add an onClick that calls our submitChart method.
<button className="new-chart__submit" onClick={ this.submitChart }>
  Submit
</button> src/components/NewChart/NewChart.js
import React, { Component, PropTypes } from "react";

import "./NewChart.css";

export default class NewChart extends Component {
  static propTypes = { createChart: PropTypes.func.isRequired };

  constructor( props ) {
    super( props );

    this.state = {
      labels: [],
      name: '',
      newLabel: ''
    };

    this.handleNameChange = this.handleChange.bind( this, "name" );
    this.handleLabelChange = this.handleChange.bind( this, "newLabel" );
    this.addLabel = this.addLabel.bind( this );
    this.submitChart = this.submitChart.bind( this );
  }

  handleChange(field, event) {
    this.setState({ [field]: event.target.value });
  }

  addLabel(event) {
    event.preventDefault();
    this.setState({
      labels: [ ...this.state.labels, this.state.newLabel ],
      newLabel: ''
    });
  }

  submitChart() {
    if ( !this.state.name || this.state.labels.length < 3 ) {
      return;
    }

    this.props.createChart(this.state.labels, this.state.name);
    this.setState({
      labels: [],
      name: '',
      newLabel: ''
    });
  }

  render() {
    const {
      labels,
      name,
      newLabel
    } = this.state;
    return (
      <div className="new-chart">
        <div className="new-chart__form-group">
          <label className="new-chart__label">Chart Name:</label>
          <input
            className="new-chart__name new-chart__input"
            type="text"
            onChange={ this.handleNameChange }
            value={ name }
          />
        </div>
        <form className="new-chart__form-group" onSubmit={ this.addLabel }>
          <label className="new-chart__label">Add Label:</label>
          <input
            className="new-chart__category new-chart__input"
            required
            type="text"
            onChange={ this.handleLabelChange }
            value={ newLabel }
          />
        </form>

        <div className="new-chart__labels-wrapper">
          <label className="new-chart__label">Labels:</label>
          <span className="new-chart__labels">[ { labels.join(', ') } ] (Min. 3)</span>
        </div>

        <button className="new-chart__submit" onClick={ this.submitChart }>
          Submit
        </button>
      </div>
    );
  }
}In this step, we will be rendering the active chart.
- Open
src/components/App.js. - Import the
ActiveChartcomponent underneath theimportof theSideBarcomponent. - Render the
ActiveChartcomponent in thedivwith theclassNameof"app__active-chart":- Add a
proptoActiveChartcalledchart. chartshould equal theactiveChartobject fromApp's props.
- Add a
Detailed Instructions
Let's begin by opening up src/components/App.js and importing ActiveChart from src/components/ActiveChart/ActiveChart. This will be the component that will display our active chart.
import ActiveChart from "./ActiveChart/ActiveChart";Inside of the render method's return in App.js, just beneath the closing </header> tag, render the ActiveChart component in the div with the className of "app__active-chart".
return (
  <div className="app">
    <Sidebar />
    <main className="app__main">
      <header className="app__header">
        <h1 className="app__title">Categorizer</h1>

        <div className="app__new-chart">
          <NewChart createChart={ createChart } />
        </div>
      </header>
      <div className="app__active-chart">
        <ActiveChart />
      </div>
    </main>
  </div>
);
Next, let's give our ActiveChart component a prop called chart that is equal to the activeChart object from App's props. If we take a look at our application now in the browser, we should see that it is showing our first chart from initialState in chart.js. Also if we add a new chart, we should see that new chart render for us.
<div className="app__active-chart">
  <ActiveChart chart={ activeChart } />
</div>src/components/App.js
import React, { Component } from "react";
import { connect } from "react-redux";

import "./App.css";

import { createChart } from '../ducks/chart';

import NewChart from "./NewChart/NewChart";
import Sidebar from "./Sidebar/Sidebar";
import AddDataset from "./AddDataset/AddDataset";
import ActiveChart from "./ActiveChart/ActiveChart";

class App extends Component {
  render() {
    const {
      activeChart,
      charts,
      createChart
    } = this.props;

    return (
      <div className="app">
        <Sidebar />
        <main className="app__main">
          <header className="app__header">
            <h1 className="app__title">Categorizer</h1>

            <div className="app__new-chart">
              <NewChart createChart={ createChart } />
            </div>
          </header>
          <div className="app__active-chart">
            <ActiveChart chart={ activeChart } />
          </div>
        </main>
      </div>
    );
  }
}

function mapStateToProps( { activeChartIndex, charts } ) {
  return {
    activeChart: charts[ activeChartIndex ],
    charts: charts
  };
}

export default connect(mapStateToProps, { createChart })(App);In this step, we will update our chart reducer to handle an action for setting the new active chart.
- Open
src/ducks/chart.js. - Create an action type called
SET_ACTIVE_CHART_INDEXthat equals"SET_ACTIVE_CHART_INDEX". - Create and export an action creator called
setActiveChartIndex:- This function should take in one parameter:
index- This will be an integer of the new active chart's index.
- This function should return an object with two properties:
index- This should equal the passed in index.type- This should equalSET_ACTIVE_CHART_INDEX.
- This function should take in one parameter:
- Add a case for
SET_ACTIVE_CHART_INDEXto theswitchstatement in thechartreducer:- This case should be above the default case.
- This case should return an object with two properties:
activeChartIndex- This should equal the index given onaction.charts- This should equal the charts array onstate.
Detailed Instructions
Let's being by opening src/ducks/chart.js. At the top of the file, create a new action type of SET_ACTIVE_CHART_INDEX and set it equal to "SET_ACTIVE_CHART_INDEX".
const SET_ACTIVE_CHART_INDEX = "SET_ACTIVE_CHART_INDEX";Underneath the reducer, create a setActiveChartIndex action creator that takes a single parameter: index. This action creator should return an object with two properties: index and type. index should equal the passed in index and type should equal SET_ACTIVE_CHART_INDEX ( the action type we just created ).
export function setActiveChartIndex(index) {
  return {
    index,
    type: SET_ACTIVE_CHART_INDEX
  }
}
Now let's update our chart reducer to handle this new action. Add a case checking against SET_ACTIVE_CHART_INDEX. This case should return a new state object where activeChartIndex is set equal to action.index and charts is set equal to state.charts. Make sure this case appears above the default case.
case SET_ACTIVE_CHART_INDEX:
  return {
    activeChartIndex: action.index,
    charts: state.charts
}src/ducks/chart.js
const CREATE_CHART = "CREATE_CHART";
const SET_ACTIVE_CHART_INDEX = "SET_ACTIVE_CHART_INDEX";

const initialState = {
  activeChartIndex: 0,
  charts: [
    {
      labels: [ "Red", "Blue", "Yellow", "Green", "Purple", "Orange" ],
      name: "Example Chart",
      datasets: [
        {
          label: "My First dataset",
          data: [65, 59, 90, 81, 56, 55, 40]
        },
        {
          label: "My Second dataset",
          data: [28, 48, 40, 19, 96, 27, 100]
        }
      ]
    }
  ]
};

export default function chart( state = initialState, action ) {
  switch(action.type) {
    case CREATE_CHART:
      return {
        activeChartIndex: 0,
        charts: [ action.chart, ...state.charts ]
      };
    case SET_ACTIVE_CHART_INDEX:
      return {
        activeChartIndex: action.index,
        charts: state.charts
      }
    default:
      return state;
  }
}

export function createChart(labels, name) {
  return {
    chart: { labels, name, datasets: [] },
    type: CREATE_CHART
  };
}

export function setActiveChartIndex(index) {
  return {
    index,
    type: SET_ACTIVE_CHART_INDEX
  }
}In this step, we will update our SideBar component to display a list of charts that have been created. This will allow us to navigate between created charts.
- Open
src/components/App.js. - Add
setActiveChartIndexto theimportof action creators. - Add
setActiveChartIndexto the action creators object in theconnectstatement. - Destructure
setActiveChartIndexfromApp's props in therendermethod. - Add two props where we
renderSideBar:charts- Should equalchartsfromApp's props.setActiveChartIndex- Should equalsetActiveChartIndexfromApp's props.
- Open
src/components/SideBar/SideBar.js. - Locate the
<ul>element with theclassNameof"sidebar__past-charts":- Remove the static
<li>element that is already there and replace it with{ }that contains a map inside. - Map over
chartsand keep track of thechartandindex:- Call the first parameter of the map function
chart. - Call the second parameter of the map function
index.
- Call the first parameter of the map function
- Have the map return the following
JSX:-
JSX
<li className="sidebar__past-chart" key={ chart.name }>
  <p className="sidebar__chart-name" onClick={ () => setActiveChartIndex( index ) }>
    { chart.name }
  </p>

  <p className="sidebar__chart-datasets">{ chart.datasets.length } Datasets</p>
</li>
-
- Remove the static
Detailed Instructions
Head back over to src/components/App.js and import the new setActiveChartIndex action creator so the App component can have access to it.
import { createChart, setActiveChartIndex } from '../ducks/chart';Now let's add setActiveChartIndex as another property to the action creators object passed to connect so we don't have to worry about calling dispatch when calling our setActiveChartIndex action creator.
export default connect(mapStateToProps, { createChart, setActiveChartIndex })(App);Now let's destructure setActiveChartIndex from props in the render method so we don't have to refer to it as this.props.setActiveChartIndex.
const {
  activeChart,
  charts,
  createChart,
  setActiveChartIndex
} = this.props;
We now have everything we need from our reducer and we can focus on updating our SideBar component. Let's create two new props where the SideBar component gets rendered. One called charts and another called setActiveChartIndex. The charts prop should equal charts from App's props and setActiveChartIndex prop should equal setActiveChartIndex from App's props.
<Sidebar charts={ charts } setActiveChartIndex={ setActiveChartIndex } />Let's configure our SideBar component to use these props. Open up src/components/Sidebar/Sidebar.js. We'll need to map over the charts passed to this component to create a list of charts. Let's remove the <li> element in the <ul> element with the className of "sidebar__past-charts".
export default function Sidebar( { charts, setActiveChartIndex } ) {
  return (
    <aside className="sidebar">
      <h3 className="sidebar__title">Past Charts</h3>

      <ul className="sidebar__past-charts">

      </ul>
    </aside>
  );
}
Inside of the <ul> elment let's create our map by breaking out of JSX with { }. Map over charts and keep track of the current chart and the current index.
<ul className="sidebar__past-charts">
  {
    charts.map( ( chart, index ) => (

    ))
  }
</ul>
Inside the map, return the following JSX:
<ul className="sidebar__past-charts">
  {
    charts.map( ( chart, index ) => (
      <li className="sidebar__past-chart" key={ chart.name }>

        <p className="sidebar__chart-name" onClick={ () => setActiveChartIndex( index ) }>
          { chart.name }
        </p>

        <p className="sidebar__chart-datasets">{ chart.datasets.length } Datasets</p>
      </li>
    ))
  }
</ul>
You should now be able to click on different charts in the SideBar and see the active chart render in on the right.
src/components/Sidebar.js
import React, { PropTypes } from "react";

import "./Sidebar.css";

export default function Sidebar( { charts, setActiveChartIndex } ) {
  return (
    <aside className="sidebar">
      <h3 className="sidebar__title">Past Charts</h3>

      <ul className="sidebar__past-charts">
        {
          charts.map( ( chart, index ) => (
            <li className="sidebar__past-chart" key={ chart.name }>
              <p className="sidebar__chart-name" onClick={ () => setActiveChartIndex( index ) }>
                { chart.name }
              </p>

              <p className="sidebar__chart-datasets">{ chart.datasets.length } Datasets</p>
            </li>
          ))
        }
      </ul>
    </aside>
  );
}

Sidebar.propTypes = {
  charts: PropTypes.arrayOf( PropTypes.object ).isRequired,
  setActiveChartIndex: PropTypes.func.isRequired
};In this step, we will update our chart reducer to handle an action for adding new datasets to a chart.
- Open
src/ducks/chart/js. - Create an action type called
ADD_DATASETthat equals"ADD_DATASET". - Create and export an action creator called
addDataset:- This function should take in one parameter:
dataset- This will be an array of numbers that correspond to the labels on the chart.
- This function should return an object with two properties:
dataset- This should equal the value of thedatasetsparameter.type- This should equalADD_DATASET.
- This function should take in one parameter:
- Add a case for
ADD_DATASETto theswitchstatement in thechartreducer:- This case should be above the default case.
- This case should return an object with two properties:
activeChartIndex- This should equal theactiveChartIndexon state.charts- This should equal a new array of charts from state:- The order of charts must remain the same.
- The chart we are adding a dataset to must be a new object.
- The order of the datasets must remain the same.
- The new dataset must be added to the end of the datasets array.
Detailed Instructions
Let's begin by opening src/ducks/chart.js. Create a new action type of ADD_DATASET at the top of the file that equals "ADD_DATASET".
const ADD_DATASET = "ADD_DATASET";Underneath the reducer, create and export the corresponding action creator: addDataset. addDataset will take a single parameter dataset and should return an object with two properties:
dataset- This will be an array of numbers that corresponds to the labels on the chart. This should equal the value of thedatasetparameter.type- Should equal our action type:ADD_DATASET.
export function addDataset(dataset) {
  return {
    dataset,
    type: ADD_DATASET
  }
}
Lastly, we need to update the reducer to handle this action. Add a case checking the action.type against ADD_DATASET. For this case we will need to return a new object where activeChartIndex is set equal to state.activeChartIndex and charts is is a copy of state.charts with the new dataset added to the active chart.
We'll need to use a local variable to accomplish this so let's wrap our case in { } to avoiding any scoping issues. Our local variable will be called activeChart and it should equal the chart object of the chart that is currently active.
case ADD_DATASET: {
  const activeChart = state.charts[ state.activeChartIndex ];
  return {

  }
}
Now that we know which chart is active, we can create a new object for it that has the new dataset added to it. Remember that we also want to return the activeChartIndex and all charts before and after the active chart.
case ADD_DATASET: {
  const activeChart = state.charts[ state.activeChartIndex ];
  return {
    activeChartIndex: state.activeChartIndex,
    charts: [
      ...state.charts.slice( 0, state.activeChartIndex ),
      Object.assign({}, activeChart, { datasets: [ ...activeChart.datasets, action.dataset ] }),
      ...state.charts.slice( state.activeChartIndex + 1, state.charts.length )
    ]
  }
}
There is a lot going on here, let's break it down. We start by creating a new array for charts. Next we want to keep the charts in the same order, so we need to put all the charts before the active chart at the beginning of the charts array. Using the ES2015 spread operator, we can combine it with slice to get all the charts up until our active chart. Then we can insert our active chart as a new object that has datasets modified to be an array of all the previous datasets with our new dataset from action at the end of the array. Then using the spread operator again we can get all the charts after our active chart and add it to the end of charts array.
In addition to this, we can also deconstruct state so we don't have to use state. every where. Our final solution would look like:
case ADD_DATASET: {
  const { activeChartIndex, charts } = state;
  const activeChart = charts[ activeChartIndex ];
  return {
    activeChartIndex,
    charts: [
      ...charts.slice( 0, activeChartIndex ),
      Object.assign({}, activeChart, { datasets: [ ...activeChart.datasets, action.dataset ] }),
      ...charts.slice( activeChartIndex + 1, charts.length )
    ]
  }
}src/ducks/chart.js
const CREATE_CHART = "CREATE_CHART";
const SET_ACTIVE_CHART_INDEX = "SET_ACTIVE_CHART_INDEX";
const ADD_DATASET = "ADD_DATASET";

const initialState = {
  activeChartIndex: 0,
  charts: [
    {
      labels: [ "Red", "Blue", "Yellow", "Green", "Purple", "Orange" ],
      name: "Example Chart",
      datasets: [
        {
          label: "My First dataset",
          data: [65, 59, 90, 81, 56, 55, 40]
        },
        {
          label: "My Second dataset",
          data: [28, 48, 40, 19, 96, 27, 100]
        }
      ]
    }
  ]
};

export default function chart( state = initialState, action ) {
  switch(action.type) {
    case CREATE_CHART:
      return {
        activeChartIndex: 0,
        charts: [ action.chart, ...state.charts ]
      };
    case SET_ACTIVE_CHART_INDEX:
      return {
        activeChartIndex: action.index,
        charts: state.charts
      }
    case ADD_DATASET: {
      const { activeChartIndex, charts } = state;
      const activeChart = charts[ activeChartIndex ];
      return {
          activeChartIndex,
          charts: [
            ...charts.slice( 0, activeChartIndex ),
            Object.assign({}, activeChart, { datasets: [ ...activeChart.datasets, action.dataset ] }),
            ...charts.slice( activeChartIndex + 1, charts.length )
        ]
      }
    }
    default:
      return state;
  }
}

export function createChart(labels, name) {
  return {
    chart: { labels, name, datasets: [] },
    type: CREATE_CHART
  };
}

export function setActiveChartIndex(index) {
  return {
    index,
    type: SET_ACTIVE_CHART_INDEX
  }
}

export function addDataset(dataset) {
  return {
    dataset,
    type: ADD_DATASET
  }
}In this step, we will connect our addDataset action creator in the App component. We'll then render the AddDataset component in App and pass down the addDataset action creator as a prop to it.
- Open
src/components/App.js. - Add
addDatasetto theimportof action creators. - Add
addDatasetto the action creators object in theconnectstatement. - Destructure
addDatasetfromApp's props in therendermethod. - Render the
AddDatasetcomponent underneath theActiveChartcomponent.- Add two props to the
AddDatasetcomponent:addDataset- This should equal theaddDatasetaction creator.labels- This should equal the array of labels from theactiveChartprop.
- Add two props to the
Detailed Instructions
Let's begin by opening src/components/App.js and import the addDataset action creator so the App component can have access to it.
import { createChart, setActiveChartIndex, addDataset } from '../ducks/chart';Now let's add addDataset as another property to the action creator object passed to connect so don't have to worry about calling dispatch when calling our addDataset action creator.
export default connect(mapStateToProps, { createChart, setActiveChartIndex, addDataset })(App);Now let's destructure addDataset from props in the render method so we don't have to refer to it as this.props.addDataset.
const {
  activeChart,
  charts,
  createChart,
  setActiveChartIndex,
  addDataset
} = this.props;
We now have everything we need from our reducer and we can focus on our AddDataset component. Let's begin by adding the AddDataset component into App's render method just below the ActiveChart component. This component should have two props: addDataset and labels. addDataset should equal our addDataset action creator and labels should equal the activeChart's labels array.
return (
  <div className="app">
    <Sidebar charts={ charts } setActiveChartIndex={ setActiveChartIndex } />
    <main className="app__main">
      <header className="app__header">
        <h1 className="app__title">Categorizer</h1>

        <div className="app__new-chart">
          <NewChart createChart={ createChart } />
        </div>
      </header>
      <div className="app__active-chart">
        <ActiveChart chart={ activeChart } />
        <AddDataset addDataset={ addDataset } labels={ activeChart.labels } />
      </div>
    </main>
  </div>
);
You should now be able to add datasets to charts.
src/components/App.js
import React, { Component } from "react";
import { connect } from "react-redux";

import "./App.css";

import { createChart, setActiveChartIndex, addDataset } from '../ducks/chart';

import NewChart from "./NewChart/NewChart";
import Sidebar from "./Sidebar/Sidebar";
import ActiveChart from "./ActiveChart/ActiveChart";
import AddDataset from './AddDataset/AddDataset';

class App extends Component {
  render() {
    const {
      activeChart,
      charts,
      createChart,
      setActiveChartIndex,
      addDataset
    } = this.props;

    return (
      <div className="app">
        <Sidebar charts={ charts } setActiveChartIndex={ setActiveChartIndex } />
        <main className="app__main">
          <header className="app__header">
            <h1 className="app__title">Categorizer</h1>

            <div className="app__new-chart">
              <NewChart createChart={ createChart } />
            </div>
          </header>
          <div className="app__active-chart">
            <ActiveChart chart={ activeChart } />
            <AddDataset addDataset={ addDataset } labels={ activeChart.labels } />
          </div>
        </main>
      </div>
    );
  }
}

function mapStateToProps( { activeChartIndex, charts } ) {
  return {
    activeChart: charts[ activeChartIndex ],
    charts: charts
  };
}

export default connect(mapStateToProps, { createChart, setActiveChartIndex, addDataset })(App);- Right now all data is lost on refresh, look into using
localStorageto save a user's data. - Currently the color of datasets is randomized. Try allowing users to select colors for their datasets.
If you see a problem or a typo, please fork, make the necessary changes, and create a pull request so we can review your changes and merge them into the master repo and branch.
© DevMountain LLC, 2017. Unauthorized use and/or duplication of this material without express and written permission from DevMountain, LLC is strictly prohibited. Excerpts and links may be used, provided that full and clear credit is given to DevMountain with appropriate and specific direction to the original content.


