Giter Club home page Giter Club logo

marlin-ai3m's Introduction

Anycubic i3 Mega / Mega-S Marlin 1.1.9 by davidramiro

Donate Downloads Open Issues License Latest Release Last commit Travis CI

This is a custom version of the Marlin Firmware for the i3 Mega/Mega-S, gratefully based on derhopp's repo with his remarkable efforts to get the Anycubic TFT screen to work with the latest versions of Marlin.

Looking for a BLtouch firmware? Head this way! Mounting and configuration instructions are included.

Make sure to take a look at the Wiki, especially the FAQ.

A German translation of the instructions can be found here.

Why use this?

While the i3 Mega is a great printer for its price and produces fantastic results in stock, there are some improvements and additional features that this firmware provides:

  • Many people have issues getting the Ultrabase leveled perfectly, using Manual Mesh Bed Leveling the printer generates a mesh of the flatness of the bed and compensates for it on the Z-axis for perfect prints without having to level with the screws.
  • Much more efficient bed heating by using PID control. This uses less power and holds the temperature at a steady level. Highly recommended for printing ABS.
  • Fairly loud fans, while almost every one of them is easily replaced, the stock FW only gives out 9V instead of 12V on the parts cooling fan so some fans like Noctua don't run like they should. This is fixed in this firmware.
  • Even better print quality by adding Linear Advance, S-Curve Acceleration and some tweaks on jerk and acceleration.
  • Thermal runaway protection: Reducing fire risk by detecting a faulty or misaligned thermistor.
  • Very loud stock stepper motor drivers, easily replaced by Watterott or FYSETC TMC2208. To do that, you'd usually have to flip the connectors on the board, this is not necessary using this firmware.
  • No need to slice and upload custom bed leveling tests, test it with a single GCode command
  • Easily start an auto PID tune or mesh bed leveling via the special menu (insert SD card, select special menu and press the round arrow)
  • Filament change feature enabled: Switch colors/material mid print (instructions below) and control it via display.
  • The filament runout, pause and stop functionality have been overhauled and improved: The hotend now parks and retracts (on pause or stop) and purges automatically (on resume).
  • Added M888 cooldown routine for the Anycubic Ultrabase (EXPERIMENTAL): This is meant to be placed at the end Gcode of your slicer. It hovers over the print bed and does circular movements while running the fan. Works best with custom fan ducts.
    • Optional parameters:
    • T<temperature>: Target bed temperature (min 15°C), 30°C if not specified (do not set this under room temperature)
    • S<fan speed>: Fan speed between 0 and 255, full speed if not specified
    • e.g. M888 S191 T25: run the fan at 75% until the bed has cooled down to 25°C

Known issues:

  • Power outage support is not included
  • Estimated print times from your slicer might be slightly off.
  • Special characters on any file or folders name on the SD card will cause the file menu to freeze. Simply replace or remove every special character (Chinese, Arabic, Russian, accents, German & Scandinavian umlauts, ...) from the name. Symbols like dashes or underscores are no problem. Important note: On the SD card that comes with the printer there is a folder with Chinese characters in it by default. Please rename or remove it.

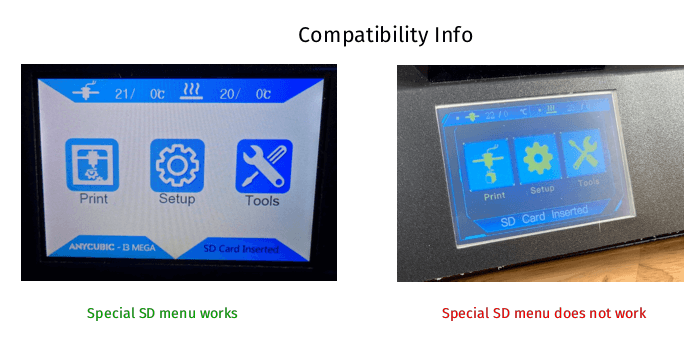
Compatibility Info

Updated compatibility info: Since late 2020, Anycubic started shipping their printers with a new display. It has a blue background and yellow text. With this display, the special SD menu will not work. Features like Manual Mesh Leveling and PID Tuning need to be configured via USB (e.g. OctoPrint or Cura as host). The printing features itself remain functional.

How to flash this?

I provided three different precompiled hex files: One for no modifications on the stepper motor drivers - good for people who didn't touch anything yet, one for boards with TMC2208 installed and where the connectors have been flipped and one with TMC2208 and the connectors in original orientation.

Choose your precompiled hex:

  • Download the precompiled firmware here: Releases
  • Choose the correct hex file:
  • For TMC2208 with connectors in original orientation, use Marlin-AI3M-vx.x.x-TMC2208.hex
  • If you use TMC2208 and already reversed your connectors, use Marlin-AI3M-vx.x.x-TMC2208_reversed.hex
  • If you use a newer version of the TMC2208 that doesn't require the connector to be reversed (TMC2208 "v2.0" written on the PCB, chip on the top side), please also use Marlin-AI3M-vx.x.x-TMC2208_reversed.hex.
  • If you use the original stepper motor drivers, use Marlin-AI3M-vx.x.x-stock_drivers.hex.

Or compile it yourself:

  • Download and install Arduino IDE
  • Clone or download this repo
  • Browse into the Marlin folder and run Marlin.ino
  • In the IDE, under Tools -> Board select Genuino Mega 2560 and ATmega2560
  • Open Marlin.ino in the Marlin directory of this repo
  • Customize if needed (e.g. motor directions and type at line 559 to 566 and line 857 to 865 in Configuration.h)
  • Under Sketch, select Export compiled binary
  • Look for the .hex file in the Marlin directory (only use the Marlin.ino.hex, not the Marlin.ino.with_bootloader.hex!)

After obtaining the hex file:

  • Flash the hex with Cura, OctoPrint or similar
  • Use a tool with a terminal (OctoPrint, Pronterface, Repetier Host, ...) to send commands to your printer.
  • ⚠️ Important Connect to the printer and send the following commands:
    • M502 - load hard coded default values
    • M500 - save them to EEPROM

If you are using this on a Mega-S, those four additional commands are necessary:

  • M92 E384 - set correct steps for the new extruder
  • M203 E30 - limit extruder feedrate
  • M204 R1500.00 - lower retract acceleration
  • M500 - save the values
  • It is highly recommend that you calibrate the extruder.

Calibration and other instructions have been moved to the Wiki.

Manual Mesh Bed Leveling

If you have issues with an uneven bed, this is a great feature.

  • Insert an SD card, enter the print menu.
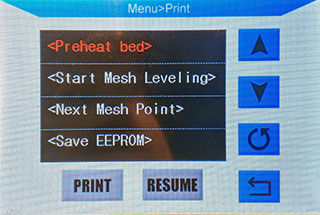
  • Enter the special menu by selecting it and pressing the round arrow:

Special Menu

  • In this menu, the round arrow is used to execute the command you selected.
  • Preheat the bed to 60°C with this entry: (if you usually print with a hotter bed, use the Anycubic menu)

Preheat bed

  • Level your preheated bed as well as you can with the four screws.
  • Start the mesh leveling:

Start MMBL

  • Your nozzle will now move to the first calibration position.
  • Don't adjust the bed itself with screws, only use software from here on!
  • Use a paper - I recommend using thermopaper like a receipt or baking paper
  • Use the onscreen controls to lower or raise your nozzle until you feel a light resistance: (If you want to send the same command multiple times, select the item again, even though it is still marked red.)

Z axis controls

  • Once finished , move to the next point:

Next mesh point

  • Repeat the last two steps until all 25 points are done.
  • Your printer will beep, wait 20 seconds and then save (the printer will beep once more to confirm):

Save to EEPROM

  • Reboot your printer.

After leveling:

  • To ensure your mesh gets used on every print from now on, go into your slicer settings and look for the start GCode
  • Look for the Z-homing (either just G28 or G28 Z0) command and insert these two right underneath it:
M501
M420 S1
  • Your printer should now correctly print first layers even on a warped bed.
  • When working on the printer, installing a new hotend or nozzle or the bed warping over time, a new Mesh Leveling procedure is recommended.

Manual commands for use with OctoPrint etc.:

  • G29 S1 - Start MMBL
  • G29 S2 - Next Mesh point
  • Raising Z: G91, G1 Z0.02, G90 (one after another, not in one line)
  • Lowering Z: G91, G1 Z-0.02, G90
  • After seeing ok in the console, send M500 to save.

Testing your bed leveling

  • No need to download or create a bed leveling test, simply send those commands to your printer:
G28
G26 C H200 P5 R25 Q4.2 Z4
  • To adjust your filament's needed temperature, change the number of the H parameter
  • Default bed temperature is 60°C, if you need another temperature, add e.g. B80
  • Q parameter sets retraction length in mm, Z sets unretraction.
  • If your leveling is good, you will have a complete pattern of your mesh on your bed that you can peel off in one piece
  • Don't worry if the test looks a bit messy, the important thing is just that the line width is the same all over the mesh
  • Optional: Hang it up on a wall to display it as a trophy of how great your leveling skills are.

M600 Filament Change

M600 Demo

BETA: This now also works without USB printing, via SD & display.

Configuration (only needed once):

  • Send M603 L0 U0 to use manual loading & unloading.
  • Send M603 L538 U555 to use automatic loading & unloading
    • The L and U paramters define the load and unload length in mm. The values above work well on a stock setup, if you modded your extruder, bowden tube or hotend, you might need to adjust those.
  • Save with M500

Filament change process (manual loading):

  • For printing via SD:
    • Place M600 in your GCode at the desired layer
  • For printing via USB:
    • Place M600 in your GCode at the desired layer or send it via terminal
    • Alternatively: Use FilamentChange Pause in the Special Menu
  • The nozzle will park and your printer will beep
    • For safety reasons, the printer will turn off the hotend after 10 minutes. If you see the temperature being under the target:
      • SD printing: Click CONTINUE (only once!) on the screen and wait for the hotend to heat up again.
      • USB printing: Send M108 and wait for the hotend to heat up again.
  • Remove the filament from the bowden tube
  • Insert the new filament right up to the nozzle, just until a bit of plastic oozes out
  • Remove the excess filament from the nozzle with tweezers
  • For printing via SD:
    • Click CONTINUE on the screen
  • For printing via USB:
    • Send M108 via your USB host or use FilamentChange Resume in the Special Menu
    • Note for OctoPrint users: After sending M108, enable the advanced options at the bottom of the terminal and press Fake Acknowledgement

Filament change process (automatic loading):

  • For printing via SD:
    • Place M600 in your GCode at the desired layer
  • For printing via USB:
    • Place M600 in your GCode at the desired layer or send it via terminal
    • Alternatively: Use FilamentChange Pause in the Special Menu
  • The nozzle will park
  • The printer will remove the filament right up to the extruder and beep when finished
    • For safety reasons, the printer will turn off the hotend after 10 minutes. If you see the temperature being under the target:
      • SD printing: Click CONTINUE (only once!) on the screen and wait for the hotend to heat up again.
      • USB printing: Send M108 and wait for the hotend to heat up again.
  • Insert the new filament just up to the end of the bowden fitting, as shown here:

Load Filament

  • For printing via SD:
    • Click CONTINUE on the screen
  • For printing via USB:
    • Send M108 via your USB host or use FilamentChange Resume in the Special Menu
    • Note for OctoPrint users: After sending M108, enable the advanced options at the bottom of the terminal and press Fake Acknowledgement
  • The printer will now pull in the new filament, watch out since it might ooze quite a bit from the nozzle
  • Remove the excess filament from the nozzle with tweezers

Updating

Back up & restore your settings

Some updates require the storage to be cleared (M502), if mentioned in the update log. In those cases, before updating, send M503 and make a backup of all the lines starting with:

M92
G29
M301
M304

After flashing the new version, issue a M502 and M500. After that, enter every line you saved before and finish by saving with M500.

Something went wrong?

No worries. You can easily go back to the default firmware and restore the default settings.

  • Flash the hex file from the manufacturer's website (in case it's offline, I have uploaded the stock firmwares here as well).
  • After flashing, send M502 and M500. Now your machine is exactly as it came out of the box.

Detailed changes:

  • Thermal runaway protection thresholds tweaked
  • Manual mesh bed leveling enabled (check this link to learn more about it)
  • Heatbed PID mode enabled
  • TMC2208 configured in standalone mode
  • Stepper orientation flipped (you don't have to flip the connectors on the board anymore)
  • Linear advance unlocked (Off by default. Research, calibrate and then enable with M900 Kx)
  • S-Curve Acceleration enabled
  • G26 Mesh Validation enabled
  • Some redundant code removed to save memory
  • Minor tweaks on default jerk and acceleration
  • Print statistics enabled (send M78 to read them)
  • M600 filament change feature enabled
    • Implemented easy resume via display
  • Filament runout behaviour tweaked
    • Added purge and retract
    • Move nozzle to park position on runout
    • Prevent false positives by adding a small delay to the sensor
  • Pause and stop behaviour tweaked
  • Added M888 cooldown routine for the Anycubic Ultrabase

Changes by derhopp:

  • 12V capability on FAN0 (parts cooling fan) enabled
  • Buzzer disabled (e.g. startup beep)
  • Subdirectory support: Press the round arrow after selecting a directory
  • Special menu in the SD file menu: Press the round arrow after selecting Special menu

About Marlin

Marlin is an optimized firmware for RepRap 3D printers based on the Arduino platform. First created in 2011 for RepRap and Ultimaker printers, today Marlin drives a majority of the world's most popular 3D printers. Marlin delivers outstanding print quality with unprecedented control over the process.

Coverity Scan Build Status Travis Build Status Flattr Us!

Contributing to Marlin

If you have coding or writing skills you're encouraged to contribute to Marlin. You may also contribute suggestions, feature requests, and bug reports through the Marlin Issue Queue.

Before contributing, please read our Contributing Guidelines and Code of Conduct.

Marlin Resources

Credits

Marlin's administrators are:

Notable contributors include:

License

Marlin is published under the GPLv3 license because we believe in open development. The GPL comes with both rights and obligations. Whether you use Marlin firmware as the driver for your open or closed-source product, you must keep Marlin open, and you must provide your compatible Marlin source code to end users upon request. The most straightforward way to comply with the Marlin license is to make a fork of Marlin on Github, perform your modifications, and direct users to your modified fork.

Disclaimer

/*
* Flashing a custom firmware happens at your own risk.
*
* THIS SOFTWARE IS PROVIDED BY THE COPYRIGHT HOLDERS
* AND CONTRIBUTORS “AS IS” AND ANY EXPRESS OR IMPLIED
* WARRANTIES, INCLUDING, BUT NOT LIMITED TO, THE IMPLIED
* WARRANTIES OF MERCHANTABILITY AND FITNESS FOR A
* PARTICULAR PURPOSE ARE DISCLAIMED. IN NO EVENT SHALL
* THE COPYRIGHT OWNER OR CONTRIBUTORS BE LIABLE FOR
* ANY DIRECT, INDIRECT, INCIDENTAL, SPECIAL, EXEMPLARY, OR
* CONSEQUENTIAL DAMAGES (INCLUDING, BUT NOT LIMITED TO,
* PROCUREMENT OF SUBSTITUTE GOODS OR SERVICES; LOSS
* OF USE, DATA, OR PROFITS; OR BUSINESS INTERRUPTION)
* HOWEVER CAUSED AND ON ANY THEORY OF LIABILITY, WHETHER
* IN CONTRACT, STRICT LIABILITY, OR TORT (INCLUDING NEGLIGENCE
* OR OTHERWISE) ARISING IN ANY WAY OUT OF THE USE OF THIS
* SOFTWARE, EVEN IF ADVISED OF THE POSSIBILITY OF SUCH DAMAGE.
*/

marlin-ai3m's People

Contributors

coding-pivo avatar davidramiro avatar dersimn avatar fgiudice98 avatar scruplelesswizard avatar

Stargazers

 avatar  avatar  avatar  avatar  avatar  avatar  avatar  avatar  avatar  avatar  avatar  avatar  avatar  avatar  avatar  avatar  avatar  avatar  avatar  avatar  avatar  avatar  avatar  avatar  avatar  avatar  avatar  avatar  avatar  avatar  avatar  avatar  avatar  avatar  avatar  avatar  avatar  avatar  avatar  avatar  avatar  avatar  avatar  avatar  avatar  avatar  avatar  avatar  avatar  avatar  avatar  avatar  avatar  avatar  avatar  avatar  avatar  avatar  avatar  avatar  avatar  avatar  avatar  avatar  avatar  avatar  avatar  avatar  avatar  avatar  avatar  avatar  avatar  avatar  avatar  avatar  avatar  avatar  avatar  avatar  avatar  avatar  avatar  avatar  avatar  avatar  avatar  avatar  avatar  avatar  avatar  avatar  avatar  avatar  avatar  avatar  avatar  avatar  avatar  avatar

Watchers

 avatar  avatar  avatar  avatar  avatar  avatar  avatar  avatar  avatar  avatar  avatar  avatar  avatar  avatar  avatar  avatar  avatar  avatar  avatar  avatar  avatar  avatar  avatar  avatar  avatar  avatar  avatar  avatar  avatar  avatar  avatar  avatar  avatar  avatar  avatar  avatar  avatar  avatar  avatar  avatar  avatar  avatar  avatar  avatar  avatar  avatar  avatar  avatar  avatar  avatar  avatar  avatar  avatar  avatar  avatar  avatar  avatar  avatar  avatar  avatar  avatar  avatar  avatar  avatar  avatar  avatar  avatar  avatar  avatar  avatar  avatar  avatar  avatar

marlin-ai3m's Issues

Filament sensor not working on Mega-S (new board revision?)

Describe your suggestion.
The Anycubic Mega-S come with a filament sensor. It seems it is not activated on this firmware. Could it be possible to trigger a M600 when the filament sensor detect the end of filament, so that we can change the spool to another one ?

Reasoning
As it is a main feature of the Anycubic Mega-S, and it is supported by the stock firmware, we're loosing a feature using this firmware (event if overall, we win way more than we loose by using it instead of stock). I think others Anycubic Mega-S users would be pleased to be able to keep this feature, and as Anycubic is selling official parts, it would allow Anycubic Mega i3 users to easily upgrade if they wish to.

[BUG] M600 Extruder to fast! (titan)

Describe the bug
if ich use M600 for filament change ir runs very quickly 3 times and after this it runs with normal speed.
i have set a max speed with M92 E388.27 but this will be ignored :(

To Reproduce
Steps to reproduce the behavior:

use M600 :)

Printer (please complete the following information):

  • Model [i3 Mega with Titan extruder]

M503 Output

Printer is now online.
echo:V1.1.3
1.1.0-RC8
echo: Last Updated: 2016-12-06 12:00 | Author: (Jolly, xxxxxxxx.CO.)
Compiled: Oct 24 2018
echo: Free Memory: 3109 PlannerBufferBytes: 1168
echo:V27 stored settings retrieved (398 bytes)
echo:Steps per unit:
echo: M92 X80.00 Y80.00 Z400.00 E388.27
echo:Maximum feedrates (mm/s):
echo: M203 X500.00 Y500.00 Z6.00 E60.00
echo:Maximum Acceleration (mm/s2):
echo: M201 X3000 Y2000 Z60 E10000
echo:Accelerations: P=printing, R=retract and T=travel
echo: M204 P3000.00 R3000.00 T3000.00
echo:Advanced variables: S=Min feedrate (mm/s), T=Min travel feedrate (mm/s), B=minimum segment time (ms), X=maximum XY jerk (mm/s), Z=maximum Z jerk (mm/s), E=maximum E jerk (mm/s)
echo: M205 S0.00 T0.00 B20000 X10.00 Y10.00 Z0.40 E5.00
echo:Home offset (mm)
echo: M206 X0.00 Y0.00 Z0.00
echo:Z2 Endstop adjustment (mm):
echo: M666 Z0.00
echo:Material heatup parameters:
echo: M145 S0 H180 B70 F0
M145 S1 H240 B110 F0
echo:PID settings:
echo: M301 P9.02 I0.31 D42.76
echo:Filament settings: Disabled
echo: M200 D1.75
echo: M200 D0
echo:SD card ok
echo:SD card ok

First lines are not printed.

Hello.

I want use your FW but it doenst work.

I upload the FW and i try to print my cal cube.

  1. Printer start to draw the skirt > All OK
  2. Printer starts to draw the fist outer lines > NOK. No material is extruded. Extruder motor stands still.
  3. Printer starts to draw the infill. > OK

How i flash the FW.
I flash the FW with cura (Marlin-AI3M-181227-stock_drivers.hex)
I send the command M502
I send M500
I enter my custom stettings M92 X79.7607 Y80.04 Z399.92 E95.10
I store this with M500 and send M82

If i fall back to the orignal FW all works fine with the same gcode file. Any idea how i can solve this issue? What am I doing wrong?

X Axis home fails

Seemingly having an issue where X axis home is not working. Steps to reproduce:

  1. Move carriage to extreme right
  2. Send home X axis request
  3. Carriage moves about half way along the axis, before stopping and giving up. Does not make it to stop switch.
  4. Prints are misaligned on the bed.

May be related to: MarlinFirmware/Marlin#11224
(although this turned into a Z axis issue).

Does not happen with original Anycubic FW.

[BUG] 12864 LCD // RepRap // Rotary Encoder does not work

Hi,

i have an problem with this Firmware and my Rotary Encoder on my 12864 LCD.

I want to upgrade my Anycubic i3 Mega with a Piezo Orion and therefore i want to update the Firmware.

Currently i am on https://github.com/derhopp/Marlin-with-Anycubic-i3-Mega-TFT and with this version everything works fine.

I am using this LCD https://www.amazon.de/gp/product/B01LO20XGS/ and uncommented in the configuration.h this line "#define REPRAP_DISCOUNT_FULL_GRAPHIC_SMART_CONTROLLER".

The LCD works and i can click the rotary encoder to enter the first submenu (Info Screen, Prepare, Control..) but i cannot chose between them. I rotate the knob, but nothing happens.

For testing purposes I just downloaded the firmware of DerHopp and changed only this one line "#define REPRAP_DISCOUNT_FULL_GRAPHIC_SMART_CONTROLLER" (and adjusted the AnycubicTFT.h (it has a problem with 'ftostr32 out of scope' im REPRAP_XXX is activated) and it all works fine.

I am referring to DerHopp, because he is mentioned on the first page.

Am i missing something?

Greetings, Daniel

Printer Menu Freezes on SD Card after flashing

I just received my Anycubic I3 mega. It had Firmware 1.1.0 on it. I flashed the custom firmware using Cura 3.6.0. I can navigate all the menus just fine. Once I plug in an SD Card the Print menu shows the following options:

<Special_Menu>
Owl_pair.gcode
/Files_Engish_Mega
/D™_-‡_Mega

However the touch screen doesn't react and I can't navigate the menu anymore. I can use Pronterface and move the motors so its not entirely unresponsive. To get out of the menu I have to restart the printer. Once I enter it again, it freezes again. Down below you'll find an image of what I see and where it freezes and the M503 Output.

https://drive.google.com/file/d/1YiHG0ZxP2h58uPbw5SjJnTwriLZKem5f/view?usp=sharing

M503 Output

SENDING:M503
echo:  G21    ; (mm)
echo:Filament settings: Disabled
echo:  M200 D1.75
echo:  M200 D0
echo:Steps per unit:
echo:  M92 X80.00 Y80.00 Z400.00 E92.60
echo:Maximum feedrates (units/s):
echo:  M203 X500.00 Y120.00 Z6.00 E60.00
echo:Maximum Acceleration (units/s2):
echo:  M201 X2000 Y1200 Z60 E10000
echo:Acceleration (units/s2): P<print_accel> R<retract_accel> T<travel_accel>
echo:  M204 P1200.00 R3000.00 T1500.00
echo:Advanced: Q<min_segment_time_us> S<min_feedrate> T<min_travel_feedrate> X<max_x_jerk> Y<max_y_jerk> Z<max_z_jerk> E<max_e_jerk>
echo:  M205 Q50000 S0.00 T0.00 X8.00 Y8.00 Z0.40 E5.00
echo:Home offset:
echo:  M206 X0.00 Y0.00 Z0.00
echo:Mesh Bed Leveling:
echo:  M420 S0 Z0.00
echo:Endstop adjustment:
echo:  M666 Z0.00
echo:PID settings:
echo:  M301 P15.94 I1.17 D54.19
echo:  M304 P251.78 I49.57 D319.73
echo:Linear Advance:
echo:  M900 K0.00
echo:Filament load/unload lengths:
echo:  M603 L538.00 U555.00

High frequency fan noise on second layer

Description:
An beeping (high frequency, but quiter than the regular start signal) if the code is reaching the second layer. video (link to youtube) follows tomorrow.

ANY I3 Mega

MODs:
Only regular things, like:

  • Hotend fan (noctua)
  • board and psu fan (Sunon Lüfter 60x60x15mm HA60151V4-999)
  • stepper tmc2208

and since yesterday Marlin 1.1.9

Hopefully
Dirk

Abort print via LCD leads to a movement of the hotend into the printed part [BUG]

Yesterday I started a print and everything was just working fine. At a height of approx 26mm I got some issues with the extruder which are most likely based on a misconfiguration of my slicing software.

However, when I aborted the print using the LCD "STOP"-Button, the printer stopped printing and moved the Z-Axis down right into the print.

I guess there is some problem with the stop code, which moves the printhead to an absolute position instead of a relative plus.

-Firmware version: davidramiro - v1.4.0
-Printing method: SD
-Model: Mega-S

[FR] Reduced retraction multiplier during Mesh Validation

Describe your suggestion.
I recommend changing the default retraction multiplier for G26 Mesh Validation to a lower value: I recommend a value of 1.

Reasoning
The current value results in a default retraction of 6mm and unretraction of 7.5mm during the mesh validation print: This is a lot of retraction and priming, even for a stock i3 Mega. A lower value would be less likely to pull molten plastic out of the melt zone, and result in more consistent line widths during the mesh validation print. One possible drawback is that there is more likely to be oozing and stringing on this print, but I'd rather have that than a jammed hotend.

References, context or examples.
The retraction multiplier can also be manually set by passing the Q parameter with the G26 mesh validation command, so an alternative to adjusting the default value is to update the readme pointing out this parameter. Basic Marlin (not customized for the Mega) uses a default of 1 for this value.

One motor doesnt stop when homig Z - Single endstop

Describe the bug
When homing Z axis, one motor (the right one, on the side of the end-stop button) doesn't stop and keeps grinding until I turn off the printer.

Im also a dev, I can answer technical questions, but I am not accustomed with the code much. You can point me to code where I can debug myself. Thanks!

To Reproduce

  • Flash firmware 1.4.6-stock-drivers (also tried 1.3.4 and 1.4.5 with same results) using Cura 4.2.1
  • Run M502 and M500
  • Run G28 Z (Home Z)
  • Watch the printer destroy itself

Expected behavior
All motors should stop when hitting the end-stop button

Printer (please complete the following information):
Anycubic i3 Mega, I bought it very soon after the release

M503 Output

[17:13:05:109] echo: G21 ; (mm)␊
[17:13:05:110] ␊
[17:13:05:110] echo:Filament settings: Disabled␊
[17:13:05:111] echo: M200 D1.75␊
[17:13:05:114] echo: M200 D0␊
[17:13:05:114] echo:Steps per unit:␊
[17:13:05:114] echo: M92 X80.00 Y80.00 Z400.00 E92.60␊
[17:13:05:116] echo:Maximum feedrates (units/s):␊
[17:13:05:117] echo: M203 X500.00 Y120.00 Z6.00 E60.00␊
[17:13:05:118] echo:Maximum Acceleration (units/s2):␊
[17:13:05:120] echo: M201 X2000 Y1200 Z60 E10000␊
[17:13:05:121] echo:Acceleration (units/s2): P<print_accel> R<retract_accel> T<travel_accel>␊
[17:13:05:124] echo: M204 P1200.00 R3000.00 T1500.00␊
[17:13:05:126] echo:Advanced: Q<min_segment_time_us> S<min_feedrate> T<min_travel_feedrate> X<max_x_jerk> Y<max_y_jerk> Z<max_z_jerk> E<max_e_jerk>␊
[17:13:05:131] echo: M205 Q50000 S0.00 T0.00 X8.00 Y8.00 Z0.40 E5.00␊
[17:13:05:133] echo:Home offset:␊
[17:13:05:134] echo: M206 X0.00 Y0.00 Z0.00␊
[17:13:05:136] echo:Mesh Bed Leveling:␊
[17:13:05:137] echo: M420 S0 Z0.00␊
[17:13:05:137] echo:Endstop adjustment:␊
[17:13:05:139] echo: M666 Z0.00␊
[17:13:05:139] echo:PID settings:␊
[17:13:05:141] echo: M301 P15.94 I1.17 D54.19␊
[17:13:05:141] echo: M304 P251.78 I49.57 D319.73␊
[17:13:05:143] echo:Linear Advance:␊
[17:13:05:143] echo: M900 K0.00␊
[17:13:05:146] echo:Filament load/unload lengths:␊
[17:13:05:146] echo: M603 L530.00 U555.00␊
[17:13:05:148] ok␊\

Cheers, and thanks for the great work!

termistor HT-NTC100K - B3950

hi can i use this thermistor HT-NTC100K Thermistor Temperature Sensor for High Temperature Filament 350 Degrees Hotend Kit B3950, for your firmware

AstroPrint USB Connection abort

Hi David,

with the current/latest release i have serious connection problems.
Printing from SD works fine, but as soon i use an external USB controller (AstroPrint) the connection get lost after a few minutes.
Right now its not possible to print anything else, except from SD card.

I hope its not a problem with my printer itself..

Trigorilla 1.1 Board causes display to loop on filament sensor warning

Problem I am experiencing
When flashing the .hex of the latest version - the printer will fall into an endless loop of a lack of filament message. This stops commands from running on terminals, and commands such as M105 get sent but never hear a response because of this.

Flashing stock firmware via arduino IDE causes the machine to start chiming on loop instead.

I can't go back to the old trigorilla board due to it having issues with some connections, therefore I am stuck with the 1.1 board.

Settings for Release Build

Hallo.

Can you please provide settings or method how to build your various releases.:

  • Default drivers
  • TMC2208
  • TMC2208 reversed.

I believe that it depends on some defines or somehow similar.

Can you please add this piece of information to Build own FW section of the Readme ?

Thank you.

[BUG] x home is set to x endpoint at the end of a print

I start the printer and release the motor and set the x position to the left side.
After this I start a print job (chessman) via octoprint 1.3.12 on octopie 0.16.0.
At the end of the job the hotend strays at the right hand side of the printed model but at the end of the plate. If I press X home (via lcd or octoprint) it will not move left. Only right and after this left to the point which seem to be the new X home. If I repeat it the next jobs are shifted to right the same way.

M503 Output
Send: M503
Recv: echo: G21 ; (mm)
Recv:
Recv: echo:Filament settings: Disabled
Recv: echo: M200 D1.75
Recv: echo: M200 D0
Recv: echo:Steps per unit:
Recv: echo: M92 X80.00 Y80.00 Z400.00 E92.60
Recv: echo:Maximum feedrates (units/s):
Recv: echo: M203 X500.00 Y500.00 Z6.00 E60.00
Recv: echo:Maximum Acceleration (units/s2):
Recv: echo: M201 X2000 Y1500 Z60 E10000
Recv: echo:Acceleration (units/s2): P<print_accel> R<retract_accel> T<travel_accel>
Recv: echo: M204 P4000.00 R3000.00 T4000.00
Recv: echo:Advanced: Q<min_segment_time_us> S<min_feedrate> T<min_travel_feedrate> X<max_x_jerk> Y<max_y_jerk> Z<max_z_jerk> E<max_e_jerk>
Recv: echo: M205 Q20000 S0.00 T0.00 X20.00 Y20.00 Z0.40 E5.00
Recv: echo:Home offset:
Recv: echo: M206 X0.00 Y0.00 Z0.00
Recv: echo:Mesh Bed Leveling:
Recv: echo: M420 S0 Z0.00
Recv: echo:Endstop adjustment:
Recv: echo: M666 Z0.00
Recv: echo:PID settings:
Recv: echo: M301 P15.94 I1.17 D54.19
Recv: echo: M304 P251.78 I49.57 D319.73
Recv: echo:Linear Advance:
Recv: echo: M900 K0.00
Recv: echo:Filament load/unload lengths:
Recv: echo: M603 L538.00 U555.00
Recv: ok

[BUG] compilation failure when enabling axis as TMC2208 (Uart mode)

Hello,

Fist thanks for the great work you did.
Now I tried to change the Mode for the extruder from TMC2208_STANDALONE to TMC2208, cause I want to use this axis in UART mode.
changing line 565 to "#define E0_DRIVER_TYPE TMC2208 " in configurations.h

After that I always the the compiling error "'E0_SERIAL_RX_PIN' was not declared in this scope"
I added the TMC2208 library in Arduino IDE.

Please find attached the full log from the compiler.
UART_compiler error.txt

Issues with SD init fail

with the new addition of the folder menu
i cannot get the sd card to read

on terminal it shows sd init fail?

have you ran into this.

[BUG] Endstop BEEP on second Z axis

Describe the bug
There is no BEEP sound when endstop on right Z axis is closed. But motor stopping successfully.

To Reproduce
Steps to reproduce the behavior:

  1. Compile and flash last firmware with #define ENDSTOP_BEEP at Configuration.h
  2. Manualy close endstop on right Z axis
  3. ???
  4. NO BEEP!

Expected behavior
Should be BEEP as at other endstops.

Printer (please complete the following information):

  • realese v1.4.6
  • i3 Mega

[BUG] in Mega-S print hangs mid-print, screen blanks

Describe the bug
Printing normally and after a few minutes the printer halts and the screen in blank (all white). The only way I found to recover is to switch off the printer.

To Reproduce
Steps to reproduce the behavior:

  1. Start printer
  2. Start printing
  3. Wait 5 minutes
  4. Printer halts

Expected behavior
A clear and concise description of what you expected to happen.

Photos of the print / output of the terminal
how can I get the console logs/output ?

Printer (please complete the following information):

  • Firmware: v19.01.10 (Marlin-AI3M-190110-stock_drivers.hex)
  • Printing method: SD
  • Model: Mega-S

M503 Output
Please paste the complete output of the M503 command here.

>>> M503
SENDING:M503
echo:  G21    ; (mm)
echo:Filament settings: Disabled
echo:  M200 D1.75
echo:  M200 D0
echo:Steps per unit:
echo:  M92 X80.00 Y80.00 Z400.00 E384.00
echo:Maximum feedrates (units/s):
echo:  M203 X500.00 Y500.00 Z6.00 E60.00
echo:Maximum Acceleration (units/s2):
echo:  M201 X3000 Y2000 Z60 E10000
echo:Acceleration (units/s2): P<print_accel> R<retract_accel> T<travel_accel>
echo:  M204 P1200.00 R3000.00 T3000.00
echo:Advanced: Q<min_segment_time_us> S<min_feedrate> T<min_travel_feedrate> X<max_x_jerk> Y<max_y_jerk> Z<max_z_jerk> E<max_e_jerk>
echo:  M205 Q20000 S0.00 T0.00 X8.00 Y8.00 Z0.40 E5.00
echo:Home offset:
echo:  M206 X0.00 Y0.00 Z0.00
echo:Mesh Bed Leveling:
echo:  M420 S0 Z0.00
echo:Endstop adjustment:
echo:  M666 Z0.00
echo:PID settings:
echo:  M301 P15.94 I1.17 D54.19
echo:  M304 P251.78 I49.57 D319.73
echo:Linear Advance:
echo:  M900 K0.00

Add M600 support

Please add support for menu guided filament change on layer / height via M600 command

Count length of filament

It will be nice if it's possible to implement am. Menupoint where it's possible to see how much filament is already used. It will be nice if you can calculate the mass so you could know how much it's availible on the rest of the filament roll and if it's enough for the next print.

[FR] No retraction / filament purge for M125

Describe your suggestion.
When sending an M125 command (pause print, basically an M600 without exchanging the filament, great for putting in nuts, magnets, etc. into prints) the printer still retracts a lot and purges after sending the continue command. Because of the retract I often get clogs and the purge wastes a lot of filament.
It would be great if only M600 retracts and exchanges the filament but M125 should only retract a little bit and "park" the head.

Reasoning
It's a great feature for many things. You can either put in mechanical parts into prints, like nuts, magnets, keyrings, ... but it is also great if there is something bad going on the printbed (e.g. failed support structure) that needs to be cleaned before continuing the print.

Reference: http://marlinfw.org/docs/gcode/M125.html

Cooling Fan Min/Max

Hello,
i replaced the cooling fans with new ones from noctua and flashed your firmware for 12V pwm output. The Hotend cooler (always 100%) runs fine, but the part cooling fan start to run about 70%+. So any values below are useless.

Is it possible to remap the pwm output without changing the source code? E.g. S1 = 70% : S255 = 100%

[Docs] Error in "Calibration" wiki page

In the "Calibration" wiki page the following is stated:

If you use the stock cooler, I generally recommend running it at 70% (M106 S191) because of the 12V mod. Remember to also limit it in your slicer.

I think 75% would be correct here though? At least that is what the GCode would result in.

[BUG] Part cooling fan turns off if you change print speed via printer's menu

Describe the bug
If you adjust print speed via printer's menu while still printing, the part cooling fan is turned off (or paused) until it spots M106 command in your file or via the serial terminal. I'm not sure if anything else is affected (it might be), but turning the part cooling fan is enough to ruin PLA-model.

To Reproduce
Steps to reproduce the behavior:

  1. Start printer
  2. Start printing
  3. Wait until part cooling fan turns on, in my case at the second layer
  4. Adjust the print speed to any value via menu and hit 'OK'
  5. Enjoy the silence - part cooling fan is turned off
    Or:
  6. Open Repetier Host
  7. Turn on part cooling fan and home the nozzle
  8. Adjust the print speed to any value via menu and hit 'OK'
  9. Enjoy the silence - part cooling fan is turned off

Expected behavior
The part cooling fan should be running? Or i'm wrong?

Printer (please complete the following information):

  • Firmware version: downloaded from 'Releases' a week ago, tmc2208 version
  • Printing method: SD, Serial
  • Model: Mega-S
    I'm sorry for not providing a logs and photos - too far away from machine atm :)

filament change problem, printer stuck

Hi Davidramiro, first of all I would like to congratulate you for the great work done in this firmware, I solved the problem of the plate not perfectly plane But I have a problem with changing the filament, I use cura 4.2.1 and when I set pause to height, I save the file in the sd memory, I start printing from the sd memory, when the printer pauses, I change filament but at the moment the sensor no longer detects the filament, the printer stops. I tried to change the filament and press "continue" but it remains locked. I can only turn it off and on to restart it. do you have any advice for me? Can you explain how to enter the M600 command for sd card printing? Do I have to insert it before the desired layer or immediately after? Thank you

Heat bed can not be fully used

Hello,

no idea if it is a bug. After switching from Marlin 1.1.0 to 190208-TMC2208, the heating bed max can only be heated up to 105 ° C.

The PID tuning is unfortunately not possible at 110°. The error message: "PID Autotune failed! Temperature too high" is displayed in the octo print terminal.

Otherwise, the new pid function works great. There are two mosfets installed in the i3 mega v3. I hope you can help me, because I print mostly abs at 110 °.

here are the calculated optimized values from the bed

Recv: #define DEFAULT_bedKp 241.85
Recv: #define DEFAULT_bedKi 47.62
Recv: #define DEFAULT_bedKd 307.09

Thanks in advance

com port connetcions problem

Hi @davidramiro
today i flash Marlin-AI3M-181213-TMC2208.hex. connectors in original orientation.
Step by step i configure like written on https://www.thingiverse.com/thing:3249319
exept "Bonus: Manual Mesh Bed Leveling".
Reboot, try to connect from Octoprint with error:

Connecting to: /dev/ttyUSB1   
Changing monitoring state from "Offline" to "Opening serial port"  
Connected to: Serial<id=0xaa976cf0, open=True>(port='/dev/ttyUSB1', baudrate=115200, bytesize=8, parity='N', stopbits=1, timeout=10.0, xonxoff=False, rtscts=False, dsrdtr=False), starting monitor  
Changing monitoring state from "Opening serial port" to "Connecting"  
Send: N0 M110 N0*125  
Recv: �Np|\x18_�M��hn6H5\x06\x07JpON6��Z�z-\x0c>|YL6M>~HN6a.�8\x0f\x04\x07\x1a~�H\x07�H�X�J\x13\x03�~�Z-�]]�M�7��5\x08\x07  
Recv: \x08�^�\x1b6\x17jO>\x0b��H7�(^�Z��\x07J�%\x08\x08\x04p|"]\x0bX\x1b6�H.l�p|\x084\x08]�f�J�J�X�\x1a�H\x13H6f�J�JJ�8J�(K�J?Jzp|$~H\x0f^\x17�}�$p|\x084Recv: ��I��I�k\x08�HJp|$~\x18�\x0b^>h}�zf�J�Z�A\x08�A\x08nh%�X�\x1a�\x0b^>h}�z�Kq?.aKP�..aKKa�.a+\x07J�J�%HJ�AHJ�AHJp|@_a\x13�6�\x0fM\x7f\x1fY�6]�6\x1b�6O6�]�6\x1b�&>�K7&\x1f�K{&>�K\x1b&��+\x07J�Z�J�\x18�Jj\x08N�8�Jj\x08��X�*�Ma*\x07J�J�I�j\x08N�X�:\x17\x08\x0bd_6�p|\x080\x08@�I�\x07\x1a]N6�\x0b*\x07J�K�If�  
There was a timeout while trying to connect to the printer  
Changing monitoring state from "Connecting" to "Offline"  
Connection closed, closing down monitor

what is a dirty answer? maybe i missed something?

Y moves too far after printing

Hi,

thanks for your great work! This FW is much better than the stock FW! I installed the latest version (December 27th, only used the stock version before) and have one issue on my Anycubic Mega I3:

After the print completes the following G-Code is executed (Cura 3.6 default setting):

M140 S0 ; turn off bed
M84 ; disable motors
M107
G91 ;relative positioning
G1 E-1 F300 ;retract the filament a bit before lifting the nozzle to release some of the pressure
G1 Z+0.5 E-5 ;X-20 Y-20 F{speed_travel} ;move Z up a bit and retract filament even more
G28 X0 ;Y0 ;move X/Y to min endstops so the head is out of the way
G1 Y180 F2000
M84 ;steppers off
G90
M300 P300 S4000

The G1 Y180 F2000 command is supposed to move the plate to the front for easier access to the printed object. However, with your FW the blade moves far too much, hitting the mounts and making the mechanics jump (there's no end switch on this direction).

Sending a G0 Y100 command to the printer positions it approximately at where the Y100 is supposed to be.

Please note, that before printing the positioning works correctly. The only change I did to the start up G Code was to include the settings for levelling:

G21 ;metric values
G90 ;absolute positioning
M82 ;set extruder to absolute mode
M107 ;start with the fan off
G28 X0 Y0 ;move X/Y to min endstops
G28 Z0 ;move Z to min endstops
M501 ; restore bed leveling
M420 S1
G1 Z15.0 F{speed_travel} ;move the platform down 15mm
G92 E0 ;zero the extruded length
G1 F200 E3 ;extrude 3mm of feed stock
G92 E0 ;zero the extruded length again
G1 F{speed_travel}
M117 Printing...
G5

I can provide the full G-Code if required. The print I did was: https://www.thingiverse.com/thing:2376990

Best Regards
Bernhard

[FR] Connections sound , filament empty sound

Hello

Where in the firmware can I configure the USB connect sound (when the cura connect to the printer with the old firmware there was a sound) how do I configure it?

Also there is no sound when filament sensor do not detect filament...

Hotend fan won't turn off after thermistor replacement

Describe the bug
This may not be an issue with the firmware but my hope is the experts around here might be able to lend me a hand. I installed the firmware on my upgraded i3 Mega which has a Titan Aero hot end. The heatsink fan used to turn off when the hot end temperature was below a certain point (around 40c or something like that).

When I installed the Aero I missed the instruction about not over tightening the thermistor cartridge and it was damaged somewhat, but seemed to work fine for quite a while. At some point, it failed in a way that caused the hot end to overhead to the point of burning the filament to a crisp (no fire though and I caught it).

I was able to confirm the thermistor was shot and ordered a replacement which I just got and installed correctly this time. It is reporting temperature correctly now, but for some reason as long as the machine is turned on the heatsink fan is always running now. Nothing will shut it down.

To Reproduce
Steps to reproduce the behavior:

  1. Turn on printer
  2. Thermistor temp reading 20 degrees
  3. Fan is running

Expected behavior
Fan should turn off when the hot end is not heated.

Printer (please complete the following information):

  • Firmware: [e.g. 181227]
  • Printing method: Typically Curae[ep
  • Model i3 Mega with Ultravase

M503 Output
Please paste the complete output of the M503 command here.

09:24:40.167 : N18 M503*28
09:24:40.173 : echo:  G21    ; (mm)
09:24:40.173 : echo:Filament settings: Disabled
09:24:40.173 : echo:  M200 D1.75
09:24:40.173 : echo:  M200 D0
09:24:40.173 : echo:Steps per unit:
09:24:40.176 : echo:  M92 X80.00 Y80.00 Z400.00 E405.00
09:24:40.176 : echo:Maximum feedrates (units/s):
09:24:40.180 : echo:  M203 X500.00 Y500.00 Z6.00 E60.00
09:24:40.180 : echo:Maximum Acceleration (units/s2):
09:24:40.184 : echo:  M201 X3000 Y3000 Z60 E10000
09:24:40.184 : echo:Acceleration (units/s2): P<print_accel> R<retract_accel> T<travel_accel>
09:24:40.192 : echo:  M204 P1000.00 R3000.00 T3000.00
09:24:40.192 : echo:Advanced: Q<min_segment_time_us> S<min_feedrate> T<min_travel_feedrate> X<max_x_jerk> Y<max_y_jerk> Z<max_z_jerk> E<max_e_jerk>
09:24:40.213 : echo:  M205 Q20000 S0.00 T0.00 X8.00 Y8.00 Z0.40 E5.00
09:24:40.213 : echo:Home offset:
09:24:40.213 : echo:  M206 X3.00 Y-10.00 Z0.00
09:24:40.213 : echo:Mesh Bed Leveling:
09:24:40.213 : echo:  M420 S0 Z0.00
09:24:40.213 : echo:  G29 S3 X1 Y1 Z0.04000
09:24:40.213 : echo:  G29 S3 X2 Y1 Z0.08000
09:24:40.213 : echo:  G29 S3 X3 Y1 Z0.08000
09:24:40.213 : echo:  G29 S3 X4 Y1 Z0.02000
09:24:40.213 : echo:  G29 S3 X5 Y1 Z-0.02000
09:24:40.213 : echo:  G29 S3 X1 Y2 Z0.00000
09:24:40.213 : echo:  G29 S3 X2 Y2 Z0.06000
09:24:40.213 : echo:  G29 S3 X3 Y2 Z0.08000
09:24:40.213 : echo:  G29 S3 X4 Y2 Z0.04000
09:24:40.213 : echo:  G29 S3 X5 Y2 Z-0.04000
09:24:40.213 : echo:  G29 S3 X1 Y3 Z0.00000
09:24:40.213 : echo:  G29 S3 X2 Y3 Z0.06000
09:24:40.231 : echo:  G29 S3 X3 Y3 Z0.08000
09:24:40.231 : echo:  G29 S3 X4 Y3 Z0.02000
09:24:40.231 : echo:  G29 S3 X5 Y3 Z-0.04000
09:24:40.231 : echo:  G29 S3 X1 Y4 Z0.00000
09:24:40.231 : echo:  G29 S3 X2 Y4 Z0.06000
09:24:40.231 : echo:  G29 S3 X3 Y4 Z0.06000
09:24:40.231 : echo:  G29 S3 X4 Y4 Z0.02000
09:24:40.231 : echo:  G29 S3 X5 Y4 Z-0.06000
09:24:40.231 : echo:  G29 S3 X1 Y5 Z0.00000
09:24:40.231 : echo:  G29 S3 X2 Y5 Z0.04000
09:24:40.231 : echo:  G29 S3 X3 Y5 Z0.06000
09:24:40.231 : echo:  G29 S3 X4 Y5 Z0.02000
09:24:40.231 : echo:  G29 S3 X5 Y5 Z-0.04000
09:24:40.231 : echo:Endstop adjustment:
09:24:40.231 : echo:  M666 Z0.00
09:24:40.231 : echo:PID settings:
09:24:40.231 : echo:  M301 P31.96 I3.61 D70.68
09:24:40.234 : echo:  M304 P188.98 I33.93 D263.18
09:24:40.234 : echo:Linear Advance:
09:24:40.234 : echo:  M900 K0.06

Touchscreen freezes on filament change pause.

Describe the bug
The filament change pause from the special menu causes the LCD screen to freeze. but the printer works fine and I can send the M108 command from octoprint to make it work.
.

To Reproduce
Steps to reproduce the behavior:

  1. Start a print (from octoprint in my case)
  2. Use Filament change pause from the special menu after a few layers
  3. The touchscreen freezes. no beep sounds when you select an item anymore either. it's just fully frozen

Expected behavior
The touchscreen would continue functioning and lets me touch resume.

Photos of the print / output of the terminal
If applicable, add photos or console outputs to help explain your problem.

Printer (please complete the following information):

  • Firmware version: 1.1.9
  • Printing method: Octoprint
  • Model: Mega-S

M503 Output
Please paste the complete output of the M503 command here.
Send: M503
Recv: echo: G21 ; (mm)
Recv:
Recv: echo:Filament settings: Disabled
Recv: echo: M200 D1.75
Recv: echo: M200 D0
Recv: echo:Steps per unit:
Recv: echo: M92 X80.00 Y80.00 Z400.00 E404.21
Recv: echo:Maximum feedrates (units/s):
Recv: echo: M203 X500.00 Y500.00 Z12.00 E120.00
Recv: echo:Maximum Acceleration (units/s2):
Recv: echo: M201 X1500 Y1500 Z500 E10000
Recv: echo:Acceleration (units/s2): P<print_accel> R<retract_accel> T<travel_accel>
Recv: echo: M204 P1500.00 R1500.00 T2000.00
Recv: echo:Advanced: Q<min_segment_time_us> S<min_feedrate> T<min_travel_feedrate> X<max_x_jerk> Y<max_y_jerk> Z<max_z_jerk> E<max_e_jerk>
Recv: echo: M205 Q20000 S0.00 T0.00 X10.00 Y10.00 Z0.20 E2.50
Recv: echo:Home offset:
Recv: echo: M206 X0.00 Y0.00 Z0.00
Recv: echo:Auto Bed Leveling:
Recv: echo: M420 S0 Z10.00
Recv: echo: G29 W I0 J0 Z0.05750
Recv: echo: G29 W I1 J0 Z-0.09500
Recv: echo: G29 W I2 J0 Z-0.02750
Recv: echo: G29 W I3 J0 Z0.13750
Recv: echo: G29 W I4 J0 Z0.30750
Recv: echo: G29 W I0 J1 Z0.21750
Recv: echo: G29 W I1 J1 Z0.10500
Recv: echo: G29 W I2 J1 Z0.11000
Recv: echo: G29 W I3 J1 Z0.21000
Recv: echo: G29 W I4 J1 Z0.27750
Recv: echo: G29 W I0 J2 Z0.36250
Recv: echo: G29 W I1 J2 Z0.15750
Recv: echo: G29 W I2 J2 Z0.10250
Recv: echo: G29 W I3 J2 Z0.12000
Recv: echo: G29 W I4 J2 Z0.19250
Recv: echo: G29 W I0 J3 Z0.40750
Recv: echo: G29 W I1 J3 Z0.23750
Recv: echo: G29 W I2 J3 Z0.15000
Recv: echo: G29 W I3 J3 Z0.10250
Recv: echo: G29 W I4 J3 Z0.11500
Recv: echo: G29 W I0 J4 Z0.44500
Recv: echo: G29 W I1 J4 Z0.26750
Recv: echo: G29 W I2 J4 Z0.14500
Recv: echo: G29 W I3 J4 Z0.05250
Recv: echo: G29 W I4 J4 Z0.03750
Recv: echo:Endstop adjustment:
Recv: echo: M666 Z0.00
Recv: echo:PID settings:
Recv: echo: M301 P14.98 I0.85 D66.26
Recv: echo: M304 P251.78 I49.57 D319.73
Recv: echo:Z-Probe Offset (mm):
Recv: echo: M851 Z-0.80
Recv: echo:Stepper driver current:
Recv: echo: M906 X815 Y820
Recv: M906 I1 Z800
Recv: M906 T0 E895
Recv:
Recv: echo:Hybrid Threshold:
Recv: echo: M913 X210 Y210
Recv: M913 I1 Z4
Recv: M913 T0 E35
Recv:
Recv: echo:Linear Advance:
Recv: echo: M900 K0.45
Recv: echo:Filament load/unload lengths:
Recv: echo: M603 L538.00 U555.00

Extruder Heatsink Fan is Controlled with Part Cooling Fan

Describe the bug
Extruder heatsink fan speed is set to the speed of part cooling fan while running g-codes from octoprint or direct from SD card. i.e. If I am not using part cooling fan the heatsink fan also turns off. I can manually set the part cooling fan speed via octoprint terminal (m106 S100) and separate control is restored.

Expected behavior
heatsink fan will run at full speed whenever the extruder is above 50 degrees per firmware setting.

Printer (please complete the following information):

  • Firmware version: Marlin-Ai3M-v1.4.6-TMC2208_reversed.hex
  • Printing method: SD, Octoprint; sliced by cura
  • Model: Mega-S

M503 Output
Send: M503
Recv: echo: G21 ; (mm)
Recv:
Recv: echo:Filament settings: Disabled
Recv: echo: M200 D1.75
Recv: echo: M200 D0
Recv: echo:Steps per unit:
Recv: echo: M92 X80.00 Y80.00 Z400.00 E500.00
Recv: echo:Maximum feedrates (units/s):
Recv: echo: M203 X500.00 Y500.00 Z6.00 E30.00
Recv: echo:Maximum Acceleration (units/s2):
Recv: echo: M201 X3000 Y2000 Z60 E10000
Recv: echo:Acceleration (units/s2): P<print_accel> R<retract_accel> T<travel_accel>
Recv: echo: M204 P500.00 R1500.00 T500.00
Recv: echo:Advanced: Q<min_segment_time_us> S<min_feedrate> T<min_travel_feedrate> X<max_x_jerk> Y<max_y_jerk> Z<max_z_jerk> E<max_e_jerk>
Recv: echo: M205 Q20000 S0.00 T0.00 X10.00 Y10.00 Z0.40 E5.00
Recv: echo:Home offset:
Recv: echo: M206 X0.00 Y-10.00 Z0.00
Recv: echo:Mesh Bed Leveling:
Recv: echo: M420 S0 Z0.00
Recv: echo:Endstop adjustment:
Recv: echo: M666 Z0.00
Recv: echo:PID settings:
Recv: echo: M301 P25.37 I1.67 D96.13
Recv: echo: M304 P165.35 I17.40 D392.82
Recv: echo:Linear Advance:
Recv: echo: M900 K10.00
Recv: echo:Filament load/unload lengths:
Recv: echo: M603 L538.00 U555.00
Recv: ok

Thanks in advance

Behaviour when stopping (by user) in mid-print

Thanks for the great FW!
I have (in addion this new FW) new extruder and bowden tube so I have made several test prints lately and I stopped many of them in mid-print manually from the screen. The behaviour of the Z axis is a bit odd in my opinion. When manually stopped, the Z axis moves down a bit (1 mm or so) and the hot end dibs into print and stays there. I have not tried but it might be that if print is stopped just after first layers, the nozze could crash into the bed... if not saved by endstops.
I do not remember if official FW had this behaviour too. If this is by design, I wonder what is the benefit?

[FR] Marlin 2 porting

Describe your suggestion.
Trying to integrate into marlin 2.0 bugfix.
Have a version which compiles, but the LCD is not working. I could provide you the modified source.

Could you assist me with that?

Thanks

Reasoning
Would be great to have the LCD working in the newest version as well
Marlin.zip

[FR] Mega-S Extruder maybe add values to the describtion

Hey

i have the Mega-S Exruder mounted to the printer and tried a few prints with different seetings.
You allready write in your describtion to adjust the Steps per Unit.
I would add two more important changes for the extruder. Just for a start point of fine tuning.
The first is the feedrate for the extruder this works perfect for my printer at E25.00.
The second is the Acceleration für the Retract this should be 1500 not 3000.

Maximum feedrates (units/s):
M203 X500.00 Y500.00 Z6.00 E25.00

Acceleration (units/s2): P<print_accel> R<retract_accel> T<travel_accel>
Recv: echo: M204 P1500.00 R1500.00 T3000.00

Awesome work elsewise for this fantastic work on this special firmware!!!!

Marcel

[BUG] Hotend cools down during printing, PID tuning doesn't help

Describe the bug
In preheat, hotend manages to heat up to 240°C and maintains stable. but when I start to print for a couple of minutes, it starts to cool down to 230°C and even lower. later the thermal protection seems to kick in and all motor freezes, the print just stops.
Notice : when it stops printing, the screen loses control, it cannot read the correct temperature. The pause/stop button can be clicked but it will just show please wait forever.
Tried M303 E0 S240 C15 U1 to tune hotend PID and nothing different happens.

To Reproduce
Steps to reproduce the behavior:

  1. Start printer
  2. Preheat ABS
  3. Throw any gcode with above 220°C via SD card
  4. A few minutes later, It just stops printing

Expected behavior
Expect it to print normally without cooling down.
I know it's very likely that I did someting wrong instead of a bug. Could you please help me out?

Printer (please complete the following information):

  • Firmware version: V1.4.6
  • Printing method: SD, sliced with Cura
  • Model: i3 mega with single Z endstop

M503 Output
Please paste the complete output of the M503 command here.

[QUESTION] Fans won't turn off, when printer is cooled down, still running

Describe the bug
Hello, I have a question about the fans. After upgrading printer firmware, hotend and motherboard fan don't want to stop even if the printer is cooled down. I tried to load original firmware from anycubic, do M502, M500, but still same. Maybe I have higher temperature in room (25 - 26 C). I have now loaded Your firmware. Is possible to change, when will motherboard fan work? Thank you

Printer (please complete the following information):

  • Firmware version: [v1.4.6]
  • Printing method [SD]
  • Model [i3 Mega]

M503 Output

Connecting...
start
Printer is now online.
echo: External Reset
Marlin 1.1.9
Marlin-AI3M v1.4.6
echo: Last Updated: 2019-04-03 | Author: (davidramiro)
echo:Compiled: Apr  4 2019
echo: Free Memory: 1362  PlannerBufferBytes: 1664
echo:V55 stored settings retrieved (731 bytes; crc 3107)
echo:  G21    ; (mm)
echo:Filament settings: Disabled
echo:  M200 D1.75
echo:  M200 D0
echo:Steps per unit:
echo:  M92 X80.00 Y80.00 Z400.00 E92.60
echo:Maximum feedrates (units/s):
echo:  M203 X500.00 Y500.00 Z6.00 E60.00
echo:Maximum Acceleration (units/s2):
echo:  M201 X3000 Y2000 Z60 E10000
echo:Acceleration (units/s2): P<print_accel> R<retract_accel> T<travel_accel>
echo:  M204 P1500.00 R3000.00 T3000.00
echo:Advanced: Q<min_segment_time_us> S<min_feedrate> T<min_travel_feedrate> X<max_x_jerk> Y<max_y_jerk> Z<max_z_jerk> E<max_e_jerk>
echo:  M205 Q20000 S0.00 T0.00 X10.00 Y10.00 Z0.40 E5.00
echo:Home offset:
echo:  M206 X0.00 Y0.00 Z0.00
echo:Mesh Bed Leveling:
echo:  M420 S0 Z0.00
echo:Endstop adjustment:
echo:  M666 Z0.00
echo:PID settings:
echo:  M301 P15.94 I1.17 D54.19
echo:  M304 P251.78 I49.57 D319.73
echo:Linear Advance:
echo:  M900 K0.00
echo:Filament load/unload lengths:
echo:  M603 L538.00 U555.00
echo:SD card ok

Printer stops while printing because 'Heating failed', connection closes

Hi, I'm using the stock drivers. This firmware works really well, but I've already had 3 times when the print process was stopped because of an error. This time I actually got a log:

Recv:  T:192.60 /200.00 B:60.21 /60.00 @:113 B@:22
Recv: ok
Send: N359 M205 X8 Y8*42
Recv: ok
Send: N360 G1 F2400 X115.768 Y68.936 E210.31436*57
Recv: ok
Send: N361 G1 X116.214 Y69.382 E210.35842*90
Recv: ok
Recv: ok
Send: N362 G1 X180.787 Y69.382 E214.8686*101
Send: N363 G1 X181.233 Y68.936 E214.91266*81
Recv: ok
Send: N364 G1 X181.233 Y58.663 E215.63019*92
Recv: Error:Heating failed, system stopped! Heater_ID: 0
Recv: Error:Printer halted. kill() called!
Changing monitoring state from "Printing" to "Error: Heating failed, system stopped! Heater_ID: 0 - Printer halted. kill() called!"
Changing monitoring state from "Error: Heating failed, system stopped! Heater_ID: 0 - Printer halted. kill() called!" to "Offline (Error: Heating failed, system stopped! Heater_ID: 0 - Printer halted. kill() called!)"
Connection closed, closing down monitor

As far as I know everything was heated properly, but I wasn't really paying attention to the temperatures while printing. The logs show that the actual temperature of the hotend was a bit lower than expected, but I don't think that is related.

Please ask for any additional logs / info if you need it.

Thanks.

[BUG] Screaming stepper motors with stock drivers

Describe the bug
Always when the motors are powerd with this firmware they are screaming relativly loud to hold its position and while moving. As soon as I stop the motors the sound will disapear. For now I switched back to the stock firmware where the sound is a lot quieter till I know how to fix that.

To Reproduce
Steps to reproduce the behavior:

  1. Start printer
  2. Move axis by any value
  3. hear error

Expected behavior
The same noise level as the stock firmware

Printer (please complete the following information):

  • Firmware version: [v1.4.6 stable]
  • Printing method [SD, USB (OctoPrint, Cura, ...)]
  • Model [i3 Mega]

Repetitive Z movements via display menu not working

Hi, erstmal ein ganz großes Lob für deine Arbeit! Ich finde es absolut super, was hier alles möglich gemacht wird!

Mir ist beim Autobedleveling aufgefallen, dass die 0.02er Schritte nicht wirklich laufen. Ich habe mehrfach 0.02er Schritte ausgeführt und dennoch hat sich die Z-Achse nicht bewegt. Wenn ich jedoch einen 0.1er Schritt mache, geht es sofort, was jedoch in einigen Fällen zu viel war.

Ich hatte manchmal das Gefühl (absolut subjektiv) dass er nach mehrmaligem hoch- und runterfahren von 0.1er Schritten dann irgendwann auch mal einen 0.02er genommen hat.

Meine Erwartung wäre, dass wenn ich fünf Mal einen 0.02er Schritt in eine Richtung mache, dass es das selbe Ergebnis wäre wie ein 0.1er Schritt.

Recv: echo:Marlin 1.1.9
Recv: Marlin-AI3M v1.4.2
Recv: echo: Last Updated: 2019-02-24 | Author: (davidramiro)
Recv: echo:Compiled: Feb 24 2019
Recv: echo: Free Memory: 2186  PlannerBufferBytes: 1664
Recv: echo:V55 stored settings retrieved (731 bytes; crc 42887)
Recv: FIRMWARE_NAME:Marlin 1.1.9(Github, davidramiro) MACHINE_TYPE:Anycubic i3 Mega EXTRUDER_COUNT:1 UUID:cede2a2f-41a2-4748-9b12-c55c62f367ff MARLIN-AI3M_VERSION:v1.4.2
Recv: FIRMWARE_NAME:Marlin 1.1.9(Github, davidramiro) 
Send: M503
Recv: echo:  G21    ; (mm)
Recv: 
Recv: echo:Filament settings: Disabled
Recv: echo:  M200 D1.75
Recv: echo:  M200 D0
Recv: echo:Steps per unit:
Recv: echo:  M92 X80.00 Y80.00 Z400.00 E398.50
Recv: echo:Maximum feedrates (units/s):
Recv: echo:  M203 X500.00 Y120.00 Z6.00 E60.00
Recv: echo:Maximum Acceleration (units/s2):
Recv: echo:  M201 X2000 Y1200 Z60 E10000
Recv: echo:Acceleration (units/s2): P<print_accel> R<retract_accel> T<travel_accel>
Recv: echo:  M204 P1200.00 R3000.00 T1500.00
Recv: echo:Advanced: Q<min_segment_time_us> S<min_feedrate> T<min_travel_feedrate> X<max_x_jerk> Y<max_y_jerk> Z<max_z_jerk> E<max_e_jerk>
Recv: echo:  M205 Q50000 S0.00 T0.00 X8.00 Y8.00 Z0.40 E5.00
Recv: echo:Home offset:
Recv: echo:  M206 X0.00 Y0.00 Z0.00
Recv: echo:Mesh Bed Leveling:
Recv: echo:  M420 S0 Z0.00
Recv: echo:  G29 S3 X1 Y1 Z0.00000
Recv: echo:  G29 S3 X2 Y1 Z0.02000
Recv: echo:  G29 S3 X3 Y1 Z0.02000
Recv: echo:  G29 S3 X4 Y1 Z-0.06000
Recv: echo:  G29 S3 X5 Y1 Z-0.16000
Recv: echo:  G29 S3 X1 Y2 Z-0.06000
Recv: echo:  G29 S3 X2 Y2 Z0.02000
Recv: echo:  G29 S3 X3 Y2 Z0.02000
Recv: echo:  G29 S3 X4 Y2 Z-0.06000
Recv: echo:  G29 S3 X5 Y2 Z-0.16000
Recv: echo:  G29 S3 X1 Y3 Z-0.06000
Recv: echo:  G29 S3 X2 Y3 Z0.02000
Recv: echo:  G29 S3 X3 Y3 Z0.02000
Recv: echo:  G29 S3 X4 Y3 Z-0.04000
Recv: echo:  G29 S3 X5 Y3 Z-0.18000
Recv: echo:  G29 S3 X1 Y4 Z-0.08000
Recv: echo:  G29 S3 X2 Y4 Z0.02000
Recv: echo:  G29 S3 X3 Y4 Z0.04000
Recv: echo:  G29 S3 X4 Y4 Z-0.06000
Recv: echo:  G29 S3 X5 Y4 Z-0.18000
Recv: echo:  G29 S3 X1 Y5 Z-0.10000
Recv: echo:  G29 S3 X2 Y5 Z-0.02000
Recv: echo:  G29 S3 X3 Y5 Z-0.02000
Recv: echo:  G29 S3 X4 Y5 Z-0.02000
Recv: echo:  G29 S3 X5 Y5 Z-0.16000
Recv: echo:Endstop adjustment:
Recv: echo:  M666 Z0.00
Recv: echo:PID settings:
Recv: echo:  M301 P15.94 I1.17 D54.19
Recv: echo:  M304 P251.78 I49.57 D319.73
Recv: echo:Linear Advance:
Recv: echo:  M900 K0.00
Recv: echo:Filament load/unload lengths:
Recv: echo:  M603 L538.00 U555.00
Recv: ok

Danke!

Recommend Projects

  • React photo React

    A declarative, efficient, and flexible JavaScript library for building user interfaces.

  • Vue.js photo Vue.js

    🖖 Vue.js is a progressive, incrementally-adoptable JavaScript framework for building UI on the web.

  • Typescript photo Typescript

    TypeScript is a superset of JavaScript that compiles to clean JavaScript output.

  • TensorFlow photo TensorFlow

    An Open Source Machine Learning Framework for Everyone

  • Django photo Django

    The Web framework for perfectionists with deadlines.

  • D3 photo D3

    Bring data to life with SVG, Canvas and HTML. 📊📈🎉

Recommend Topics

  • javascript

    JavaScript (JS) is a lightweight interpreted programming language with first-class functions.

  • web

    Some thing interesting about web. New door for the world.

  • server

    A server is a program made to process requests and deliver data to clients.

  • Machine learning

    Machine learning is a way of modeling and interpreting data that allows a piece of software to respond intelligently.

  • Game

    Some thing interesting about game, make everyone happy.

Recommend Org

  • Facebook photo Facebook

    We are working to build community through open source technology. NB: members must have two-factor auth.

  • Microsoft photo Microsoft

    Open source projects and samples from Microsoft.

  • Google photo Google

    Google ❤️ Open Source for everyone.

  • D3 photo D3

    Data-Driven Documents codes.