


You're looking at the script, which essentially allows you to place an order using /odata/v1/BatchOrder/OData.CSC.Orderendpoint. You have 3 main options:
1 - Create Batch Order Using A Body
2 - Create Batch Order Using a Query
3 - Check Order Details
- Use the first one if you want to place an order by hardcoding all products in
IdentifierListparameter, specified inorder_body.jsonfile. - If you'd rather place an order by providing
query_url, without hardcoding products, then use option 2. The script will search for products found inquery_urlparameter and place an order for them. Once yourparallel_quota(which is basically a limit for a number of products per one order) will be exhausted, and order will be processed, then the new order will be placed (with remaining products found inquery_url), provided that you setnew_ordersparameter totrueinquery_details.jsonfile. New orders will be placed till you reach your monthly quota limit or all products will be ordered. If, on the other hand, you setnew_orderstofalse, then you will create a single order where number of products in this order will be equal to givenparallel_quotaand remaining products inquery_urlwon't be ordered. - Finally, you can check order details by selecting option 3. Just provide an identifier and you will see order details.

In order to run the script, simply cd into the project folder and then type python main.py gui in the terminal. You will be prompted with:
Please choose one of the following:
1 - Create Batch Order Using A Body
2 - Create Batch Order Using a Query
3 - Check Order Details
4 - Exit
Just choose one of the options and then script will do its magic.
Optionally, you can use Cron, which is a utility allowing you to automatically run commands on a schedule.
While using cron, you cannot use main.py gui, because it simply won't work since this particular command waits for user's input. You have two options in this case:
create-order-with-body   Creates BatchOrder Using Provided By User Body.
create-order-with-query  Creates BatchOrder Using Provided By User Query.
You can either use main.py create-order-with-body or main.py create-order-with-query. These two options essentially do pretty much the same thing as option 1 and option 2 from GUI, however there is one expection. In case of main.py create-order-with-query, you can additionally provide --hours option, which allows you to look back in time for specific products. The script will do its thing and adjust dates in your provided query accordingly to --hours option.
In order to set a schedule, you can use crontab -e in your terminal and from there specify your cron job (in this example, the script will run at 12:51 everyday and will create BatchOrder(s) with products from the last 12 hours in your given query):
51 12 * * * /usr/bin/python3.11 ~/repos/ordering_script/main.py create-order-with-query --hours=12 > /tmp/ordering_script.log 2>&1
If you're not familiar with cron, that line may look a little intimidating, but it's actually pretty straightforward. There are many great tutorials on cron, so please take a look at them if you're not sure what's going on here, but for now, let's take a look at another example. In this case, the script will run at 16:14 on Mondays and will create BatchOrder(s) with all products from your given query, without modifying dates in your query:
14 16 * * 0 /usr/bin/python3.11 ~/repos/ordering_script/main.py create-order-with-query > /tmp/ordering_script.log 2>&1
In this example, the script will run at 11:10, on 15th day of each month and will create a single BatchOrder using your given body:
10 11 15 * * /usr/bin/python3.11 ~/repos/ordering_script/main.py create-order-with-body > /tmp/ordering_script.log 2>&1
In order to see logs, you can use cat /tmp/ordering_script.log.
- Install all necessary libraries from
requirements.txtfile bypip install -r requirements.txtin your terminal. - Make sure to provide essential variables in
jsonsfolder:
- no matter what, you have to provide proper parameters in
keycloak_ordering.jsonandorder_body.json - if you'd like to place an order by providing a query, without hardcoding products, then you also have to fill
query_details.json. Ifquery_urlthat you provided isHDA, then you also have to put parameters intokeycloak_catalogue.json, because they are required for hda authentication. - if you'd like to place an order by hardcoding all products in
order_body.jsonfile, then you also have to put proper values intoorder_details.json
These variables that you're seeing down below are essential for keycloak authorization:
{
  "client_id": "",
  "username": "",
  "password": "",
  "client_secret": "",
  "keycloak_address": ""
  *"host": "",
  **"totp_code": ""
}
*host is required only in keycloak_ordering.json (please do not provide https:// at the beginning). For security reasons, I won't provide any example.
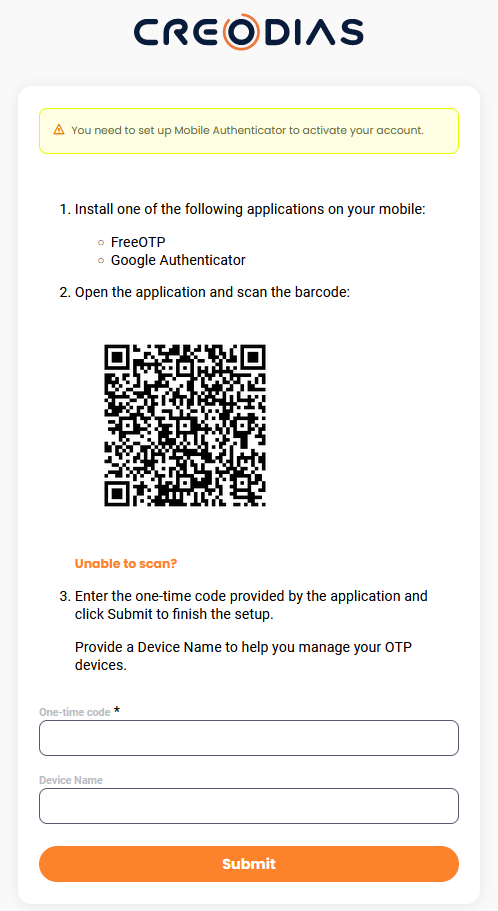
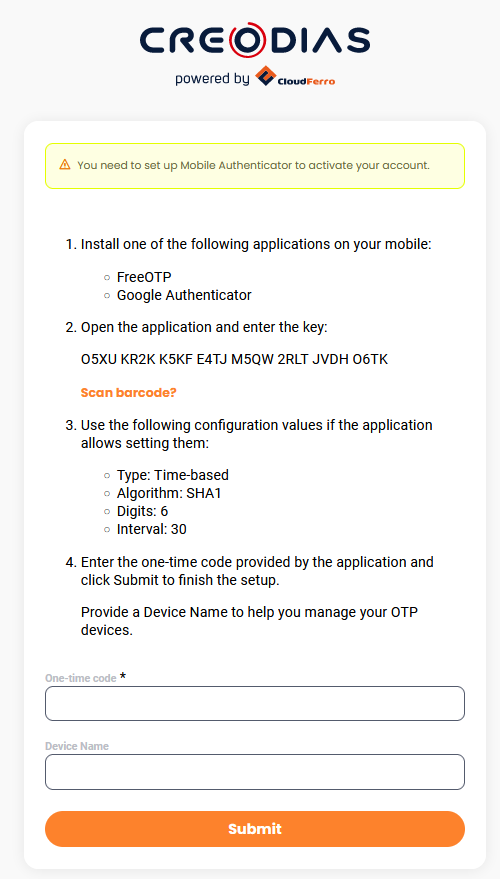
**If your account uses 2FA authentication, then you can also specify totp_code, which consists of 32 characters (or possibly 39 if you use space each time after 4 characters). This parameter might be useful for you if you'd like to use Creodias for ordering. You may be scratching your head right now and thinking how can you get this code? I'm going to assume that you're already an existing user of Creodias, but you don't know your TOTP secret code yet. The most straightforward way of going about this is to simply reset your code. All you have to do is navigate to the TOTP management console and remove your existing secret key. Once you've removed your secret key, click on Set up authenticator application. You should be prompted with this first window down below. Click on Unable to scan?, save your secret key in a secure place and complete your form (ref. picture 2). Do not scan your QR code, because it uses a different secret code to the one presented in the Unable to scan? page. It's really important, because once you start using it, it will be the one that works for your account. If you'd like to learn more about how Creodias handles 2FA, you might find this and that useful.
BatchOrder/OData.CSC.Order endpoint takes following parameters in a body:
{
  "Name": "string",
  "Priority": 0,
  "WorkflowName": "string",
  "NotificationEndpoint": "string",
  "NotificationEpUsername": "string",
  "NotificationStatus": "string",
  "WorkflowOptions": [
    {
      "Name": "string",
      "Value": "string"
    }
  ],
  "IdentifierList": [
    "string"
  ],
  "BatchSize": 0,
  "BatchVolume": 0,
  "NotificationEpPassword": "string",
  "SendIntermediateNotifications": false
}
Name and WorkflowName are mandatory to create an order. IdentifierList is required if you'd like to use option 1 - Create Batch Order Using A Body and hardcode all products in IdentifierList. If you'd rather use option 2 - Create Batch Order Using a Query, then by all means, you can skip IdentifierList since the script will look for products found in a query_url parameter (specified in query_details.json file) and place an order for all of them. Some processors require some special parameters, so you also have to provide them. Script will give you a run-down and inform you which parameters are missing. Here's how order_body.json could possibly look like:
{
    "WorkflowName": "sleep_processor",
    "Name": "order_name",
   "IdentifierList": ["S1A_IW_GRDH_1SDV_20231215T054205_20231215T054230_051661_063CFA_38C9.SAFE"]
}
If you'd like your workflow to use hda, then you also have to put a list of these WorkflowOptions into order_body.json:
"WorkflowOptions": [
        {
            "Name": "source_password",
            "Value": ""
        },
        {
            "Name": "source_username",
            "Value": ""
        },
        {
            "Name": "source_realm",
            "Value": ""
        },
        {
            "Name": "source_server_url",
            "Value": ""
        },
        {
            "Name": "source_client_id",
            "Value": ""
        },
        {
            "Name": "source_client_secret",
            "Value": ""
        },
        {
            "Name": "s3_access_key",
            "Value": ""
        },
        {
            "Name": "s3_secret_key",
            "Value": ""
        },
        {
            "Name": "s3_bucket",
            "Value": ""
        },
        {
            "Name": "s3_endpoint_url",
            "Value": ""
        },
        {
            "Name": "s3_prefix",
            "Value": ""
        },
        {
            "Name": "output_storage",
            "Value": ""
        },
        {
            "Name": "input_catalogue_type",
            "Value": ""
        },
        {
            "Name": "input_catalogue_collection",
            "Value": ""
        },
        {
            "Name": "input_catalogue_url",
            "Value": ""
        }
    ]
In case of TEMPORARY output_storage, it is recommended to ommit s3 parameters, namely: s3_access_key, s3_secret_key, s3_bucket, s3_endpoint_url, s3_prefix. If you won't do this, you may get validation error.
If you'd like to create an order using a query (option 2, aka create-order-with-query), then you also have to provide some parameters:
{
    "parallel_quota": 0,
    "query_url": "string",
    "new_orders": true
}
A few words about them:
parallel_quota- limit for a number of products per one orderquery_url- query to catalogue (datahub/HDA), can be generated fromexplore.creodias.eunew_orders- when set to true, new order will be placed with new products once the previous one was processed
Here's how it could possibly look like if you want to use datahub as a catalogue:
{
    "parallel_quota": 5,
    "query_url": "https://datahub.creodias.eu/odata/v1/Products?$filter=((ContentDate/Start%20ge%202023-12-28T00:00:00.000Z%20and%20ContentDate/Start%20le%202023-12-28T23:59:59.999Z)%20and%20(Online%20eq%20true)%20and%20(((((Collection/Name%20eq%20%27SENTINEL-1%27)%20and%20(((Attributes/OData.CSC.StringAttribute/any(i0:i0/Name%20eq%20%27productType%27%20and%20i0/Value%20eq%20%27SLC%27))))%20and%20(((Attributes/OData.CSC.StringAttribute/any(i0:i0/Name%20eq%20%27operationalMode%27%20and%20i0/Value%20eq%20%27WV%27)))))))))&$expand=Attributes&$expand=Assets&$orderby=ContentDate/Start%20asc&$top=20",
    "new_orders": true
}
And here's yet another example, but this time around for hda as a catalogue:
{
    "parallel_quota": 5,
    "query_url": "https://hda.data.destination-earth.eu/stac/search?limit=10&collections=EO.ESA.DAT.SENTINEL-2.MSI.L1C",
    "new_orders": true
}
You may ask yourself, how could you generate a query? Go to explore.creodias.eu, filter products however you wish and then click on Copy query right below Search button.

Please note that you will get query to datahub catalogue by following these instructions. Unfortunately, there's no option to generate a query to stac, so you have to prepare url by yourself. I recommend going to https://hda.data.destination-earth.eu/docs/ for more details.
If you'd like to create an order by hardcoding all products in IdentifierList parameter in order_body.json (option 1, aka create-order-with-body), then you have to specify these parameters' values in order_details.json:
{
    "parallel_quota": 0,
    "new_orders": true
}
Just like mentioned earlier, parallel_quota is a limit for number of products per one order and new_orders parameter determines whether new order will be placed with new products once the previous one was processed.
Contributions are welcomed. Just create a new branch and submit pull request with extensive description of changes.

