WidgetKit gives users ready access to content in your app by putting widgets on the iOS Home screen or macOS Notification Center. Your widgets stay up to date so users always have the latest information at a glance. When they need more details, your widget takes them directly to the appropriate place in your app. You can find more information in a presentation and video.
https://developer.apple.com/documentation/widgetkit/creating-a-widget-extension
To implement a widget, you add a widget extension to your app. You configure the widget with a timeline provider, and use SwiftUI views to display the widget’s content. The timeline provider tells WidgetKit when to update your widget’s content.
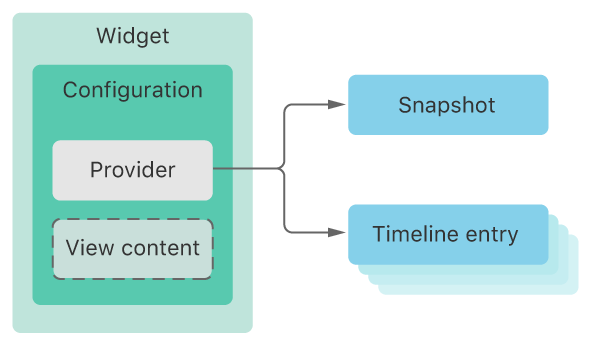
A diagram showing the major components of a widget extension, including the widget, its configuration with a provider and view content, and timeline entries To make a widget user-configurable, you add a custom SiriKit intent definition to your extension. WidgetKit automatically provides a customization interface to let users personalize their widgets.
- Open your app project in Xcode and choose File > New > Target.
- From the Application Extension group, select Widget Extension, and then click Next.
- Enter the name of your extension.
- If the widget provides user-configurable properties, check the Include Configuration Intent checkbox.
- Click Finish.

StaticConfiguration: For a widget with no user-configurable properties. For example, a stock market widget that shows general market information, or a news widget that shows trending headlines.
StaticConfiguration(kind: kind, provider: GraphTimelineProvider(), content: { data in
            WidgetEntryView(data: data)
                .background(Color(.black))
        })
        .description(Text("Covid-19 stats in Ukraine"))
        .configurationDisplayName(Text("Covid Stats"))
        .supportedFamilies([.systemLarge, .systemMedium, .systemSmall])
        .onBackgroundURLSessionEvents {
            (sessionIdentifier, competion) in
            if sessionIdentifier == self.kind {
                // SOME KIND OF PROCESSING //
                competion()
            }
        }
IntentConfiguration: For a widget with user-configurable properties. You use a SiriKit custom intent to define the properties. For example, a weather widget that needs a zip or postal code for a city, or a package tracking widget that needs a tracking number.
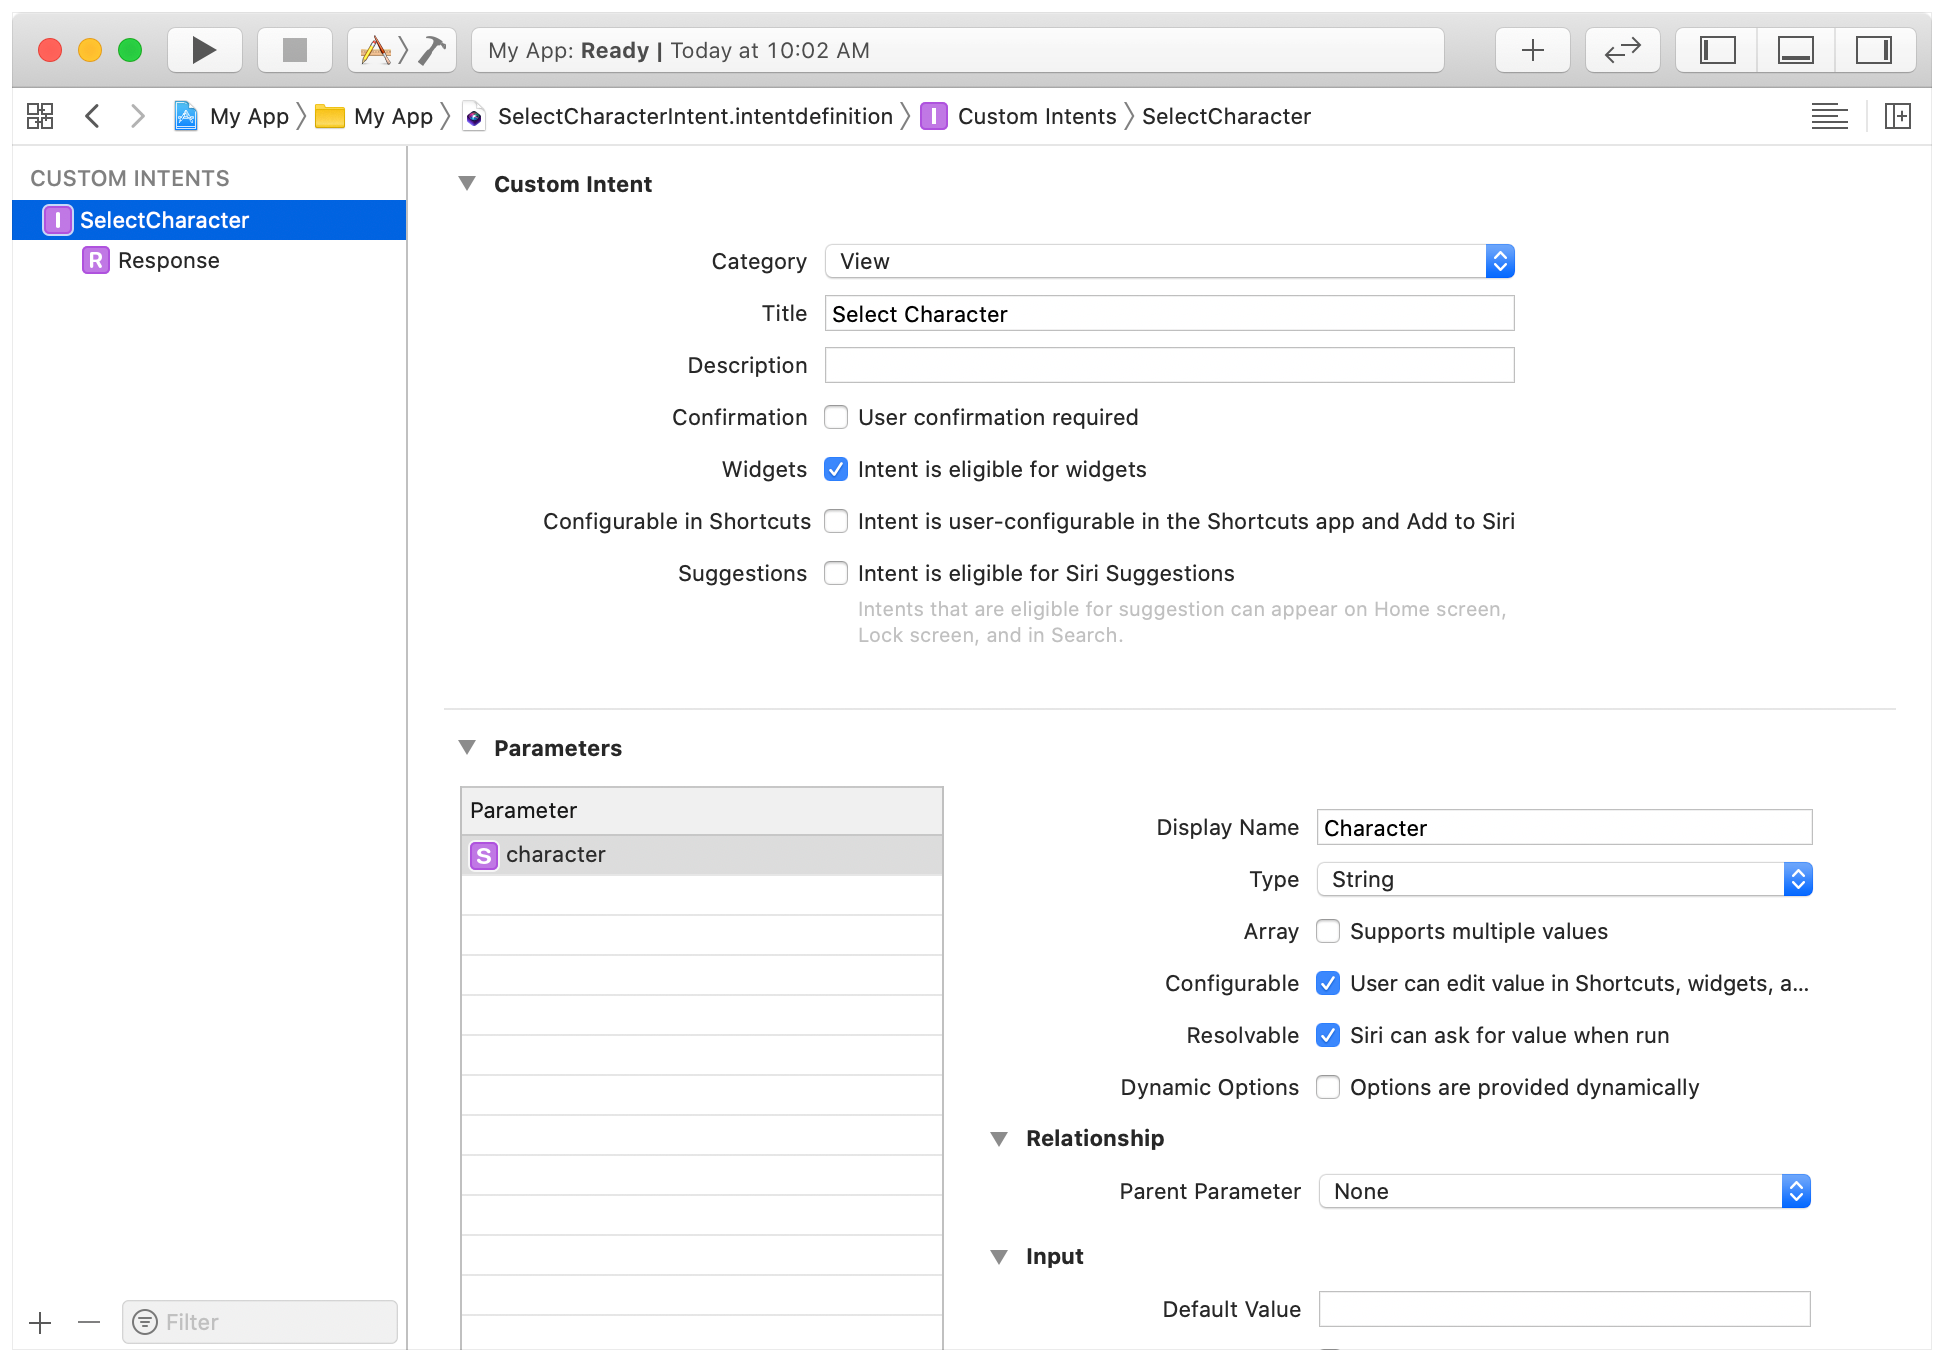
struct CharacterDetailWidget: Widget {
    var body: some WidgetConfiguration {
        IntentConfiguration(
            kind: "com.mygame.character-detail",
            intent: SelectCharacterIntent.self,
            provider: CharacterDetailProvider(),
        ) { entry in
            CharacterDetailView(entry: entry)
        }
        .configurationDisplayName("Character Details")
        .description("Displays a character's health and other details")
        .supportedFamilies([.systemSmall, .systemMedium, .systemLarge])
    }
}Before we will fetch data, we should provide the widget some stubbed data, so it can already display a placeholder view for the widget to the users.
func placeholder(in context: Context) -> Entry {
        Entry.placeholder
    }
    static var placeholder: Model {
        Model(date: Date(),
              widgetData: [JSONModel(
                            country: "-",
                            code: "-",
                            confirmed: 1000,
                            recovered: 1000,
                            critical: 1000,
                            deaths: 1000,
                            latitude: 0.44,
                            longitude: 44.0,
                            lastChange: "2021-01-04T08:03:24+01:00",
                            lastUpdate: "2021-01-04T10:00:04+01:00")],
              isPlaceholder: true)

    }
Now you have a placeholder view, we can fetch data to finally display our widget. The function that needs to be updated, is getTimeline. Inside this function, you’re able to fetch data and also declare the next refresh moment of your widget.
func getTimeline(in context: Context, completion: @escaping (Timeline<Entry>) -> Void) {

        coronaLoader.getData { (result) in
            switch result {
            case .success(let data):
                let date = Date()
                let entry = Model(date: date, widgetData: data)
                let timeline = Timeline(entries: [entry], policy: .after(Date().addingTimeInterval(60 * 10)))
                completion(timeline)
            case .failure(_):
                let entry = Model.placeholder
                let timeline = Timeline(entries: [entry], policy: .after(Date().addingTimeInterval(60 * 2)))
                completion(timeline)
            }
        }
    }
When a user wants to add your widget, they will see a snapshot version of your widget. You can decide which data should be visible inside this snapshot. The data displayed inside the snapshot can be fetched from the cloud before presenting it to the user.
func getSnapshot(in context: Context, completion: @escaping (Entry) -> Void) {

        if context.isPreview {
            completion(Entry.placeholder)
        } else {
            coronaLoader.getData { (result) in
                switch result {
                case .success(let data):
                    let date = Date()
                    let entry = Model(date: date, widgetData: data)
                    completion(entry)
                case .failure(_):
                    completion(Entry.placeholder)
                }
            }
        }
}You are able to recognise the size of the widget by defining an Environment for widgetFamily. After that, you are able to check the widget size style in the body. The size can be systemSmall, systemMedium or systemLarge.
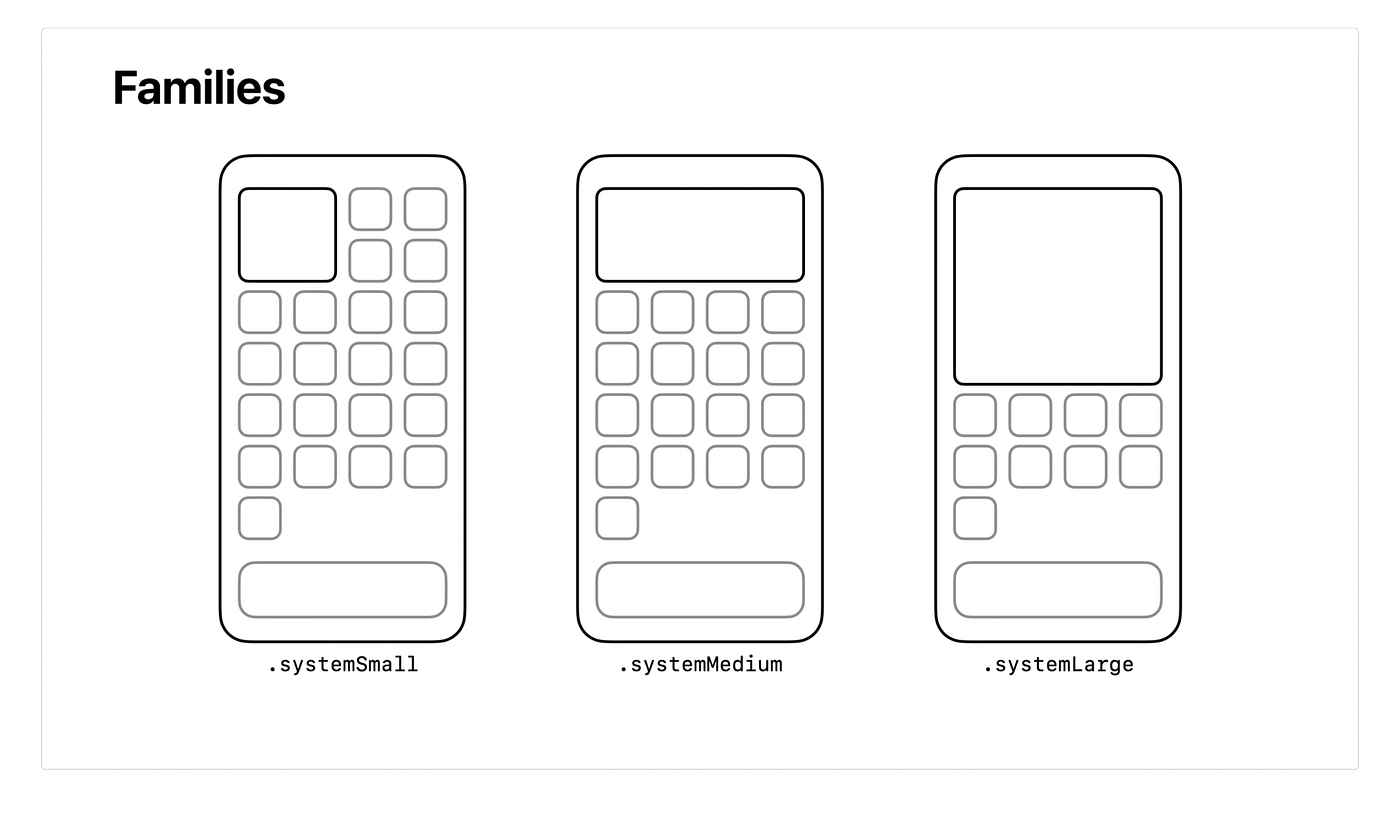
struct WidgetEntryView: View {

    @Environment(\.widgetFamily) var widgetFamily
    var data: Model

    var body: some View {
        switch widgetFamily {
        case .systemSmall:
            StatsWidgetSmall(data: data)
        case .systemLarge:
            StatsWidgetLarge(data: data)
        case .systemMedium:
            StatsWidgetMedium(data: data)
        default:
            Text("Undetected family size")
        }
    }
}Optionally, you can detect taps in your Widget and redirect them to a deeplink. This is unfortunately the only interaction you're allowed to have in your widget, so no scrolling or other forms of interaction are possible.
You can configure which deeplink is triggered when your Widget is tapped through the .widgetURL(myDeeplink) method, but you can also make different parts of the widget trigger different deeplinks by using a Link. Note that since widgets are small, you shouldn't pack a ton of actions into a single Widget.
Here's an example of a Widget View that redirects to the webview when tapped. For systemSmall widgetFamily:
struct StatsWidgetSmall: View {
 .....
    var body: some View {
        VStack(alignment: .center, spacing: 0) {
           .....
        }
        .edgesIgnoringSafeArea(.all)
        .background(Color.clear)
        .widgetURL(emojiDetails)
    }
}
For systemMedium(same logic for systemLarge) widgetFamily:
struct StatsWidgetMedium: View {
    .....
    var body: some View {
    Link(destination: URL(string: "someURL")!) {
            VStack(alignment: .leading, spacing: spacing) {
            .....
            }
         }
    }
Catching deepLink in WidgetApp's ContentView:
struct ContentView: View {
    .....
    var body: some View {
    HStack {
          .....
         }
         .onOpenURL { url in
            visibleDetails = Details(url: link)
        }
        .sheet(item: $visibleDetails, content: { details in
            DetailsView(details: details, shouldRefresh: shouldRefresh)
        })
}Build Your First Widget in iOS 14 With WidgetKit
iOS 14: Create a widget using WidgetKit
Now go on and create your first WidgetKit App 💪
- Panteleimenko Anton, CHI Software
- Kosyi Vlad, CHI Software
Copyright 2020 CHI Software.
Licensed under the Apache License, Version 2.0 (the "License"); you may not use this file except in compliance with the License. You may obtain a copy of the License at
http://www.apache.org/licenses/LICENSE-2.0
Unless required by applicable law or agreed to in writing, software distributed under the License is distributed on an "AS IS" BASIS, WITHOUT WARRANTIES OR CONDITIONS OF ANY KIND, either express or implied. See the License for the specific language governing permissions and limitations under the License.
