face_rec_webcam.py is an example program that uses the Face Recognition class in Yoda.py
The Face Recognition class shows how to find frontal human faces in an image and estimate their pose. The pose takes the form of 68 landmarks. These are points on the face such as the corners of the mouth, along the eyebrows, on the eyes, and so forth.
The face detector we use is made using the classic Histogram of Oriented Gradients (HOG) feature combined with a linear classifier, an image pyramid, and sliding window detection scheme. The pose estimator was created by using dlib's implementation of the paper: One Millisecond Face Alignment with an Ensemble of Regression Trees by Vahid Kazemi and Josephine Sullivan, CVPR 2014 and was trained on the iBUG 300-W face landmark dataset (see https://ibug.doc.ic.ac.uk/resources/facial-point-annotations/): C. Sagonas, E. Antonakos, G, Tzimiropoulos, S. Zafeiriou, M. Pantic. 300 faces In-the-wild challenge: Database and results. Image and Vision Computing (IMAVIS), Special Issue on Facial Landmark Localisation "In-The-Wild". 2016.
You can get the trained model file from: http://dlib.net/files/shape_predictor_68_face_landmarks.dat.bz2.
Note that the license for the iBUG 300-W dataset excludes commercial use. So you should contact Imperial College London to find out if it's OK for you to use this model file in a commercial product.
The program maps an image of a human face to a 128 dimensional vector space where images of the same person are near to each other and images from different people are far apart. Therefore, you can perform face recognition by mapping faces to the 128D space and then checking if their Euclidean distance is small enough.
When using a distance threshold of 0.6, the dlib model obtains an accuracy of 99.38% on the standard LFW face recognition benchmark, which is comparable to other state-of-the-art methods for face recognition as of February 2017. This accuracy means that, when presented with a pair of face images, the tool will correctly identify if the pair belongs to the same person or is from different people 99.38% of the time.
Sample Face recognition program that uses the Yoda Face Recognition library:
from Yoda import FaceRecognition
import cv2

video_capture = cv2.VideoCapture(0)

model = FaceRecognition()
obama_image = model.load_image_file('obama.jpg')
obama_face_encoding = model.face_embeddings(obama_image)[0]

biden_image = model.load_image_file('biden.jpg')
biden_face_encoding = model.face_embeddings(biden_image)[0]

# Create arrays of known face encodings and their names
known_face_encodings = [
    obama_face_encoding,
    biden_face_encoding
]
known_face_names = [
    "Barack Obama",
    "Joe Biden"
]


# Initialize some variables
face_locations = []
face_encodings = []
face_names = []
process_this_frame = True

while True:
    # Grab a single frame of video
    ret, frame = video_capture.read()

    # Resize frame of video to 1/4 size for faster face recognition processing
    small_frame = cv2.resize(frame, (0, 0), fx=0.25, fy=0.25)

    # Convert the image from BGR color (which OpenCV uses) to RGB color (which FaceRecognition uses)
    rgb_small_frame = small_frame[:, :, ::-1]

    # Only process every other frame of video to save time
    if process_this_frame:
        # Find all the faces and face encodings in the current frame of video
        face_locations = model.find_face_locations(rgb_small_frame)
        face_encodings = model.face_embeddings(rgb_small_frame, face_locations)

        face_names = []
        for face_encoding in face_encodings:
            # See if the face is a match for the known face(s)
            matches = model.compare_faces(known_face_encodings, face_encoding)
            name = "Unknown"

            # If a match was found in known_face_encodings, just use the first one.
            if True in matches:
                first_match_index = matches.index(True)
                name = known_face_names[first_match_index]

            face_names.append(name)

    process_this_frame = not process_this_frame


    # Display the results
    for d, name in zip(face_locations, face_names):
        # Scale back up face locations since the frame we detected in was scaled to 1/4 size
        top = d.top() * 4
        right = d.right() * 4
        bottom = d.bottom() * 4
        left = d.left() * 4

        # Draw a box around the face
        cv2.rectangle(frame, (left, top), (right, bottom), (0, 0, 255), 2)

        # Draw a label with a name below the face
        cv2.rectangle(frame, (left, bottom - 35), (right, bottom), (0, 0, 255), cv2.FILLED)
        font = cv2.FONT_HERSHEY_DUPLEX
        cv2.putText(frame, name, (left + 6, bottom - 6), font, 1.0, (255, 255, 255), 1)

    # Display the resulting image
    cv2.imshow('Video', frame)

    # Hit 'q' on the keyboard to quit!
    if cv2.waitKey(1) & 0xFF == ord('q'):
        break

# Release handle to the webcam
video_capture.release()
cv2.destroyAllWindows()
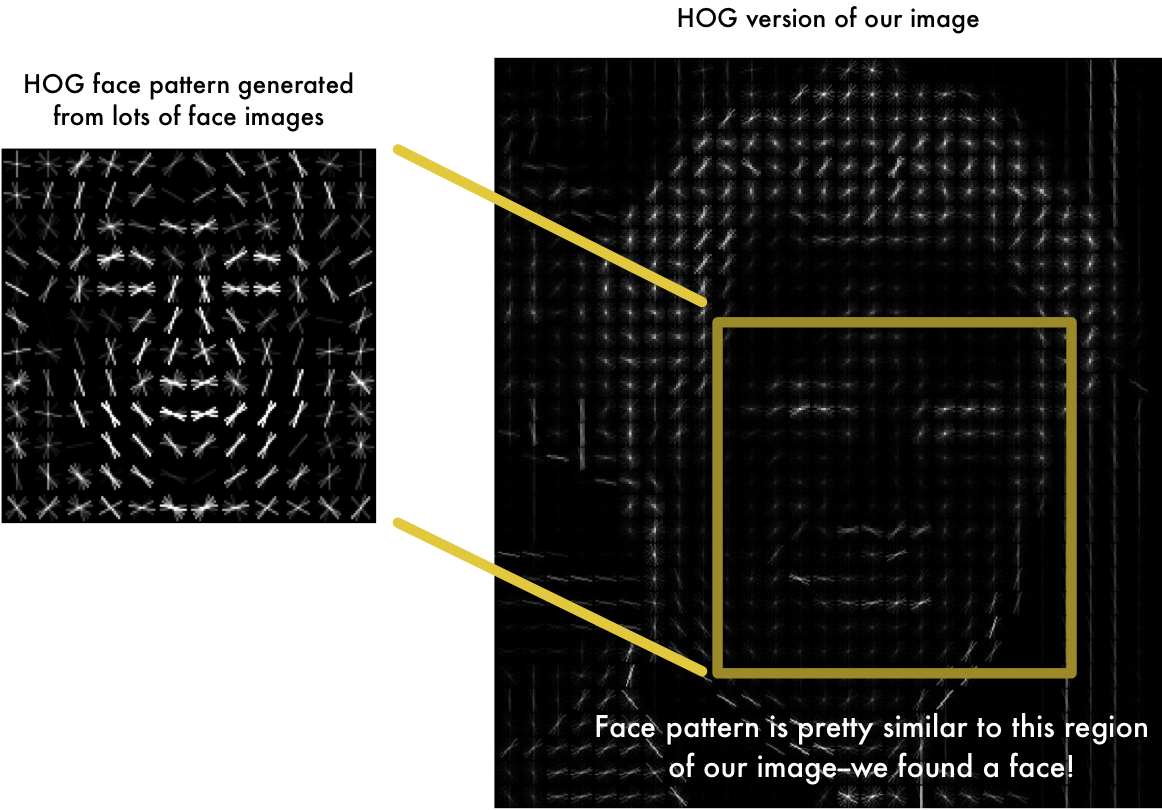
The first step in our pipeline is face detection. We’re going to use a method called Histogram of Oriented Gradients — or just HOG for short.
The original image is turned into a HOG representation that captures the major features of the image regardless of image brightnesss.
To find faces in this HOG image, all we have to do is find the part of our image that looks the most similar to a known HOG pattern that was extracted from a bunch of other training faces:
This example program shows how to find frontal human faces in an image.
import sys

import dlib
from skimage import io


detector = dlib.get_frontal_face_detector()
win = dlib.image_window()

for f in sys.argv[1:]:
    print("Processing file: {}".format(f))
    img = io.imread(f)
    # The 1 in the second argument indicates that we should upsample the image
    # 1 time.  This will make everything bigger and allow us to detect more
    # faces.
    dets = detector(img, 1)
    print("Number of faces detected: {}".format(len(dets)))
    for i, d in enumerate(dets):
        print("Detection {}: Left: {} Top: {} Right: {} Bottom: {}".format(
            i, d.left(), d.top(), d.right(), d.bottom()))

    win.clear_overlay()
    win.set_image(img)
    win.add_overlay(dets)
    dlib.hit_enter_to_continue()
We use a face landmark estimation algorithm to come up with 68 specific points (called landmarks) that exist on every face — the top of the chin, the outside edge of each eye, the inner edge of each eyebrow, etc.
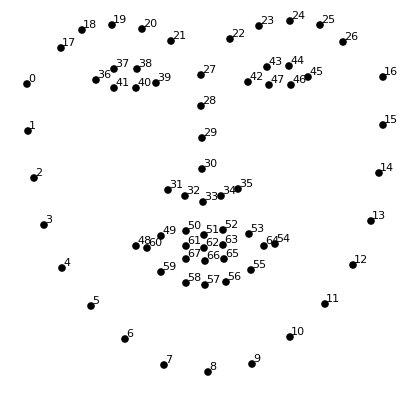
The 68 landmarks we will locate on every face. This image was created by Brandon Amos of CMU who works on OpenFace.
This example program shows how to do face landmark detection.
import sys
import dlib
from skimage import io

# You can download the required pre-trained face detection model here:
# http://dlib.net/files/shape_predictor_68_face_landmarks.dat.bz2
predictor_model = "shape_predictor_68_face_landmarks.dat"

# Take the image file name from the command line
file_name = sys.argv[1]

# Create a HOG face detector using the built-in dlib class
face_detector = dlib.get_frontal_face_detector()
face_pose_predictor = dlib.shape_predictor(predictor_model)

win = dlib.image_window()

# Take the image file name from the command line
file_name = sys.argv[1]

# Load the image
image = io.imread(file_name)

# Run the HOG face detector on the image data
detected_faces = face_detector(image, 1)

print("Found {} faces in the image file {}".format(len(detected_faces), file_name))

# Show the desktop window with the image
win.set_image(image)

# Loop through each face we found in the image
for i, face_rect in enumerate(detected_faces):

	# Detected faces are returned as an object with the coordinates
	# of the top, left, right and bottom edges
	print("- Face #{} found at Left: {} Top: {} Right: {} Bottom: {}".format(i, face_rect.left(), face_rect.top(), face_rect.right(), face_rect.bottom()))

	# Draw a box around each face we found
	win.add_overlay(face_rect)

	# Get the the face's pose
	pose_landmarks = face_pose_predictor(image, face_rect)

	# Draw the face landmarks on the screen.
	win.add_overlay(pose_landmarks)

dlib.hit_enter_to_continue()
Here’s the result of locating the 68 face landmarks on my image:

It is the process of learning a mapping from face images to a compact Euclidean space where distances directly correspond to a measure of face similarity. Once this space has been produced, tasks such as face recognition, verification and clustering can be easily implemented using standard techniques with FaceNet embeddings as feature vectors.
The neural network learns to reliably generate 128 measurements for each person. Any ten different pictures of the same person should give roughly the same measurements.
The exact approach for faces we are using was invented in 2015 by researchers at Google, called Facenet
Find the person in our database of known people who has the closest measurements to our test image.
You can do that by using any basic machine learning classification algorithm. As of now, Yoda.py doesn't implement any classification algorithm yet.


