Giter Club home page Giter Club logo

atmega's Introduction

About

With these configuration files you can program bare ATmega microcontrollers from the Arduino IDE, without using the Arduino bootloader. It supports chips using external or internal clocks.

Skipping the Arduino bootloader means sketches start immediately after power-on, without any delay, and you have a little extra flash memory available to your programs. Using the (optional) slower internal clock options means you can save on components, but also on power (since a slower chip draws less current).

Supported Chips and Clocks

  • ATmega8/168: The chips used in early arduino boards (e.g. Arduino NG, Arduino Diecimila).
  • ATmega328p: The chips used in recent arduino boards (eg. Arduino Duemilanove, Arduino UNO).
  • ATmega168p/328: Different but functionally equivalent to the above. People sometimes buy these by mistake.

The core delay() function is not very precise for clock rates other than external 8 and 16MHz. The internal clock should provide enough precision for most cases but external 12 and 20 MHz are useful only if your code does not depend on precision timing.

Install

Open the Arduino IDE preferences window and add the following URL to the Additional Boards Manager URLs list:

Now go to Tools > Board > Boards Manager and search for Barebones ATmega Chips. Select it from the list and click Install. A new section called ATmega Microcontrollers will immediately appear in the Tools > Board menu.

ATmega

Alternatively you can create an <Arduino Sketckbook Folder>/hardware directory and git clone this repository inside it. The Arduino IDE must be restarted for this to take effect.

Programming

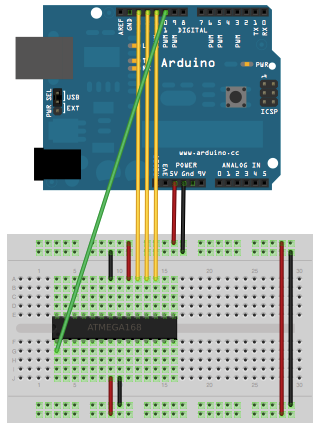
To program the microcontroller you will need an ISP programmer. An Arduino as ISP works just fine (don't forget to put a 10uF capacitor between the Arduino's RESET pin and GND if your're using an Arduino UNO):

Arduino as ISP

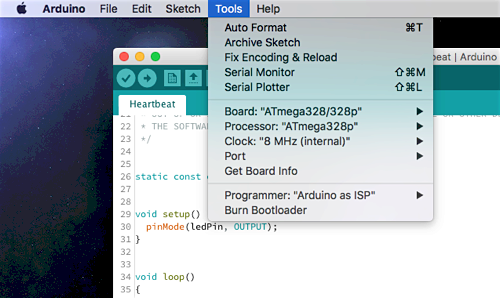
Choose your ISP programmer in the Tools > Programmer menu. Then choose your ATmega microcontroller family from Tools > Board, the specific chip you have from Tools > Processor and your choice of clock frequency and source from Tools > Clock.

To set the ATmega configuration fuses, use the Tools > Burn Bootloader menu item. This doesn't actually burn an Arduino bootloader onto the chip, it only sets the chip configuration for the chosen clock settings.

Note: If you're seeing weird behavior, like things not running at the speed you're expecting, check if you're updated the chip configuration with "Burn Bootloader". The configuration isn't updated automatically when you upload a sketch to the chip.

To load programs into the microcontroller, use the Upload button as usual. You can also use the Sketch > Upload with Programmer menu entry. Both will make the IDE upload the code using the selected ISP programmer.

Pin Mapping

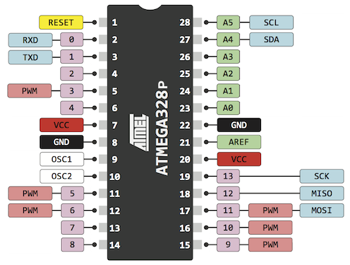
The ATmega168/328 families have identical pin configurations. Check this diagram for their correspondence to Arduino pin numbering:

ATmega168/168p/328/328p

The pin layout for the ATmega8 is also identical to these, but additional functions may be missing (eg. PWM on the left-side pins).

Tips and Caveats

If you're using an ATmega chip that already has the Arduino bootloader inside or has otherwise been configured to require an external clock source, you may get an avrdude: Yikes! Invalid device signature. error. In this case, connect an appropriate external clock source to it (most likely 16 MHz) and try again. Once the ATmega has been configured to use its internal clock source, you can remove the external one and the error shouldn't happen again.

You may also get this error if you're using an Arduino UNO as an ISP programmer and you forget to put a 10uF capacitor between its RESET and GND pins to prevent it from resetting on upload.

atmega's People

Contributors

carlosefr avatar n8henrie avatar nvonbulow avatar per1234 avatar rkonklex avatar stackmagic avatar

Stargazers

 avatar  avatar  avatar  avatar  avatar  avatar  avatar  avatar  avatar  avatar  avatar  avatar  avatar  avatar  avatar  avatar  avatar  avatar  avatar  avatar  avatar  avatar  avatar  avatar  avatar  avatar  avatar  avatar  avatar  avatar  avatar  avatar  avatar  avatar  avatar  avatar  avatar  avatar  avatar  avatar  avatar  avatar  avatar  avatar  avatar  avatar  avatar  avatar  avatar  avatar  avatar  avatar  avatar  avatar  avatar  avatar  avatar  avatar  avatar  avatar  avatar  avatar  avatar  avatar  avatar  avatar  avatar  avatar  avatar  avatar  avatar  avatar  avatar  avatar  avatar  avatar  avatar  avatar  avatar  avatar  avatar  avatar  avatar

Watchers

 avatar  avatar  avatar  avatar  avatar  avatar  avatar

atmega's Issues

where to find bootloader file?

avrdude: erasing chip
avrdude: reading input file "C:\development\electronics\Arduino\hardware\breadboard\avr/bootloaders/{bootloader.file}"
avrdude: can't open input file C:\development\electronics\Arduino\hardware\breadboard\avr/bootloaders/{bootloader.file}: No such file or directory
avrdude: read from file 'C:\development\electronics\Arduino\hardware\breadboard\avr/bootloaders/{bootloader.file}' failed

image

image

Please create an updated release

I would like to use the updated version of this board definition with the lower external clock speeds (FWIW to be compatible with 3.3V VCC), which I see already exists in master.

In the Arduino IDE 1.6.7 I have not been able to manually install the board definitions from the master .zip file. No matter where I put the files the never seem to appear in the Tools->Board menu.

However the latest IDE still correctly interprets your json definition and updates the packages correcty, so it would be greatly appreciated if you could create a new release and update the json definition accordingly.

arduino 1.8.8 and atmeg328p

Hi
I want to use your code for a stand alone atmeg328p at 8 Mhz intern with Arduino 1.8.8
I included your json files.
A can use my code on an Arduino Version 1.0.5 without problem, I can also use a Arduino Mini oder Nano. All works, but
the code is round about 2kb bigger, or the available flash is only 30700 instead of 32768 when I use this
settings here.

The problem is, all works fine, compiling and uploading, but the chip is dead. It ist just not running.
Not even a simple blink program.
What can go wrong by usings your code?

There are just 2 options
Chip : atmega328p
Clock: 8mhz intern.
Fuses are ok. It works if I use other boards.

I realy would like to use your code, because it gives me 2 kb more flash.
Would be great if you have any idea.
Thank you.
Greatings klaus

Request for ATmega328PB

Hi Carlos,

Any chance that you could add the "PB" variant to your library?

Regards, Martin

Match ATmega8 fuses to the other chips

To match the configuration of other chips (activating brown-out detection and not saving EEPROM on chip erase), the ATmega8 fuses should probably be changed to these:

atmega8.menu.clock.internal1=1 MHz (internal)
atmega8.menu.clock.internal1.bootloader.low_fuses=0xa1
atmega8.menu.clock.internal1.bootloader.high_fuses=0xcc
atmega8.menu.clock.internal1.build.f_cpu=1000000L

atmega8.menu.clock.internal8=8 MHz (internal)
atmega8.menu.clock.internal8.bootloader.low_fuses=0xa4
atmega8.menu.clock.internal8.bootloader.high_fuses=0xcc
atmega8.menu.clock.internal8.build.f_cpu=8000000L

atmega8.menu.clock.external16=16 MHz (external)
atmega8.menu.clock.external16.bootloader.low_fuses=0xbf
atmega8.menu.clock.external16.bootloader.high_fuses=0xcc
atmega8.menu.clock.external16.build.f_cpu=16000000L

Testing requires access to an ATmega8 chip, which I don't have available right now.

Ref: http://www.engbedded.com/fusecalc/

Preserve EEPROM

Hello and thank you for this useful library.
Is there a way to prevent the EEPROM from being erased after each upload ?

How do I specify which external clock I'm using?

I am using an ATMega168A-PU with a 16 MHz external clock.
I was able to upload the bootloader using the ATMega168/168p board.
Do I need to manually modify the fuse bits in boards.txt to configure my microcontroller to use a 16 MHz crystal? Thanks!

Recommend Projects

  • React photo React

    A declarative, efficient, and flexible JavaScript library for building user interfaces.

  • Vue.js photo Vue.js

    ๐Ÿ–– Vue.js is a progressive, incrementally-adoptable JavaScript framework for building UI on the web.

  • Typescript photo Typescript

    TypeScript is a superset of JavaScript that compiles to clean JavaScript output.

  • TensorFlow photo TensorFlow

    An Open Source Machine Learning Framework for Everyone

  • Django photo Django

    The Web framework for perfectionists with deadlines.

  • D3 photo D3

    Bring data to life with SVG, Canvas and HTML. ๐Ÿ“Š๐Ÿ“ˆ๐ŸŽ‰

Recommend Topics

  • javascript

    JavaScript (JS) is a lightweight interpreted programming language with first-class functions.

  • web

    Some thing interesting about web. New door for the world.

  • server

    A server is a program made to process requests and deliver data to clients.

  • Machine learning

    Machine learning is a way of modeling and interpreting data that allows a piece of software to respond intelligently.

  • Game

    Some thing interesting about game, make everyone happy.

Recommend Org

  • Facebook photo Facebook

    We are working to build community through open source technology. NB: members must have two-factor auth.

  • Microsoft photo Microsoft

    Open source projects and samples from Microsoft.

  • Google photo Google

    Google โค๏ธ Open Source for everyone.

  • D3 photo D3

    Data-Driven Documents codes.